background image

EN

EN – 14

EN – 14

BEFORE USING THE OVEN

When the oven fi rst plugged in, beep will sound and the display will show "

1: 00

". Note that the clock does not have 

to be set for the oven to operate correctly. To set the clock, follow the instructions in the “

Setting the Clock

” section of 

this User Manual.
When new, the very fi rst time the grill is used, smoke and odors will be given off . To avoid this happening when food is 
being cooked, use the grill function without food for approx. 20 minutes.
•  After opening and closing the door, the oven will enter the standby mode. If no buttons are press within 1 minute, 

the display will remain on and the buttons will not operate. To enter standby mode again, open and close the door.

•  During cooking, if the 

STOP/ECO

 button is pressed once, the cooking cycle will be paused. To restart cooking press 

the 

START/QUICK START

 button. If the 

STOP/ECO

 button is pressed twice, cooking will be canceled.

•  When programming the oven for a particular function and there is a pause between button presses of more than 30 

seconds the oven will return to the standby mode.

•  When a cooking cycle is completed, the display will show “

End

” and a tone will be heard every two minutes until a 

button is pressed or the door is opened.

 SETTING  THE  CLOCK

This oven has a clock which can be used in either 12- or 24-hour mode. To set the clock, follow the instructions as 
below:

1. 

In standby mode, press and hold 

TIME/SET CLOCK

 button for at least 3 seconds to enter the clock setting mode.

2. 

Press the 

TIME/SET CLOCK

 button to select the 12- or 24-hour clock mode.

3. 

Rotate the 

JOG DIAL

 to set the hour. Press the 

TIME/SET CLOCK

 button to store.

4. 

Rotate the 

JOG DIAL

 to set the minutes. Press the 

TIME/SET CLOCK

 button to store and exit the clock setting 

mode.

•  It is not necessary to set the clock for the oven to work normally.
•  While in the cook mode, press the 

TIME/SET CLOCK

 button to see the time of day (if set). The time of day will 

change back to the cooking count down after fi ve seconds. Note that the time of day can not be viewed if the 
kitchen timer has been set.

EN – 15

EN – 15

 MICROWAVE  COOKING

To use the microwave function, follow the insturcitons given below:
1. 

In standby mode, press the 

MICROWAVE POWER

 button to select power level. Each time this button is pressed, 

the display will show the microwave power level.

2. 

Once the desired microwave power level has been selected, rotate the 

JOG DIAL

 to select the time to cook.

3. 

Press the 

START/QUICK START

 button to start cooking.

4. 

When the cooking cycle is completed, the display will show “

End

” and a tone will be heard every two minutes until 

a button is pressed or the door is opened.

Note that the table below is for guidance. Your oven has 10 microwave power levels. These are 10%, 20%, 30%, 40%, 
50%, 60%, 70%, 80%, 90% and 100%. The actual wattage output can be calculated by multiplying the microwave 
power by the percentage.

Microwave Cooking Guide:

Display

Microwave 
Power

Suggested Use

P100

100%

Use this setting for fast cooking or reheating e.g., for casseroles, hot beverages, 
vegetables etc.

P-80

80%

For dense foods which require a long cooking time when cooked conventionally, 
e.g., beef dishes. It is advisable to use this power setting to ensure the meat will be 
tender.

P-60

60%

Used for longer cooking of dense foods such as roast joints, meat loaf and plated 
meals, also for sensitive dishes such as cheese sauce and sponge cakes.

P-40

40%

Defrost setting; select this power setting, to ensure that the dish defrosts evenly. 
This setting is also ideal for simmering rice, pasta, dumplings and cooking egg 
custard.

P-20

20%

For gentle defrosting, e.g., cream gateaux or pastry.

•  During cooking you can check the cooking power level by pressing and holing the 

MICROWAVE POWER

 button.

•  The longest cooking time is 95 minutes.

Summary of Contents for YC-PG204AU

Page 1: ...YC PS204AU YC PS234AU YC PS254AU YC PG204AU YC PG234AU YC PG254AU YC PG284AU Microwave oven User manual Product images are for illustration purpose only Actual product may vary EN ...

Page 2: ......

Page 3: ...ironment and human health which could otherwise arise due to inappropriate waste handling 2 In other Countries outside the EU If you wish to discard this product please contact your local authorities and ask for the correct method of disposal For Switzerland Used electrical or electronic equipment can be returned free of charge to the dealer even if you don t purchase a new product Further collect...

Page 4: ...e to the door hinges latches or door seals and sealing surfaces 4 Do not attempt to repair or adjust the oven CONTENTS IMPORTANT SAFETY INSTRUCTIONS 3 INSTALLATION 10 RADIO INTERFERENCE 11 GROUNDING EARTHING INSTRUCTIONS 11 SPECIFICATIONS 11 OVEN AND ACCESSORIES 12 CONTROL PANEL 13 BEFORE USING THE OVEN 14 SETTING THE CLOCK 14 MICROWAVE COOKING 15 QUICK START 16 GRILL COOKING 16 MICROWAVE GRILL 16...

Page 5: ...t breaker A separate circuit serving only this appliance should be provided Do not place the oven in areas where heat is generated For example close to a conventional oven Do not install the oven in an area of high humidity or where moisture may collect Do not store or use the oven outdoors If smoke is observed switch off or unplug the oven and keep the door closed in order to stifle any flames Use...

Page 6: ...h sugar or fat content for example Sausage rolls Pies or Christmas pudding See the corresponding hints in the operation manual To avoid the possibility of injury WARNING Do not operate the oven if it is damaged or malfunctioning Check the following before use a Make sure the door closes properly and ensure it is not misaligned or warped b Check to make sure the hinges and safety door latches are n...

Page 7: ...ersely affect the life of the appliance and possibly result in a hazardous situation Individuals with PACEMAKERS should check with their doctor or the manufacturer of the pacemaker for precautions regarding microwave ovens To avoid the possibility of electric shock Under no circumstances should you remove the outer cabinet Never spill or insert any objects into the door lock openings or ventilation...

Page 8: ...ng the container Never use sealed containers Remove seals and lids before use Sealed containers can explode due to a build up of pressure even after the oven has been turned off Take care when microwaving liquids Use a wide mouthed container to allow bubbles to escape Never heat liquids in narrow necked containers such as baby bottles as this may result in the contents erupting from the container ...

Page 9: ... to prevent burns Always open containers popcorn makers oven cooking bags etc away from the face and hands to avoid steam burns and eruption of boiling To avoid burns always test food temperature and stir before serving and pay special attention to the temperature of food and drink given to babies children or the elderly Accessible parts may become hot during use Young children should be kept away...

Page 10: ...ensure that they do not play with the appliance Models with Electronic touch panel are enabled with a child lock mode Do not lean or swing on the oven door Do not play with the oven or use it as a toy Children should be taught all important safety instructions use of pot holders careful removal of food coverings paying special attention to packaging e g self heating materials designed to make food...

Page 11: ...he oven is still hot from using the GRILL and MIX GRILL operation because they may melt Plastic containers must not be used during above modes unless the container manufacturer says they are suitable If you are unsure how to connect your oven please consult an authorised qualified electrician Neither the manufacturer nor the dealer can accept any liability for damage to the oven or personal injury...

Page 12: ... the sides of the microwave oven and any adjacent walls or objects Leave a minimum space of 30 cm above the oven Do not remove the feet from the bottom of the oven Blocking the intake and or outlet openings can damage the oven Place the oven as far away from radios and TV as possible Operation of microwave oven may cause interference to your radio or TV reception 20 cm 30 cm 85 cm 10 cm 20 cm 5 Se...

Page 13: ... Brown LIVE SPECIFICATIONS Model name YC PS204A YC PS234A YC PS254A YC PG204A YC PG234A YC PG254A YC PG284A AC LineVoltage 230 240V 50 Hz single phase Distribution line fuse circuit breaker 10 A Power Microwave 700W 900W 900W 700W 900W 900W 900W Grill 900W 1000W 1000W 1000W Off Mode 0 5W Energy Save Mode 0 5W AC Power required 1200W 1400W 1400W 1400W 1400W 1400W 1400W Microwave Frequency 2450 MHz ...

Page 14: ...ve function For use of the Grill Rack refer to the GRILL sections of this User Manual Never touch the grill when it is hot NOTE When you order accessories please mention two items part name and model name NOTES After cooking fatty foods without a cover always clean the cavity thoroughly these must be dry and free from grease Built up grease may overheat and begin to smoke or catch fire When microw...

Page 15: ...age 16 6 MICROWAVE GRILL Press to set microwave and grill combination cooking program Page 16 7 JOG DIAL Rotate clockwise or anticlockwise to set various functions 8 STOP ECO Press once to temporarily stop cooking or twice to cancel cooking altogether Use to set power saving mode Page 18 9 CHILD LOCK Page 19 10 TIME SET CLOCK Use to set clock time Use to set timer function Page 14 9 2 10 4 7 8 3 1...

Page 16: ...ng the oven for a particular function and there is a pause between button presses of more than 30 seconds the oven will return to the standby mode When a cooking cycle is completed the display will show End and a tone will be heard every two minutes until a button is pressed or the door is opened SETTING THE CLOCK This oven has a clock which can be used in either 12 or 24 hour mode To set the cloc...

Page 17: ...ated by multiplying the microwave power by the percentage Microwave Cooking Guide Display Microwave Power Suggested Use P100 100 Use this setting for fast cooking or reheating e g for casseroles hot beverages vegetables etc P 80 80 For dense foods which require a long cooking time when cooked conventionally e g beef dishes It is advisable to use this power setting to ensure the meat will be tender...

Page 18: ...When the cooking cycle is completed the display will show End and a tone will be heard every 2 minutes until a button is pressed or the door is opened Grill models only MICROWAVE GRILL Using both the microwave and grill function it is possible to brown and cook the food quickly To use the microwave and grill function follow the instruction as below 1 In standby mode press MICROWAVE GRILL pad once ...

Page 19: ...to 1800g Reheat Beverages Select the number of cups by rotating the JOG DIAL control then press the START QUICK START button to begin cooking 1 to 3 cups 200ml each Jacket Potato Select the number of potatoes by rotating the JOG DIAL control then press the START QUICK START button to begin cooking 1 to 3 potatoes 230g each Popcorn Select the weight by rotating the JOG DIAL control then press the S...

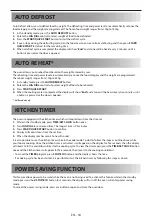
Page 20: ...wo minutes until a button is pressed or the door is opened Grill models only KITCHEN TIMER The oven is equipped with a kitchen timer which will count down from the time set 1 While in the standby mode press TIME SET CLOCK button once 2 Turn JOG DIAL to set desired time The longest time is 95 minutes 3 Press START QUICK START button to confirm 4 Display will count down from the set time 5 When the ...

Page 21: ... mode if there is no operation within one minute the oven will automatically enter Safety lock mode and Loc will appear in the display In the lock state all buttons are disabled Press any button lock indication appears on the display for 5 seconds to remind user to cancel the Safety lock To turn the safety lock off simply open and close the door to the microwave and the keypad will become active a...

Page 22: ...leave oven door open to prevent oven from accidentally turning on If steam accumulates inside or around the outside of the oven door wipe with a soft cloth This may occur when the microwave oven is operated under high humidity condition This is not a fault The base turntable turntable support and coupling should be cleaned regularly to avoid contamination and potential arcing damage Simply wipe wi...

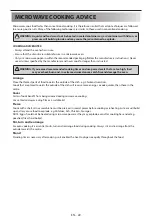
Page 23: ... to be used in a microwave oven Kitchen Paper Only use kitchen paper which is recommended for use in microwave ovens Glassware e g Pyrex Care should be taken if using fine glassware as it can break or crack if heated suddenly Metal Tray It is not recommended to use metal cookware as it will arc which can lead to fire Metal Rack It is not recommended to use metal cookware as it will arc which can l...

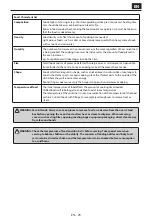
Page 24: ...o high food may overheat burn and in extreme circumstances catch fire and damage the oven Arrange Place the thickest parts of food towards the outside of the dish e g Chicken drumsticks Foods that are placed towards the outside of the dish will receive more energy so cook quicker than those in the centre Cover Certain foods benefit from being covered during microwave cooking Use vented microwave c...

Page 25: ...chicken breasts or drumsticks take longer to cook in the thicker parts For even cooking place the thickest parts to the outside of the dish where they will receive more energy Round shapes cook more evenly than square shapes when microwave cooking Temperature of food The initial temperature of food affects the amount of cooking time needed Chilled foods will take longer to cook than food at room t...

Page 26: ...eas This will ensure that all parts of the food defrosts evenly Separate Foods may be stuck together when removed from the freezer It is important to separate foods as soon as it is possible during defrosting e g bacon rashers chicken fillets Shield Some areas of food being defrosted may become warm To prevent them becoming warmer and starting to cook these areas can be shielded with small pieces ...

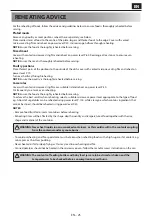
Page 27: ...50 Stir frequently to ensure even reheating NOTE Ensure the food is thoroughly reheated before serving To achieve the best results when reheating select a suitable microwave power level appropriate to the type of food e g A bowl of vegetables can be reheated using power level P 100 while a lasagne which contains ingredients that cannot be stirred should be reheated using power level P 40 NOTES Rem...

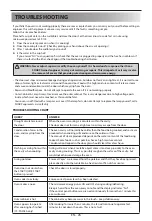
Page 28: ...th a lamp access cover If the lamp fails do not attempt to replace the lamp yourself call a SHARP approved service facility TROUBLESHOOTING CHART QUERY ANSWER Draught circulates around the door When the oven is working air circulates within the cavity The door does not form an airtight seal so air may escape from the door Condensation forms in the oven and may drip from the door The oven cavity wi...

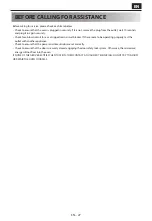
Page 29: ...circuit fuse or a tripped main circuit breaker If these seem to be operating properly test the outlet with another appliance Check to ensure that the power and timer knobs are set correctly Check to ensure that the door is securely closed engaging the door safety lock system Otherwise the microwave energy will not flow into the oven IF NONE OF THE ABOVE RECTIFIES THE SITUATION THEN CONTACT A QUALI...

Page 30: ...EN 28 EN 28 ...

Page 31: ......

Page 32: ...www sharpconsumer eu Sharp Consumer Electronics Poland sp z o o Ostaszewo 57B 87 148 Łysomice Poland SHARP CORPORATION 1 Takumi cho Sakai ku Sakai City Osaka 590 8522 Japan SDA MAN 0187 ...

Reviews: