background image

E-13

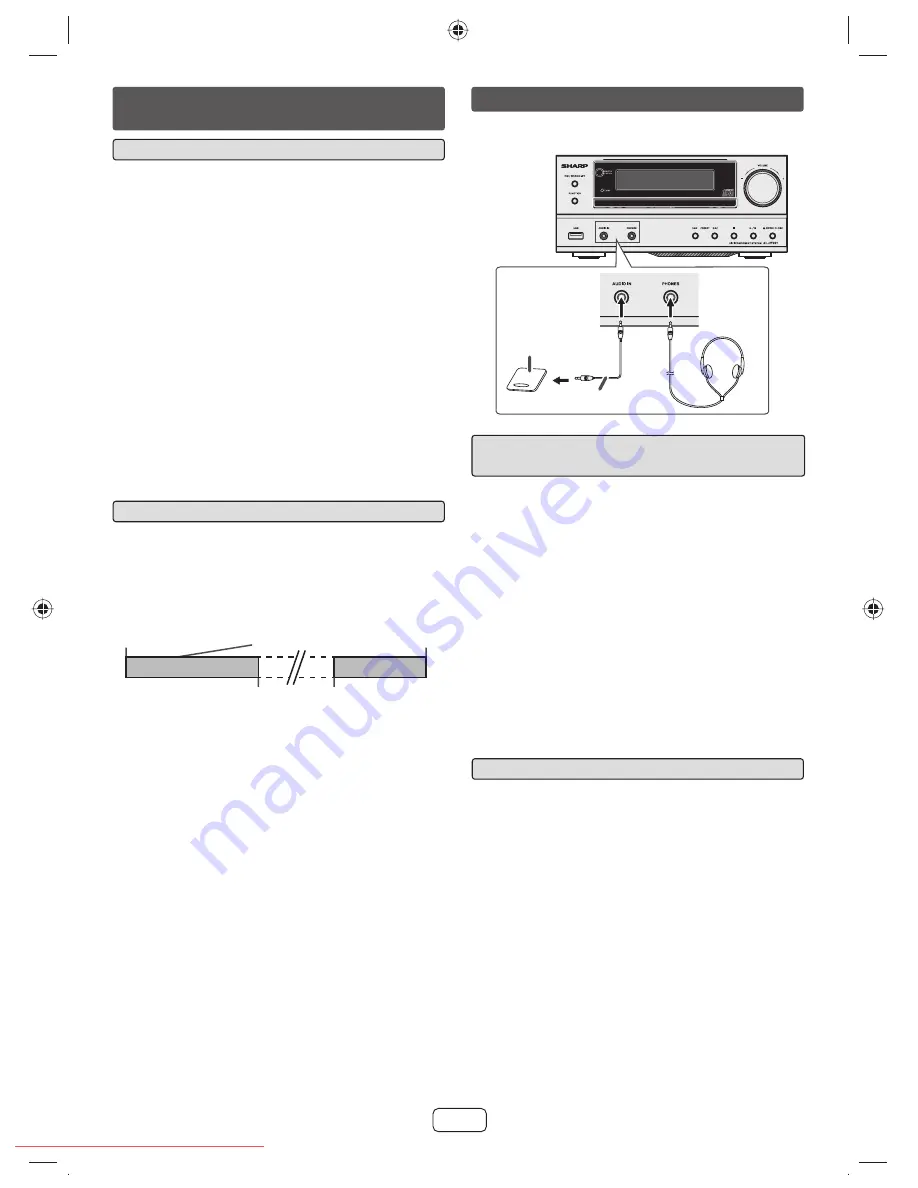
Headphones


Do not turn the volume on to full at switch on and listen 


to music at moderate levels. Excessive sound pressure 
from earphones and headphones can cause hearing 
loss.
Before plugging in or unplugging the headphone, 


reduce the volume.
Be sure your headphone has a 3.5 mm (1/8") diameter 


plug and impedance between 16 and 50 ohms. The 
recommended impedance is 32 ohms.
Plugging in the headphone disconnects the speakers 


automatically. Adjust the volume using the VOLUME 
control.

Enhancing your system

The connection cord is not included. Purchase a commercially 
available cord as shown below.

Portable audio 
player, etc.

Audio cable (not supplied)

Listening to the playback sounds of 


portable audio player, etc.

Use a connection cord to connect the portable audio 

player etc. to the AUDIO IN jack. When using video 
equipment, connect the audio output to this unit and 
the video output to a television.

Press the ON/STAND-BY button to turn the power on.

Press the AUDIO/LINE (INPUT) button on the remote 

control or FUNCTION button repeatedly on main unit 
to select AUDIO IN function.

Play the connected equipment. If volume level of the 

connected device is too high, sound distortion may 
occur. Should this happen, lower the volume of the 
connected device. If volume level is too low, increase 
the volume of the connected device.

Note:

To prevent noise interference, place the unit away from the 
television.

Timer and sleep operation
(Remote control only) (continued)

Desired time

1-99 minutes

Sleep operation will 
automatically stop

Timer playback start 
time

Sleep operation


The radio, compact disc, iPod, USB, Audio In and Line In 
can all be turned off automatically

.

Play back the desired sound source.

Press the SLEEP button.

Within 5 seconds, press the Numeric button to set the 

time. (1 minute ~ 99 minutes)

“SLEEP” will appear.

The unit will enter the power stand-by mode 

automatically after the preset time has elapsed. The 
volume will be turned down 1 minute before the sleep 
operation fi nishes.

To con

fi

 rm the remaining sleep time:

While “SLEEP” is indicated, press the SLEEP button.

To cancel the sleep operation:

Press the ON/STAND-BY button while “SLEEP” is 
indicated.  To cancel the sleep operation without setting 
the unit to the stand-by mode, proceed as follows.

While “SLEEP” is indicated, press the SLEEP button.

Within 5 seconds, press the “0” button twice until 

“SLEEP 00” appears.

Sleep timer setting

Timer playback setting

End time

To use timer and sleep operation together


Sleep and timer playback:

For example, you can fall asleep listening to the radio and 
wake up to CD in the next morning.

Set the sleep time (see above, steps 1 - 5).

While the sleep timer is set, set the timer playback 

(steps 2 - 9, page 12).

XL-HF201P_HF301P_US.indd   13

XL-HF201P_HF301P_US.indd   13

3/7/2012   10:35:26 AM

3/7/2012   10:35:26 AM

Downloaded from 

www.Manualslib.com


manuals search engine


Downloaded From Disc-Player.com Sharp Manuals

Summary of Contents for XL-HF201P

Page 1: ...ing technology licensed from Fraunhofer IIS and Thomson Printed in Malaysia 12D R KI 1 Made for iPod Made for iPhone and Made for iPad mean that an electronic accessory has been designed to connect specifically to iPod iPhone or iPad respectively and has been certified by the developer to meet Apple performance standards Apple is not responsible for the operation of this device or its compliance w...

Page 2: ...measures Reorient or relocate the receiving antenna Increase the separation between the equipment and receiver Connect the equipment into an outlet on a circuit different from that to which the receiver is connected Consult the dealer or an experienced radio TV technician for help WARNING FCC Regulations state that any unauthorized changes or modifications to this equipment not expressly approved ...

Page 3: ...ired be sure the service technician has used replacement parts specified by the manufacturer or have the same characteristics as the original part Unauthorized substitutions may result in fire electric shock or other hazards 20 Safety Check Upon completion of any service or repairs to this product ask the service technician to perform safety checks to determine that the product is in proper operat...

Page 4: ...HAVE OTHER RIGHTS WHICH VARY FROM STATE TO STATE Model Specific Section Your Product Model Number Description Warranty Period for this Product Additional Item s Excluded from Warranty Coverage if any Where to Obtain Service What to do to Obtain Service XL HF201P BK XL HF301P T HI FI COMPONENT SYSTEM Be sure to have this information available when you need service for your Product One 1 year parts ...

Page 5: ... high volumes Excessive sound pressure from earphones and headphones can cause hearing loss Incorrect Make sure to unplug the AC power cord before making any connections Subwoofer pre out connection You can connect a subwoofer with an amplifier to the SUBWOOFER PRE OUT jack Commercially available subwoofer amplifier built in Audio cable commercially available Audio signal To audio input jack To SU...

Page 6: ... Remote control Battery installation Use a AA size battery UM SUM 3 R6 HP 7 or similar Battery are not included Open the battery cover 1 Insert the battery according to the direction indicated in the battery 2 compartment When inserting or removing the battery push them toward the battery terminals Close the battery cover 3 Caution Remove the battery if the unit will not be used for a long period ...

Page 7: ... may also experience brief audio interference during incoming calls Insert the connector to the 1 iPod iPhone or iPad iPad Connector Place the iPad to the stand 2 for iPad iPad Stand for iPad Connect the iPod iPhone 3 or iPad to the unit via USB connector USB Note USB terminal does not support VIDEO out To insert adaptor for iPod or iPhone Open the docking station for iPod and 1 iPhone by pulling ...

Page 8: ...n Note When navigating the iPod iPhone or iPad menu with remote control do not operate any of the buttons on the iPod or iPhone unit The volume level is adjusted by pressing the VOL or button on the main unit or the remote control Adjusting the volume on the iPod iPhone or iPad units give no effect iPod iPhone and iPad operations The operations described below depend on the generation iPod iPhone ...

Page 9: ...epeatedly until Repeat All appears To cancel repeat play Press the REPEAT button repeatedly until Normal appears and disappears Listening to a CD or MP3 WMA disc continued Function Main unit Remote control Operation Play Press in the stop mode Stop Press in the playback mode Pause Press in the playback mode Press the button to resume playback from the paused point Track up down Press in the playba...

Page 10: ...ist display Programed play MP3 WMA While in the stop mode press the MEMORY button to enter the 1 programing save mode Press the PRESET 2 or button on the remote control to select the desired folder Then press the or button on the remote control to select the desired tracks Press the MEMORY button to save the track number 3 Repeat steps 2 3 for other tracks Up to 32 tracks can be programed 4 If you...

Page 11: ... folder mode off Press the USB button on the remote control or FUNCTION button 1 repeatedly on main unit to select USB function Connect the USB memory device that has MP3 WMA format files on the unit When the USB memory is connected to the main unit the device information will be displayed Select desired file to be played back by pressing the 2 or button Press the 3 CD USB button Playback will sta...

Page 12: ...n protects the memorized stations for a few hours should there be a power failure or the AC power cord become disconnected Listening to the radio Tuning Press the ON STAND BY button to turn the power on 1 Press the TUNER button repeatedly to select the desired 2 frequency 2 band FM or AM Press the TUNING 3 or button on the remote control to tune in to the desired station Manual tuning Press the TU...

Page 13: ...utton Within 10 seconds press the 3 or button to select Timer On and press the ENTER button Press the ON STAND BY button to enter the power stand 4 by mode Timer playback Before setting timer Check that the clock is set to the correct time refer to page 11 12 If it is not set you cannot use the timer function For timer playback Plug in USB or load discs or dock iPod to be played Press the ON STAND...

Page 14: ... too low increase the volume of the connected device Note To prevent noise interference place the unit away from the television Timer and sleep operation Remote control only continued Desired time 1 99 minutes Sleep operation will automatically stop Timer playback start time Sleep operation The radio compact disc iPod USB Audio In and Line In can all be turned off automatically Play back the desir...

Page 15: ...ear all the memory by resetting it Troubleshooting chart Many potential problems can be resolved by the owner without calling a service technician If something is wrong with this product check the following before calling your authorized SHARP dealer or service center General Symptom Possible cause The clock is not set to the correct time Did a power failure occur Reset the clock Refer page 11 Whe...

Page 16: ...s 2 6 kg CD player Type Single disc multi play compact disc player Signal readout Non contact 3 beam semiconductor laser pickup D A converter Multi bit D A converter Frequency response 20 20 000 Hz Dynamic range 90 dB 1 kHz Amplifier Output power RMS Total 100 watt 50 W per channel into 4 ohms at 1 kHz 10 Total harmonic distortion FTC 37 5 watt minimum RMS per channel into 4 ohms from 100 Hz to 20...

Reviews: