background image

18

Preparation

Preparation

Tips on Recording
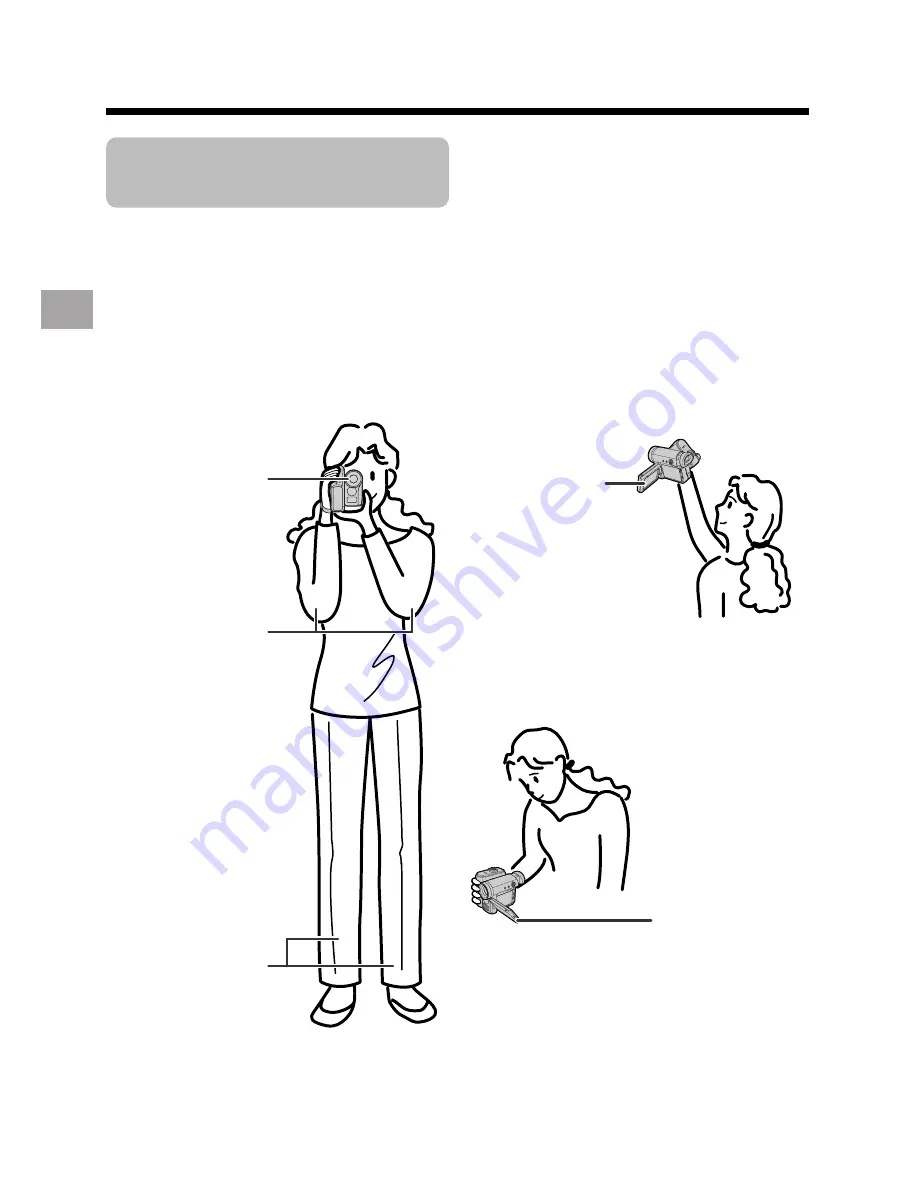
Positions

Turn the LCD
monitor so that the
screen faces
upward.

Balance your

weight on both

legs.

Turn the LCD

monitor so that the

screen faces

downward.

Place your elbows

against your sides.

To create images that are easy to watch during playback, try to record with an upright
posture and steady hands to prevent a shaky image.

Holding the camcorder

Put your right hand through the hand strap, and place your left hand under the camcorder
for support.

Basic posture

Place the viewfinder

eyecup firmly against

your eye.

Shooting from a low angle

Shooting from a high angle

Note:

• Take care not to touch the microphone with your fingers during recording. It will cause noise on

the audio track.

Summary of Contents for Viewcam VL-Z1U

Page 1: ...ase read this operation manual carefully before using the camcorder For assistance in reporting the theft or loss of this product record on the line below the model number and serial number which are located on the bottom of the unit Please retain this information See page 64 for use of Demo mode ...

Page 2: ...r video world CAUTION RISK OF ELECTRIC SHOCK DO NOT OPEN This symbol warns the user of uninsulated voltage within the unit that can cause dangerous electric shocks This symbol alerts the user that there are important operating and maintenance instructions in the litera ture accompanying this unit CAUTION TO REDUCE THE RISK OF ELEC TRIC SHOCK DO NOT REMOVE COVER NO USER SERVICEABLE PARTS INSIDE REF...

Page 3: ... BE DISPOSED OF PROPERLY CONTACT YOUR LOCAL AGENCIES FOR INFORMATION ON RECYCLING AND DISPOSAL OPTIONS IN YOUR AREA TO PREVENT ELECTRIC SHOCK MATCH WIDE BLADE OF PLUG TO WIDE SLOT FULLY INSERT applies to the supplied AC adapter CAUTION ON LITHIUM BATTERY If a battery is reversed positive end where the negative end belongs and vice versa it can overheat and rupture This has happened when young chil...

Page 4: ...or rect the interference by one or more of the following measures CReorient or relocate the receiving antenna CIncrease the separation between the equipment and receiver CConnect the equipment into an outlet on a circuit different from that to which the receiver is connected CConsult the dealer or an experienced radio TV technician for help DECLARATION OF CONFORMITY Sharp Camcorder Model VL Z1U Th...

Page 5: ...perating instructions should be read before the product is operated 2 Retain InstructionsCThe safety and operating instructions should be retained for future reference 3 Heed WarningsCAll warnings on the product and in the operating instructions should be adhered to 4 Follow InstructionsCAll operating and use instructions should be followed 5 CleaningCUnplug this product from the wall outlet befor...

Page 6: ...m the wall outlet and disconnect the antenna or cable system This will prevent damage to the product due to lightning and power line surges 15 Power LinesCAn outside antenna system should not be located in the vicinity of overhead power lines or other electric light or power circuits or where it can fall into such power lines or circuits When installing an outside antenna system extreme care shoul...

Page 7: ...een dropped or damaged in any way and f When the product exhibits a distinct change in performanceCthis indicates a need for service 20 Replacement PartsCWhen replacement parts are required be sure the service technician has used replacement parts specified by the manufacturer or have the same characteristics as the original part Unauthorized substitutions may result in fire electric shock or othe...

Page 8: ...g the Hand Strap 14 Using the Grip 14 Detaching the Lens Hood 15 Using the Viewfinder 15 Using the LCD Monitor 17 Tips on Recording Positions 18 Camera Recording Easy Camera Recording in Full Auto Mode 19 Zooming 20 Power Standby Mode 21 Turning on off the Backlight 21 Auto Focus 22 Macro Shots 22 Remaining Recording Time Display 23 Remaining Battery Power Display 23 Playback Playback 24 Volume Co...

Page 9: ...n LP Long Play Recording Mode 39 Windbreak 40 Selecting the 16 bit Audio Recording Mode 41 Playback Using the Remote Control Not supplied 42 Playback Functions with the Remote Control Not supplied 43 Selecting the Date and Time of Recording Display 44 Picture Effect Playback 45 Rotate Playback 46 Advanced Features Camera Recording Manual Focus 47 Returning to Auto Focus 48 Displaying the Manual Se...

Page 10: ...Adjustments 60 Turning off the Confirmation Sound 61 Selecting the Language for the Information Display 62 Setting the Camcorder to Factory Presettings 63 Demonstration Mode 64 Useful Information 65 Troubleshooting 70 Specifications 73 On screen Display Index 74 Note Before requesting service please read Troubleshooting carefully See pages 70 72 Guía de operación rápida en español 76 Contents ...

Page 11: ...order was purchased outside of these areas the part numbers may be different Please refer to the part numbers printed on the labels of the supplied AC adapter and battery pack Note The listed model names are for U S accessories For optional and additional accessories contact your local dealer call the Sharp Accessories and Supply Center at 1 800 642 2122 or visit SHARP s website http www sharpusa ...

Page 12: ...order in close proximity to lighting equipment The heat from in candescent lights may deform the camcorder or cause it to malfunction Always respect prohibitions or restric tions on the use of electronic equipment on commercial flights or in other sensi tive areas Be aware of the temperature and humid ity You can use your camcorder at 32 F to 104 F 0 C to L40 C and at 30 to 80 relative humidity Do...

Page 13: ...rouble When using the camcorder in a place where dew is likely to form allow the camcorder and the video tape to acclimate to the surroundings for about one hour For example when bringing the camcorder indoors after skiing place it in a plastic bag 1Be sure to tightly seal the plastic bag containing the camcorder 2Remove the bag when the air tem perature inside it reaches the tempera ture of the r...

Page 14: ...t soon after cleaning this might be caused by a damaged tape In this case stop using that cassette immediately 1 Insert a cleaning tape into the camcorder 2 Hold down the Lock button and set the Power switch to w The video head cleaning screen appears 3 Press m on the Operation button to begin video head cleaning NOW CLEANING flashes during cleaning After about 20 seconds video head cleaning autom...

Page 15: ...s Operation References Part Names For details on the use of each part refer to the page number indicated in parentheses Front view Zoom lens DISPLAY button p 27 Operation button p 27 Monaural microphone LCD LAMP button p 21 ...

Page 16: ... Tripod socket Left view Diopter adjustment dial p 16 Battery release pp 6 10 When attaching a tripod with a guide pin do not attach the pin to the bottom of the camcorder LCD monitor p 17 DV terminal p 56 DC IN jack pp 7 8 AV terminal pp 26 55 Terminal cover pp 26 55 56 ...

Page 17: ...utton p 34 Power switch v Camera Recording mode w Playback mode select switch pp 19 24 STANDBY button p 21 STANDBY indicator p 21 POWER CHARGE RED indicator pp 7 8 19 DC IN jack cover pp 7 8 Cassette holder p 9 Cassette compartment door release p 9 Cassette compartment door p 9 Right view Hand strap p 14 Speaker Window cleaning cover p 68 ...

Page 18: ...s been slid to the record protect position preventing recording see page 66 The tape is about to end Prepare a new cassette THE ENDS SOON TAPE DEW LAMP LAMP DEW The tape has reached the end Replace it with a new cassette see page 9 The battery is almost depleted Replace it with a fully charged battery pack see pages 5 6 Dew has formed inside the camcorder Wait a few hours for the dew to dry away s...

Page 19: ...Make sure that the Power switch is set to OFF 2 Open the LCD monitor to a 90 angle to the camcorder body 3 Slide the battery pack in the direction of the arrow with the m mark facing out 4 Push the battery pack in the direction of the arrow until it clicks 90 Power switch m mark ...

Page 20: ...the battery pack from the camcorder if you will not use the camcorder for a long period of time Make sure that the battery pack is firmly attached during operation If it is not the battery pack may come off or camcorder operation may fail because of the poor contact pressure To prevent damage to the battery pack when removing be sure to firmly hold the battery pack while pressing the release Use o...

Page 21: ...ing the zoom see page 20 and other functions or turning the power on and off frequently will increase power consump tion This may result in a decrease in the actual recording time compared to the maximum continuous recording time listed above The charging time and recording time may vary depending on the ambient tempera ture and the condition of the battery pack See pages 67 and 68 for more inform...

Page 22: ...plug into the DC IN jack of the camcorder 1 and plug the AC plug into a power outlet 2 4 Hold down the Lock button and set the Power switch to v or w The POWER CHARGE RED indicator lights up green DC IN jack Notes BEFORE REMOVING THE DC PLUG ALWAYS STOP RECORDING OR PLAY BACK AND TURN THE POWER OFF Removing the DC plug while shooting or during playback may damage the tape by causing it to wrap aro...

Page 23: ... Be careful not to get your fingers caught in the cassette holder Do not apply force to the cassette holder except when pressing the PUSH mark to close it Do not tilt the camcorder or hold it upside down when you are inserting or removing a cassette It may damage the tape Remove the cassette if you will not use the camcorder for a long period of time If you do not correctly close the cassette hold...

Page 24: ... release in the direction of the arrow then take the battery pack out 4 Pull out the lithium battery cover in the direction of the arrow 5 Insert the CR 1216 type lithium battery into the compartment with the H side of the battery facing out 6 Close the lithium battery cover firmly until it clicks into place Removing the Memory Battery Perform steps 1 to 4 above then lift out the battery by using ...

Page 25: ...on Notes on the Use of the Lithium battery Do not short circuit recharge disassemble or heat the lithium battery Should the lithium battery leak wipe the battery compartment clean and then insert a new battery The lithium batteries will last about one year under normal usage CAUTION The battery used in this device may present a risk of fire of chemical burn if mistreated Do not recharge disassembl...

Page 26: ...time to 10 30 am 10 30 AM Note Before performing the steps below make sure that the CR1216 type lithium battery has been installed see page 10 1 Hold down the Lock button and set the Power switch to v 2 Press the DISPLAY button until the mode screen appears 3 Press l or m on the Operation button to select MENU then press the center of the Operation button B L C GA I N OF F F AD E ME NU SC EN E ME ...

Page 27: ...ing or removing the lens cap grasp the indents on both sides of the cap When recording remove the lens cap and attach the lens cap cord to the fastener so that the cap will not get in the way Note Always attach the lens cap over the lens when not using the camcorder 24H 2 1 H 24H 10 Press m or l to select 30 minute then press the center of the Operation button The internal clock now starts operati...

Page 28: ...rt Stop button and your index finger on the Power Zoom control Then pull the grip strap tight until it fits snugly 3 Seal the Velcro fasteners of the grip strap and the hand strap flap Using the Grip Rotate the grip 135 forward or 90 downward so that you can record images easily from high or low angle see page 18 Note The grip cannot rotate when a tripod is attached Grip strap Hand strap flap 135 ...

Page 29: ...ll out the viewfinder completely 2 Hold down the Lock button and set the Power switch to v or w Detaching the Lens Hood Before using a commercially available conversion lens detach the lens hood as shown below Continued on the next page Note You cannot attach the supplied lens hood or lens cap to a conversion lens Power switch Viewfinder Lock button ...

Page 30: ... You can adjust the settings on the MENU screen through the viewfinder by using the Operation button see page 27 for use of the Operation button Be sure to close the viewfinder after use Adjusting the diopter Adjust the diopter according to your eyesight when the picture in the viewfinder or the characters on the on screen display is not clear 1 Pull out the viewfinder completely 2 Hold down the L...

Page 31: ...tor Note Battery consumption is larger when the LCD monitor is opened Use the viewfinder instead of the LCD monitor when you want to save the battery power Closing the LCD monitor Return the LCD monitor to the vertical 90 position with the screen facing in and fold it into the camcorder into place Notes Do not use excessive force when moving the LCD monitor When closing the LCD monitor do not tilt...

Page 32: ...y to watch during playback try to record with an upright posture and steady hands to prevent a shaky image Holding the camcorder Put your right hand through the hand strap and place your left hand under the camcorder for support Basic posture Place the viewfinder eyecup firmly against your eye Shooting from a low angle Shooting from a high angle Note Take care not to touch the microphone with your...

Page 33: ... Note Before recording an important scene please perform the recording test then playback to check if the scene was recorded properly If noise occurs use a commercially available cleaning tape to clean the video heads see page xiv Maximum continuous recording and actual recording times Note Using the zoom see page 20 and other functions or turning the power on and off frequently will increase powe...

Page 34: ...out 4 minutes Zooming Zooming allows you to move visually closer to or farther from a subject without physi cally changing your position When using the optical zoom you can enlarge the subject up to 10K Zooming in Push the Power Zoom control to the T telephoto side to get a close up view 1 Zooming out Push the Power Zoom control to the W wide angle side to get a wide field of view 2 The zoom range...

Page 35: ...LCD screen To turn on the backlight Press the LCD LAMP button Note The BACKLIGHT OFF mode will cancel when you close the LCD monitor Press the STANDBY button again to return to the Recording Standby mode It takes about 2 seconds to be able to start recording Notes Power Standby will cancel and the STANDBY indicator will turn off in these situations below When the camcorder remains in Power Standby...

Page 36: ...an approximately 5 feet 1 5 m Set the zoom control to wide angle and try refocusing again If the lens is dirty or fogged the camcorder may not be able to focus correctly Macro Shots This camcorder lets you shoot close up images of small objects such as flowers and insects or make title frames for your videos When you want to record a magnified image of a subject which is within approximately 5 fee...

Page 37: ... Less than 1 min The tape has reached the end CHANGE THE CASSE TTE TAPE END Remaining Battery Power Display When using the camcorder with the battery pack as the power source the remaining battery power indicator is displayed If the battery power becomes very low a warning indicator appears Replace the battery pack Notes The remaining battery power indicator appears when the on screen indicators a...

Page 38: ...itor with the screen facing in You cannot monitor the sound through the speaker when watching the playback in the viewfinder Playback The LCD monitor screen functions as a handy playback monitor Nothing needs to be connected allowing instant on screen playback with the sound through the built in speaker 1 Hold down the Lock button and set the Power switch to w 2 Press j or k on the Operation butto...

Page 39: ... Repeat steps 1 and 2 above until you find the scene 4 Press m to begin normal playback Notes The sound is off during search You may experience picture noise during search This is not a malfunction Still The still function allows you to pause playback During playback press m on the Operation button To return to normal playback press m again Notes The sound is off in Still mode To protect the tape ...

Page 40: ... on while making a connection 3 Turn on the TV and set it to the AV or VIDEO channel See the operation manual of your TV When connecting to a TV via a VCR turn on the VCR and set it to the AV or LINE input channel Operate the TV as you normally do to view the signal from the VCR See the operation manuals of your TV and VCR 4 Set the Power switch on the camcorder to w and begin playback see page 24...

Page 41: ...ress the DISPLAY button until the mode screen appears 3 Press l or m on the Operation button to select the desired mode item SCENE MENU then press the center of the Operation button 4 Press l or m to select the desired mode setting DUSK then press the center of the Operation button To turn off the mode screen Press the DISPLAY button Note Items that are not selectable are grayed out 4 0 0 2 2 0 3 ...

Page 42: ...tem DGTL ZOOM then press the center of the Operation button You can press k instead of the center of the Operation button 7 Press l or m to select the desired menu setting 40 then press the center of the Operation button You can press j instead of the center of the Operation button To adjust another menu item press l or m to select RETURN and press the center of the Operation button then perform s...

Page 43: ...lows you to record powerful close up pictures with the same operation as normal zooming Notes The digital zoom is in addition to the optical zoom giving a combined maximum zoom range of 1 500K As the image is enlarged digitally the picture quality decreases when higher digital zoom settings are used 1 In Camera mode press the DISPLAY button until the mode screen appears 2 Press l or m on the Opera...

Page 44: ...s 2 Press l or m on the Operation button to select BLC GAIN then press the center of the Operation button 3 Press l or m to select ON x then press the center of the Operation button B L C GA I N OF F F AD E ME NU SC EN E ME NU BLC GA I N ON AUTO AUTO 30min 30min 4 Press the DISPLAY button to turn off the mode screen x appears when on screen indicators are turned on indicating that the backlight co...

Page 45: ...in up mode which increases when the e appears When the e indicator appears you may get a shadow image behind a subject that is moving around a lot Fine brightness adjustments are possible when using manual iris see page 50 The e indicator will disappear and Gain up mode will cancel if you aim the camcorder in a bright location 2 Press l or m on the Operation button to select BLC GAIN then press th...

Page 46: ...en returns to Recording Standby mode To cancel Fade mode Select OFF in step 3 above To use Fade Out only 1 During camera recording press the DISPLAY button until the mode screen appears 2 Perform steps 2 and 3 in Using 3 Press the Start Stop button at the point where you wish to stop recording Note Fade mode automatically cancels after Fade Out Using 1 In Camera mode press the DISPLAY button until...

Page 47: ...TURN then press the center of the Operation button 6 Press l or m to select START then press the center of the Operation button SEARCH flashes and the tape begins fast forwarding or rewinding to the end of the last recorded scene When the tape reaches the end of the last recorded scene FINISHED is displayed and the camcorder enters Recording Standby mode 7 Press the DISPLAY button to turn off the ...

Page 48: ...icture quality in Still Recording function will be slightly lower than normal pictures Edit Search The edit search function lets you search without switching from Camera mode to Playback mode for the point on the tape where you wish to start recording next 1 In Recording Standby mode press and hold down j reverse edit search or k forward edit search on the Operation button 2 When you find the poin...

Page 49: ... the center of the Operation button 5 Press l or m to select DIS then press the center of the Operation button 6 Press l or m to select ON then press the center of the Operation button 7 Press the DISPLAY button to turn off the menu screen The DIS indicator only appears when the on screen indicators are turned on To cancel DIS function Select OFF in step 6 above The z indicator will disappear Note...

Page 50: ... yourself in the scene by watching yourself on the LCD monitor 1 Pull out the viewfinder completely Open the LCD monitor to a 90 angle to the camcorder body 1 and then rotate it 180 vertically 2 180 90 2 Set the Power switch to v The subject is displayed in the viewfinder and a mirror image of the subject is displayed on the LCD monitor 3 Press the Start Stop button to begin recording Note You can...

Page 51: ...ot be displayed All of the manual settings are set to AUTO and some other settings will set to OFF in self recording You may experience image noise when using self recording To operate self recording with reversed grip correctly make sure to turn the grip and the lens section so that the Start Stop button and the tripod socket face upward and the lens faces toward you The I indicator will appear B...

Page 52: ... the Operation button 3 Press l or m to select EXECUTE then press the center of the Operation button 4 Press l or m to select Y then press the center of the Operation button 5 Press l or m to select 16 9 then press the center of the Operation button 6 Press l or m to select ON then press the center of the Operation button The picture is displayed with the top and bottom portions masked 7 Press the...

Page 53: ...creen The long play recording mode indicator only appears when the on screen indicators are turned on To return to SP mode Select SP in step 6 above Notes on the use of LP mode To record in LP mode be sure to use a Mini DV cassette labeled for use with LP mode Frozen images mosaic pattern picture noise audio interruptions or audio loss may occur in the following cases When using a tape which is no...

Page 54: ...en press the center of the Operation button 4 Press l or m to select Y then press the center of the Operation button 5 Press l or m to select WIND then press the center of the Operation button 6 Press l or m to select ON then press the center of the Operation button 7 Press the DISPLAY button to turn off the menu screen S E T T I NG 2 D I S 1 6 9 AUD I O MODE RE TURN W I ND OF F ON ON WI ND To can...

Page 55: ...en press the center of the Operation button 5 Press l or m to select AUDIO MODE then press the center of the Operation button 6 Press l or m to select 16bit then press the center of the Operation button 7 Press the DISPLAY button to turn off the menu screen The 16 bit audio recording mode indicator only appears when the on screen indicators are turned on To return to 12 bit audio recording mode Se...

Page 56: ...m to select ON then press the center of the Operation button 7 Press the DISPLAY button to turn off the menu screen Useful Features Playback Operating Aim the remote control at the remote sensor of the camcorder and press the control buttons to operate Notes Be careful not to expose the remote sensor to direct sunlight or strong interior lighting as this may prevent the remote control from operati...

Page 57: ...rder automati cally returns to normal playback if it is left in Slow mode for more than 10 minutes Frame Advance The frame advance function allows you to play back still images frame by frame 1 During playback press the PAUSE STILL button g to pause playback 2 Press the h or j button Each time you press the button the picture advances one frame forward or backward To return to normal playback pres...

Page 58: ... press the center of the Operation button Each time you press l or m the setting changes as shown below 5 Press the DISPLAY button until the date or date and time appears Notes The date or date and time appears when the on screen indicators are turned on Before recording make sure that the date and time have been correctly set If they have not been set the display will be left blank when playing b...

Page 59: ...IA The picture is displayed in sepia color similar to that of an old photograph SOLARI The contrast of the subject is enhanced creating an unique artistic image NEGA The blacks and whites of the image are reversed and colors of the image are inverted 1 During playback press the DISPLAY button until the mode screen appears 2 Press l or m on the Operation button to select PIC EFFECT then press the c...

Page 60: ...tate Playback indicator appears 7 Press m to begin Rotate Playback The image is rotated 180 upside down P L A Y B AC K AUD I O RE T URN S E T E X E C UT E RE T URN ROT A T E P B AUDIO ROT AT E PB 2 1 To cancel Rotate Playback Press the center of the Operation button in step 7 above Notes When executing Rotate Playback during playback playback will stop Press m to begin Rotate Playback Even if the ...

Page 61: ... Subject has fine repeated patterns Subjects at different distances appear in the center of the scene at the same time Advanced Features Camera Recording 1 In Camera mode press the DISPLAY button until the mode screen appears 2 Press l or m on the Operation button to select FOCUS then press the center of the Operation button 3 Adjust the Power Zoom control to frame the subject as you desire 4 Pres...

Page 62: ... Note Items that are not selectable are grayed out Returning to Auto Focus You can set Manual Focus mode to Auto Focus mode with the operation below 1 In Camera mode press the DISPLAY button until the mode screen appears 2 Press l or m on the Operation button to select AUTO FOCUS then press the center of the Operation button 3 Press l or m to select EXECUTE then press the center of the Operation b...

Page 63: ...te object Adjust the distance of the object so that the entire screen is white 7 Press the center of the Operation button to set the white balance lock LOCK MODE will change to LOCK after pressing the center of the Operation button LOCK flashes during the locking procedure and stops flashing after locking the white balance Note If you move the camcorder while LOCK is flashing LOCK may not stop fla...

Page 64: ... to select MANUAL SET then press the center of the Operation button see page 48 3 Press l or m to select EXECUTE then press the center of the Operation button 4 Press l or m to select IRIS then press the center of the Operation button 5 Press l or m to select the desired iris value then press the center of the Operation button The number shown is the selected iris value The adjustment range is 15 ...

Page 65: ...ANUAL SET then press the center of the Operation button see page 48 3 Press l or m to select EXECUTE then press the center of the Operation button 4 Press l or m to select GAIN then press the center of the Operation button 5 Press l or m to select the desired gain value then press the center of the Operation button The number shown is the selected gain value The adjustment range is 7 steps from 0d...

Page 66: ...s l or m to select EXECUTE then press the center of the Operation button 4 Press l or m to select FULL AUTO then press the center of the Operation button WH I T E B A L I R I S E X E C UT E L OCK GA I N F U L L AU T O RE TURN 3 d B F 4 0 WH I T E B A L I R I S GA I N F U L L AU T O RE TURN E X E CU T E AU T O AU T O AU T O 5 Press l or m to select EXECUTE then press the center of the Operation but...

Page 67: ...tton The selected scene setting displays on the mode screen 4 Press the DISPLAY button to turn off the mode screen The selected scene setting indicator displays when the on screen indicators are turned on To cancel the scene setting Select OFF in step 3 above Note Scene settings cannot be used when using any manual setting except focus Also not selectable when e displays Types SPORT A When you wan...

Page 68: ...ed Features Playback 6 Press the DISPLAY button to turn off the menu screen The time code appears when the on screen indicators are turned on ON T IME CODE OTH E RS 2 T I ME CODE T C OU T RE TURN OF F ON 0 1 0 2 0 T C AUDIO 2 1 Displaying the time code on a TV during playback 1 In Playback mode press the DIS PLAY button until the mode screen appears 2 Select MENU then EXECUTE by using the Operatio...

Page 69: ...of the portion that you wish to keep 2 Load a video cassette into the recording VCR 3 Press m on the camcorder to begin playback then press the Record button on the VCR to begin recording 4 Press the Pause Still button on the VCR to pause recording when the source tape reaches the beginning of the sequence to be cut 5 Press the Pause Still or Record button on the VCR to resume recording when the s...

Page 70: ...g the video equipment as the recording source Notes Make sure that the video equipment to which you are recording can input dubbing signals via the DV terminal When displaying the playback picture on the PC you may find black bands around the image This is caused by the differences of the image display sizes i Link refers to the IEEE1394 1995 industry specification and extensions thereof The z log...

Page 71: ...ral on Audio 1 Audio 1 Monaural sound Audio 2 No audio 16 bit audio recording The audio is recorded in monaural on two separate channels Audio 1 Monaural sound Audio 2 Monaural sound In Audio Dubbing mode 12 bit audio recording The dubbed audio is recorded on Audio 2 Audio 1 Original monaural sound Audio 2 Dubbed monaural sound 16 bit audio recording The dubbed audio is recorded on Audio 2 over th...

Page 72: ...sap pears If you wish to change the dubbed audio or dub addi tional scenes 1 Press the DISPLAY button to turn off the audio dubbing screen 2 Repeat steps 1 to 6 above Notes It is recommended that you use Audio Dubbing only with recordings made with this camcorder Use of recordings made with other digital video equipment may result in poor audio quality Audio dubbing will automatically pause if the...

Page 73: ...eration button see page 28 4 Press l or m to select V then press the center of the Operation button 5 Press l or m to select AUDIO then press the center of the Operation button 6 Press l or m to select the desired audio playback mode then press the center of the Operation button P L A Y B AC K S E T 1 1 2 2 AUD I O ROT A T E P B RE T URN AUDIO 2 1 AUD I O 1 2 7 Press the DISPLAY button to turn off...

Page 74: ...lect MENU then press the center of the Operation button 3 Press l or m to select EXECUTE then press the center of the Operation button 4 Press l or m to select O then press the center of the Operation button 5 Press l or m to select LCD BRIGHT LCD COLOR or VF BRIGHT then press the center of the Operation button L C D S E T BA CK L I GHT L C D BR I GHT L C D C OL OR RE T URN NORMAL V F BR I GHT 7 P...

Page 75: ...T L C D C OL OR RE T URN V F BR I GHT NORMA L BR I GHT BACKL I GHT BR I GHT Turning off the Confirmation Sound A confirmation sound is made when you turn on or off the Power switch press the Start Stop button or perform other designated operations Use the procedure below to turn off the confirmation sounds The example screens shown are for Camera mode 1 Press the DISPLAY button until the mode scre...

Page 76: ...until the mode screen appears 2 Press l or m on the Operation button to select MENU then press the center of the Operation button 3 Press l or m to select EXECUTE then press the center of the Operation button 4 Press l or m to select Z then press the center of the Operation button 5 Press l or m to select LAN GUAGE then press the center of the Operation button 6 Press l or m to select the desired ...

Page 77: ...then press the center of the Operation button 5 Press l or m to select DEFAULT then press the center of the Operation button 6 Press l or m to select EXECUTE then press the center of the Operation button OTH E RS 1 B E E P REMO T E DE F AUL T RE TURN L ANGUAG E DEMO MODE E X E CUT E RE T URN 7 Press l or m to select YES then press the center of the Operation button To cancel the setting select NO ...

Page 78: ...he Operation button 6 Press l or m to select DEMO MODE then press the center of the Operation button 7 Press l or m to select ON then press the center of the Operation button 8 Set the Power switch to OFF then hold down the Lock button and set the Power switch to v The demonstration begins Canceling 1 During the demonstration press the center of the Operation button to pause the demonstration 2 Pe...

Page 79: ...ation or correct the iris value to improve the picture see pages 30 and 50 Before zooming think about how to best frame the shot Frequent zooming produces unattractive pictures It also runs down the battery more quickly When image shaking is noticeable during zoomed in telephoto shooting use a tripod or push the Power Zoom control to the W side to zoom out Light from behind Backlighting Horizontal...

Page 80: ...iously recorded Mini DV cassette is used again for recording the previously recorded material will be automatically erased The Mini DV cassette will not operate if inserted in the wrong direction Do not repeatedly insert and eject the Mini DV cassette without running the tape as this may cause uneven tape winding and damage the tape Do not place the Mini DV cassette in direct sunlight near strong ...

Page 81: ...HARP BT L226 battery packs These are designed specifically for use with this camcorder Storage Store the battery pack in a fully dis charged state Store the battery pack in a dry cool place When storing the battery pack put it in the original protective plastic bag Notes Improper handling of the battery pack may present a risk of fire or explosion Pay close attention to the following Do not allow ...

Page 82: ...ned with a diluted neutral detergent Then wipe it again with a soft dry cloth Use a soft cloth to wipe finger marks and other smudges off the LCD screen Use a soft cloth or compressed air and lens paper designed for photographic lenses to clean the lens Pull out the viewfinder and open the window cleaning cover as shown below so that you can clean up the inside of the viewfinder with a camera blow...

Page 83: ...adaptor if necessary depending on the design of the wall outlet Television Signal Standards In any country you can always watch the video picture by using the LCD monitor screen However if you want to watch the picture on a TV screen the TV must be NTSC M system compatible NTSC M is used in the following areas The Bahamas Barbados Bermuda Myanmar previously Burma Canada Chile Colombia Costa Rica C...

Page 84: ... source is not properly con nected Battery pack is not charged Dew in camcorder Safety function is in effect Erasure protect tab on video cas sette is open Camcorder left in Recording Standby mode for 5 minutes in Camera mode Manual Focus mode is engaged Zoom used on close subject Subject has little contrast in bright ness or is full of horizontal or verti cal stripes Occurs when shooting subject ...

Page 85: ... is recording Backlight has been turned off Fluorescent lamp has burned out Viewfinder diopter is not properly adjusted Inappropriate picture adjustments Inappropriate picture adjustments Suggested solution Call for service p 73 or use a commercially available cleaning tape p xiv Use a new cassette Set the AUDIO menu item to AU DIO 1 or AUDIO 1L2 p 59 Set the Power switch to Playback mode p 24 Cha...

Page 86: ...ervice p 73 General Notes This unit is equipped with a microprocessor Its performance could be adversely affected by external electrical noise or interference If this should happen turn off the power and disconnect the unit from any power sources including the lithium battery etc Then reconnect the power sources to resume operation If the characters displayed in the viewfinder or on the LCD monito...

Page 87: ...amera recording in Camera mode using the viewfinder in Full Auto mode with the DIS function on 4 2 W during camera recording in Camera mode using the LCD monitor in Full Auto mode with the DIS function on and backlight in normal mode Operating Temperature 32 F to 104 F 0 C to L40 C Operating Humidity 30 to 80 Storage Temperature 4 F to 140 F 20 C to L60 C Dimensions WKHKD approx 3 1 4 K 3 15 64 K ...

Page 88: ...OOM T A PE S P E E D R E T URN S E T T I NG 2 D I S 1 6 9 AUD I O MODE RE TURN W I ND OTH E RS 1 O T H E RS 2 L C D S E T BA CK L I GHT L C D BR I GHT L C D C OL OR RE T URN V F BR I GHT RE TURN DEMO MODE B E E P REMO T E DE F AUL T L ANGUAG E RE TURN T I ME CODE T C OUT S E T T I NG 1 2 H 2 4 H B L C GA I N p 33 p 29 p 39 Camera mode p 35 p 38 p 41 p 40 p 63 p 42 p 61 p 64 p 62 p 54 p 54 p 13 p 1...

Page 89: ...GHT L C D BR I GHT L C D C OL OR RE T URN V F BR I GHT DA T E D I SP AUD I O DUB P I C E F F EC T ME NU DA T E AUD I O P I C ME NU P L A Y B AC K AUD I O RE T URN S E T OTH E RS 2 T I ME CODE T C OU T RE TURN ROT A T E P B AUDIO 2 1 F F REW S T OP P L A Y p 46 p 59 Playback mode p 63 p 42 p 61 p 54 p 54 p 61 p 60 p 60 p 60 p 45 p 58 p 28 p 44 p 23 p 59 ...

Page 90: ... RIESGO DE RECIBIR UNA DESCARGA ELÉCTRICANORETIRELATAPA EN ELINTERIORNOHAYPARTESQUE DEBA REPARAR EL USUARIO SOLICITE LAS REPARACIONES AL PERSONAL DE SERVICIO CUALIFICADO Este símbolo avisa al usuario de la presencia de tensión sin aislar en el interior del aparato que puede causar descargas eléctricas peligrosas Este símbolo alerta al usuario de que existen instrucciones de manejo y mantenimiento ...

Page 91: ...ONTACTO CON LAS AGENCIAS LOCALES PERTINENTES PARA OBTENER INFORMACIÓN SOBRE LAS OPCIONES DE RECICLADO Y ELIMINACIÓN EXISTENTES EN SU ZONA DE RESIDENCIA PARA TIRAR EL PRODUCTO Este producto utiliza soldadura de estaño y plomo y su lámpara fluorescente contiene una pequeña cantidad de mercurio Debido a la conservación del medio ambiente puede que para tirar estos materiales deban seguirse ciertos re...

Page 92: ...ido por las luces incandescentes puede deformar la videocámara o hacer que ésta funcione mal Respete siempre las prohibiciones o restricciones relacionadas con la utilización de equipos electrónicos en vuelos comerciales o en otras áreas susceptibles Tenga cuidado con la temperatura y la humedad Podrá utilizar su videocámara a temperaturas de entre 32 F y 104 F 0 C y L40 C con una humedad relativa...

Page 93: ...iones de manejo 1 Lectura de las instrucciones Antes de utilizar este producto deberán leerse todas las instrucciones de seguridad y manejo 2 Conservación de las instrucciones Las instrucciones de seguridad y manejo deberán guardarse para poder consultarlas en futuro en caso de ser necesario 3 Cumplimiento de las advertencias Deberán cumplirse todas las advertencias del producto y de las instrucci...

Page 94: ...te la antena o el sistema de cable Esto impedirá que el producto se estropee debido a las tormentas eléctrica o a la sobretensión en la línea de alimentación 15 Líneas de alimentación Una antena exterior no deberá colocarse cerca de líneas de alimentación elevadas ni tampoco cerca de luces eléctricas o circuitos de alimentación ni donde pueda caer encima de tales líneas de alimentación o circuitos...

Page 95: ... otros peligros 21 Comprobación de seguridad Al terminar cualquier trabajo de mantenimiento o reparación en este producto pida al técnico de servicio que realice las comprobaciones de seguridad para determinar si el producto se encuentra en condiciones de funcionamiento apropiadas 22 Montaje en la pared o en el techo El producto deberá montarse en una pared o en un techo sólo como lo recomienda su...

Page 96: ...terruptor de alimentación esté en OFF 2 Abra la cubierta de la toma DC IN 3 Inserte la clavija de CC en la toma DC IN de la videocámara 1 y enchufe la clavija de CA en una toma de corriente 2 El indicador POWER CHARGE RED se enciende en rojo El indicador POWER CHARGE RED se apaga cuando se carga la batería 4 Desconecte la clavija de CC de la toma DC IN y luego desconecte el adaptador de CA de la t...

Page 97: ...illa hacia fuera y con la lengüeta de protección contra borrado hacia arriba 3 Pulse suavemente la marca PUSH hasta que el portavideocasete encaje en posición produciendo un chasquido El portavideocasete se introducirá automáticamente 4 Espere a que el portavideocasete se pliegue completamente Cierre la puerta del compartimiento presionando sobre el centro hasta que quede cerrada haciendo un ruido...

Page 98: ...l del zoom motorizado Luego tire firmemente de la correa de empuñadura hasta que quede bien colocada 3 Pliegue los cierres Velcrob de la correa de empuñadura y de la solapa de la correa para la mano Utilización de la empuñadura Gire la empuñadura 135 hacia delante o 90 hacia abajo para poder grabar imágenes fácilmente desde un ángulo alto o bajo consulte la página 20 Nota La empuñadura no puede gi...

Page 99: ...ueo y ponga el interruptor de alimentación en v 3 Mientras mira a través del visor gire el dial ajuste de dioptrías hasta que los indicadores del visor puedan verse claramente Utilización del monitor LCD 1 Abra el monitor LCD de manera que forme un ángulo de 90 con el cuerpo de la videocámara 2 Ajuste el monitor LCD con un ángulo que permita ver fácilmente la imagen en la pantalla También puede pl...

Page 100: ...orrea para la mano y ponga su mano izquierda debajo de la videocámara para apoyarla Postura básica Filmación desde un ángulo bajo Filmación desde un ángulo alto Nota Tenga cuidado para no tocar el micrófono con sus dedos durante la grabación Esto causará ruidos en la pista de audio Gire el monitor LCD para que la pantalla quede hacia arriba Balancee su peso en ambas piernas Gire el monitor LCD par...

Page 101: ... POWER CHARGE RED se enciende en verde AUTO AUTO REC 3 Pulse el botón de inicio parada para empezar a grabar Para hacer una pausa en la grabación Pulse de nuevo el botón de inicio parada Empleo del zoom Pulse el control del zoom motorizado hacia el lado de la T 1 telefoto o el lado de la W 2 granangular Botón de inicio parada Interruptor de alimentación Indicador POWER CHARGE RED Botón de bloqueo ...

Page 102: ...funcionamiento para rebobinar o avanzar rápidamente la cinta hasta el punto deseado 3 Pulse m para iniciar la reproducción Para detener la reproducción Pulse l Control de volumen Pulse el control de volumen hacia el lado L o para aumentar 1 o disminuir 2 el volumen Botón de funcionamiento Botón de bloqueo Interruptor de alimentación Control de volumen ...

Page 103: ...ein shall constitute complete fulfillment of all liabilities and responsibilities of Sharp to the purchaser with respect to the Product and shall constitute full satisfaction of all claims whether based on contract negligence strict liability or otherwise In no event shall Sharp be liable or in any way responsible for any damages or defects in the Product which were caused by repairs or attempted ...

Reviews: