background image

Digital Still Camera Features
Playback

Digital Still Camera

Features

 77

Print Order

Available mode:

CARD-VCR

The print order function allows you to add print
information called DPOF to still images
recorded on a card.

5

Press

j

,

k

,

l

 or 

m

 to select the

image to which you want to assign a
print order.

6

Press the SET button, then press 

l

 or

m

 to select the number of printouts.

• 1 through 99 can be set for the number

of printouts.

7

Press the SET button to set the print
order.

• The

M

 indicator appears.

• If you want to assign another print order,

repeat steps 5 to 7.

8

Press the MENU button to display a
thumbnail of images.

E F F E C T

P L A Y B A C K

P I C .
S L I D E
D E L E T E
P RO T E C T

S HOW

P R I .
R E T U RN

O R D E R

P R I . S E L E C T

P R I . A L L
P R I . N O N E

S E T

R E T U RN

1

4

2

5

3

6

1

0

0

0

-

0

0

2

/

1

P A G E

1

N O RMA L

P R I N T

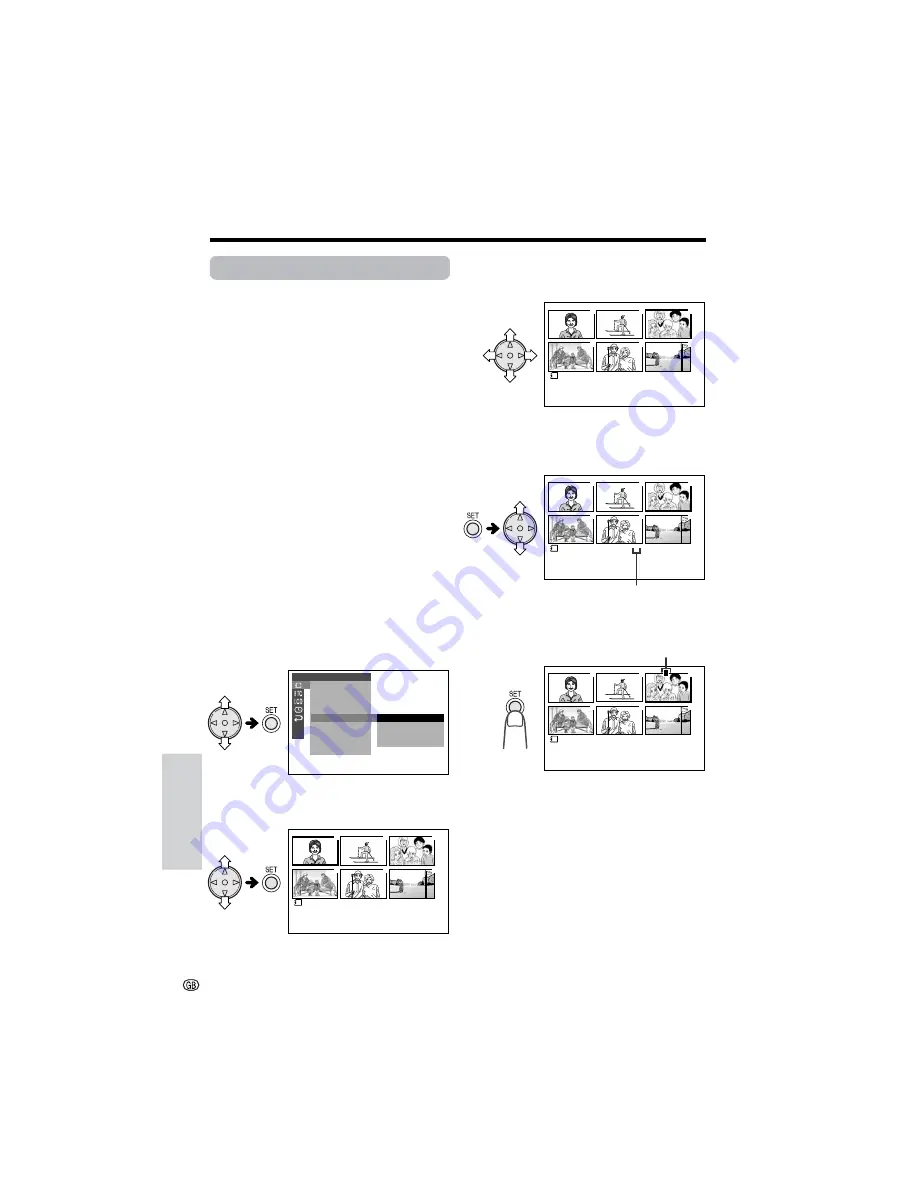
Assigning Print Order to an Image

1

In CARD-VCR mode, press the MENU
button until the menu screen appears.

2

Press

l

 or 

m

 on the operation button

to select 

S

, then press the SET button.

3

Press

l

 or 

m

 to select “PRI. ORDER”,

then press the SET button.

4

Press

l

 or 

m

 to select “PRI. SELECT”,

then press the SET button to display a
thumbnail of the recorded images.

1

4

2

5

3

6

3

0

0

0

-

0

0

2

/

1

P A G E

1

N O RMA L

P R I N T

1

4

2

5

3

6

3

0

0

0

-

0

0

1

1

S E T NUMB E R

P R I N T

1

4

2

5

3

6

3

0

0

0

-

0

0

2

/

1

P A G E

1

N O RMA L

P R I N T

P

About DPOF

DPOF (Digital Printing Order Format) defines
the print information for the specific images
and number of each image on memory cards.
In the near future you will be able to easily
make prints on a DPOF-compatible printer or
order copies at your local print shop.

Note:

• You can print an image even if no print order has

been assigned.

Number of printouts

M

 indicator

Summary of Contents for Viewcam VL-NZ10S

Page 1: ...VIDEOKAMERA MED FLYTANDE KRISTALLSKÄRM LIQUID CRYSTAL DISPLAY CAMCORDER BRUKSANVISNING OPERATION MANUAL VL NZ8S VL NZ10S SVENSKA ENGLISH ...

Page 2: ...93 68 EEC Â Í Ù ÛÙ ÛÁ ıÙfi ÌÙ ÔÍÒflÌÂÙ È ÛÙÈÚ ÈÙfiÛÂÈÚ Ù Ì Ô Á È Ì ÙÁÚ EıÒ ÍfiÚ EÌ ÛÁÚ 89 336 EOK Í È 73 23 EOK Ú ÔÈ Í ÌÔÌÈÛÏÔfl ıÙÔfl ÛıÏ ÎÁÒ ËÁÍ Ì ÙÁÌ Ô Á fl 93 68 EOK Este equipamento obedece às exigências das directivas 89 336 CEE e 73 23 CEE na sua versão corrigida pela directiva 93 68 CEE Este aparato satisface las exigencias de las Directivas 89 336 CEE y 73 23 CEE modificadas por medio de la 93 6...

Page 3: ...nnecting it to either the AC adapter battery charger or battery pack The AC adapter battery charger incorporates the AUTO VOLTAGE AC 110 240 V 50 60 Hz function NOTE The LCD panel of this camcorder is a very high technology product with more than 120 000 thin film transistors giving you fine picture detail Occasionally a pixel may appear on the screen as a fixed point of blue green red or black Pl...

Page 4: ...ower cord to the AC power socket on the AC adapter battery charger and insert the AC plug into a power outlet The POWER indicator lights up 2 Align the mark on the battery pack with the mark on the charger 1 and guide the battery into the groove Pressing the battery 2 slide it in the direction of the arrow 3 until it locks into place The CHARGE indicator lights up The CHARGE indicator turns off wh...

Page 5: ...o place SAVE R E C Inserting a Card 1 Make sure that the Power switch is set to OFF 2 Slide the card slot cover release and open the card slot cover in the direction of the arrow 3 Insert a card into the slot as shown below and push it in as far as it will go 4 Close the card slot cover Note You can use an SD Memory Card commer cially available and a MultiMediaCard only supplied with VL NZ10 for s...

Page 6: ... to T 1 tele photo or W 2 wide angle side Tape Playback 1 Set the Media Selection switch to TAPE 2 Hold down the Lock button and set the Power switch to VCR 3 Press j or k on the Operation button to rewind or fast forward the tape to the desired point 4 Press m to begin playback To stop playback Press l Volume Control Push the Volume control to the L or side to increase 1 or decrease 2 the volume ...

Page 7: ... recorded on the card and returns to white when recording completes Card Playback 1 Set the Media Selection switch to CARD 2 Hold down the Lock button and set the Power switch to VCR The images recorded on the card are displayed in a thumbnail format 3 Press j k l or m on the Operation button to move the selection frame to the desired image 4 Press the MULTI button The selected image is displayed ...

Page 8: ...er PixLab Video Capture Software Lite Version CDSKA0059TA01 PC connecting cable QCNW 1914TAZZ Zoom microphone RMICC0107TAZZ 8 MB MultiMediaCard CDSKA0063TA01 y Shoulder strap UBNDS0029TAZZ DV cable 2 for VL NZ10 1 for VL NZ8 For VL NZ10 For VL NZ8 Parts with mark is not supplied with VL NZ8 Contact the nearest SHARP service centre or your dealer for purchasing specified parts Earphones connecting ...

Page 9: ...vi Optional Accessories Standard life battery pack BT L225 Extended life battery pack BT L445 ...

Page 10: ...ded image Avoid placing the camcorder in close proximity to lighting equipment The heat from incan descent lights may de form the camcorder or cause it to malfunction Always respect prohibitions or restrictions on the use of electronic equipment on commercial flights or in other sensitive ar eas Be aware of the temperature and humidity You can use your camcorder at 0 C to L40 C and at 30 to 80 rel...

Page 11: ...ure If dew forms the word DEW flashes on the screen and the power will automatically turn off in approximately 10 seconds 1If DEW flashes remove the cassette leave the cassette compartment open and wait for a few hours to allow the camcorder to acclimatise to the surrounding temperature 2To use the camcorder again turn on the power after waiting for a few hours Be sure that DEW has disappeared 3Do...

Page 12: ...clogged with dirt soon after cleaning this might be caused by a damaged tape In this case stop using that cassette immediately 1 Insert a cleaning tape into the camcorder 2 Set the camcorder to TAPE VCR mode The video head cleaning screen appears 3 Press the SET button to begin video head cleaning NOW CLEANING flashes during cleaning After about 20 seconds video head cleaning automatically finishe...

Page 13: ...ns Cap 18 Tips on Recording Positions 18 Camera Recording Selecting the Camcorder Mode 19 Easy Camera Recording on Tape in Full Auto Mode 20 Zooming 21 Auto Focus 21 Macro Shots 21 Remaining Recording Time Display 22 Remaining Battery Power Display 22 Playback Tape Playback 23 Using Earphones Commercially Available 23 Volume Control 24 Still 24 Video Search 24 Watching Playback on a TV 25 Using th...

Page 14: ...te Control Only supplied with VL NZ10 43 Playback Zoom with the Remote Control Only supplied with VL NZ10 44 Displaying the Date and Time of Recording 45 Gamma Playback 46 Multiple Strobe Playback 47 Copying an Image from Tape to Card 48 Playback Effects 49 Picture Effect Playback 50 Advanced Features Camera Recording Digital Picture Effects 51 Scene Menu Program AE 52 Manual Focus 53 Setting the ...

Page 15: ...matting a Card 70 Playback Card Playback 71 Delete Protection 72 Deleting Stored Images 73 Slide Show Playback 75 Copying an Image from Card to Tape 76 Print Order 77 Transferring Data on Card to Computer 79 Picture Backlight Adjustments 80 World Clock 81 Selecting Summer Time 83 Setting the Confirmation Sounds 83 Setting the Camcorder to Factory Presettings 84 Useful Information 85 Demonstration ...

Page 16: ...mes For details on the use of each part refer to the page number indicated in brackets Front view Lithium battery compartment door p 14 Accessory shoe p 29 Stereo microphone Zoom lens Cassette holder p 12 Cassette compartment door p 12 Cassette compartment door release p 12 ...

Page 17: ...ion References 2 Rear view PC connection jack p 65 DV terminal p 61 AVLS terminal pp 25 60 Media Selection switch TAPE CARD selection switch p 19 Operation button EarPHONES jack p 23 Jack cover pp 25 60 61 65 ...

Page 18: ...apter socket p 41 GAMMA BRIGHTER button pp 31 32 46 FADE button p 34 SET button p 26 Remote sensor p 42 Power Zoom Wide angle Telephoto control p 21 VOLume control p 24 STILL button pp 36 47 48 67 Power switch CAMERA VCR select switch p 19 Speaker Card slot cover p 13 MENU button p 26 DIS button p 37 MULTI button p 71 LCD monitor RECord START STOP button p 20 ...

Page 19: ...38 Self Recording To record the subject with higher quality audio See page 40 Selecting the 16 bit Audio Recording Mode To enlarge any part of the picture during playback See page 44 Playback Zoom with the Remote Control To brighten the dark portion of the playback images without changing the bright portion See page 46 Gamma Playback To focus on an off centred subject See page 53 Manual Focus To r...

Page 20: ...TURN MODE L C D S E T BA CK L I GHT L C D BR I GHT L C D C OL O UR RE T URN C L O C K S E T D I S P L A Y S UMR T I ME S E T T I NG A RE A 1 2 H 2 4 H RE TURN E F F E C T P L A Y B AC K P I C MULTI F RAME AUD I O DUB AUD I O P B MO T I ON RE T URN E F F E C T S E T OTH E RS OSD DE F AUL T S OUND REMO T E T I ME CODE T C OU T RE T URN C L O C K S E T D I S P L A Y RE TURN L C D S E T BA CK L I GHT ...

Page 21: ...8 9 0 1 0 0 0 0 2 2 P A GE 1 NORMA L P L A YB ACK E F F E C T P L A Y B AC K P I C S L I D E DE L E T E PRO T E C T SHOW P R I RE T URN ORDE R S E T CAMER A RE C MODE S E L F T I ME R RE C MO T I ON RE T URN GU I D E SNA P E F F DG T L Z OOM S E T OTH E RS OSD DE F AUL T F ORMAT SOUND DEMO L ANGUA GE RE T URN MODE E F F E C T P L A Y B AC K P I C S L I D E DE L E T E PRO T E C T SHOW P R I RE T UR...

Page 22: ...t depleted Replace it with a fully charged battery pack see page 10 Dew has formed inside the camcorder Wait a few hours for the dew to dry away see page viii About 10 seconds after this warning appears the camcorder automatically turns off The video heads are clogged and should be cleaned see page ix The fluorescent lamp behind the LCD monitor is close to the end of its service life Call your loc...

Page 23: ...ch is not compatible with this camcorder Format the card to use it with this camcorder see page 70 The card has not been formatted with this camcorder Format the card see page 70 The card is write protected see page 89 You are trying to delete a protected image Cancel the protection setting see page 72 The selected image cannot be read by this camcorder Format the card to use it with this camcorde...

Page 24: ...inu ous recording time Max continu ous playback time BT L445 approx 1hr 20min approx 2hr 20min approx 1hr 30min approx 1hr 30min approx 3hr approx 3hr Notes Charge the battery pack between 10 C and 30 C The battery pack may not charge properly at temperatures too low or too high The battery pack and charger become warm during charging This is not a malfunction Using the zoom see page 21 and other ...

Page 25: ...DING OR PLAYBACK AND TURN THE POWER OFF Removing the battery pack while shooting or during playback may damage the tape by causing it to wrap around the video head drum or destroy the card rendering it unreadable and unwritable Remove the battery pack from the camcorder if you will not use the camcorder for a long period of time Make sure that the battery pack is firmly attached during operation I...

Page 26: ...is supplied power Note When using the AC adapter battery charger to power the camcorder it cannot be used to charge the battery pack Removing the DC cable from the camcorder Make sure that the Power switch is set to OFF Rotate the monitor section of the camcorder 1 then press the power source release 2 Slide the battery pack in the direction of the arrow and take it out 3 Cautions BEFORE REMOVING ...

Page 27: ...tte compartment door while the cassette holder is extending or retracting Be careful not to get your fingers caught in the cassette holder Do not apply force to the cassette holder except when pressing the W mark to close it Do not tilt the camcorder or hold it upside down when you are inserting or removing a cassette It may damage the tape Remove the cassette if you will not use the camcorder for...

Page 28: ...s preformatted for immediate use See pages 88 and 89 for more information on the cards intended for use with this camcorder Caution Do not remove the card from the camcorder while recording data on the card S indicator flashes during recording This may delete the recorded image or damage the card Inserting a Card 1 Make sure that the Power switch is set to OFF 2 Slide the card slot cover release a...

Page 29: ...TION Danger of explosion if battery is incorrectly replaced Replace only with the same or equivalent type CR2025 recom mended by the equipment manufacturer X KEEP THIS BATTERY AWAY FROM CHILDREN IF SWALLOWED CONSULT A PHYSICIAN IMMEDIATELY FOR EMERGENCY TREATMENT Z BATTERY MAY EXPLODE IF MIS USED OR INSTALLED WITH POLARITY REVERSED DO NOT RECHARGE DISAS SEMBLE OR DISPOSE OF IN FIRE Do not short ci...

Page 30: ... 3 Press l or m to select LANGUAGE SPRACHE or LANGUE then press the SET button The language selection screen appears 4 Press l or m to select the desired language then press the SET button The menu screen displays in the language selected 5 Press the MENU button to turn off the menu screen ENGL I SH L ANGUAGE DEUTSCH F RANÇ A I S AU T O E NGL I SH L ANGUAGE DEUTSCH F RANÇ A I S OTH E RS OSD DE F A...

Page 31: ...ETTING then press the SET button 6 Press l or m to select 2 day then press the SET button 7 Press l or m to select 6 month then press the SET button 8 Press l or m to select 2002 year then press the SET button 9 Press l or m to select 10 hour then press the SET button 10 Press l or m to select 30 minute then press the SET button The internal clock now starts operating 11 Press the MENU button to t...

Page 32: ... still be attached on top of the lens hood Filters and other accessories cannot be attached on the top of the lens hood C L O C K S E T D I S P L A Y SUMR T I ME S E T T I NG A RE A 1 2 H 2 4 H RE TURN 1 2 H 2 4 H 12H 2 1 H 24H Attaching the Straps Attach the hand strap or the shoulder strap to the strap loop as shown below When using the shoulder strap Only supplied with VL NZ10 Adjust the length...

Page 33: ... Place your left thumb on the thumb rest on the left side of the screen Basic posture Shooting from a high angle Shooting from a low angle Note Take care not to touch the microphone with your fingers during recording It will cause noise on the audio track Tabs When recording hang the hook of the lens cap on the hand strap or shoulder strap to keep the cap out of the way Note Always attach the lens...

Page 34: ...ERA mode For recording still images on cards 1 Set the Media Selection switch to CARD 2 Hold down the Lock button and set the Power switch to CAMERA TAPE CAMERA mode For recording motion and still images on tapes 1 Set the Media Selection switch to TAPE 2 Hold down the Lock button and set the Power switch to CAMERA CARD VCR mode For playing back still images recorded on cards 1 Set the Media Selec...

Page 35: ...er is consumed in Recording Standby mode Turn off the power if you will not be recording again soon If the camcorder remains in Recording Standby mode for more than 5 minutes in TAPE CAMERA mode the power will automatically turn off to save battery power and to protect the tape from being damaged To resume recording set the Power switch to OFF and then back to CAMERA The camcorder will make a conf...

Page 36: ...the centre of the scene the focus area will expand and the subject nearest the centre will be focused on If no subject is displayed the camcorder will automatically zoom out until a subject comes into the frame Auto Focus may not work in the situations described on page 53 In these situations use the manual focus function Macro Shots Available modes TAPE CAMERA CARD CAMERA This camcorder lets you ...

Page 37: ...low a warning indicator appears Replace the battery pack Notes The remaining battery power indicator appears when the OSD menu item is set to ON Use the remaining battery power indicator only as an approximate indication The remaining battery power indicator may change to either a higher or lower level if you set the Power switch to OFF and then back to CAMERA or VCR In cold environments the red r...

Page 38: ...t erased VL NZ10 only see page 61 To stop playback Press l Basic Operations Playback Using Earphones Commercially available Available modes TAPE VCR TAPE CAMERA You can monitor the sound via stereo ear phones commercially available during playback or recording Stereo earphones with a 3 5 mm diameter plug can be used with this camcorder by using the supplied earphones connecting cable Connect the p...

Page 39: ...tes Video Search Available mode TAPE VCR The video search function makes it easy to search for a desired scene on the tape VOLUME Searching for a Scene Near the Current Tape Position 1 During playback in TAPE VCR mode press k or j on the Operation button The playback picture fast forwards or reverses 2 When you find the scene press m to return to normal playback Searching for a Scene Far from the ...

Page 40: ...AUSE STILL Removing the audio video S video cable from the camcorder Press the release tabs on the sides of the connector then remove the plug from the terminal Caution Do not forcibly remove the connector without pressing the release tabs This may damage the cable or the camcorder About the S video socket S video sockets are used to separately pass the chroma colour and luminance bright ness comp...

Page 41: ...tem press l or m to select RETURN and press the SET button then perform steps 4 to 6 CAMER A PHO T O SNA P SNA P E F F DG T L Z OOM T A P E S PE ED RE C 1 6 9 MO T I ON RE TURN GU I DE S E T OF F 4 0 3 0 0 0 4 DGTL ZOOM E F F E C T MA NUAL P I C S C E NE MENU F UL L AU T O MA N F OC US WH I T E E X POSURE SHU T S P E E D QK RE T URN RE T URN BA L S E T CAMER A PHO T O SNA P SNA P E F F DG T L Z OO...

Page 42: ...nu screen CAMER A PHO T O SNA P SNA P E F F DG T L Z OOM T A P E S PE ED RE C 1 6 9 MO T I ON RE TURN GU I DE S E T OF F ON ON REC GU I DE Selecting the recording guide Press l or m on the Operation button To turn off the recording guide Select OFF in step 4 above then press the SET button Notes When using manual focus you cannot change the recording guide The recording guide appears when the OSD ...

Page 43: ...hen higher digital zoom settings are used 1 In TAPE CAMERA or CARD CAMERA mode press the MENU button until the menu screen appears 2 Press l or m on the operation button to select Y then press the SET button 3 Press l or m to select DGTL ZOOM then press the SET button 4 Press l or m to select 40 or 300 then press the SET button 5 Press the MENU button to turn off the menu screen CAMER A PHO T O SN...

Page 44: ...nd slide it in the direction of the arrow until it locks into place 2 Turn the screw in the direction of the arrow to secure the microphone Selecting Zoom Microphone Mode Select a Zoom Microphone mode when the zoom microphone is mounted Types of Zoom Microphone modes AUTO The camcorder automatically selects the optimum sound according to the magnification of the zoom lens When the zoom lens is at ...

Page 45: ...il the menu screen appears 2 Press l or m on the operation button to select U then press the SET button 3 Press l or m to select WIND then press the SET button 4 Press l or m to select ON then press the SET button 5 Press the MENU button to turn off the menu screen To cancel Windbreak Select OFF in step 4 above Note Keep the windbreak function off during normal recording If left on the recorded au...

Page 46: ...naffected To obtain a brighter picture Press the GAMMA BRIGHTER button again The x indicator appears Note When the x indicator is displayed the background will become slightly brighter AU T O 3 3 3 0 min AU T O 0 min AU T O 3 0 min AU T O 0 min GAMMA GAMMA GAMMA AU T O 3 3 0 min GAMMA AU T O 0 min To cancel Gamma Brightness Compen sation Press the GAMMA BRIGHTER button until GAMMA disappears In TA...

Page 47: ... BRIGHTER button until GAMMA disappears Notes You may experience some picture noise in Gain up mode which increases when the e displays When the e indicator displays you may get a shadow image behind a subject that is moving around a lot Fine brightness adjustments are possible when using manual exposure see page 56 Gain up will cancel if you aim the camcorder in a bright location AU T O 3 0 min A...

Page 48: ...quick return function while SEARCH is flashing press the SET button twice Quick return will not work if you remove the cassette and reload it after recording or if nothing has been recorded since loading E F F E C T MA NUAL P I C S C E NE MENU F UL L AU T O MA N F OC US WH I T E E X POSURE SHU T S P E E D QK RE T URN RE T URN BA L S E T S T AR T S T OP QK RETURN SEARCH Edit Search Available mode T...

Page 49: ... button at the point where you wish to stop recording The image and sound fade out as the picture gradually turns white The camcorder then returns to Recording Standby mode To cancel Fade mode Press the FADE button again in Recording Standby mode To use Fade Out only 1 During camera recording in TAPE CAMERA mode press the FADE button to display FADE 2 Press the REC START STOP button at the point w...

Page 50: ...ME S 1 6 F RAME S Still Recording Effects Available modes TAPE CAMERA CARD CAMERA You can select one of these still recording effects to record the still images with an effect EFF SNAP 9 F RAME S Selecting a still recording effect 1 In TAPE CAMERA or CARD CAMERA mode press the MENU button until the menu screen appears 2 Press l or m on the operation button to select Y then press the SET button 3 P...

Page 51: ...corder is in Recording Standby mode In STILL mode press the STILL button fully CAMER A PHO T O SNA P SNA P E F F DG T L Z OOM T A P E S PE ED RE C 1 6 9 MO T I ON RE TURN GU I DE S E T ON OF F OFF MO T I ON Recording a Still Life Available modes TAPE CAMERA CARD CAMERA You can record a clearer still life image with this camcorder The example screens shown are for TAPE CAMERA mode 1 In TAPE CAMERA ...

Page 52: ...n The picture is displayed with the top and bottom portions masked To return to normal screen Select OFF in step 4 above Note When still recording with 9 FRAMES or 16 FRAMES effect each frame will display in normal not wide screen Digital Image Stabilization DIS Available modes TAPE CAMERA CARD CAMERA The digital image stabilization DIS function allows you to stabilize the image by electroni cally...

Page 53: ...the monitor section to the self recording position during recording or playback For recording in Self Recording mode be sure to rotate the monitor section NOT the lens section If you hold the camcorder upside down with the lens at the bottom the subject will be recorded upside down More Information on Self Recording Use the remote control only supplied with VL NZ10 to begin stop recording The scre...

Page 54: ...eturn to SP mode Select SP in step 4 above CAMER A PHO T O SNA P SNA P E F F DG T L Z OOM T A P E S PE ED RE C 1 6 9 MO T I ON RE TURN GU I DE S E T S P L P LP TAPE SPEED L P AU T O 4 5 min Notes on the use of LP mode To record in LP mode be sure to use a Mini DV cassette labelled for use with LP mode Frozen images mosaic pattern picture noise audio interruptions or audio loss may occur in the fol...

Page 55: ...ing Audio Dubbing with 16 bit audio recordings both the dubbed and original sounds will be recorded in mono see page 62 Turning off the On screen Indicators Available modes All modes You can turn the on screen indicators on and off as you like OTH E RS OSD DE F AUL T S OUND T I ME CODE T C OU T DEMO L A NGUAGE RE TURN MODE ON OF F OFF OSD 1 Press the MENU button until the menu screen appears 2 Pre...

Page 56: ...tripod to tripod socket Note You cannot use the supplied tripod adapter if the alignment pin is not retractable Attaching the Supplied Grip Handle Attach the supplied grip handle when you want to steady the camcorder with your right hand during recording Align the grip handle with the tripod adapter socket on the bottom of the camcorder then rotate as shown below Caution Do not pick up the camcord...

Page 57: ...Turning on the Remote Control Mode Available modes TAPE VCR CARD VCR 1 In TAPE VCR or CARD VCR mode press the MENU button until the menu screen appears 2 Press l or m on the operation button to select I then press the SET button 3 Press l or m to select REMOTE then press the SET button 4 Press l or m to select ON then press the SET button 5 Press the MENU button to turn off the menu screen REMOTE ...

Page 58: ... in TAPE VCR mode press the j button Slow The slow function allows you to play back images in slow motion During playback in TAPE VCR mode press the SLOW button f To view slow playback in reverse press the j button To return to normal playback press the PLAY button t Note To protect the tape the camcorder automatically returns to normal playback if it is left in Slow mode for more than 10 minutes ...

Page 59: ...ns shown are for TAPE VCR mode 1 During playback in TAPE VCR or CARD VCR mode press the ZOOM T button to zoom in 2 Press the Shift q w a or s button to shift the displayed image To cancel Playback Zoom Press the ZOOM W button which zooms out to the widest angle Notes Use of Playback Zoom may cause a reduction in picture quality for still images Images in Playback Zoom mode cannot be transferred vi...

Page 60: ...E then press the SET button 6 Press the MENU button to turn off the menu screen The date or the date and time is displayed C L O C K S E T D I S P L A Y SUMR T I ME S E T T I NG A RE A 1 2 H 2 4 H RE TURN OF F DA T E DA T E T I ME D I SPL AY DATE T IME AU T O 3 0 min 2 0 0 2 6 0 3 0 1 2 Notes The date or date and time appears when the OSD menu item is set to ON Before recording make sure that the ...

Page 61: ...During playback in TAPE VCR mode press the GAMMA BRIGHTER button once GAMMA1 appears and the picture becomes brighter To obtain a brighter picture press the GAMMA BRIGHTER button again GAMMA2 appears AUDIO AUDIO 2 1 2 1 GAMMA1 GAMMA1 GAMMA 2 GAMMA 2 AUDIO AUDIO 2 1 2 1 To cancel Gamma Playback Press the GAMMA BRIGHTER button until GAMMA1 and GAMMA2 disappear Note Gamma Playback has no effect durin...

Page 62: ... 5 Press l or m to select 9 FRAMES 9 frame picture or 16 FRAMES 16 frame picture then press the SET button FRAMES 1 6 MULTI FRAME E F F E C T P L A Y B AC K P I C MULTI F RAME AUD I O DUB AUD I O P B E F F E C T S E T OF F F RAMES F RAMES 9 1 6 MO T I ON RE TURN 6 Press the MENU button to turn off the menu screen then begin playback 7 Press the STILL button fully at the point where you want to beg...

Page 63: ...re 16 FRAMES 16 frame picture 4 Hold the STILL button half way down at the point where the desired image appears A still picture of the image is displayed Note To cancel the still picture release the STILL button OFF MULTI FRAME AUDIO AUDIO 2 1 2 1 CARD 5 Press the STILL button fully to copy the image to the card The S indicator flashes red while the image is copied Note To capture clearer still i...

Page 64: ...layback effects cannot be used with Playback Zoom or Picture Effect Playback Playback effects will cancel if the power source is interrupted or the Power switch is set to OFF If you record the still images less than six seconds or if you record the still images on the tape from CARD in CARD VCR mode the Playback Effect will not work correctly E F F E C T P L A Y B AC K P I C MULTI F RAME AUD I O D...

Page 65: ...onal computer You cannot use Picture Effect Playback with Multiple Strobe Playback or Slide Show Playback Types of Picture Effects B W The picture is displayed in black and white SEPIA The picture is displayed in sepia colour similar to that of an old photograph SOLARI The contrast of the subject is enhanced creating a unique artistic image NEGA The blacks and whites of the image are reversed and ...

Page 66: ... AU T O MA N F OC US WH I T E E X POSURE SHU T S P E E D QK RE T URN RE T URN BA L S E T OF F B W S E P I A SOL AR I B L U E NE G A B W P I C EFFECT Advanced Features Camera Recording Types of Digital Picture Effects B W To record in black and white SEPIA To record in sepia colour similar to that of an old photograph SOLARI To record with enhanced contrast creating a unique artistic image NEGA To ...

Page 67: ...splays To cancel the scene setting Select OFF in step 4 above Note Scene settings cannot be used when displaying a still image E F F E C T MA NUAL P I C S C E NE MENU F UL L AU T O MA N F OC US WH I T E E X POSURE SHU T S P E E D QK RE T URN RE T URN BA L S E T OF F SUNL I GH T SPORT DUS K PAR T Y SPORT SCENE MENU SPORT Types of Scene Settings SPORT When you want to record a fast moving subject SU...

Page 68: ...press the SET button to display the focus setting screen 5 Adjust the Power Zoom control to frame the subject as you desire E F F E C T MA NUAL P I C S C E NE MENU F UL L AU T O MA N F OC US WH I T E E X POSURE SHU T S P E E D QK RE T URN RE T URN BA L S E T OF F AU T O MANUA L Fast speed shutter being used under fluorescent lighting Subject is too dark Lack of contrast e g snow scene Fast moving ...

Page 69: ...g screen is not displayed Setting the Camcorder to Full Auto Mode Available modes TAPE CAMERA CARD CAMERA You can set all manual settings including manual focus white balance manual exposure and manual shutter speed to Full Auto mode in one operation 1 In TAPE CAMERA or CARD CAMERA mode press the MENU button until the menu screen appears 2 Press l or m on the operation button to select T then pres...

Page 70: ...repeat step 3 4 Press the MENU button to turn off the menu screen To cancel White Balance setting After performing step 1 to 3 in Selecting a White Balance setting press l or m to select AUTO then press the SET button To return to Full Auto mode Set the camcorder to Full Auto mode see page 54 Note White Balance setting will cancel if a scene setting is selected thereafter Selecting a White Balance...

Page 71: ... scene setting is selected thereafter Manual Exposure Available modes TAPE CAMERA CARD CAMERA The camcorder is preset to Auto Exposure mode which automatically selects the optimal aperture However when there is too much contrast in brightness between the subject and background you may not be able to record a clear image In this case use the manual exposure function to correct the exposure level Ba...

Page 72: ...e Set the camcorder to Full Auto mode see page 54 Setting the Shutter Speed Available modes TAPE CAMERA CARD CAMERA The shutter speed is preset to auto mode which automatically selects the optimal shutter speed for the ambient light However depend ing on the subject or situation you may want to set the shutter speed manually to create a high quality picture 1 In TAPE CAMERA or CARD CAMERA mode pre...

Page 73: ...tuation Recording sports action in bright daylight Recording in bright daylight at a ski resort Recording outdoor sports on a partially cloudy day Recording an outside scene through a car window when you want to minimize blur caused by the camera shaking When you want to reduce the light by half Use as a substitute for an ND2 filter Recording in a poorly illuminated location When you want to creat...

Page 74: ...OF F ON Advanced Features Playback 5 Press the MENU button to turn off the menu screen The time code appears To turn off the time code Select DISP OFF in step 4 above Notes The time code appears when the OSD menu item is set to ON When the tape reaches an unrecorded section the time code returns to zero TC0 00 00 Once recorded the time code cannot be changed You can also press the T C Time Code bu...

Page 75: ...the VCR to resume recording when the source tape reaches the end of the sequence to be cut POWER TV VCR SET UP CHANNEL REC PLAY STOP EJECT PAUSE STILL To stop editing Press l on the camcorder and press the Stop button on the VCR Notes Some of the transitions between edited sequences may be slightly off There may be picture noise during video search or still playback This does not imply a defect in...

Page 76: ...sume recording when the source tape reaches the end of the sequence to be cut Notes Make sure that the video equipment from which you are recording can output dubbing signals via the DV terminal If the video equipment is not set to playback mode or the DV cable is not properly connected NO SIGNAL is displayed on the camcorder screen If no picture or sound is input to the camcorder even if the DV c...

Page 77: ...audio recording The dubbed audio is recorded on Audio 2 Audio 1 Original stereo left and right sound Audio 2 Dubbed stereo left and right sound 16 bit audio recording The dubbed audio is recorded on Audio 2 over the original right sound Both dubbed and original sounds are mono Audio 1 Original left sound Audio 2 Dubbed sound Note You can select the 12 bit or 16 bit audio recording mode by performi...

Page 78: ...O DUB S T O P S T A R T AUDIO AUDIO 2 1 2 1 MO T I ON RE TURN To cancel audio dubbing Press the MENU button The audio dubbing screen disappears If you wish to change the dubbed audio or dub additional scenes 1 Press the MENU button to turn off the audio dubbing screen 2 Repeat steps 1 to 6 above Notes It is recommended that you use Audio Dubbing only with recordings made with this camcorder Use of...

Page 79: ...the recording mode 12 or 16 bit used for the recording being played back A white display indicates 12 bit recording mode while a green indicates 16 bit E F F E C T P L A Y B AC K P I C MULTI F RAME AUD I O DUB AUD I O P B E F F E C T S E T 1 1 2 2 MO T I ON RE TURN AUD I O 1 2 Audio 1 2 12 bit recording in stereo Audio 1 and Audio 2 channels 16 bit recording in stereo left and right channels Audio...

Page 80: ... still images on a card to a PC see page 79 To edit still images transferred with the Video Capture Software use a commercially available image editing software System Requirements IBM PC AT or compatible with Intelb Pentiumb 133 MHz or faster processor Microsoft Windowsb 95B Windowsb 95C Windowsb 98 Windowsb 98 Second Edition Windowsb 2000 Professional or Windowsb Me operating system 32 MB or mor...

Page 81: ...manual of the Video Capture Software If the Adobe Acrobat Reader is not installed on your PC perform steps below to install one 1 Insert the CD ROM of the Video Capture Software into the CD ROM drive 2 Double click on the My Computer icon 3 Double click on the CD ROM drive icon 4 Double click on the Acroread folder 5 Double click on the desired language version Opening the PDF Manual 1 Insert the ...

Page 82: ... above the camcorder does not lock the focus 8 Press the STILL button fully to begin recording The S indicator flashes red while data is being recorded on the card and returns to white when recording completes To record another image release the STILL button and make sure the picture is not frozen in the monitor then perform steps 7 and 8 Notes Recording under insufficient lighting may result in b...

Page 83: ...of data for that recorded image Since the amount of data differs depending on factors such as image detail sometimes the picture quality indicator displayed during playback may not match the picture quality setting used during recording Note The number of recordable images differs depending on the combination of picture quality settings used and the images shot Approx number of images 100 180 60 P...

Page 84: ...timer operating indicator flashes while the timer counts down The shutter automatically releases after 10 seconds and a still image of the subject is recorded Notes When recording with the self timer stabilize the camcorder in the horizontal plane by attaching it to a tripod etc To cancel the self timer press the STILL button fully again in step 4 above Self timer mode cancels after recording one ...

Page 85: ... AC outlet for the power supply 1 Insert a card to be formatted into the camcorder 2 In CARD CAMERA mode press the MENU button until the menu screen appears 3 Press l or m on the operation button to select I then press the SET button 4 Press l or m to select FORMAT then press the SET button To cancel formatting press l or m to select NO then press the SET button 5 Press l or m to select YES then p...

Page 86: ...0 0 0 0 0 1 NORMA L 0 1 1 CARD Available Operations during Full screen Display You can display the full screen picture of the previous or next image by pressing j or k When holding down j or k you can search through the images on the card The search can be very fast so it is recommended that you set the OSD menu item to ON to display the image number To return to a thumbnail of the images press th...

Page 87: ... and 5 6 Press the MENU button to display a thumbnail of images E F F E C T P L A Y B AC K P I C S L I D E DE L E T E PRO T E C T SHOW P R I RE T URN ORDE R S E T E X E CU T E 1 4 2 5 3 6 1 0 0 0 0 0 2 1 P A GE 1 NORMA L P RO T E C T 1 4 2 5 3 6 3 0 0 0 0 0 2 1 P A GE 1 NORMA L PROT E C T To cancel the protection setting 1 Select the image for delete protection cancellation in step 4 above 2 Press...

Page 88: ... be deleted 6 Press the SET button to set the image To cancel deletion press l or m to select NO then press the SET button 7 Press l or m to select YES then press the SET button to delete the image If you want to delete another image repeat steps 5 to 7 8 Press the MENU button to display a thumbnail of images Note The protected images cannot be deleted Cancel the protection setting to delete the i...

Page 89: ... YES then press the SET button to delete all the images To cancel deletion press l or m to select NO then press the SET button Notes The protected images cannot be deleted Cancel the protection setting to delete the image see page 72 If a print order is assigned to delete protected images and you perform the procedure above the print order will cancel the protection setting will not cancel It may ...

Page 90: ... select SLIDE SHOW then press the SET button Beginning from the image selected in step 2 the recorded images will display in full screen one after another in order of recording After playing back all the images on the card once Slide Show Playback automatically stops 6 Press the MENU button to turn off the menu screen then press the MULTI button to display a thumbnail of images 1 4 2 5 3 6 3 0 0 0...

Page 91: ...VCR mode 4 Press j k l or m to select the desired image then press the MULTI button The selected image is displayed in full screen 5 Press the REC START STOP button The camcorder enters Recording Standby mode 6 Press l or m to select REC then press the SET button to begin copying the image to the tape 7 Press the SET button to stop copying 8 Press l or m to select CANCEL then press the SET button ...

Page 92: ...S E T RE T URN 1 4 2 5 3 6 1 0 0 0 0 0 2 1 P A GE 1 NORMA L PR I NT Assigning Print Order to an Image 1 In CARD VCR mode press the MENU button until the menu screen appears 2 Press l or m on the operation button to select S then press the SET button 3 Press l or m to select PRI ORDER then press the SET button 4 Press l or m to select PRI SELECT then press the SET button to display a thumbnail of t...

Page 93: ... to 3 in Assigning Print Order to an Image 2 Press l or m to select PRI NONE then press the SET button to cancel the print order for all images The M indicators are turned off 1 4 2 5 3 6 3 0 0 0 0 0 2 1 P A GE 1 0 NORMA L P R I NT P 1 4 2 5 3 6 3 0 0 0 0 0 2 1 P A GE 1 NORMA L P R I NT E F F E C T P L A Y B AC K P I C S L I D E DE L E T E PRO T E C T SHOW P R I RE T URN ORDE R P R I S E L E C T P...

Page 94: ...ly Available Notes For details see the operation manuals of the computer and PC card adapter If you copy any data incompatible with this camcorder to the card the camcorder will not be able to recognize it DCIM 100SHARP DVC00001 JPG DVC00002 JPG Image Folders and File Names Still images recorded using the camcorder are stored on a card as shown below Still image To PC card slot Folder of still ima...

Page 95: ...the camcorder in CAMERA modes or press any button other than operation button and Volume control in VCR modes The example screens shown are for TAPE CAMERA mode Adjusting the Picture 1 Press the MENU button until the menu screen appears 2 Press l or m on the operation button to select O then press the SET button 3 Press l or m to select LCD BRIGHT or LCD COLOUR then press the SET button 4 Press l ...

Page 96: ...n the operation button to select P then press the SET button 3 Press l or m to select AREA then press the SET button 4 Press l or m to select 1 LONDON then press the SET button The camcorder is now set to London time 5 Press the MENU button to turn off the menu screen Time Zone Chart HAWAII CHICAGO DENVER NEW YORK L A CARACAS FN ISL RIO ANCHRGE SAMOA 150 LONDON MOSCOW PARIS AZORES CAIRO DUBAI KARA...

Page 97: ...nesia Jakarta Thailand Vietnam Australia Perth China Hong Kong Indonesia Borneo Bali Malaysia Philippines Singapore Taiwan Japan Korea Australia Sydney New Caledonia Fiji New Zealand Western Samoa U S A Hawaii Tahiti HST Hawaii Standard Time U S A Alaska AST Alaska Standard Time U S A Los Angeles San Francisco PST Pacific Standard Time U S A Denver MST Mountain Standard Time Mexico Mexico City U S...

Page 98: ...on Sounds Available modes All modes A confirmation sound is made when you turn on or off the Power switch press the REC START STOP button or perform other desig nated operations Use the procedure below to change the type of sound or to turn off the confirmation sounds altogether OTH E RS OSD DE F AUL T S OUND T I ME CODE T C OU T DEMO L A NGUAGE RE TURN MODE CH I ME B E E P OF F BEEP SOUND Types o...

Page 99: ...or m to select DEFAULT then press the SET button 4 Press l or m to select YES then press the SET button To cancel press l or m to select NO then press the SET button 5 Press the MENU button to turn off the menu screen Note Even when you perform the steps above the on screen display language setting and clock setting maintain the memory OTH E RS OSD DE F AUL T S OUND T I ME CODE T C OU T DEMO L A N...

Page 100: ...atch during playback Use a wide angle setting for fast moving subjects Note It may take longer to focus when zooming and panning are used frequently Lighting For clear good quality recording 500 to 100 000 lux is needed Recording is possible with less light but the picture quality may suffer Adequate lighting is also essential for correct white balance Note The figures in the chart are approximati...

Page 101: ...ni DV cassette DV cassette 8 mm cassette VHS cassette Beta cassette Note This camcorder reproduces the highest picture quality when used with an ME tape It is recommended you use an ME tape for high quality recording and playback 8 mm VHS and Beta cassettes cannot be used for playback or recording with this camcorder SD Memory Card and MultiMediaCard SD Memory card and MultiMediaCard are compact r...

Page 102: ...d damage the tape Do not place the Mini DV cassette in direct sunlight near strong heat sources or in areas with excessive steam Store the Mini DV cassette in its case and stand it in an upright position If the tape is not properly wound rewind the tape Do not drop the Mini DV cassette or subject it to excessive shocks To protect recordings against acciden tal erasure Slide the protect tab on the ...

Page 103: ...ent Locations subject to electrical noise or powerful magnetic fields Data on the card may be destroyed erased Locations exposed to direct sunlight Locations subject to high temperature or high humidity Locations where dust gathers in large amounts or blows through the air Corrosive environments Sunlit or enclosed spaces and other such locations subject to high temperature Watch out for condensati...

Page 104: ... the write protect switch to LOCK Set the switch to the unlocked side when you want to record or edit the card again Use an oil based felt tipped pen to write in the memo space Do not use a pencil or ballpoint pen as these may damage the card or destroy the data on the card Do not remove the card or turn off the power of the camcorder and peripheral equipment while data is being read or written Al...

Page 105: ...h a new battery pack If the terminals of the battery pack are dirty wipe the terminals with a soft dry cloth Use To conserve battery power be sure to turn off the camcorder power when not in use Battery consumption may vary depending on the condition of use Recording with many starts and stops frequent zooming and recording in low temperatures will shorten actual recording times Use of a weak batt...

Page 106: ...signal standards and electrical voltages and frequencies vary substantially from country to country When you are abroad check the sections below before using the AC adapter battery charger or connecting the camcorder to a TV AC Adapter Battery Charger Supplied Accessory The supplied AC adapter battery charger is compatible with 50 Hz and 60 Hz electrical systems in the range of 110 V to 240 V AC T...

Page 107: ...or m to select OFF then press the SET button 5 Press the MENU button to turn off the menu screen Note The demonstration will pause if you press the MENU button If you leave it for 60 seconds or turn the power off temporarily and then set the Power switch to CAMERA the demonstration will begin again OFF DEMO MODE Watching the Demonstration 1 Remove the Mini DV cassette from the camcorder see page 1...

Page 108: ...p 21 Focus manually p 53 Direct lens to some subject or set zoom to widest angle before shooting p 21 Set DEMO MODE menu item to OFF p 92 Select video input channel or TV channel properly p 25 Connect audio video S video cable properly p 25 Connect DV cable properly p 61 Possible cause Power source is not properly con nected Battery pack is not charged Dew in camcorder Safety function is in effect...

Page 109: ...te protected Power source is not properly con nected Battery pack is not charged Camcorder is recording Backlight has been turned off Fluorescent lamp has burned out Inappropriate picture adjustments AC adapter or battery pack may have malfunctioned Audio video S video cable is not properly connected REMOTE menu item is set to OFF Remote control battery has run down Remote control used beyond oper...

Page 110: ...e Recording Medium SD Memory Card MultiMediaCard Power Requirement DC 7 4 V Power Consumption 4 5 W during camera recording in Full Auto mode with zoom motor off and backlight in normal mode Operating Temperature 0 C to L40 C Operating Humidity 30 to 80 Storage Temperature 20 C to L60 C Dimensions approx 136 1 mm W K 86 3 mm H K 58 6 mm D Weight approx 455 g without battery pack lithium battery vi...

Page 111: ...Tryckt i Japan Printed in Japan TINSL0297TAZZ 01P09 JKG SHARP CORPORATION ...

Reviews: