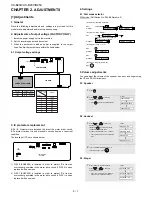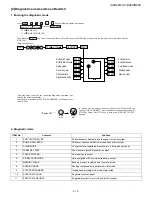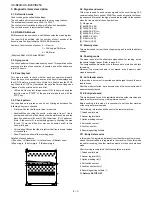
background image


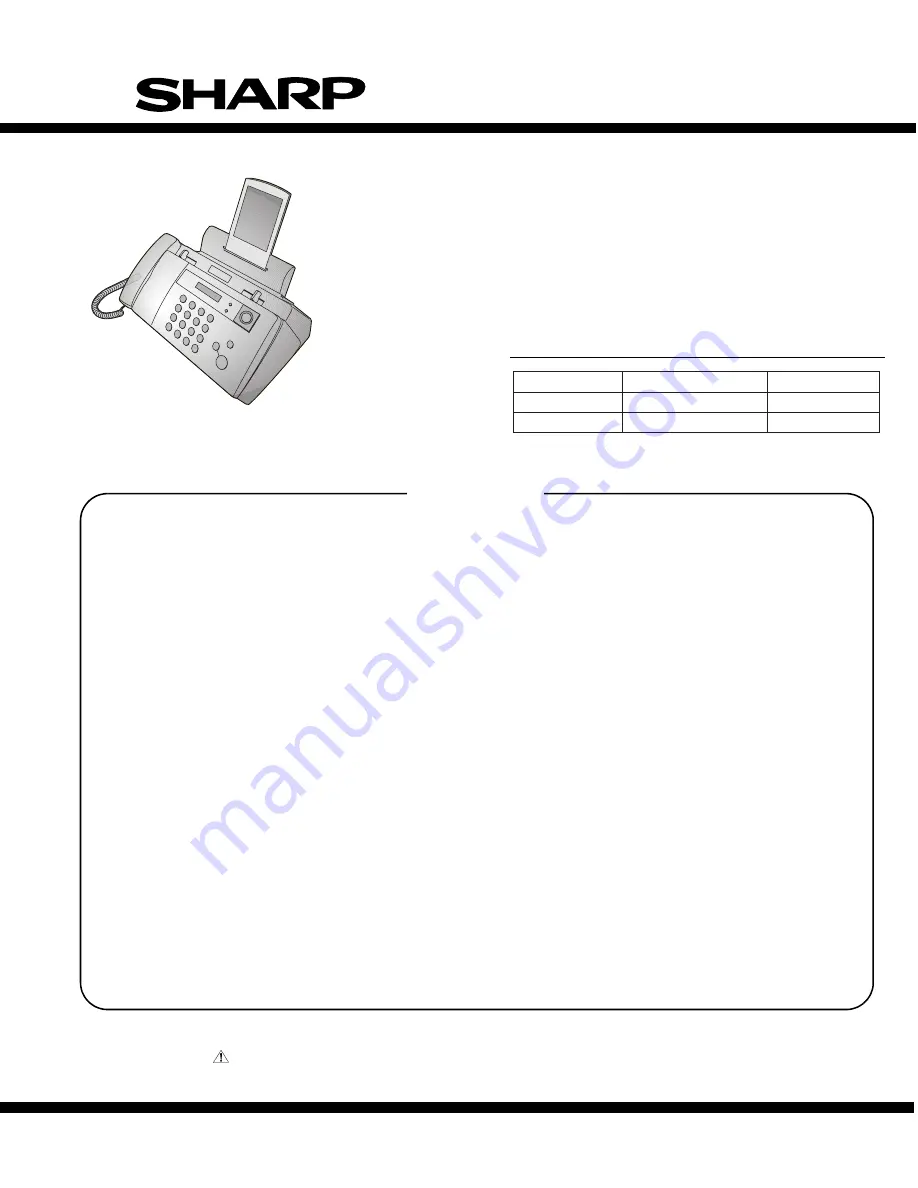
SERVICE MANUAL

MODEL

SELECTION CODE DESTINATION

UX-B20

U

U.S.A.

UX-B20/B25

C

Canada

UX-B20U/UX-B20C/B25C

No. 00ZUXB20U/SME

FACSIMILE

UX-B20
UX-B25

MODEL

SHARP CORPORATION

CONTENTS

Parts marked with "

" are important for maintaining the safety of the set. Be sure to replace these parts with specified ones for

maintaining the safety and performance of the set.

This document has been published to be used
for after sales service only.
The contents are subject to change without notice.

CHAPTER 1. GENERAL DESCRIPTION

[1] Specifications ................................................. 1-1
[2] Operation 

panel.............................................. 1-2

[3] Transmittable 

documents ............................... 1-3

[4] Installation ...................................................... 1-4
[5]  Quick setup guide ........................................ 1-10
[6]  Quick reference guide .................................. 1-11

CHAPTER 2. ADJUSTMENTS

[1] Adjustments ................................................... 2-1
[2]  Diagnostics and service soft switch ............... 2-2
[3] Troubleshooting ........................................... 2-23
[4]  Error code table............................................ 2-24

CHAPTER 3. MECHANISM BLOCKS

[1] General 

description ........................................ 3-1

[2]  Ink jet printer .................................................. 3-3
[3]  Disassembly and assembly procedures......... 3-6

CHAPTER 4. DIAGRAMS

[1] Block 

diagram ................................................ 4-1

[2] Wiring 

diagram ............................................... 4-2

[3] Point-to-point 

diagram.................................... 4-3

CHAPTER 5. CIRCUIT DESCRIPTION

[1] Circuit 

description........................................... 5-1

[2]  Circuit description of control PWB  ................5-2
[3]  Circuit description of LIU PWB ....................5-15
[4]  Circuit description of power supply PWB......5-17
[5]  Circuit description of CIS unit ......................5-17

CHAPTER 6. CIRCUIT SCHEMATICS AND PARTS
LAYOUT

[1]  Control PWB circuit .......................................6-1
[2]  LIU PWB circuit ........................................... 6-11
[3]  Power Supply PWB circuit...........................6-16
[4]  Operation Panel PWB circuit .......................6-18
[5]  Ink PWB circuit ............................................6-21

CHAPTER 7. OPERATION FLOWCHART

[1] Protocol .........................................................7-1
[2] Power 

on 

sequence.......................................7-2

CHAPTER 8. OTHER

[1] Service 

tools ..................................................8-1

[2]  Changing the record paper size ....................8-4
[3]  Rewriting version up the FLASH ROM ..........8-5

Parts Guide

Illustration: UX-B20U

Summary of Contents for UX-B20

Page 1: ...cs and service soft switch 2 2 3 Troubleshooting 2 23 4 Error code table 2 24 CHAPTER 3 MECHANISM BLOCKS 1 General description 3 1 2 Ink jet printer 3 3 3 Disassembly and assembly procedures 3 6 CHAPTER 4 DIAGRAMS 1 Block diagram 4 1 2 Wiring diagram 4 2 3 Point to point diagram 4 3 CHAPTER 5 CIRCUIT DESCRIPTION 1 Circuit description 5 1 2 Circuit description of control PWB 5 2 3 Circuit descripti...

Page 2: ... i UX B20U UX B20C B25C ...

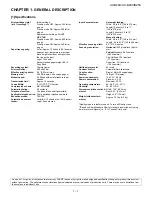
Page 3: ...ocument size Effective scanning width Scanning resolution Halftone grayscale Contrast control Copy function Display Power requirements Power consumption Operating temperature Humidity Dimensions without attach ments Weight without attach ments Automatic feeding Width 5 8 to 8 5 148 to 216 mm Length 10 sheets 5 5 to 11 140 to 279 mm Length 5 sheets 5 5 to 14 140 to 356 mm Manual feeding Width 5 8 t...

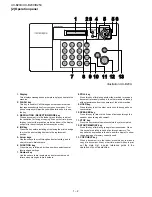
Page 4: ...nctions and settings 7 Number key Use these keys to dial numbers and enter numbers and letters when storing auto dial numbers 8 POLL key Press this key after dialing another fax machine to receive a document previously loaded in the other machine s feeder without assistance from the operator of the other machine 9 HOLD key Press this key to put the other party on hold during a phone conversation 1...

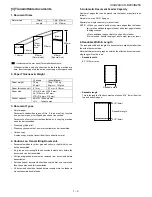
Page 5: ...nned before insertion into the feeder to prevent possible double feeds 5 Automatic Document Feeder Capacity Number of pages that can be placed into the feeder at anytime is as follows Normal size max ADF 10 pages Special size single sheet only manual feed NOTE When you need to send or copy more pages than the feeder limit place additional pages in feeder when last page in feeder is being scanned P...

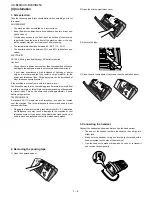
Page 6: ...ine is moved from a cold to a warm place Condensation may form on the reading glass if machine is moved from a cold to a warm place this will prevent proper scanning of documents for transmission Turn on the power and wait approximately 2 hours before using machine TELEPHONE JACK A standard RJ 11C single line wall telephone jack must be located near the machine This is the telephone jack commonly ...

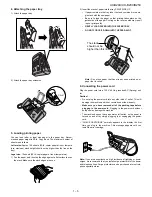
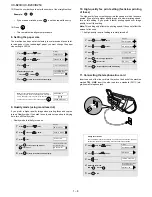
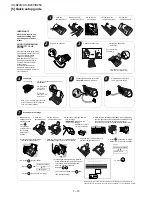
Page 7: ... GENTLY LOAD PAPER INTO THE PAPER TRAY DO NOT FORCE IT DOWN INTO THE FEED SLOT Note Do not use paper that has already been printed on or paper that is curled 6 Connecting the power cord Plug the power cord into a 120 V 60 Hz grounded AC 3 prong out let Caution Do not plug the power cord into any other kind of outlet This will damage the machine and is not covered under the warranty Make sure you h...

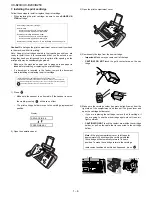
Page 8: ...5 Make sure the cartridge holder has moved slightly away from the right side of the compartment and then pull the green lever and open the cartridge holder cover If you are replacing the cartridge remove the old cartridge If you are going to use the old cartridge again place it in an air tight container CAUTION DO NOT touch the contact area inside the cartridge holder or pull on the cable that is ...

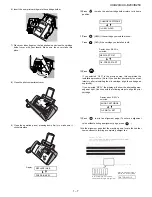
Page 9: ... find that print quality is not sat isfactory after reinstalling the old cartridge align the cartridge as explained If you selected NEW the display will show the alternating mes sages at right Continue with the following steps to align the print cartridge 13 Press to print an alignment page To enter an alignment value without printing an alignment page press 14 In the alignment page that the machi...

Page 10: ...wall telephone jack START MEMORY 1 Press once and twice 2 Press once and once 3 Press once 4 Select the paper size LETTER LEGAL 5 Press to return to the date and time display The display briefly shows your selection then PAPER SIZE SET COPY CUT OFF 1 LETTER 2 LEGAL Display PRINT SET UP Note If at any time the display shows the alternating messages at right check the printing paper If the tray is e...

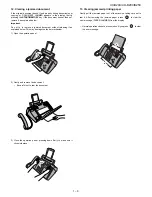
Page 11: ...ut releasing it as explained below This may damage the feeder mechanism 1 Open the operation panel 2 Gently and remove the document Be careful not to tear the document 3 Close the operation panel pressing down firmly to make sure it clicks into place 13 Clearing jammed printing paper Gently pull the jammed paper out of the machine taking care not to tear it After removing the jammed paper press to...

Page 12: ...and then pull the green lever and open the cartridge holder cover Do not pull on the cable or touch the gold contact area 7 Place your index finger on the tab and close the cartridge holder cover with your thumb Caution Do not touch the gold contact area 8 Close the print compartment cover and then the operation panel 10 a Press to select NEW b Press c Press to print an alignment page ST AR T MEMO...

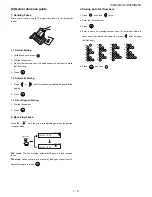
Page 13: ...the arrow in the display points to the desired reception mode FAX mode The fax machine automatically answers and receives faxes TEL mode Answer all calls even faxes by picking up the handset To begin fax reception press 3 Storing Auto Dial Numbers 1 Press once and twice 2 Enter the full fax number 3 Press 4 Enter a name by pressing number keys To enter two letters in succession that require the sa...

Page 14: ... UP and DOWN arrow keys 5 1 Speaker 5 2 Handset 5 3 Ringer Output Voltage limits 5V 4 75V 5 25V 30V 27 0V 33 0V 1 30V 2 30V 3 MG 4 MG 5 DG 6 DG Connector No CNPW Pin No 7 8 5V 5V CNPW CNCRMT CNFDMT CNHEAD1 CNHEAD2 CNPN CNBKL CONTROL PWB CNSP CNCIS CNPRG CNLIU CNLIU 1 8 CNPW POWER SUPPLY PWB LIU PWB 8 1 CNBKL FU100 FU101 CNPW CNCRMT CNFDMT CNHEAD1 CNHEAD2 CNPN CNBKL CONTROL PWB TOP SIDE CNSP CNCIS ...

Page 15: ...t is received and its list is output Press FUNC 9 8 7 and the following display will appear ROM Ver TC25 or TC44 After 2 sec DIAG MODE TC25 UX B20U TC44 UX B20C UX B25C Then press the START key Select the desired item with the UP key or the DOWN key or select with the rapid key Enter the mode with the START key Diag specifications If the diag mode cannot be set repeat the diag mode operation per f...

Page 16: ...g paper Detailed of check patterns 1 Top skew 2 Nozzle test 3 Vertical lines 4 Bottom skew 5 Top margin 6 Left margin 7 Bottom margin 3 6 Signal send mode This mode is used to send various signals to the circuit during FAX communication Every push of START key sends a signal in the follow ing sequence Moreover the signal sound is also output to the speaker when the line monitor of the soft switch ...

Page 17: ...ted to check the inclination performance 4 CROSS PATTERN The image data of the cross pattern to be printed 5 INITIAL CARTRIDGE DATA SETTING It makes the dot counter the setting for the initial cartridge 6 IJP LIST MODE The maintenance data is printed 7 PRINTER ERROR CHECK MODE The cause of PRINTER ERROR message is displayed Press FUNC 9 8 6 and the following display will appear PRINT DIAG MODE The...

Page 18: ... from printer PRINTER ERR 02 Print data transfer from Printer interface ASIC to printer was not completed for 180 sec PRINTER ERR 03 Cap position check of the carrier is failed PRINTER ERR 04 Printing 1 page is not finished during 5 min PRINTER ERR 05 Carrier moving from cartridge change position to cap position is failed PRINTER ERR 06 Carrier moving to cartridge change position is failed PRINTER...

Page 19: ... SW A1 1 0 0 0 0 0 0 0 S F T SW A1 1 0 0 0 0 0 0 0 S F T SW A2 0 0 0 0 0 0 0 0 S F T SW P7 0 0 0 0 0 0 0 0 Press key during setting To finish the settings halfway between SW A1 and SW P7 press the STOP key In this case the setting being done to the SW No on display will be nullified while settings done to the preceding SW No remain in effect The soft switch mode is terminated S F T SW A1 0 0 0 0 0...

Page 20: ...mode No Yes 0 7 Communication error treatment in RTN sending mode reception No communication error Communication error 0 8 CNG transmission No Yes 0 SW l A3 1 2 CED tone signal interval 1000ms 750ms 500ms 75ms 0 0 No 1 1 1 0 0 No 2 1 0 1 0 3 MR coding No Yes 0 4 Reserved 0 5 Reserved 0 6 Reserved 0 7 Reserved 0 8 Reserved 0 SW l A4 1 2 3 4 5 Signal transmission level 0 0 1 1 1 6 Protocol monitor E...

Page 21: ... auto dial No Yes 0 5 6 Waiting time after dialing 45 sec 55 sec 90 sec 140 sec 0 0 No 5 0 0 1 1 No 6 0 1 0 1 7 Reserved 0 8 Reserved 0 SW l B3 1 Reserved 0 2 Reserved 0 3 Reserved 0 4 Reserved 0 5 Reserved 0 6 7 Auto dial mode delay timer of before line connect 0 sec 1 5 sec 3 0 sec 4 5 sec 0 0 No 6 0 0 1 1 No 7 0 1 0 1 8 Hold key Enable Disable 1 SW l B4 1 2 Auto dial mode delay timer of after l...

Page 22: ...s for auto receive 0 1 0 0 OPTION 5 Automatic switching manual to auto receive mode Reception after 5 rings No reception 0 6 Reserved 0 7 8 Cl detect frequency As PTT 11 5Hz 13 0Hz 20 0Hz 0 0 No 7 0 0 1 1 No 8 0 1 0 1 SW l D2 1 2 3 Distinctive ringing setting PATTERN 4 and 5 are for CANADA only No 1 No 2 No 3 0 0 0 OPTION OFF 0 0 0 STANDARD 0 0 1 PATTERN1 0 1 0 PATTERN2 0 1 1 PATTERN3 1 0 0 PATTER...

Page 23: ...rved 0 6 Reserved 0 7 Reserved 0 8 Reserved 0 SW l E3 1 Reserved 0 2 Reserved 0 3 Reserved 0 4 Reserved 0 5 Reserved 0 6 Reserved 0 7 Reserved 0 8 Reserved 0 SW l F1 1 2 DTMF detection time 50ms 80ms 100ms 120ms 0 0 No 1 0 0 1 1 No 2 0 1 0 1 3 Protection of remote reception 5 detect Yes No 1 4 Remote reception with GE telephone Compatible Not compatible 1 5 6 7 8 Remote operation code figure by ex...

Page 24: ...0 6 Reserved 0 7 Reserved 0 8 Reserved 0 SW l G2 1 Reserved 0 2 Reserved 0 3 Reserved 0 4 Reserved 0 5 Reserved 0 6 Reserved 0 7 Reserved 0 8 Reserved 0 SW l G3 1 Reserved 0 2 Reserved 0 3 Reserved 0 4 Reserved 0 5 Reserved 0 6 Reserved 0 7 Reserved 0 8 Reserved 0 SW l H1 1 Reserved 0 2 Reserved 0 3 Reserved 0 4 Reserved 0 5 Reserved 0 6 Reserved 0 7 Reserved 0 8 Reserved 0 SW l H2 1 Reserved 0 2 ...

Page 25: ... 0 6 Reserved 0 7 Reserved 0 8 Reserved 0 SW l I4 1 Reserved 0 2 Reserved 0 3 Reserved 0 4 Reserved 0 5 Reserved 0 6 Reserved 0 7 Reserved 0 8 Reserved 0 SW l I5 1 Reserved 0 2 Reserved 0 3 Reserved 0 4 Reserved 0 5 Reserved 0 6 Reserved 0 7 Reserved 0 8 Reserved 0 SW l I6 1 Reserved 0 2 Reserved 0 3 Reserved 0 4 Reserved 0 5 Reserved 0 6 Reserved 0 7 Reserved 0 8 Reserved 0 SW l I7 1 Reserved 0 2...

Page 26: ... Reserved 0 8 Reserved 0 SW l J3 1 Reserved 0 2 3 4 Communication results printout Transaction report E T M Send only Always No print Err only 1 0 0 OPTION No 2 0 0 0 0 1 No 3 0 0 1 1 0 No 4 0 1 0 1 0 5 Reserved 0 6 Reserved 0 7 Reserved 0 8 Reserved 0 SW l K1 1 Reserved 0 2 Reserved 0 3 Reserved 0 4 Reserved 0 5 Reserved 0 6 Reserved 0 7 Reserved 0 8 Reserved 0 SW l L1 1 Reserved 0 2 Reserved 0 3...

Page 27: ...rved 0 2 Reserved 0 3 Reserved 0 4 Reserved 0 5 Reserved 0 6 Reserved 0 7 Reserved 0 8 Reserved 0 SW l N2 1 Reserved 0 2 Reserved 0 3 Reserved 0 4 Reserved 0 5 Reserved 0 6 Reserved 0 7 Reserved 0 8 Reserved 0 SW l N3 1 Reserved 0 2 Reserved 0 3 Reserved 0 4 Reserved 0 5 Reserved 0 6 Reserved 0 7 Reserved 0 8 Reserved 0 SW l O1 1 Reserved 0 2 Reserved 0 3 Reserved 0 4 Reserved 0 5 Reserved 0 6 Res...

Page 28: ...rved 0 2 Reserved 0 3 Reserved 0 4 Reserved 0 5 Reserved 0 6 Reserved 0 7 Reserved 0 8 Reserved 0 SW l O6 1 Reserved 0 2 Reserved 0 3 Reserved 0 4 Reserved 0 5 Reserved 0 6 Reserved 0 7 Reserved 0 8 Reserved 0 SW l P1 1 Reserved 0 2 Reserved 0 3 Reserved 0 4 Reserved 0 5 Reserved 0 6 Reserved 0 7 Reserved 0 8 Reserved 0 SW l P2 1 Reserved 0 2 Reserved 1 3 Reserved 1 4 Reserved 0 5 Reserved 1 6 Res...

Page 29: ...ved 0 5 Reserved 0 6 Reserved 0 7 Reserved 0 8 Reserved 0 SW l P6 1 Ink save mode Yes No 0 OPTION 2 Half tone copy ink save mode print ing fixed Yes No 1 3 Reserved 0 4 Reserved 0 5 Reserved 0 6 Reserved 0 7 Reserved 0 8 Reserved 0 SW l P7 1 Reserved 0 2 Reserved 0 3 Reserved 0 4 5 End buzzer 3sec 1sec No beep 0 0 No 4 0 0 1 No 5 0 1 0 6 Key error Communication error beep No beep Beep 0 OPTION 7 E...

Page 30: ... SW A2 No 1 No 4 Modem speed Used to set the initial modem speed The default is 9600BPS It may be necessary to program it to a slower speed when frequent line fallback is encountered in order to save the time required for fall back procedure SW A2 No 5 Sender s information transmit SENDER S INFORMATION TRANSMISSION is a switch to set the function to print the content of HEADER PRINT described in t...

Page 31: ...signal from handset or speaker SW A6 No 7 Initial compression scheme for sharp fax in TX mode When set to 0 if the other fax is Sharp model fax transmit the docu ment by H2 mode When set to 1 even if the other fax is Sharp model fax transmit the document by MR mode SW A6 No 8 Modem speed automatic fallback when RX level is under 40dBm When set to 1 if fax signal level is under 40dBm during recepti...

Page 32: ...elected It may be set from one to four rings using a binary number Since the facsimile telephone could be used as an ordinary telephone if the handset is taken off the hook it should be programmed to the user s choice If the soft switch was set to 1 direct connection is made to the facsimile If a facsimile calling beep was heard when the handset is taken off the hook press the START key and put th...

Page 33: ...nger the detect time is the less the error detection is caused by noises SW F1 No 3 Protection of remote reception 5 detect Used to set the function of remote reception 5 When set to 1 the remote reception function is disabled SW F1 No 4 Remote reception with GE telephone Corresponding to TEL mode by GE P B X 1 Compatible with TEL mode by GE 0 Not compatible When sending 5 for remote reception wit...

Page 34: ...und volume from a speaker SW J2 No 3 Reserved Set to 0 SW J2 No 4 No 5 Handset receiver volume Used to adjust sound volume from a handset receiver volume SW J2 No 6 No 8 Reserved Set to 0 SW J3 No 1 Reserved Set to 0 SW J3 No 2 No 4 Communication result printout Transaction report Every communication the result can be output As usual it is set to print the timer sending communication error alone I...

Page 35: ... save mode printing fixed If set to 1 copy of half tone resolution is printed with ink save mode regardless of SW P6 No 1 setting If set to 0 copy of half tone reso lution is printed based on SW P6 No 1 setting SW P6 No 3 No 8 Reserved Set to 0 SW P7 No 1 No 3 Reserved Set to 0 SW P7 No 4 No 5 End buzzer The sounding length of the buzzer for normal end of operation set SW P7 No 6 Key error Communi...

Page 36: ... the follow ing format and check the related matters TO ATT Ref No CC ATT Date FM Dept Sign Please complete this report before calling the TAC hotline if problem still occurs Facsimile communication problem Ref No Date From Mr Fax Tel No Our customer Name Tel No Address Fax No Contact person Model name Other party Name Tel No Address Fax No Contact person Model name Problem mode Line Domestic inte...

Page 37: ...o be impossible 12 Error occurred just after fallback 13 Error occurred after a response to retransmission end command was received Code Final received signal Error Condition Receiver side 0 Incomplete signal frame Cannot recognize bit stream after flag 1 NSS DCS Cannot recognize CFR or FTT signal Disconnects line during transmission line error 2 NSC DTC Cannot recognize NSS signal FIF code etc 3 ...

Page 38: ...aper feed roller to assure smooth feeding of the document 2 Document separation method Separate plate 3 3 Documents applicable for automatic feed NOTE Double side coated documents and documents on facsimile recording paper should be inserted manually The document feed quantity may be changed according to the document thickness Documents corresponding to a paper weight heavier than 70 kg 80 g m2 an...

Page 39: ...peration panel must be opened first 5 Recording block 1 The pulse motor is rotated by the PICK UP ROLLER to feed the recording sheet The PICKUP ROLLER feeds one by one from the top sheet 2 The recording sheet contacts the P IN SENSOR 3 The FEED ROLLER rotates in the reverse direction of paper feed refer to the figure of PICKUP ROLLER The tip of recording sheet is set parallel to the FEED ROLLER wh...

Page 40: ...act design of Ink PWB is obtained by using Head Driver IC and Home position Sensor 4 2 Electrical system The PWB provides mechanical control for Ink Jet Printer Fig 1 shows the interconnection of PWB and other electrical component in the print mechanism 4 3 Electrical overview The information in this section appears in a sequence relative to the system diagram in the following figure 4 4 Power sup...

Page 41: ...CE BETWEEN 30V AND GND SHORT OR NOT CHECK IC10 REPLACE CONTROL PWB REPLACE IC10 SHORT CHECK 30V PATTERN REPLACE CONTROL PWB NO OK OK NG REPLACE FEED MOTOR OK CHECK WAVEFORMS IC10 19 21 25 27PIN REPLACE CONTROL PWB NG FEED MOTOR IS NG CARRIER MOTOR IS GOOD CARRIER MOTOR IS NG FEED MOTOR IS GOOD REPLACE CARRIER OK CHECK WAVEFORMS IC10 19 21 25 20PIN REPLACE CONTROL PWB NG ...

Page 42: ...OK CHECK 11 82V CNHEAD1 5 6PIN NG CORRECT SOLDER NG REPLACE IC10 NO CHECK 11 82V PATTERN REPLACE CONTROL PWB SHORT CHECK RESISTANCE BETWEEN 11 82V AND GND SHORT OR NOT NG CHECK 30V CNHEAD1 8PIN OK CHECK 30V PATTERN REPLACE CONTROL PWB SHORT CHECK RESISTANCE BETWEEN 30V AND GND SHORT OR NOT NO NG CHECK 3 3V CNHEAD1 4PIN OK CHECK 3 3V PATTERN REPLACE CONTROL PWB SHORT CHECK RESISTANCE BETWEEN 3 3V A...

Page 43: ...the parts list and the flowchart in a same section are common to each other To assure reliability of the product the disassembly and the assembly procedures should be performed carefully and deliberately Fig 1 ASF cover Top cabinet Document guide under 1 1 3 2 4 2 5 5 5 6 Mechanism unit ASF cover 7 Document guide under Top cabinet NOTE For disassembly of the inside of the unit refer to the explode...

Page 44: ...me unit 1 No Part name Qty No Part name Qty 1 Mechanism unit 2 Connector 2 4 Screw 3x10 1 5 Screw 3x6 1 6 Speaker spring 1 NOTE For disassembly of the inside of the unit refer to the exploded view in the parts guide 2 3 4 10 3 3 3 5 3 2 1 6 7 Mechanism unit Speaker LIU PWB Power supply PWB Main frame unit 9 8 Operation panel unit Control PWB 1 3 Screw 3x10 5 ...

Page 45: ...Qty No Part name Qty 1 Mechanism unit 1 2 Screw 3x10 2 3 Screw 3x6 1 4 LIU PWB unit 1 5 Screw 3x10 1 6 Screw 4x6 1 7 Power supply PWB unit 1 8 Screw 3x6 3 10 Connector 5 11 Flat cable 2 12 Control PWB unit 1 5 1 8 9 10 10 11 8 2 6 3 2 4 7 Mechanism unit LIU PWB Power supply PWB Washer FG earth cable DG earth cable 12 Control PWB Main frame unit Core 8 9 Sheet 1 ...

Page 46: ...le puss to the core 2 times 3 Operation Panel unit Panel cable Speaker cable Speaker cable Control PWB Panel cable Panel cable CIS cable CIS cable Rib Rib Rib Carrier motor cable Carrier motor cable LIU cable FPC flat cable Feed motor cable Feed motor cable FG earth cable AC cord earth cable AC cord DG earth cable LIU PWB Power supply PWB Main frame unit Rib CML1 T1 1 FPC flat cable Carrier unit 1...

Page 47: ... diagram HANDSET LIU PWB UNIT LCD UNIT FAX ENGINE SCE209L ASIC IMAGE PROCESSING PRINTER CONTROL INK PWB UNIT POS SPIT FIRE FPC OPERATION PANEL PWB UNIT KEY SENSOR FLASH 4MBIT PROGRAM D RAM 4MBIT SD RAM 16MBIT THUNDERBOLT MOTOR DRIVER CARRIER MOTOR FEED MOTOR CIS UNIT POWER SUPPLY PWB UNIT 30V 5V CONTROL PWB UNIT PIN ...

Page 48: ...CNLIU CNLIU CNSP CNPRG CNCIS CNPW CNPW CNPN CNPN OPERATION PANEL PWB UNIT LCD UNIT CNLCD 12 12 4 4 16 14 CNHEAD1 CNHEAD2 CNCRMT CARRIER MOTOR CNFDMT FEED MOTOR CN1 AC CORD POWER SUPPLY PWB UNIT CNHJ LIU PWB UNIT SPEAKER CIS 2 12 8 7 CONTROL PWB UNIT INK PWB UNIT FPC ...

Page 49: ...CONTROL PWB UNIT 1 2 1 2 SP SPD SP SPD CNSP SPEAKER 1 2 3 4 5 6 7 8 9 10 11 12 1 2 3 4 5 6 7 8 9 10 11 12 INK PWB UNIT DG ACLK AGATE 3 3VS 11 82V 11 82V PCLK 30VHD PHID1 OK2PRT DG DG DG ACLK AGATE 3 3VS 11 82V 11 82V PCLK 30VHD PHID1 OK2PRT DG DG CNHEAD1 CNHEAD1 1 2 3 4 5 6 7 8 9 10 11 12 1 2 3 4 5 6 7 8 9 10 11 12 DG PENABLE PLOAD PHD0 PHD1 PHD2 PHD3 LHXS LCN SPRES POS DG DG PENABLE PLOAD PHD0 PH...

Page 50: ...signal into binary data This binary data is transferred from the scan processor to the image buffer within the RAM and encoded and stored in the transmit buffer of the RAM The data is then con verted from parallel to serial form by the modem where the serial data is modulated and sent onto the line Receive operation There are two ways of starting reception manual and automatic Depression of the ST...

Page 51: ...Channel 2 can be reprogrammed for external access to thermal printing thermal transfer or plain paper inkjet printing 2 2 4 External RAM and ROM Moveable and programmable size external SRAM memory of up to 1 MB DRAM memory of up to 4 MB and ROM of up to 2 MB can be directly connected to the SCE209L By using an external address decoder the size of SRAM and or ROM can be extended The ROM stores all ...

Page 52: ...in the proper date and time for 32 years Leap year compensation is included A 32 768 kHz or 65 536 kHz crystal is required by the RTC 2 2 16 Tone Generator ALT_TONE The CX06835 provides a programmable tone generator output The frequency of the tone generator is programmable from 400 Hz to 4 kHz By using a PWM programmable high frequency as a modulation frequency the output level can be made progra...

Page 53: ...S GPO 17 O 1XC 24 VDD Digital Power 25 RASn O 13Xs 26 CAS 0 n O 13Xs 27 DWRn O 13Xs 28 VBAT RTC Battery Power 29 XIN I Osc1 30 XOUT O Osc1 31 WRPROTn O 1XC 32 TEST 1 I Hd 33 TEST 0 I Hd 34 BATRTSn I H 35 INTPWRDWNEn I H 36 PWRDWNn I O H 13Xs 37 N C 38 ADGA VADG PADC Analog GND 39 VREFn CLREF I VR PADC 40 VIN I VA PADC 41 ADGA VADG PADC Analog GND 42 ADVA VADV PADC Analog Power 43 ADXG VXG PADC 44 ...

Page 54: ...eaker Driver Output 90 DVDD PWD IA Digital Power 91 MODE_0 ID u Connect to VSS IA Mode Selection 92 ICLK I OD IA Bit Clock Input Output 93 VSS VSS Digital GND 94 FCSn 1 VIDCTL 0 GPO 23 O 13Xs 95 IARESET O 13Xs DSP to EXTIA POR 96 IACLK O 13Xs DSP to EXTIA MCLK 97 VDD Digital Power 98 IA1CLK I H DSP from EXTIA ICLK 99 SR3IN DSPIRQn I H DSP from primary EXTIA SOUT EXT Modem IRQn 100 SR4OUT O 13Xs DS...

Page 55: ... Tu 13Xs CPU Data Bus 142 D 1 I O Tu 13Xs CPU Data Bus 143 D 2 I O Tu 13Xs CPU Data Bus 144 D 3 I O Tu 13Xs CPU Data Bus 145 D 4 I O Tu 13Xs CPU Data Bus 146 D 5 I O Tu 13Xs CPU Data Bus 147 D 6 I O Tu 13Xs CPU Data Bus 148 D 7 I O Tu 13Xs CPU Data Bus 149 GPIO 20 ALTTONE I O Hu 13Xs 150 GPIO 26 I O Hu 13Xs 151 GPIO 27 I O Hu 13Xs 152 GPIO 28 I O Hu 13Xs 153 GPO 26 O 13Xs 154 GPO 27 O 13Xs 155 GPO...

Page 56: ...0 RTC CRYSTAL SCANNER CONTROLS START CLK2 XIN XOUT INTERNAL IA LINE INTERFACE DRAM SCANNER VIDEO PREPROCESSING SERIAL SYNC PORTS SSIF VIN SSCLK 2 1 SSTXD 2 1 SSRXD 2 1 SSSTAT 2 1 SYNC ASYNC SERIAL PORT SASIF SASCLK SASTXD SASRXD GPIO GENERAL PURPOSE I O DEBUGN VDD VDRAM VBAT VSS D 7 0 RDN A 23 0 WRN ROMCSN CS 5 0 N CAS 0 1 N RASN DWRN SCE209L 1 CHIP FAX ENGINE EXTERNAL BUS ADVA ADGA TONE INTPWRDWN...

Page 57: ...o control the SIA The following table the PIA SIA control register RAM access code For changes made to IACR1 to be effective the host must write to IAADD with a value of 0002h For changes made to IACR2 to be effective the host must write to IAADD with a value of 0006h For changes made to IACR3 to be effective the host must write to IAADD with a value of 0007h Configuration default values are shown...

Page 58: ...his circuit monitors data which is converted by the enlargement reduction resolution conversion circuit to be written to the print buffer to calculate the number of print dots 4800 dots for horizontal scanning are divided into 8 areas 600 dots per each and the calculation is made for each area This circuit sends the split printing status when detecting an area with 62400 600 x 208 divided by 2 dot...

Page 59: ... automatically inserted by distributed refresh exe cuted every 15 6µs maximum and when initialization sequence is performed after reset 2 6 15 Sensor Detection Circuit For home position sensor input and paper detection sensor input this circuit eliminates noises such as chattering The detection method is based on multiple sampling sequential matching The sampling clock is 1 008 MHz and detection t...

Page 60: ...Interrupt L Interrupt Hi Z No Interrupt EXTH Open Drain RDY 61 O External Wait L Wait Hi Z Ready EXTH Open Drain SCANSYNC 60 I Scanner Motor Sync Signal Rise Sync FISI Schmitt SYMBOL PIN NO I O DESCRIPTION PAD CELL NOTE Thunderbolt Control Interfaces 4 pin SCS_N 141 O Chip Select FO09 SCLK 142 O Clock FO09 SDAT 140 O Data FO09 SRST_N 133 I Reset FISI Schmitt SYMBOL PIN NO I O DESCRIPTION PAD CELL ...

Page 61: ...perations FDS1 Schmitt Pull Down TM1 52 I FDS1 Schmitt Pull Down TM2 53 I FDS1 Schmitt Pull Down TEST 50 I Test mode enable L Normal operation H Test mode FDS1 Schmitt Pull Down DEBUG 54 O Debug output FO09 SYMBOL PIN NO I O DESCRIPTION PAD CELL NOTE Power Ground Pins 55 pin VDD 1 10 25 36 56 57 73 76 79 80 86 87 98 108 121 134 Power 3 3V GND 11 20 21 23 24 37 3845 46 48 49 55 58 59 62 63 69 71 72...

Page 62: ...09 RB 40 O Black select L Bank 0 H Bank 1 FO09 RD0 9 I O Data bus L Logic 0 H Logic 1 B00U RD1 8 I O B00U RD2 7 I O B00U RD3 6 I O B00U RD4 5 I O B00U RD5 4 I O B00U RD6 3 I O B00U RD7 2 I O B00U RD8 19 I O B00U RD9 18 I O B00U RD10 17 I O B00U RD11 16 I O B00U RD12 15 I O B00U RD13 14 I O B00U RD14 13 I O B00U RD15 12 I O B00U RCS_N 41 O Chip select L Select H Deselect FO09 RRAS_N 42 O Command Co...

Page 63: ...A or a Bipolar stepper motor driver with current levels average of 183 ma 367 ma and 550 ma per phase with quarter step mode capability In stepper mode both drivers shall be capable of being operated in the quarter step mode nRESET Generation All ASIC input control lines are to be compatible with CMOS type 3 3 volts and 5 volts logic PLCC44 IC10 Pin descriptions PIN NO PIN NAME PIN DESCRPTION 1 VC...

Page 64: ...the LINE DRIVER in the modem and the ringer sending level sent from the modem Speaker volume It is controlled by the attenuator value of the LINE DRIVER in the modem 4 Ringer circuit section The ringer sound is formed in the tone of modem when CI signal is detected The amplifier circuit drives the speaker of the main body 5 CI detection circuit CI is detected by the photo coupler which is integrat...

Page 65: ...MFMUTE High Middle L L L H Low DTMF H H Signal Name Function RHS H The handset is in the on hook state L The handset is in the off hook state CI Incoming call CI detection signal Signal Name Function TEL IN Receiving signal from line or modem SPOUT Speaker output signal TXOUT Transmission DTMF analog signal output from modem RXIN Reception DTMF others analog signal input into modem NO Signal Name ...

Page 66: ...e energy to the transformer In case of the over voltage this cir cuit reduces providing the energy to the transformer by letting the Power Zener D104 connected between the 30 V output voltage and GND into the short mode and letting the over current protection circuit work 6 30V circuit block This circuit block rectifies and smoothes the high frequency pulse volt age provided by the transformer and...

Page 67: ...70 I A C30 1u 10V C13 1u 10V C131 1u 10V R122 470 C123 1u 10V C317 R118 10K R28 0 IC13 1 2 4 5 3 R124 68 C1 C318 RA18 33 5 1 8 7 6 2 3 4 C120 R132 10K J R123 470 R120 33 C329 K CISCLK C130 1u 10V C C125 1u 10V R119 33 C133 1u 10V C153 100pF C126 18pF C192 1u 10V C53 L SCE209L 1 2 IC5 TEST0 33 TEST1 32 D0 141 D1 142 D2 143 D3 144 D4 145 D5 146 D6 147 D7 148 A23 140 A22 139 A21 138 A20 137 A19 136 A...

Page 68: ...E 18 RAS 17 WE 15 D8 39 D9 40 D10 42 D11 43 D12 45 D13 46 D14 48 CLK 35 D2 5 D4 8 D6 11 D0 2 D1 3 D7 12 D5 9 D3 6 UDQM 36 CKE 34 GNDQ 4 VDDQ 13 VDD 1 NC1 33 CAS 16 LDQM 14 VDDQ 38 GNDQ 10 VDD 25 VDDQ 7 GND 26 GND 50 VDDQ 44 GNDQ 41 GNDQ 47 NC2 37 C176 0 1uF C239 0 1uF RA7 100 5 1 8 7 6 2 3 4 RA11 100 5 1 8 7 6 2 3 4 R159 C10 N M C4 0 1uF RA9 33 5 1 8 7 6 2 3 4 RA10 33 5 1 8 7 6 2 3 4 IC7 A0 20 A1 ...

Page 69: ...161 270 R149 C242 10u 10 2012 2012 2012 V R185 R215 R204 100 C191 R108 C243 0 1uF C284 0 1uF C154 R216 R217 R162 R218 C193 1000pF IC5 SCE209L 2 2 MODEM BLOCK GPIO4 56 GPIO16 52 AVDD IIA 85 GPO28 155 GPIO31 159 GPO27 154 GPO25 68 GPIO34 162 GPO30 SR3OUT 157 GPIO32 160 GPIO17 51 SPKR_OUTP IIA 88 GPO1 168 MIC_INM IIA 81 MIC_INP IIA 80 GPO29 156 MCDE0 91 GPO0 167 LINE_INP IIA 79 N C 37 SASRXD 110 GPIO...

Page 70: ...7k R111 150 C185 RA4 100 5 1 8 7 6 2 3 4 RA3 100 5 1 8 7 6 2 3 4 C233 470pF 470pF 470pF 470pF 470pF 470pF 470pF 470pF 470pF 470pF 470pF RA15 33 5 1 8 7 6 2 3 4 C235 R134 0 R246 33 C11 N M IC4 µPD65945 ASIC WR_N 107 RD_N 106 A0 104 A2 102 A4 100 D0 95 D1 94 D4 91 D3 92 D6 89 RRAS_N 42 RCAS_N 43 RWE_N 44 CS_N 68 RD0 9 RD1 8 RD2 7 RD3 6 RD5 4 RD4 5 RD6 3 RD7 2 RD8 19 RD9 18 RD10 17 RD11 16 RD12 15 RD...

Page 71: ... 100p C305 2200p C24 47uF 50V L1 680uH R104 0 R195 33 PLCC44 THUNDERBOLT IC10 nCS 43 SCK 42 SDI 41 Motor1_PWM 22 Motor1_Mode 9 nRESET 4 VBULK 11 VCC_Src 10 VCC 5 VCC_FB 8 VPH_Src 36 VPH_FB 38 Motor1_A 19 Motor1_A 21 Motor1_B 27 Motor1_B 25 Motor1_A_R 20 Motor1_B_R 26 Motor2_A 12 Motor2_A 14 Motor2_B 34 Motor2_B 32 Motor2_A_R 13 Motor2_B_R 33 GND 6 VCP 1 CP2 2 CP1 3 GND 7 VBULK 15 VBULK 16 GND 17 G...

Page 72: ...1 N M R152 33 R193 0 R106 5 6K R219 0 C141 C220 1u 10V R220 5 1K Q108 2SC2411KR B C E C187 0 1uF C188 1u 10V Q105 2SA1530AS B C E R154 390 C240 1000pF R153 390 C16 1000pF D104 1SS355 A K 3 3VS L100 0 C8 1608 0 1uF C17 N M C28 47uF 25V VIN L105 0 REG1 BA178M24FP E2 Vin 1 Vout 3 VSS 2 L106 0 R180 R18 220 2W C18 1000pF 3 3V DG C144 1000pF VBT R107 N M D100 1SS355 A K R237 N M N M C332 0 1u 50V R23 C2...

Page 73: ...D 21 AVSS_TX 16 AVSS_RX 8 AVDD 15 AGND 14 NC6 32 NC1 25 NC2 27 NC3 28 NC4 29 NC5 30 VREF 13 MICINP 10 MICINN 11 LINEIN 9 SPKRON 19 SPKROP 18 LINEO 17 XCLOKO 22 MODE1 23 MODE0 24 TEST 3 SOUT 4 SIN 5 MICBIAS 12 FSYNC 6 ICLK 26 MCLK 31 CTRLSOUT 2 CTRLSIN 1 POR 7 C340 C203 C248 R19 0 C246 R190 C208 R135 20K C335 N M C35 0 1uK R148 C139 0 1uF L107 0 C20 C36 C291 0 C207 0 1uF C22 10uF C49 0 1uF R140 82K...

Page 74: ...KL1 BKL2 C163 0 1uF C134 0 1uF C164 0 1uF C300 C157 0 1uF C223 0 1uF CNMIC A2001WV2 3PM 1 2 3 C168 0 1u 50V C218 0 1uF C140 0 1uF C107 0 1uF CNCRMT A2001WV2 4PA 1 2 3 4 C263 0 1u 50V C142 0 1uF C301 CNFDMT A2001WV2 4PE 1 2 3 4 C102 0 1uF CNCIS A2001WV2 7PE 1 2 3 4 5 6 7 C145 0 1uF CNLIU A2001WV2 12PE 1 2 3 4 5 6 7 8 9 10 11 12 13 14 15 16 CNPRG A2001WR2 3PE 1 2 3 C109 0 1uF CNPN A2001WV2 16PE 1 2 ...

Page 75: ...UX B20U UX B20C B25C 6 9 9 Control PWB parts layout Top side The CONTROL PWB of the model employs lead free solder ...

Page 76: ...UX B20U UX B20C B25C 6 10 10 Control PWB parts layout Bottom side The CONTROL PWB of the model employs lead free solder ...

Page 77: ...08 C M B C103 1000p R5 L4 N M Q1 G D S PC4A R3 R120 100 D2 1N4148 PC1A 2 1 L3 N M N M C14 N M R6 22k 1 4W AR1 RA 391P V6 2 T1 I2164 R1 C1 C6 0 01u C7 22u 50V PC2B 4 3 L5 ZD9 C13 JP6 JP PC3A PS2501A 1 2 1 R103 ZD5 C4 N M N M N M N M N M ZD8 JP R15 JP 1 4W R2 R135 L6 N M R102 ZD10 R101 ZD1 AR2 N M ZD3 HZ2C1 VA1 C118 Ð RE C1 AR3 RA501P C6 C119 JP5 C5 0 82u 250V JP4 JP7 JP ZD7 HZ27 1 R13 JP 12 5mm R7 ...

Page 78: ...p R112 22k C122 0 C113 2200p C124 1000p C105 0 R130 3 3k D4 R129 13k ZD4 HZ9C3 R133 620 R126 3 3k R107 R122 82k R111 24k C137 N M R118 1k E Q105 RT1N436C B C JP9 JP R121 0 C129 R109 0 C11 C107 0 R12 150 1 4W C108 N M N M C115 1000p C106 0 1u 16V k C12 C141 2200p R110 39k R127 11k C10 N M C136 2200p L2 C127 2200p R119 8 2k L9 C102 C16 22u 16V C126 0 1u 16V k C17 4 7u 25V R131 13k D3 1N4148 R105 C11...

Page 79: ...V HS RHS DPON R123 1k R16 100 1 2W PC3B PS2501A 1 4 3 R18 JP 1 4W R124 N M PC4B CML1B A5X G 24E 908 C111 0 1u C15 100u 50V C120 N M R17 R104 C3 22u 50V C134 N M PH1 SG206 C8 100u 25V REG1 N M Vout 1 GND 2 Vin 3 R9 R10 1k 1 4W C101 1000p PC2A N M N M 2 1 C117 R4 220 1 4W D1 1N4148 PC1B 4 3 C143 0 1u 16V k Q102 RT1N436C B C E D101 C133 ZD11 Q101 B C E C9 47u 16V IC101E LM2902 4 11 C121 N M N M LIU P...

Page 80: ...UX B20U UX B20C B25C 6 14 4 LIU PWB parts layout Top side The TEL LIU PWB of the model employs lead free solder ...

Page 81: ...UX B20U UX B20C B25C 6 15 5 LIU PWB parts layout Bottom side The TEL LIU PWB of the model employs lead free solder ...

Page 82: ...12 22K PC1 PC123 R8 33K R13 820 R11 10K C9 4700P R17 680 C11 100P D12 D11 D13 R1 2 2M R41 2 2M C1 0 1 Z1 ENC241 R109 7 5K R111 2 7K PC1 PC123 R110 100 BEA101 BL02RN1 R112 820 R113 6 2K IC101 TA76431AS C110 0 1 D101 ERC91 02 D102 EC31QS03L D10 L1 R7 R6 820 C10 0 033 R19 10 Q1 2SK3563 D3 1SS133 R10 6 8K Q2 FG C7 4700P D7 N M F1 250V 2 5A CNAC 1 3 FG C111 12 9 8 6 4 3 T1 07D1 2 N M N M NTC1 JUMPER R4...

Page 83: ...04 IC101 CNPW PC1 1 D5 C6 C7 Z1 D3 D4 D7 D6 T1 BEA1 D12 D11 F1 AC250V 2 5A C1 J1 CNAC L1 C5 R19 NTC1 D13 D10 D8 C8 Q1 D101 C102 D106 1 The POWER PWB of the model employs lead free solder R41 R1 R109 R9 R12 R10 R110 R111 C110 R101 R112 R113 R115 R108 R102 R105 R106 D102 R11 R13 R8 C9 C11 R6 C10 R5 R2 R3 R4 Q2 R17 R7 The POWER PWB of the model employs lead free solder ...

Page 84: ...11 10 12 VO 14 3 LD2 LD1 LD0 13 N C LD3 RS 8 N C 7 4 DG 6 1 2 E 9 R W 3 3V 5 CNLCD CNLCD 11 CNLCD 12 CNLCD 13 CNLCD 14 CNLCD 4 CNLCD 5 CNLCD 6 CNLCD 3 CNLCD 2 CNLCD 1 A SPEED DIAL D6 1N4148 A K START SW2 FLASH INTERCOM D4 1N4148 A K R4 STOP R2 SW1 HOLD R3 N M R1 C1 22u 50V PLAY 1 SPEAKER 2 REC MEMO 3 FUNCTION D5 1N4148 A K 4 RESOLUTION 5 D2 1N4148 A K 6 7 INKRESET C2 220p D7 1N4148 A K 8 9 COPY HE...

Page 85: ...UX B20U UX B20C B25C 6 19 2 Operation Panel PWB parts layout Top side The OPERATION PANEL PWB of the model employs lead free solder Note Since the parts of PWB cannot be supplied change it as a unit ...

Page 86: ...UX B20U UX B20C B25C 6 20 3 Operation Panel PWB parts layout Bottom side The OPERATION PANEL PWB of the model employs lead free solder Note Since the parts of PWB cannot be supplied change it as a unit ...

Page 87: ... 82V GND GND 3 3V GND GND GND GND R105 3 9K CNHEAD1 1 2 3 4 5 6 7 8 9 10 11 12 C112 N M R108 5 1K CNHEAD2 1 2 3 4 5 6 7 8 9 10 11 12 IC100 SPITFIRE VCC2 2 VCC2 5 VCC2 8 VCC2 11 VCC2 38 VCC2 14 VCC2 41 VCC2 44 VCC2 47 VCC3 56 A1 26 A2 25 A4 23 A3 24 A7 27 A8 20 A6 21 A5 22 A11 17 A12 28 A10 18 A9 19 A13 29 P13 6 P7 4 P11 1 P3 45 P9 3 P8 37 P6 39 P10 12 P5 43 P4 40 P12 9 P2 42 P1 46 P15 48 P16 10 P1...

Page 88: ...UX B20U UX B20C B25C 6 22 2 Ink PWB parts layout Top side 3 Ink PWB parts layout Bottom side FPC FPC ...

Page 89: ...TC EOP MCF MCF DCN CFR TSI CSI CSI TSI RTC EOP MCF DCN IMAGE SIGNAL Document ejected Recording paper ejected Receive side G3 communication CED Transmitter side Document inserted into document sensor during standby To recording position DCS Cut line printed IMAGE SIGNAL Cut line printed IMAGE SIGNAL IMAGE SIGNAL Next page insert command 1st page Document inserted to the reading position DCS ...

Page 90: ...zed MODEM initialized STOP key WAIT A MOMENT display START NO YES STAND BY 3 sec NO MEMORY CLEAR display NO YES STAND BY 3 sec NO NO START key COPY key STOP key NO Memory clear STAND BY 2 1 MEMORY CLEARED display Memory clear PROCESS CHECK MODE MEMORY CLEARED display YES ...

Page 91: ...7 QCNWG232CSCZZ BLK EXTENSION CABLE 3PIN CNBLK CNBLK 2 1 AS 8 QCNWG233CSCZZ MIC EXTENSION CABLE 3PIN CNMIC CNMIC 2 NOT USED 1 AQ 9 QCNWG226CSCZZ POWER SUPPLY EXTENSION CABLE 8PIN CNPW CNPW 2 1 AY 10 QCNWG227CSCZZ FEED MOTOR EXTENSION CABLE 4PIN CNFDMT CNFDMT 2 1 AU 11 QCNWG228CSCZZ CARRIER MOTOR EXTENSION CABLE 4PIN CNCRMT CNCRMT 2 1 AU 12 QCNWG229CSCZZ INK 1 EXTENSION CABLE 12PIN CNHEAD1 CNHEAD1 ...

Page 92: ... 1 CNLIU The extension cables are used as one pair The hook switch is manually operated PIN YELLOW 3 3V GREEN PIN EXTENSION CABLE QCNWG231CSCZZ TO CHECK CONTROL PWB TO EXTENSION PWB PIN YELLOW 3 3V GREEN YELLOW GREEN The hook switch is operated by the mechanical unit switch and the test PWB switch When performing installation in the machine unit set the test PWB switches to the fixed position Mech...

Page 93: ... white and black basis is applied to remember the shading waveform Be sure to perform this operation when replacing the battery or replacing the control PWB Execute in the shading mode of DIAG mode SHADING WAVE MEMORY STANDARD PAPER PSHEZ3579SCZZ ...

Page 94: ... guide PGiDM2673XHZZ which shows in the drawing Remove A4 paper guide when you use the record paper of the letter size 2 Set soft switch SW L2 No 1 and the initialization of SW L2 No 2 as follows Hook Paper tray A4 PAPER GUIDE PGiDM2673XHZZ SW NO DATA NO ITEM Switch setting and function Initial setting Remarks 1 0 SW l L2 Paper set size LETTER LEGAL A4 OPTION 1 No 1 0 0 1 0 2 No 2 0 1 0 0 ...

Page 95: ...cription for application is detailed in the attached document below Rewriting the flash for the FAX engine with software Tera Term for the PC Fig 1 Connected chart PARTS CORD PRICE RANK NAME REMARKS DUNTK404CSCZZ DG Program loader BOX Includes RS 232C cable QCNW 306BSCZZ BF Main cable Connects Program loader BOX and FAX machine Table 1 Program loader unit CNPRG FAX Machine Control PWB CN2 CN1 3PIN...

Page 96: ...ng the PC and Program loader BOX with RS 232C cable 1 3 Power supply to the FAX machine 4 Connect Program loader BOX and the Control PWB of the FAX machine CNPRG with Main cable 3 FAX PWB rewriting Set the switches of Program loader BOX as follows a MAIN SW OFF down b CALIBRATION OFF down c BATSW OFF down d PARK SW OFF down e IC Voltage to 3 3V down f MODE to DOWNLOAD down Set the switch of Progra...

Page 97: ...Tera Term Execute the SETUP EXE from compressed files to install Tera Term Execute the ttermpro exe to start Tera Term 1 Select New connection from the pull down menu of File 1 Check Serial 2 Select the port number in which the RS 232C cable is connected to 3 Click OK for confirmation Proceed to 2 ...

Page 98: ...X B20C B25C 8 8 2 Select Serial port from the pull down menu of Setup Select the port number which the RS 232C cable is connected to Set the other parameters as follows and click OK for confirmation Proceed to 3 ...

Page 99: ...Program loader BOX After performing procedures described in Table 3 press down the START key on the FAX machine DOWNLOAD MODE WT appears on the LCD Proceed to 4 1 Before connecting the PC and Program loader BOX with RS 232C cable 2 After connecting the PC and Program loader BOX with RS 232C cable 1 3 Power supply to the FAX machine 4 Connect Program loader BOX and the Control PWB of the FAX machin...

Page 100: ...UX B20U UX B20C B25C 8 10 4 Select Send file from the pull down menu of File Enable the Binary in Option and open Atl0 cmd Proceed to 5 ...

Page 101: ...UX B20U UX B20C B25C 8 11 5 If the description above does not appear return to 4 If the description above appears proceed to 6 ...

Page 102: ...UX B20U UX B20C B25C 8 12 6 Select Send file from the pull down menu of File Enable the Binary in Option and open ta ver Select a file you want to download here Proceed to 7 ...

Page 103: ...UX B20U UX B20C B25C 8 13 7 If the description above appears return to 4 If the description above appears downloading was completed normally Proceed to 8 ...

Page 104: ...owing procedures 2 1 Perform procedures 1 through 3 described in Table 4 2 2 Terminate Tera Term 1 Perform procedures 1 through 3 in numerical order 1 Remove the connector from the Control PWB CNPRG of the FAX machine 2 Turn off the FAX machine 3 Turn off the Program loader BOX FAX PWB rewriting Turn off the FAX machine Set the switch of Program loader BOX as follows a MAIN SW OFF down Table 4 Ter...

Page 105: ... UX B20U UX B20C B25C UX B20 UX B25 This document has been published to be used for after sales service only The contents are subject to change without notice MODEL SELECTION CODE DESTINATION UX B20 U U S A UX B20 B25 C Canada 1 Cabinet etc 2 Operation panel unit Document guide upper 3 Packing material Accessories 4 Control PWB unit 5 LIU PWB unit 6 Power supply PWB unit 7 Operation panel PWB unit...

Page 106: ...43 44 45 45 46 46 47 47 48 49 50 51 52 53 53 54 55 57 57 58 59 60 61 62 63 64 65 66 67 68 69 70 71 72 73 74 75 76 77 78 79 80 81 82 83 84 85 85 85 86 87 88 89 90 91 92 93 94 94 94 95 96 97 98 99 100 101 102 102 102 103 104 105 105 105 106 107 108 109 110 111 112 113 114 114 115 116 117 117 117 118 119 120 120 120 121 121 121 122 123 124 125 126 B1 B2 B3 B3 B3 B3 B3 B3 B3 B3 B3 B3 B3 B3 B3 B4 B4 B4...

Page 107: ...ar 21Z 37 NGERH2637XHZZ AF N C Reduction gear 25 50Z 39 NGERH2639XHZZ AF N C Reduction gear 16 28Z 40 NROLR2483XHZZ AL C Paper feed roller 41 NSFTP2385XHZZ AF N C Paper feed shaft 42 RUNTZ2145XHZZ BN B CIS unit 43 LHLDZ2276XHZZ AF N C CIS holder left 44 LHLDZ2277XHZZ AF N C CIS holder right 45 QCNWN499BXHZZ AP N C CIS cable 46 QCNWN200CXHZZ AL N C Power supply cable 47 QCNWN201CXHZZ AP N C LIU cab...

Page 108: ...AE N C Earth spring 1 109 MSPRC3463XHZZ AE N C Sled spring 110 MSPRC3464XHZZ AE N C Latch lever spring 111 MSPRC3490XHZZ AE N C Friction arm spring 112 MSPRK3503XHZZ AF N C Carrier spring right 113 MSPRK3502XHZZ AF N C Carrier spring left 114 NBLTT2065XHZZ AR N C Carrier belt 115 MSPRC3457XHZZ AE N C Feed gear spring 116 NGERH2634XHZZ AF N C Reduction gear 1 29 67Z 117 NGERH2638XHZZ AF N C Idler g...

Page 109: ...Z2080XH02 BA B LCD unit 14 PSHEZ3830XHZZ AE N C Protection sheet 15 QCNWN498BXHZZ AR N C Panel cable 16 LPLTG3311XHZZ AF N C Separate rubber 17 LPLTP3312XHZZ AE N C Separate plate 18 LPLTP3313XHZZ AE N C Paper feed plate 19 LPLTP3314XHZZ AE N C Sub feed plate 20 MSPRC3455XHZZ AE N C Separate spring 21 MSPRC3456XHZZ AE N C Sub feed spring 22 MSPRD3495XHZZ AE N C PO pinch roller spring 23 NROLP2332X...

Page 110: ...C Telephone line cord 7 SPAKA446FXHZZ AH N D Packing add left 8 SPAKA447FXHZZ AH N D Packing add right 9 SPAKA450FXHZZ AK N D Pad A 10 SPAKA451FXHZZ AE N D Pad B 11 SPAKP449FXHZZ AG N D Vinyl cover 12 TCADH3685XHZZ AE N D Setup guide 20U 13 TCADZ2891XHZZ AF D Registration card 20U 14 TCADZ3683XHZZ AG N D Pop card English 20U 14 TCADZ3700XHZZ AG N D Pop card English 20C 25C 15 TINSE4427XHTZ AQ N D ...

Page 111: ... VCKYCY1HF104Z AA C Capacitor 50WV 0 1µ F C104 42 VCKYCY1HF104Z AA C Capacitor 50WV 0 1µ F C105 43 VCKYCY1HF104Z AA C Capacitor 50WV 0 1µ F C107 44 VCKYCY1HF104Z AA C Capacitor 50WV 0 1µ F C108 45 VCKYCY1HF104Z AA C Capacitor 50WV 0 1µ F C109 46 VCKYCY1HF104Z AA C Capacitor 50WV 0 1µ F C110 47 VCKYCY1HF104Z AA C Capacitor 50WV 0 1µ F C111 48 VCCCCY1HH101J AA C Capacitor 50WV 100PF C112 49 VCKYCY1H...

Page 112: ...2 126 VCKYCY1HF104Z AA C Capacitor 50WV 0 1µ F C223 127 VCKYCY1HB102K AA C Capacitor 50WV 1000PF C224 128 VCKYCY1HB471K AB C Capacitor 50WV 470PF C225 129 VCKYCY1HB471K AB C Capacitor 50WV 470PF C226 130 VCKYCY1HB471K AB C Capacitor 50WV 470PF C227 131 VCKYCY1HB471K AB C Capacitor 50WV 470PF C228 132 VCKYCY1HB471K AB C Capacitor 50WV 470PF C229 133 VCKYCY1HB471K AB C Capacitor 50WV 470PF C230 134 ...

Page 113: ...8 QCNCM2681XH0D AD N C Connector 4pin CNCRMT 209 QCNCM2666XH0D AD N C Connector 4pin CNFDMT 210 QCNCW2556SC1B AG C Connector 12pin CNHEAD1 211 QCNCW2556SC1B AG C Connector 12pin CNHEAD2 212 QCNCM2666XH1B AE N C Connector 12pin CNLIU 213 QCNCM2666XH1F AF C Connector 16pin CNPN 214 QCNCM2667XH0C AD N C Connector 3pin CNPRG 215 QCNCM2666XH0H AE N C Connector 8pin CNPW 216 QCNCM2666XH0B AD C Connector...

Page 114: ...JB680J AA C Resistor 1 16W 68Ω 5 R128 296 VRS CY1JB106J AA C Resistor 1 16W 10MΩ 5 R130 297 VRS CY1JB224J AA C Resistor 1 16W 220KΩ 5 R131 298 VRS CY1JB103J AA C Resistor 1 16W 10KΩ 5 R132 299 VRS CY1JB000J AA C Resistor 1 16W 0Ω 5 R133 300 VRS CY1JB000J AA C Resistor 1 16W 0Ω 5 R134 301 VRS CY1JB203J AA C Resistor 1 16W 20KΩ 5 R135 302 VRS CY1JB104J AA C Resistor 1 16W 100KΩ 5 R136 303 VRS CY1JB0...

Page 115: ...8 RR TZ3023SCZZ AC B Resistor array 100Ω x4 RA5 379 RR TZ3023SCZZ AC B Resistor array 100Ω x4 RA6 380 RR TZ3023SCZZ AC B Resistor array 100Ω x4 RA7 381 RR TZ3023SCZZ AC B Resistor array 100Ω x4 RA8 382 RR TZ3016SCZZ AA C Block resistor 33Ω x4 RA9 383 RR TZ3016SCZZ AA C Block resistor 33Ω x4 RA10 384 RR TZ3023SCZZ AC B Resistor array 100Ω x4 RA11 385 RR TZ3023SCZZ AC B Resistor array 100Ω x4 RA12 3...

Page 116: ...B393J AA C Resistor 1 16W 39KΩ 5 R110 63 VRS CY1JB243J AA C Resistor 1 16W 24KΩ 5 R111 64 VRS CY1JB223J AA C Resistor 1 16W 22KΩ 5 R112 65 VRS CY1JB153J AA C Resistor 1 16W 15KΩ 5 R113 66 VRS CY1JB332J AA C Resistor 1 16W 3 3KΩ 5 R114 67 VRS CY1JB000J AA C Resistor 1 16W 0Ω 5 R115 68 VRS CY1JB332J AA C Resistor 1 16W 3 3KΩ 5 R116 69 VRS CY1JB163J AA C Resistor 1 16W 16KΩ 5 R117 70 VRS CY1JB822J AA...

Page 117: ...55 0KYR1053UQ562 AC N C Resistor 1 4W 5 6KΩ R103 56 0KYR1053UQ562 AC N C Resistor 1 4W 5 6KΩ R104 57 0KYR3131AC752 AC N C Resistor 1 4W 7 5KΩ R105 58 0KYR3131AC752 AC N C Resistor 1 4W 7 5KΩ R106 59 0KYR1053UQ562 AC N C Resistor 1 4W 5 6KΩ R107 60 0KYR3131AC752 AC N C Resistor 1 4W 7 5KΩ R108 61 0KYR3131AC752 AC N C Resistor 1 4W 7 5KΩ R109 62 0KYR3121TC101 AB C Resistor 1 8W 100Ω R110 63 0KYR3111...

Page 118: ... 1KΩ 5 R108 22 VRS CZ1JB121J AA C Resistor 1 16W 120Ω 5 R109 23 PSHEP3680XHZZ AD C C1 sheet SHEET1 24 PTPEH2098XHZZ AD C FPC tape TAPE1 25 PTPEH2086XHZZ AC C FFC tape 1 TAPE2 26 PTPEH2086XHZZ AC C FFC tape 1 TAPE3 27 PTPEH2096XHZZ AD C FPC tape 2 TAPE4 Unit 901 DCEKI256DXH01 BG N E Ink PWB unit with FPC 8 Ink PWB unit ...

Page 119: ...273XHZZ 1 W2 AE N C LX WZ2309XHZZ 1 W3 AE N C M MARMP2036XHZZ 1 98 AF N C MARMP2037XHZZ 1 99 AE N C MLEVP2377XHZZ 1 62 AE C MLEVP2395XHSA 1 6 AF N C MLEVP2396XHZZ 1 100 AF N C MLEVP2397XHZZ 1 101 AF N C MSPRC3360XHZZ 1 102 AE C MSPRC3362XHZZ 1 72 AD C MSPRC3387XHZZ 1 103 AD C MSPRC3455XHZZ 2 20 AE N C MSPRC3456XHZZ 2 21 AE N C MSPRC3457XHZZ 1 115 AE N C MSPRC3458XHZZ 1 104 AE N C MSPRC3459XHZZ 1 1...

Page 120: ...4 387 AA C 4 388 AA C 4 389 AA C 4 390 AA C 4 391 AA C 4 392 AA C RR TZ3018SCZZ 4 374 AC C 4 375 AC C RR TZ3023SCZZ 4 376 AC B 4 377 AC B 4 378 AC B 4 379 AC B 4 380 AC B 4 381 AC B 4 384 AC B 4 385 AC B RTRNI2164XHZZ 5 84 AG B PARTS CODE No PRICE RANK NEW MARK PART RANK RUNTZ2080XH02 2 13 BA B RUNTZ2145XHZZ 1 42 BN B S SPAKA446FXHZZ 3 7 AH N D SPAKA447FXHZZ 3 8 AH N D SPAKA450FXHZZ 3 9 AK N D SPA...

Page 121: ...C 4 134 AB C 4 135 AB C 4 136 AB C 4 137 AB C 4 138 AB C 4 139 AB C VCKYCY1HB472K 4 66 AA C VCKYCY1HB821K 5 18 AA C VCKYCY1HF104Z 4 3 AA C PARTS CODE No PRICE RANK NEW MARK PART RANK 4 7 AA C 4 23 AA C 4 34 AA C 4 36 AA C 4 37 AA C 4 38 AA C 4 39 AA C 4 40 AA C 4 41 AA C 4 42 AA C 4 43 AA C 4 44 AA C 4 45 AA C 4 46 AA C 4 47 AA C 4 49 AA C 4 51 AA C 4 52 AA C 4 54 AA C 4 64 AA C 4 69 AA C 4 70 AA ...

Page 122: ...A C 4 349 AA C 4 350 AA C 4 351 AA C 4 366 AA C 4 373 AA C 5 15 AA C 5 17 AA C PARTS CODE No PRICE RANK NEW MARK PART RANK 5 25 AA C 5 61 AA C 5 67 AA C 5 72 AA C VRSCY1JB1000F 4 347 AA C VRS CY1JB100J 4 324 AA C 4 368 AA C 4 369 AA C VRS CY1JB101J 4 256 AA C 4 343 AA C 4 344 AA C 5 71 AA C VRS CY1JB102J 4 261 AA C 4 264 AA C 4 304 AA C 4 321 AA C 4 329 AA C 4 331 AA C 5 59 AA C 5 74 AA C 5 83 AA ...

Page 123: ...SN40 08100 1 W1 AA C 0 0KYC10A9RQ221 6 7 AG C 0KYC10Q1EQ101 6 10 AC C 0KYC10Q2BQ104 6 14 AC N C 0KYC1102CC333 6 9 AC C 0KYC1102EC472 6 8 AC C PARTS CODE No PRICE RANK NEW MARK PART RANK 0KYC1384QL472 6 5 AH C 6 6 AH C 0KYC2131QS104 6 3 AG N C 0KYC30A0BQ121 6 13 AG C 0KYC30A0BQ471 6 12 AL C 0KYC30A0EQ101 6 11 AH N C 0KYC3126KS121 6 4 AS C 0KYD1057AQ006 6 22 AF B 6 23 AF B 6 24 AF B 6 25 AF B 0KYD20...

Page 124: ...N ALL RIGHTS RESERVED SHARP CORPORATION Communication Systems Group Quality Reliability Control Center Higashihiroshima Hiroshima 739 0192 Japan A0405 DS IS T No part of this publication may be reproduced stored in a retrieval system or transmitted in any form or by any means electronic mechanical photocopying recording or otherwise without prior written permission of the publisher COPYRIGHT 2004 ...

Reviews: