background image

Sending Documents From Memory

103

7

. Spec

ia

l

Func

ti

ons

2

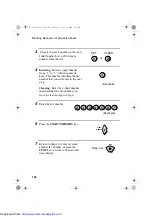
Press the 

START/MEMORY

 key 

and then 

1

.

The display will show:

Sending Documents From Memory

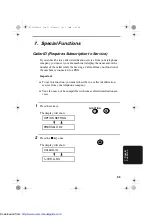
With this function, the original document is scanned immediately, 
stored in memory, and then transmitted once the connection to the 
receiving machine is made. This is convenient when transmitting to 
places where the line is often busy, as it saves you from waiting to 
pick up the original document. After transmission, the document will 
be cleared from memory.

Only one memory transmission can be set at a time.

The amount of memory currently occupied appears as a percentage 
in the display while the document is being scanned.

1

Load the document(s).

The display will show:

Set the resolution and/or contrast if 
desired.

READY TO SEND

START/

MEMORY

RESOLUTION

RECEPTION MODE

ENTER STATION #

1

all-UX84H.book  Page 103  Wednesday, July 5, 2000  8:48 AM

Downloaded from: 

http://www.usersmanualguide.com/

Summary of Contents for UX-60

Page 1: ... Sending Documents 3 Receiving Documents 4 Making Copies 5 Making Telephone Calls 6 Answering Machine Connection 7 Special Functions 8 Printing Reports and Lists 9 Maintenance 10 Troubleshooting UX 40 UX 60 FACSIMILE Downloaded from http www usersmanualguide com ...

Page 2: ...EARTHED This equipment complies with the requirements of Directives 98 13 EC and 89 336 EEC 73 23 EEC both amended by 93 68 EEC Dieses Gerät entspricht den Anforderungen der EU Richtlinien 98 13 EU und 89 336 EWG sowie 73 23 EWG die durch die Richtlinie 93 68 EWG geändert wurden Cet appareil est conforme aux exigences de la directive 98 13 CEE ainsi que des directives 89 336 CEE et 73 23 CEE modif...

Page 3: ...en succesvolle werking op elk PSTN netwerkaansluitpunt Neem bij problemen in eerste instantie contact op met de leverancier van het apparaat Este equipamento foi aprovado para ligação pan europeia de um único terminal à rede telefónica pública comutada RTPC nos termos da Decisão 98 482 CE e 1999 303 CE No entanto devido às diferenças existentes entre as RTPC dos diversos países a aprovação não gar...

Page 4: ...ts for the minute 00 to 59 7 When finished press Storing and Clearing Auto Dial Numbers 1 Press Display shows 2 Press 1 to store a number or 2 to clear a number 3 Enter a 2 digit Speed Dial number from 01 to 05 for Rapid Key Dialling or 06 to 40 for Speed Dialling If you are clearing a number go to Step 7 4 Enter the full fax telephone number 5 Press 6 Enter the name of the location by press ing n...

Page 5: ... TEL mode TEL FAX mode This mode is convenient for receiving both faxes and voice calls When a call comes in the fax will detect whether it is a voice call including manually dialled fax transmissions or an automatically dialled fax A M mode Select this mode when you go out to receive both voice messages and faxes FAX TEL FAX TEL 05 NOV 10 30 A M TEL FAX A M TEL FAX 05 NOV 10 30 FAX TEL FAX TEL 05...

Page 6: ...ermal paper Initial starter roll included with machine 10 m Recommended replacement roll FO 20PR6 30 m Paper cutting method Automatic cutter Modem speed 9600 bps with automatic fallback to lower speeds Transmission time Approx 15 seconds Resolution Horizontal 8 pels mm Vertical Standard 3 85 lines mm Fine Halftone 7 7 lines mm Super fine 15 4 lines mm Automatic document feeder 5 pages max 80 g m2 ...

Page 7: ...ive printing width 210 mm max Contrast control Automatic Dark selectable Reception modes FAX TEL TEL FAX A M Recall Yes Time Break only Copy function Yes Telephone function Yes cannot be used for outgoing or incoming calls when power fails Power requirements 230 V AC 50 Hz Operating temperature 5 35 C Humidity Maximum 85 RH Power consumption Standby 2 6 W Maximum 115 W Dimensions Width 304 mm Dept...

Page 8: ...0 Hz earthed 3 prong outlet Connecting it to any other kind of outlet may damage the machine Do not install or use the machine near water or when you are wet For example do not use the machine near a bath tub wash bowl kitchen sink or laundry tub in a wet basement or near a swimming pool Take care not to spill any liquids on the machine Unplug the machine from the telephone socket and then the pow...

Page 9: ...s in wet locations unless the socket is specifically designed for wet locations Never touch bare telephone wires or terminals unless the telephone line has been disconnected at the network interface Use caution when installing or modifying telephone lines Avoid using a telephone other than a cordless type during an elec trical storm There may be a remote risk of electric shock from lightning Do no...

Page 10: ...Mode 32 Volume Adjustment 34 2 Using the Answering Machine 36 Recording an Outgoing Message 36 Operating the Answering Machine 39 Optional Answering Machine Settings 43 Transfer Function 47 Override Ringing 50 Remote Operations 52 3 Sending Documents 61 Transmittable Documents 61 Loading the Document 63 Adjusting the Resolution and Contrast 66 Sending a Fax by Normal Dialling 68 Sending a Fax by A...

Page 11: ...quires Subscription to Service 95 Blocking Reception of Unwanted Faxes 101 Sending Documents From Memory 103 Broadcasting 105 Polling Requesting a Fax Transmission 107 8 Printing Lists 111 9 Maintenance 114 10 Troubleshooting 116 Problems and Solutions 116 Messages and Signals 120 Clearing Paper Jams 123 Index 130 all UX84H book Page 9 Wednesday July 5 2000 8 48 AM Downloaded from http www usersma...

Page 12: ...10 Note all UX84H book Page 10 Wednesday July 5 2000 8 48 AM Downloaded from http www usersmanualguide com ...

Page 13: ... retailer Before setting up make sure you have all of the following items Original document support Handset Handset lead Fax paper Sample roll Emergency labels Operation manual Telephone line cord all UX84H book Page 11 Wednesday July 5 2000 8 48 AM Downloaded from http www usersmanualguide com ...

Page 14: ...e next message Display This displays messages and prompts during operation and programming DELETE key Press this key to erase recorded messages A Look at the Operation Panel 1 2 3 3 4 5 5 DEF GHI PQRS JKL ABC DEF MNO WXYZ TUV E STOP COPY HELP START MEMORY FUNCTION VOLUME SPEED DIAL REDIAL SEARCH SPEAKER RESOLUTION RECEPTIONMODE 1 2 3 6 5 4 7 8 9 0 2 1 11 8 9 10 14 15 16 12 13 17 TEL FAX A REC MEMO...

Page 15: ... this key to send or receive a document or to scan a document into memory before sending it STOP key Press this key to cancel an operation before it is completed COPY HELP key When a document is in the feeder press this key to make a copy of a document At any other time press this key to print out the Help List a quick reference guide to the operation of your fax machine RESOLUTION RECEPTION MODE ...

Page 16: ... SEARCH R key Press this key to search for an automatic dialling number or if you are on a P B X extension press this key to transfer a call The key can also be used to review calls when Caller ID is in use Panel release Grasp this finger hold and pull toward you to open the operation panel 16 17 18 all UX84H book Page 14 Wednesday July 5 2000 8 48 AM Downloaded from http www usersmanualguide com ...

Page 17: ...ine clear to allow received documents to exit the machine About condensation If the machine is moved from a cold to a warm place it is possible that condensation may form on the scanning glass preventing proper scanning of documents for transmission To remove the condensation turn on the power and wait approximately two hours before using the machine all UX84H book Page 15 Wednesday July 5 2000 8 ...

Page 18: ...identical so they will go into either socket Make sure the handset lead goes into the socket marked with a handset symbol on the side of the machine Use the handset to make ordinary phone calls or to transmit and receive faxes manually all UX84H book Page 16 Wednesday July 5 2000 8 48 AM Downloaded from http www usersmanualguide com ...

Page 19: ...e operation panel 2 Flip up the front paper guide 3 Remove the tape from the cutter unit 4 Flip down the front paper guide and then close the operation panel Note Do not peel off or bend this strip of film all UX84H book Page 17 Wednesday July 5 2000 8 48 AM Downloaded from http www usersmanualguide com ...

Page 20: ...ences a high incidence of lightning or power surges we recommend that you install surge protectors for the power and telephone lines Surge protectors can be purchased at most telephone spe cialty stores The machine does not have a power on off switch so the power is turned on and off by simply plugging in or unplugging the power cord all UX84H book Page 18 Wednesday July 5 2000 8 48 AM Downloaded ...

Page 21: ...socket on the back of the machine marked TEL LINE Insert the other end into a wall telephone socket TEL LINE TEL SET Attaching the original document support Attach the original document support as shown below all UX84H book Page 19 Wednesday July 5 2000 8 48 AM Downloaded from http www usersmanualguide com ...

Page 22: ...ET socket 2 Connect the extension phone line to the TEL SET socket using the optional extension telephone socket adapter Note for Eire The adapter is not necessary Insert the plug of the extension phone line directly into the TEL SET socket TEL SET TEL LIN E all UX84H book Page 20 Wednesday July 5 2000 8 48 AM Downloaded from http www usersmanualguide com ...

Page 23: ...nt paper guide The fax machine s print head creates text and images by applying heat to the thermal paper Your fax machine prints incoming faxes on a special kind of paper called thermal paper Press the knob to make sure the front side of the metal guide is down all UX84H book Page 21 Wednesday July 5 2000 8 48 AM Downloaded from http www usersmanualguide com ...

Page 24: ...laced incorrectly the paper will come out blank after printing 3 Unwrap the roll of thermal paper and place it in the compartment 4 Insert the leading edge of the paper into the slot as shown Continue to push the paper through the slot until it comes out the opening in the front of the machine all UX84H book Page 22 Wednesday July 5 2000 8 48 AM Downloaded from http www usersmanualguide com ...

Page 25: ...r comes out straight and then flip down the paper guide 6 Close the operation panel making sure it clicks into place A short length of the paper will be cut off Click all UX84H book Page 23 Wednesday July 5 2000 8 48 AM Downloaded from http www usersmanualguide com ...

Page 26: ...and obtain the best reproduction quality we recommend that you use the following Sharp thermal paper which is available from your dealer or retailer FO 20PR6 THERMAL PAPER 30 m roll The use of any other paper may result in poor copy quality and excessive build up of residue on the head Handling thermal paper Do not unpack the paper until you are ready to use it It may become discoloured if It is s...

Page 27: ...ELETE 3 key key FUNCTION key STOP key START MEMORY key Entering Your Name and Fax Number 1 Press these keys The display will show ENTRY MODE Once you enter this information it will automatically appear at the top of each fax page you send Before you can begin using your fax machine you must enter your name and fax telephone number You also need to set the date and time FUNCTION 3 all UX84H book Pa...

Page 28: ...ess the SPEED DIAL key to backspace and clear the mistake 5 Press the START MEMORY key to enter the fax number in memory The display will show 3 Press the START MEMORY key The display will show 2 Press the key twice The display will show OWN NUMBER SET ENTER FAX ENTER YOUR NAME START MEMORY START MEMORY all UX84H book Page 26 Wednesday July 5 2000 8 48 AM Downloaded from http www usersmanualguide ...

Page 29: ...t letter The SPEAKER key moves the cursor forward and the SEARCH R key moves the cursor backward To clear a mistake press the SPEED DIAL key To change case press the REDIAL key To select one of the following symbols press the key or the key repeatedly _ A B C D E F G H I J K L M N O P Q R S T U V W X Y Z SPACE Cursor A dark square mark in the display that indicates where a number or letter will be...

Page 30: ...8 7 Press the START MEMORY key The display will show STORED 8 Press the STOP key to return to the date and time display START MEMORY STOP all UX84H book Page 28 Wednesday July 5 2000 8 48 AM Downloaded from http www usersmanualguide com ...

Page 31: ...e appear in the display and reports and are printed at the top of every page you transmit TEL FAX GHI PQRS JKL ABC DEF MNO WXYZ TUV A B C D STOP COPY HELP START FUNCTION VOLUME SPEED DIAL REDIAL SEARCH SPEAKER RESOLUTION RECEPTIONMODE 1 2 3 6 5 4 7 8 9 0 TEL FAX A M SYMBOLS E POLL R REC MEMO REPEAT PLAY SKIP DELETE 3 key key FUNCTION key STOP key START MEMORY key FUNCTION 3 all UX84H book Page 29 ...

Page 32: ...e cursor back to the mistake and then enter the correct number 5 Enter a two digit number for the month 01 for January 02 for February 12 for December etc Example January Example the 5th 6 Enter the year four digits Example 2000 3 Press the START MEMORY key The currently set date will appear in the display START MEMORY 0 1 0 5 9 0 5 2 0 2 0 0 all UX84H book Page 30 Wednesday July 5 2000 8 48 AM Do...

Page 33: ... to start the clock The display will show Note This fax machine is Year 2000 compliant 9 Press the STOP key to return to the date and time display START MEMORY STOP STORE JUNK all UX84H book Page 31 Wednesday July 5 2000 8 48 AM Downloaded from http www usersmanualguide com ...

Page 34: ...axes TEL FAX mode This mode is convenient for receiving both faxes and voice calls When a call comes in the fax will detect whether it is a voice call including manually dialled fax transmissions or an automatically dialled fax If it is a voice call the fax will make a special ringing sound to alert you to answer If it is an automatically dialled fax transmission reception will begin automatically...

Page 35: ...V 10 30 A M TEL FAX A M TEL FAX 05 NOV 10 30 FAX TEL FAX TEL 05 NOV 10 30 A M TEL FAX A M TEL FAX 05 NOV 10 30 RESOLUTION RECEPTION MODE key TEL FAX GHI PQRS JKL ABC DEF MNO WXYZ TUV A B C D STOP COPY HELP START MEMORY FUNCTION VOLUME SPEED DIAL REDIAL SEARCH SPEAKER RESOLUTION RECEPTIONMODE 1 2 3 6 5 4 7 8 9 0 TEL FAX A M SYMBOLS E POLL R REC MEMO REPEAT PLAY SKIP DELETE all UX84H book Page 33 We...

Page 36: ...to turn off the speaker Speaker 1 Press the SPEAKER key SPEAKER VOLUME key SPEAKER TEL FAX GHI PQRS JKL ABC DEF MNO WXYZ TUV A B C D STOP COPY HELP START MEMORY FUNCTION VOLUME SPEED DIAL REDIAL SEARCH SPEAKER RESOLUTION RECEPTIONMODE 1 2 3 6 5 4 7 8 9 0 TEL FAX A M SYMBOLS E POLL R REC MEMO REPEAT PLAY SKIP DELETE VOLUME SPEAKER all UX84H book Page 34 Wednesday July 5 2000 8 48 AM Downloaded from...

Page 37: ...f the ringer continue to press the VOLUME key until RINGER OFF OK appears in the display and then press the START MEMORY key When the ringer is switched off the pseudo ringer will still sound in TEL FAX mode to alert you to voice calls RINGER OFF OK VOLUME START MEMORY RINGER MIDDLE RINGER HIGH RINGER OFF OK RINGER LOW all UX84H book Page 35 Wednesday July 5 2000 8 48 AM Downloaded from http www u...

Page 38: ...No one is available to take your call right now Please leave a message after the beep or press your facsimile Start key to send a fax Thank you for calling 1 Press these keys The display will show To use the answering machine record an outgoing message and then set the reception mode to A M when you go out The UX 84 can store up to 24 minutes of voice messages including OGMs with no documents in m...

Page 39: ...aining to record 3 Press the START MEMORY key 4 Press 1 to select GENERAL If you are recording a message for the Transfer function explained later in this chapter press 2 for TRANSFER START MEMORY 1 2 or GENERAL TRANSFER START MEMORY 6 When finished press STOP and then replace the handset or alternatively just replace the handset 7 Press the STOP key twice to return to the date and time display ST...

Page 40: ...t the message and then press the PLAY SKIP key to listen to it or the DELETE key to erase it To return to the date and time display press the STOP key twice Note that the general outgoing message cannot be erased If you need to change it simply repeat the recording procedure all UX84H book Page 38 Wednesday July 5 2000 8 48 AM Downloaded from http www usersmanualguide com ...

Page 41: ...eived at least one incoming message or after four rings if no messages have been received For more information see Toll Saver in Remote Operations in this chapter Note If the memory is full from messages previously recorded MEM ORY IS FULL will appear in the display To set the reception mode to A M you must first erase some or all of the stored messages Note In A M mode the machine will automatica...

Page 42: ...e and time of recording will appear briefly in the display If no messages were received NO MESSAGES will appear To listen to a message a second time press the REPEAT key before playback of that message ends To move back to the previous message press the REPEAT key within 3 seconds of the beginning of the current message To skip forward to the next message press the PLAY SKIP key PLAY SKIP REPEAT R...

Page 43: ... to record telephone conversations and messages for other users of the UX 84 These will be played back together with any incoming messages when the PLAY SKIP key is pressed Recording messages To record a message press the REC MEMO key and then pick up the handset press the START MEMORY key and speak into the handset When you have finished speaking replace the handset or press the STOP key Recordin...

Page 44: ...tes and times are also shown in the Message List which can be printed out as described in Chapter 8 1 Press these keys The display will show FUNCTION 0 A M SETTINGS 2 Press these keys The display will show ICM CONFIRMATION or 3 Press the START MEMORY key The number of messages recorded will appear in the display START MEMORY 5 Press the STOP key STOP Note The recorded dates and times are cleared e...

Page 45: ...d you can change this setting to 15 30 or 60 seconds During an incoming call fax reception is initiated when the maxi mum specified recording time has been reached 1 Press these keys The display will show A M SETTINGS 2 Press these keys The display will show ICM RECORD TIME 3 Press a numeric key to select the desired ICM recording time 1 15 seconds 2 30 seconds 3 60 seconds 4 4 minutes 1 3 2 4 4 P...

Page 46: ...wers listen to your messages and then erase them see Remote Operations in this chapter Automatic fax reception YES The reception mode will switch to FAX mode allowing the UX 84 to continue to receive faxes auto matically without broadcasting an OGM on answering With this setting you can still use the remote commands to listen to your messages and erase the message memory see Remote Operations in t...

Page 47: ...ver if you are a subscriber to such telephone services as Call Waiting or Call Forwarding signals used by these services may be mistaken for a CPC signal causing the machine to hang up during a call In this case follow the steps below to turn off CPC detection Note CPC may not operate from some types of telephone exchanges For this reason periods of silence and or telephone exchange end of call si...

Page 48: ... The machine will still receive faxes sent by automatic dialling 1 Press these keys The display will show FUNCTION 0 OGM ONLY MODE 2 Press 1 to turn on OGM only mode or 2 to turn it off 1 2 or 3 Press the STOP key STOP 3 Press 1 to turn CPC detection on or 2 to turn it off 1 2 or 4 Press the STOP key STOP all UX84H book Page 46 Wednesday July 5 2000 8 48 AM Downloaded from http www usersmanualguid...

Page 49: ...o perform any of the remote operations described in Remote Operations later in this chapter Note When you hang up after a transfer call the UX 84 will not imme diately resume normal operation If you want the UX 84 to accept calls immediately after a transfer call enter twice before hanging up if you want to hang up during message playback first enter 0 and to stop playback then enter twice Program...

Page 50: ... a transfer call It can be up to 15 seconds long To record a transfer message follow the steps described in Recording an Outgoing Message in this chapter The following is an example Hello This is a transfer call for YOUR NAME Enter your remote code number now STOP START MEMORY 4 Enter a transfer number max of 32 digits including pauses by pressing the number keys 1 3 2 4 5 5 5 Example START MEMORY...

Page 51: ...eys The display will show TRANSFER FUNC 2 Press these keys The display will show 3 Press 1 to turn the Transfer function on or 2 to turn it off STOP A M SETTINGS FUNCTION 0 1 2 or 4 Press the STOP key all UX84H book Page 49 Wednesday July 5 2000 8 48 AM Downloaded from http www usersmanualguide com ...

Page 52: ...verride code To override the answering machine your callers must enter a 3 digit override code from their telephone This code has been set to 009 at the factory If you want to change it press the panel keys as shown below Important Make sure the override code is different from the remote code used for remote operations 1 Press these keys The display will show FUNCTION 0 A M SETTINGS OVERRIDE CODE ...

Page 53: ... 2 The caller should enter the override code and by pressing the appropriate keys on their telephone If an incorrect code is entered the caller will hear four beeps He or she must re enter the correct code within 10 seconds or the line will be disconnected 4 5 5 3 The UX 84 will make a special ringing sound Pick up the handset to answer the call If you do not answer within 30 seconds the outgoing ...

Page 54: ...er This number is used to prevent unauthorised people from listening to your messages or changing the settings of your machine The remote code number has been set to 001 at the factory If you want to change it press the panel keys as shown below 1 Press these keys The display will show FUNCTION 0 A M SETTINGS REMOTE CODE 3 Enter a 3 digit number by pressing the number keys Example 4 Press the STAR...

Page 55: ...efore it answers saving yourself the cost of that call If you do not want to use the Toll Saver function you can turn it off by following the steps below In this case the UX 84 will answer after the number of rings set in Changing the number of rings see Chapter 4 the ring setting for FAX reception mode 1 Press these keys The display will show 2 Press these keys The display will show FUNCTION 0 A ...

Page 56: ...en by pressing the keys on the telephone You will hear a series of beeps equal to the number of messages recorded or one long beep if four or more messages have been received The machine will then play back the messages beeping once at the end of each message When all messages have been played back you will hear a long beep If no messages have been received you will hear a short beep You can eithe...

Page 57: ... press 0 and on the telephone After this you can enter any of the commands described in the following section Other remote operations Play new messages To listen to only your new messages first stop playback by pressing 0 and and then press 6 and Erase a message To erase the message you are currently listening to press 3 and before it ends 4 When you have finished listening to your messages you ca...

Page 58: ...achine you will hear one beep If an incorrect command is entered you will hear four beeps In the latter case re enter the correct command When entering a command do not pause longer than 10 seconds between each digit If you do a 4 beep error signal will be issued and the digits entered up to that point will be disregarded In this case re enter the command from the beginning If an additional 10 sec...

Page 59: ...k ends to enter a command first stop playback by pressing 0 and and then enter the command Changing the fax reception mode Select a new reception mode by pressing the keys as follows A M mode 8 1 and FAX mode 8 2 and TEL mode 8 3 and TEL FAX mode 8 4 and Caution In TEL and TEL FAX mode you will not be able to further change the reception mode 1 8 Example Recording a new outgoing message 1 Press 4 ...

Page 60: ...rning the Transfer function on or off To turn Transfer on Press 9 1 and on the telephone To turn Transfer off Press 9 2 and on the telephone 1 Example 9 Changing the transfer telephone number 1 Press 9 0 and on the telephone 9 0 2 After you hear a short beep enter the new telephone number When finished press To insert a pause between any two digits of the number press 5 6 3 1 4 1 4 Example all UX8...

Page 61: ...ear a beep and the new message will be played back automatically 9 3 Recording a Memo You can record a memo for yourself or other users of the UX 84 The memo will be played back when incoming messages are listened to 1 Press and on the telephone 2 When you hear a short beep speak into the telephone to record the memo 3 When you are finished press 0 and If the UX 84 detects a certain period of sile...

Page 62: ...r outgoing message will play but callers will not be able to record a message Faxes sent by automatic dialling will be received To turn off OGM only mode press 1 2 and 1 2 Example all UX84H book Page 60 Wednesday July 5 2000 8 48 AM Downloaded from http www usersmanualguide com ...

Page 63: ...can load in the document feeder depend on whether you load one page at a time or several pages at once Loading one page at a time Loading several pages at once Minimum size Maximum size Minimum weight Maximum weight Minimum size Maximum size Minimum weight Maximum weight 140 mm 148 mm 52 g m all UX84H book Page 61 Wednesday July 5 2000 8 48 AM Downloaded from http www usersmanualguide com ...

Page 64: ...ples and pins must be removed from documents before loading in the feeder If these are not removed they may damage the machine Documents which are patched taped torn smaller than the mini mum size carbon backed easily smudged or have a slippery coated surface should be copied on a photocopying machine and the copy loaded in the feeder 4 mm 4 mm 5 mm 5 mm Letters in the shaded area will not be scan...

Page 65: ...e feeding or jamming If your document consists of several large or thick pages which must be loaded one at a time insert each page into the feeder as the previous page is being scanned Insert gently to prevent double feeding 1 Adjust the document guides to the width of your document READY TO SEND 2 Place the document face down and push it gently into the document feeder The top edge of the documen...

Page 66: ...ing later in this chapter Removing a document from the feeder Important Do not try to remove a document without opening the operation panel This may damage the feeder mechanism 1 Grasp the finger hold and pull up to open the operation panel If you need to remove a document from the feeder open the operation panel RESOLUTION RECEPTIONMODE all UX84H book Page 64 Wednesday July 5 2000 8 48 AM Downloa...

Page 67: ...ocuments 3 Close the operation panel Press down on both front corners of the panel to make sure it clicks into place 2 Remove the document all UX84H book Page 65 Wednesday July 5 2000 8 48 AM Downloaded from http www usersmanualguide com ...

Page 68: ...al transmission FINE Use FINE for documents containing small letters or fine drawings SUPER FINE Use SUPER FINE for documents containing very small letters or very fine drawings HALF TONE Use HALF TONE for photographs and illustrations The original will be reproduced in 64 shades of gray AUTO Use AUTO for normal documents DARK Use DARK for faint documents You must adjust the resolution and or cont...

Page 69: ...t setting AUTO will appear next to each resolution setting The second time you move through the list the contrast setting DARK will appear STANDARD AUTO FINE AUTO SUPER FINE AUTO HALF TONE AUTO STANDARD DARK FINE DARK SUPER FINE DARK HALF TONE DARK Note In order to transmit in SUPER FINE resolution the receiving fax machine must also have that resolution If it doesn t your machine will auto matica...

Page 70: ...andset to talk Normal Dialling allows you to listen to the line and make sure the other fax machine is responding 1 Load the document s The display will show 2 Pick up the handset or press the SPEAKER key Listen for the dial tone READY TO SEND 3 Dial the number of the receiving machine by pressing the number keys Example or SPEAKER 3 2 2 4 5 6 7 Set the resolution and or contrast if desired RESOLU...

Page 71: ...g machine to issue a reception tone Using the REDIAL key You can press the REDIAL key to redial the last number dialled To send a document press the START MEMORY key when you hear the fax tone after the connection is made Note that the speaker is automatically activated when you press the REDIAL key 5 When you hear the reception tone press the START MEMORY key Replace the handset if you used it Wh...

Page 72: ...l number for it Forty Speed Dial numbers are available Speed Dial numbers 01 through 05 are for Rapid Key one touch Dialling A SPEED DIAL Speed Dial numbers 06 through 40 are for dialling with the SPEED DIAL key START MEMORY Rapid Keys SPEED DIAL key 0 6 TEL FAX GHI PQRS JKL ABC DEF MNO WXYZ TUV A B C D E POLL STOP COPY HELP START MEMORY FUNCTION VOLUME SPEED DIAL REDIAL SEARCH SPEAKER RESOLUTION ...

Page 73: ...0 for Speed Dialling 4 Enter the fax or voice number by pressing the number keys Note A space cannot be entered To clear a mistake press the SPEED DIAL key If a pause is required between any of the digits to access a special service or an outside line press the REDIAL key The pause will appear as a hyphen Several pauses can be entered in a row 3 FUNCTION FAX TEL MODE 1 SET 2 CLEAR 1 FAX TEL SET EN...

Page 74: ... Example SHARP 77777 444 22 7777 77 To clear a mistake press the SPEED DIAL key To enter two letters in succession that require the same key press the SPEAKER key after entering the first letter START MEMORY A B C D E F G H I J K L M N O P Q R S T U V W X Y Z SPACE 7 Press the START MEMORY key START MEMORY all UX84H book Page 72 Wednesday July 5 2000 8 48 AM Downloaded from http www usersmanualgui...

Page 75: ...s lifted or the SPEAKER key is pressed before dialling Note Numbers stored for automatic dialling will appear on the Tele phone Number List printout so this facility should not be used to store least cost routing or system access passwords which need to remain pri vate STOP FAX TEL MODE 1 SET 2 CLEAR Step 3 or Clearing auto dial numbers 1 Press these keys The display will show 3 FUNCTION Note To c...

Page 76: ...ps 4 and 6 Step 3 or START MEMORY STOP Note The fax machine uses a lithium battery to keep automatic dialling numbers and other programmed data in memory when the power is turned off Battery power is consumed primarily when the power is off With the power kept continuously off the life of the battery is about 5 years If the battery dies have your dealer or retailer replace it Do not try to replace...

Page 77: ...ber is incorrect press the STOP key The document will be automatically transmitted once the connection is established Rapid Key Dialling If the number you want to dial has been stored for Automatic Dialling as a Speed Dial number from 01 to 05 you can dial it by pressing the corresponding Rapid Key 1 Load the document s The display will show Example To dial Speed Dial number 01 press Rapid Key A R...

Page 78: ...ber by pressing the numeric keys To enter numbers 1 through 9 first enter 0 and then the number Example START MEMORY READY TO SEND Set the resolution and or contrast if desired RESOLUTION RECEPTIONMODE 3 Check the display If the name or number shown is correct press the START MEMORY key If not press the STOP key and then repeat Step 2 SPEED DIAL 0 9 all UX84H book Page 76 Wednesday July 5 2000 8 4...

Page 79: ...ODE 2 Enter the number of the receiving machine by pressing the numeric keys If a pause is required between any of the digits to access a special service or an outside line press the REDIAL key The pause will appear as a hyphen Several pauses can be entered in a row 3 2 2 4 5 6 7 3 Check the display If the number of the receiving machine shown is correct press the START MEMORY key If it is not cor...

Page 80: ... key and then the 1 key READY TO SEND RESOLUTION RECEPTIONMODE 3 Enter the first letter of the stored name by pressing the appropriate number key the key below the marked letter one or more times until the letter appears in the display If the name begins with a special character or number press 1 If you don t remember the first letter go to Step 4 you will scroll through the list from the beginnin...

Page 81: ... been stored at all NO DATA will appear 5 Press the START MEMORY key The document will be automatically transmitted once the connection is established Automatic redialling If you use automatic dialling including Direct Keypad Dialling and the line is busy the fax machine will automatically redial the number The fax machine will make 2 redialling attempts at an interval of 5 minutes To stop automat...

Page 82: ...d on demand 1 Press these keys The display will show 2 Press a number from 1 to 4 to select the condition for printing ALWAYS PRINT A report will be printed after each transmission reception or error ERROR MEMORY A report will be printed only when an error occurs or a memory transmission is completed SEND ONLY A report will be printed after each transmission NEVER PRINT A report will never be prin...

Page 83: ...e paper or original document occurred Make sure the paper or document is loaded properly Make sure the operation panel is shut securely NO PAPER You ran out of paper during reception COM E 0 to COM E 7 A telephone line error prevented the transaction See Line Error in Chapter 10 CANCEL Transmission was cancelled because the STOP key was pressed no document was in the feeder or the other machine re...

Page 84: ...tomatically begin reception of the incoming document If your fax machine doesn t detect a fax tone this means that the call is a voice call or manually dialled fax it will make a ringing sound called pseudo ringing for 30 seconds to alert you to answer If you don t answer within this time your fax will send a fax tone to the other machine to allow the calling party to send a fax manually if they d...

Page 85: ...SOLUTION RECEPTIONMODE If you pick up the handset before the machine answers you can talk to the other party and or receive a document as explained in Using TEL Reception mode see page 85 To select FAX mode press the RESOLUTION RECEPTION MODE key until the arrow in the display points to FAX FAX TEL A M TEL FAX all UX84H book Page 83 Wednesday July 5 2000 8 48 AM Downloaded from http www usersmanua...

Page 86: ...m 2 to 5 can be selected 1 Press these keys The display will show 2 Enter the desired number of rings any number from 2 to 5 The display will show 4 FUNCTION STOP 3 Press the STOP key to return to the date and time display TEL FAX REMOTE NUMBER OF RINGS ENTER 2 5 2 Example 3 rings 3 all UX84H book Page 84 Wednesday July 5 2000 8 48 AM Downloaded from http www usersmanualguide com ...

Page 87: ...et to TEL you must answer all calls by picking up the fax machine s handset or an extension phone connected to the same line Answering with the fax s handset Beep To select TEL mode press the RESOLUTION RECEPTION MODE key until the arrow in the display points to TEL Note If you have set the Fax Signal Receive setting to NO press the START MEMORY key to begin reception see page 88 RECEIVING all UX8...

Page 88: ... an extension phone 1 Answer the extension phone when it rings 2 If you hear a soft fax tone wait until your fax responds the extension phone will go dead if it is connected to your fax or you will hear pronounced high pitched tones if the phone is connected to a separate wall socket then hang up Beep Phone goes dead or pronounced high pitched tones START MEMORY RECEIVING all UX84H book Page 86 We...

Page 89: ...ument is loaded in its feeder If you have set the Fax Signal Receive setting to NO press 5 and on the extension phone to begin reception 5 Changing the number for remote fax activation If desired you can use a number other than 5 to activate fax reception from an extension telephone You can select any number from 0 to 9 1 Press these keys The display will show 4 FUNCTION TEL FAX REMOTE 2 Press a n...

Page 90: ...event your fax from mistakenly attempting to receive documents from the computer fax modem Follow the steps below to change the setting 1 Press these keys The display will show 4 FUNCTION FAX SIGNAL RX 2 Press 1 to turn on the function or 2 to turn it off 1 2 or YES NO 3 Press the STOP key to return to the date and time display STOP 3 Press the STOP key to return to the date and time display STOP ...

Page 91: ...en the memory is full no further reception will be possible until the receording paper is replaced or the jam is removed When you have received a document in memory FAX RX IN MEMORY will appear in the display alternating with OUT OF PAPER or PAPER JAMMED When you add paper or clear the jam the stored documents will automatically print out all UX84H book Page 89 Wednesday July 5 2000 8 48 AM Downlo...

Page 92: ...before faxing to see if the resolution or contrast needs adjustment 1 Load the document The display will show If desired adjust the resolution and or contrast READY TO SEND RESOLUTION RECEPTIONMODE 2 Press the COPY HELP key COPY HELP all UX84H book Page 90 Wednesday July 5 2000 8 48 AM Downloaded from http www usersmanualguide com ...

Page 93: ...ey Listen for the dial tone 2 Dial the number using one of the following methods Normal Dialling Enter the full telephone number with the numeric keys Rapid Key Dialling Press the appropriate Rapid Key Speed Dialling Press the SPEED DIAL key and enter the 2 digit Speed Dial number with the numeric keys 3 Speak with the other party when they answer If you pressed the SPEAKER key pick up the handset...

Page 94: ...for a special service in a Rapid Key you can press the Rapid Key for that area code or access code then dial the remainder of the number by pressing a Rapid Key pressing number keys or pressing the SPEED DIAL key and entering a two digit Speed Dial number Searching for an auto dial number You can use the SEARCH R key to search for a Rapid Key or Speed Dial number First search for the number as des...

Page 95: ... Phone Plus Services and can be used in conjunction with any facility that requires a recall command Note The recall method on the fax machine is TBR Recall facilities will not be available on a PBX which does not accept Timed Break Recall as it s recall signal 2 When you hear the dial tone dial the number of the third party for the enquiry call 3 When you have finished the enquiry call you will b...

Page 96: ... hear the dial tone dial the number to which you want to transfer the call When the other party answers hang up and the call will be transferred If the other party does not answer press the SEARCH R key again to return to the original caller SEARCH R all UX84H book Page 94 Wednesday July 5 2000 8 48 AM Downloaded from http www usersmanualguide com ...

Page 97: ...may not function if the machine is connected to a PBX Important To use this function you must subscribe to a caller identification service from your telephone company Your fax may not be compatible with some caller identification ser vices 1 Press these keys The display will show 2 Press the key once The display will show 4 FUNCTION CALLER ID 1 YES 2 NO OPTION SETTING PRESS OR all UX84H book Page ...

Page 98: ...r ID or 2 to turn it off The display will show 1 2 or YES NO 4 Press the STOP key to return to the date and time display NUMBER OF RINGS STOP all UX84H book Page 96 Wednesday July 5 2000 8 48 AM Downloaded from http www usersmanualguide com ...

Page 99: ...me and number have been programmed into memory DOE JOHN Display example 525 8693 Caller s name Caller s number Display messages One of the following messages will appear while the fax rings if caller information is not available NO SERVICE No caller information was received from your telephone company Make sure that the telephone company has activated your service CALLER ID ERROR Noise on the tele...

Page 100: ... steps below to view the Caller ID List in the display If desired you can immediately dial a number when it appears 1 Press these keys The display will show REVIEWING CALLS SEARCH R 2 2 Press the key to scroll through the list from the most recent call or the key to scroll through the list from the oldest call or 3 If you want to dial one of the numbers in the list scroll through the list until th...

Page 101: ...play If you want to delete all calls from the list hold the 0 key down for at least 3 seconds while you are viewing any number in the list Priority Call If desired you can set your fax to make a special ringing sound when you receive a call from a designated phone number This lets you know immediately who is calling without having to look at the display To use this function enter the desired phone...

Page 102: ...l as fax receptions the Anti Junk Fax function normally only blocks faxes In this case when a voice call or a fax transmission comes in from a number you have specified as a Junk Number your fax will break the connection as soon as it receives the calling phone number from the caller ID service To use this function enter the number in the Anti Junk Number List as explained in Blocking Reception of...

Page 103: ... List To clear a number from the Anti Junk Number List you need to know the 1 digit number which identifies it If you have forgotten this number print out the Anti Junk Number List as explained in Chapter 8 For blocking faxes you must have either the telephone number as programmed into the transmitting machine or if Caller ID is enabled the telephone number of the calling party 1 Press these keys ...

Page 104: ...clear and go to Step 6 5 Enter the fax number 7 Return to Step 4 to enter or clear another fax number or press the STOP key to return to the date and time display 6 Press the START MEMORY key 1 Step 4 or Example Example 3 2 2 4 5 6 7 START MEMORY STOP 3 Press 1 to enter a number in the Anti Junk Number List or 2 to clear a number from the list 1 2 or SET CLEAR all UX84H book Page 102 Wednesday Jul...

Page 105: ...ne is often busy as it saves you from waiting to pick up the original document After transmission the document will be cleared from memory Only one memory transmission can be set at a time The amount of memory currently occupied appears as a percentage in the display while the document is being scanned 1 Load the document s The display will show Set the resolution and or contrast if desired READY ...

Page 106: ... number keys START MEMORY E POLL A B C D Example If the memory becomes full If the memory becomes full while the document is being scanned MEMORY IS FULL will appear in the display Press the START MEMORY key if you want to transmit the pages which have been stored up to that point in memory The remaining pages will be ejected from the feeder After transmission the mem ory will be cleared and you c...

Page 107: ...an only use Rapid Keys or Speed Dial numbers to dial the numbers of the receiving machines 1 Load the document s The display will show 2 Press the START MEMORY key and then 2 3 Dial the receiving machines maximum of 10 using one or both of the following methods Enter one or more Speed Dial numbers by pressing the number keys Press one or more Rapid Keys READY TO SEND START MEMORY 2 2 2 Example A B...

Page 108: ...mn of the report to see if any of the locations are marked Busy or have a communication error code If so send the document to those locations again START MEMORY 4 Press the START MEMORY key Set the resolution and or contrast if desired START MEMORY RESOLUTION RECEPTIONMODE all UX84H book Page 106 Wednesday July 5 2000 8 48 AM Downloaded from http www usersmanualguide com ...

Page 109: ...ing fax machine initiates the transmission To use the polling function you must first set Rapid Key E POLL for use as a polling key When Rapid Key E POLL is set as a polling key it cannot be used for Rapid Key dialling 1 Press these keys The display will show 2 Press 1 to turn on the function or 2 to turn it off FUNCTION 3 Press the STOP key to return to the date and time display STOP 4 POLLING 1 ...

Page 110: ...e E POLL 2 5 8 GHI JKL MNO TUV WXYZ PQRS ABC DEF 1 4 7 3 6 9 Requesting transmission Note A Rapid Key can only be used for polling if you lift the handset or press the SPEAKER key before pressing the Rapid Key Turnaround polling After polling a fax machine you can send a document to that machine on the same connection Simply place the document to be sent in the feeder and follow the steps describe...

Page 111: ...ion is turned on polling will only take place when the fax number of the polling fax machine has been entered in your machine s list of permitted fax numbers called passcode numbers The number of the polling fax must also be correctly programmed into itself for identification To use Polling Security follow the steps below to turn the function on and then enter permitted numbers as shown on the fol...

Page 112: ...r 2 to clear a number 1 2 or SET CLEAR 3 Storing Enter a 2 digit number from 01 to 10 This number identifies the fax number you will store in the next step Clearing Enter the number which identifies the fax number you want to clear and go to Step 5 0 1 Example 4 Enter the fax number Example 3 2 2 4 5 6 7 5 Press the START MEMORY key 6 Return to Step 3 to enter or clear another number or press STOP...

Page 113: ... follow the steps below 1 Press the FUNCTION key and 2 The display will show 2 Press the key or key until the desired list appears in the display FUNCTION 2 LISTING MODE 3 Press the START MEMORY key to print the list or START MEMORY Telephone Number List This list shows the fax numbers that have been programmed for automatic dialling all UX84H book Page 111 Wednesday July 5 2000 8 48 AM Downloaded...

Page 114: ...sscode List This list shows setting made for polling security your name and fax telephone number as entered in the machine and a sample of the header printed at the top of every page you transmit HEADER PRINT all UX84H book Page 112 Wednesday July 5 2000 8 48 AM Downloaded from http www usersmanualguide com ...

Page 115: ...the answering machine Message List This list shows information about the messages currently recorded in the answering machine including the date and time of recording the length and the type ICM memo or 2 way all UX84H book Page 113 Wednesday July 5 2000 8 48 AM Downloaded from http www usersmanualguide com ...

Page 116: ...up to open the operation panel 3 Wipe the scanning glass and rollers with a cotton pad Make sure that all dirt and stains such as correcting fluid are removed as dirt will cause vertical lines on transmitted images and copies Scanning glass 2 Flip up the green levers on each side of the white roller all UX84H book Page 114 Wednesday July 5 2000 8 48 AM Downloaded from http www usersmanualguide com...

Page 117: ... of the machine with a dry cloth Caution Do not use benzene or thinner These solvents may damage or discolour the machine 4 Flip down the green levers on each side of the white roller 5 Flip up the front paper guide and wipe the black roller under it 6 Flip down the front paper guide all UX84H book Page 115 Wednesday July 5 2000 8 48 AM Downloaded from http www usersmanualguide com ...

Page 118: ... tv dvd and othes Manual users user manuals user guide manual owners manual instruction manual manual owner manual owner s manual guide manual operation operating manual user s manual operating instructions manual operators manual operator manual product documentation manual user maintenance brochure user reference pdf manual Downloaded from http www usersmanualguide com ...

Reviews: