background image

R-870B

3

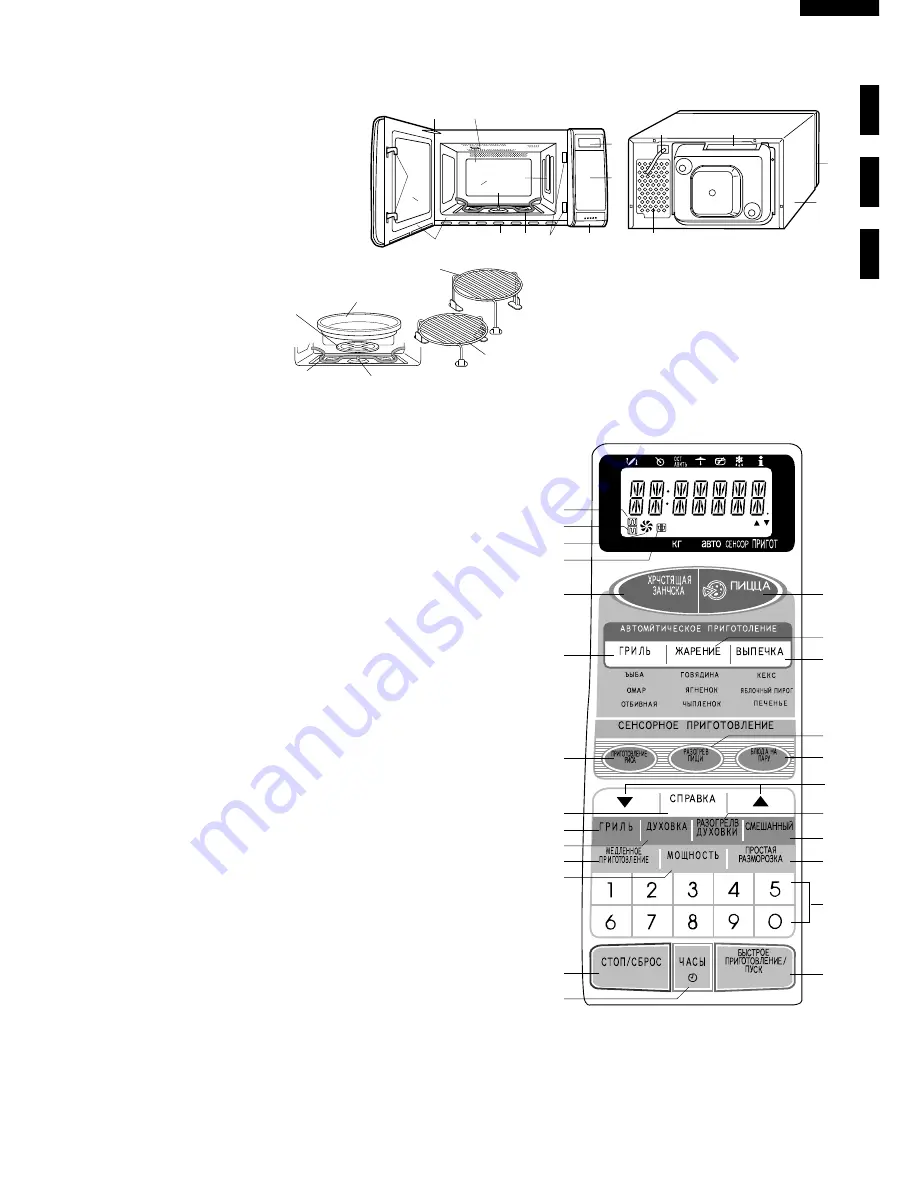
TOUCH CONTROL PANEL

1

4

u

3

0

0

0

5

5

2

6

w

7

9

8

q

e

r

t

y

Turntable 

Turntable
support 

High rack

Low rack

Turntable 
motor shaft 

Bottom 
heater

APPEARANCE VIEW

1. TOP HEATER SYMBOL

The symbol will light when the top heater is in use.

2. BOTTOM HEATER SYMBOL

The symbol will light when the bottom heater is in use.

3. CONVECTION SYMBOL

The symbol will light during convection cooking.

4. MICROWAVE SYMBOL

The symbol will light during microwave cooking.

A. CRYSPY SNACK PAD: Press to select 5 popular snack menus.

B. PIZZA PAD: Press to select 3 pizza menus.

C. AUTO GRILL PAD: Press to select 3 popular grill menus.

D. AUTO ROAST PAD: Press to select 3 popular roast menus.

E. AUTO BAKE PAD: Press to select 3 popular baking menus.

F. SENSOR RICE MENU PAD: Press to cook rice, congee or porridge.

G. SENSOR REHEAT DISH PAD: Press to reheat dish.

H. SENSOR STEAM MENU PAD

Press to steam fish, meat or dumpling.

I.

MORE (

'

) / LESS (

"

) pads

Press to adjust the doneness of food in one minute increments during
cooking or to increase/ decrease the time whilst programming the
automatic operations.

J. HELP PAD

Press to select auto start, child lock, language or demonstration modes.
Press to get cooking information.

K. GRILL PAD: Press to select grill cooking.

L. CONVEC PAD

Press to select convection cooking and convection temperature.

M. PREHEAT PAD

Press to preheat the oven prior to cooking.

N. MIX PAD: Press to select mix cooking.

O. SLOW COOK PAD: Press to cook slowly and longer time.

P. POWER LEVEL PAD

Press to select microwave power setting. If not pressed, HIGH power is
automatically selected.

Q. EASY DEFROST PAD

Press to defrost meat by entering weight.

R. NUMBER PADS

Press to enter cooking times, clock time, weight or quantity of food.

S. STOP/CLEAR PAD

Press to clear during programming. Press once to stop operation of oven
during cooking; Press twice to cancel cooking programme.

OVEN
1. Oven lamp
2. Top heaters (Grill heaters)
3. See through door
4. Door hinges
5.  Door safety latches
6. Door seals and sealing surfaces
7. Bottom heater
8. Oven cavity
9. Turntable motor shaft
10.Ventilation openings
11.Waveguide cover
12.Door opening button
13.Control panel
14.Digital display
15.Power supply cord
16.Outer cabinet
17.Ventilation slit

NOTE:
1. Ensure that the bottom heater is in the lowest

position as shown the figure, as it is possible
to move it up and down to help with cleaning.

2. Place the turntable support over the turntable

motor shaft on the floor of the cavity.

3. Then place the turntable on to the turntable

support.

T. CLOCK PAD

Press to set clock time.

U. INSTANT COOK/START PAD

Press once to cook for 1 minute at 100% (HIGH
power) or increase by 1 minute multiples each
time this pad is pressed during cooking. Press
to start oven after setting programs.

CRISPY SNACK

PIZZA

AUTO COOK

GRILL

Grilled Fish

RICE MENU

GRILL

SLOW COOK

STOP/ CLEAR

INSTANT COOK/START

POWER LEVEL

EASY DEFROST

CONVEC

PREHEAT

MIX

REHEAT DISH

STEAM MENU

Grilled Lobster

Steak

Beef

Lamb

Chicken

Cake

Apple Pie

Cookies

SENSOR COOK

ROAST

BAKE

HELP

1

2

3

1

2

3

1

2

3

TURNOVER ADD STAND

KG

%
AUTO SENSOR COOK

COVER STIR DEFROST HELP

1
2
3
4

A

C

F

K

J

O

L

P

S

T

B

E

D

H

I

M

G

N

Q

U

R

Summary of Contents for R-870B

Page 1: ...TED WIRING BOARD 41 PARTS LIST 42 S8837R870BPHR DOUBLE GRILL CONVECTION MICROWAVE OVEN MODEL R 870B In interests of user safety the oven should be restored to its original condition and only parts identical to those specified should be used SERVICE MANUAL SHARP CORPORATION DOUBLE GRILL CONVECTION Sensor CRISPY SNACK PIZZA AUTO COOK GRILL Grilled Fish RICE MENU GRILL SLOW COOK STOP CLEAR INSTANT CO...

Page 2: ...R 870B ...

Page 3: ...e ensured A The door is tightly closed B The door brackets and hinges are not defective C The door packing is not damaged D The door is not deformed or warped E There is not any other visible damage with the oven Servicing and repair work must be carried out only by trained service engineers All the parts marked on parts list are used at voltages more than 250V Removal of the outer wrap gives acce...

Page 4: ...ensions Width 352 mm Height 207 mm Depth 368 mm Turntable diameter 325 mm Control Complement Touch Control System Clock 1 00 12 59 Timer 0 99 minutes and 99 seconds Microwave Power for Variable Cooking Repetition Rate 100 Full power throughout the cooking time 70 approx 70 of FULL Power 50 approx 50 of FULL Power 30 approx 30 of FULL Power 10 approx 10 of FULL Power Mix cooking Convec Mix High 250...

Page 5: ...EVEL PAD Press to select microwave power setting If not pressed HIGH power is automatically selected Q EASY DEFROST PAD Press to defrost meat by entering weight R NUMBER PADS Press to enter cooking times clock time weight or quantity of food S STOP CLEAR PAD Press to clear during programming Press once to stop operation of oven during cooking Press twice to cancel cooking programme OVEN 1 Oven lam...

Page 6: ...cle the switches come to the following condition Switch Contact Condition During Oven Door Cooking Open No cooking 1st latch switch COM NO Closed Opened 2nd interlock relay control switch COM NO Closed Opened Monitor Switch COM NC Opened Closed The circuit to the high voltage transformer fan motor oven lamp and turntable motor are cut off when the 1st latch switch and 2nd interlock relay control s...

Page 7: ... the number pads When the START pad is pressed the following operations occur Figure O 4 a on page 35 1 The relay RY3 RY5 RY6 are energized 2 The numbers of the digital read out start the count down to zero 3 Then the top heaters turntable motor oven lamp and fan motor are energized 4 Now the food is grilled by the top heaters 5 Upon completion of the selected cooking time audible signal sounds an...

Page 8: ...d is pressed the following operations occur Figure O 5 b on page 37 1 The relay RY5 RY6 are energized 2 The numbers of the digital read out start the count down to zero 3 The turntable motor oven lamp and fan motor are energized 4 The relay RY2 RY3 are energized alternately within a 48 seconds time base by the control unit 5 The top heaters operate through the relay RY3 is energized And the high v...

Page 9: ... unit Wait t wo minutes before cooking on AH SENSOR COOKING CONDITION 2 After about 16 seconds the cook relay RY2 is ener gized The power transformer is turned on microwave energy is produced and first stage is started The 16 seconds is the cooling time required to remove any vapour from the oven cavity and sensor Figure O 2 NOTE During this first stage do not open the door or touch STOP CLEAR pad...

Page 10: ...ST PROCEDURE motor turntable motor and the oven lamp The LSI also stops counting down 3 Once the fire sensor feature has shut the unit down the programmed cooking cycle may be resumed by press ing the START pad or the unit may be reset by pressing the CLEAR pad IMPORTANT During sensor cooking operation the fire sensing operation sequence will not begin until the AH sensor has detected vapours and ...

Page 11: ... fan motor Relay RY1 will however open as soon as the convection cycle has ended turning off the convection fan motor This will now cool FUSE M10A 250V 1 If the wire harness or electrical components are short circuited this fuse blows to prevent an electric shock or fire hazard 2 This fuse blows when the 1st latch switch and 2nd interlock relay RY2 remain closed with the oven door open and when th...

Page 12: ...n removed in this event carry out 3D checks and then disconnect the leads to the primary of the high voltage transformer Ensure that these leads remain isolated from other components and the oven chassis Use insulation tape if necessary When the testing is completed carry out 3D checks and reconnect the leads to the primary of the high voltage transformer When all service work is completed and the...

Page 13: ...t is produced in oven load Microwave power does not seem to be generated properly Top heaters do not operate Bottom heater does not operate Temperature is lower or higher than preset Convection motor does not operate Oven stops after 4 minutes 15 sec Oven is in sensor cooking condition but AH sensor does not end 1st stage or does not stop cooking cycle or the oven stops soon CONDITION PROBLEM MAGN...

Page 14: ...emperature of the oven and vessel The oven and the empty vessel are at ambient temperature prior to the start the test 3 Temperature of the water The initial temperature of the water is 10 2 C 4 Selecttheinitialandfinalwatertemperaturesothatthemaximumdifferencebetweenthefinalwater temperature and the ambient temperature is 5K 5 Select stirring devices and measuring instruments in order to minimize...

Page 15: ...Connect the ohmmeter across the terminal B C of the high voltage rectifier and note the reading obtained Reverse the meter leads and note this second reading The normal resistance is infinite in one direction and more than 100 kΩ in the other direction CARRY OUT 4R CHECKS NOTE FOR MEASUREMENT OF THE RESISTANCE OF THE RECTIFIER THE BATTERIES OF THE MEASURING INSTRUMENT MUST HAVE A VOLTAGE AT LEAST ...

Page 16: ...resistricted ventilation cooling fan failure or a fault condition within the magnetron or HV circuit An open circuit thermal cut out OVEN indicates that the food in the oven cavity may catch fire this may be due to over heating produced by improper setting of the cooking timer or failure of the control panel CARRY OUT 4R CHECKS G BLOWN FUSE M10A CARRY OUT 3D CHECKS If the fuse M10A is blown when t...

Page 17: ...CKS If the fuse 15A is blown there could be a short or ground in electrical parts or wire harness Check them and replace the defective parts or repair the wire harness CARRY OUT 4R CHECKS CAUTION Only replace fuse 15A with the correct value replacement K TOP HEATERS AND BOTTOM HEATER TEST CARRY OUT 3D CHECKS Before carrying out the following tests make sure the heater is cool completely 1 Resistan...

Page 18: ...ore replacing the control unit perform the key unit test Procedure O to determine if control unit is faulty 2 1 In connection with pads a When touching the pads a certain group of pads do not produce a signal b When touching the pads no pads produce a signal 2 2 In connection with indicators a At a certain digit all or some segments do not light up b At a certain digit brightness is low c Only one...

Page 19: ... coil with a D C voltmeter during the microwave cooking operation grill operation convection operation or mix operation DC voltage indicated Defective relay DC voltage not indicated Check diode which is connected to the relay coil If diode is good control unit is defective RELAY SYMBOL OPERATIONAL VOLTAGE CONNECTED COMPONENTS RY1 Approx 24 0V D C Convection motor RY2 Approx 24 0V D C High voltage ...

Page 20: ...e dry Wipe off any moisture with a dry cloth or paper towel 6 The Sensor works with food at normal storage temperature For example chicken pieces would be at refrigerator temperature and canned soup at room temperature 7 Avoid using aerosol sprays or cleaning solvents near the oven while using Sensor settings The sensor will detect the vapor given of by the spray and turn off before food is proper...

Page 21: ...abbling If new sensor dose not operate properly the problem is with the control unit CHECKING CONTROL UNIT 1 Disconnect oven from power supply and then remove outer case 2 Discharge the high voltage capacitor 3 Disconnect the wire leads from the cook relay 4 Disconnect the sensor connector that is mounted to lower portion of control panel 5 Then connect the dummy resistor circuit see fig to the se...

Page 22: ...being cooked to control its automatic cooking The touch control section consists of the following units as shown in the touch control panel circuit 1 Key Unit 2 Control Unit The Control unit consists of Power unit and CPU unit The principal functions of these units and signals commu nicated among them are explained below Key Unit The key unit is composed of a matrix signals generated in the LSI ar...

Page 23: ...utput terminal for temperature measurement OVEN THERMISTOR H level GND Thermistor OPEN timing L level 5V Temperature measuring timing Convection cooking 12 P56 OUT Signal to sound buzzer A key touch sound B Completion sound C When the temperature of the oven cavity reaches the preset temperatureinthepreheatingmode or when the preheating hold time 30 minutes is elapsed 13 P55 OUT Timing signal outp...

Page 24: ...shut off relay RY6 The square waveform voltage is delivered to the relay RY6 driving circuit 34 P70 IN Connected to VC 35 RESET IN Auto clear terminal Signal is input to reset the LSI to the initial state when power is applied Temporarily set to L level the moment power is applied at this time the LSI is reset Thereafter set at H level 36 P81 OUT Magnetron high voltage circuit driving signal To tu...

Page 25: ... in LCD 49 50 P17 P16 OUT Segment data signal Connected to LCD No connection in LCD 51 80 SEG39 SEG10 OUT Segment data signal Connected to LCD The relation between signals are as follows LSI signal Pin No LCD Pin No LSI signal Pin No LCD Pin No SEG 0 90 SEG39 51 SEG20 70 SEG20 20 SEG 1 89 SEG38 50 SEG21 69 SEG19 19 SEG 2 88 SEG37 49 SEG22 68 SEG18 18 SEG 3 87 SEG36 48 SEG23 65 SEG17 17 SEG 4 86 SE...

Page 26: ... Connected to VC 94 COM3 OUT Common data signal Connected to LCD Pin No 36 No connection in LCD 95 COM2 OUT Common data signal COM3 Connected to LCD Pin No 35 96 COM1 OUT Common data signal COM2 Connected to LCD Pin No 34 97 COM0 OUT Common data signal COM1 Connected to LCD Pin No 33 98 99 VL3 VL2 IN Power source voltage input terminal Standard voltage for LCD 100 C2 IN Terminal not used ...

Page 27: ...ance values in parallel with R107 R111 of IC2 Changing the resistance values results in that there is the same potential at both F 3 terminal of the absolute humidity sensor and AN0 terminal of the LSI The voltage of AN1 terminal will indicate about 2 5V This initial balancing is set up about 16 seconds after the unit is put in the Sensor Cooking mode As the sensor cooking proceeds the food is hea...

Page 28: ...is removed be careful that abnor mal voltage due to static electricity etc is not applied to the input or output terminals 4 Attachconnectors electrolyticcapacitors etc toPWB making sure that all connections are tight 5 Be sure to use specified components where high precision is required E C B Transistor 2SB1238 Transistor DTD143ES E C B 1 Precautions for Handling Electronic Components This unit u...

Page 29: ...Bottom plate Oven cavity Waveguide flange Chassis support and other metallic plate 4 Movable parts to prevent a fault Fanblade Fanmotor Switch Switchlever Open button Turntable motor Convection motor 3 Do not catch the wire leads in the outer case cabinet 4 Insert the positive lock connector certainly until its pin is locked And make sure that the wire leads should not come off even if the wire le...

Page 30: ...U unit to the control panel frame 8 Release the four 4 tabs of the control panel frame holding the CPU unit to the control panel frame 9 Release the liquid crystal display LCD from the LCD holder 10 Now the LCD sheet is free CONTROL PANEL ASSEMBLY REMOVAL oven cavity rear plate 7 Release the capacitor holder from the fan duct 8 Remove the capacitor from the capacitor holder 9 Now the high voltage ...

Page 31: ...ation FAN MOTOR REPLACEMENT 1 CARRY OUT 3D CHECKS 2 Now the back plate with the sub back plate should be removed 3 Disconnect the connector CN F from the control unit 1 CARRY OUT 3D CHECKS 2 Now the back plate with the sub back plate should be removed 3 Disconnect the connector CN D from the control unit 4 Remove the one 1 screw holding the air duct to the oven cavity rear plate 5 Remove the air d...

Page 32: ...motor cover 4 Disconnect the wire leads from the turntable motor and TURNTABLE MOTOR REPLACEMENT remove the two 2 screws holding the turntable motor 5 Now the turntable motor is free 6 After replacement use the one 1 screw provided with the turntable motor assembly to fit turntable motor cover NOTE The one 1 screw to fit the turntable motor cover should be XHTSD40P08RV0 OVEN LAMP REMOVAL 1 CARRY O...

Page 33: ...d check for microwave leakage around the door with an approved microwave survey meter Refer to Microwave Measurement Procedure Figure C 4 Latch Switches Adjustment GRILL HEATERS TOP HEATERS REMOVAL 1 CARRY OUT 3D CHECKS 2 Remove the one 1 screw holding the exhaust duct to the oven cavity 2 Remove the exhaust duct from the oven cavity 4 Disconnect the wire leads from the grill heaters 5 Lay down th...

Page 34: ...ows 1 Re install the glass stopper to the door frame so that the two 2 holes of the glass stopper meet the two 2 pins of the door frame 2 Hold the glass stopper to the door frame with the two 2 screws 3 Re install the latch spring to the latch head Re install the latch spring to the door frame Re install latch head to door frame 4 Re install door panel to door frame by fitting seven 7 DOOR REPLACE...

Page 35: ...microwave ovens must be used for test ing Recommended instruments are NARDA 8100 NARDA 8200 HOLADAY HI 1500 SIMPSON 380M 2 Place the oven tray into the oven cavity 3 Place the load of 275 15ml of water initially at 20 5 C in the centre of the oven tray The water container should be a low form of 600 ml beaker with inside diameter of approx 8 5cm and made of an electrically non conductive material ...

Page 36: ... TOP BOTTOM HEATER MAGNETRON HIGH VOLTAGE TRANSFORMER B2 D1 D3 B1 F1 F3 F2 A3 A5 1ST LATCH SWITCH THERMAL CUT OUT MG THERMAL CUT OUT OVEN MONITOR SWITCH FUSE 15A FUSE M10A 220 V 50Hz MONITOR RESISTOR 0 8 20W L N OL AH SENSOR RY2 2ND INTERLOCK RELAY H V FUSE 0 75A FM TTM OVEN LAMP FAN MOTOR CONVECTION MOTOR TURNTABLE MOTOR CONTROUNIT T1 T2 COM COM COM N O COM N O N O N O A1 LINE BYPASS CAPACITOR 0 ...

Page 37: ...ER TOP BOTTOM HEATER HIGH VOLTAGE TRANSFORMER B2 D1 D3 B1 F1 F3 F2 A3 A5 1ST LATCH SWITCH THERMAL CUT OUT MG THERMAL CUT OUT OVEN MONITOR SWITCH FUSE 15A FUSE M10A 220 V 50Hz MONITOR RESISTOR 0 8 20W L N OL 2ND INTERLOCK RELAY CONTROL SWITCH AH SENSOR RY2 2ND INTERLOCK RELAY H V RECTIFIER CAPACITOR 1 07µF AC2200V MAGNETRON H V FUSE 0 75A FM TTM OVEN LAMP FAN MOTOR CONVECTION MOTOR TURNTABLE MOTOR ...

Page 38: ...TOM HEATER HIGH VOLTAGE TRANSFORMER B2 D1 D3 B1 F1 F3 F2 A3 A5 1ST LATCH SWITCH THERMAL CUT OUT MG THERMAL CUT OUT OVEN MONITOR SWITCH FUSE 15A FUSE M10A 220 V 50Hz MONITOR RESISTOR 0 8 20W L N OL 2ND INTERLOCK RELAY CONTROL SWITCH AH SENSOR RY2 2ND INTERLOCK RELAY H V RECTIFIER CAPACITOR 1 07µF AC2200V MAGNETRON H V FUSE 0 75A FM TTM OVEN LAMP FAN MOTOR CONVECTION MOTOR TURNTABLE MOTOR CONTROUNIT...

Page 39: ...OISE FILTER UNIT THERMISTOR BRN BLU G Y EARTH LIVE NEUTRAL RY4 RY3 RY2 RY6 RY5 CM RY1 GRILL HEATER TOP BOTTOM HEATER HIGH VOLTAGE TRANSFORMER B2 D1 D3 B1 F1 F3 F2 A3 A5 1ST LATCH SWITCH THERMAL CUT OUT MG THERMAL CUT OUT OVEN MONITOR SWITCH FUSE 15A FUSE M10A 220 V 50Hz MONITOR RESISTOR 0 8 20W L N OL 2ND INTERLOCK RELAY CONTROL SWITCH AH SENSOR RY2 2ND INTERLOCK RELAY H V RECTIFIER CAPACITOR 1 07...

Page 40: ...OM HEATING ELEMENT CONNECTOR GRY RED ORG CN B GRY GRY RED BRN BLK TURNTABLE MOTOR MONMITOR SWITCH 1ST LATCH SWITCH GRY WHT 2 4 5 3 1 RED ORG GRY 2 1 GRN GRY CN A NEUTRAL LIVE N L EARTH 15A M10A T2 T1 RED WHT BRN QRG GRN GRN GRN GRY N O COM 2ND INTERLOCK RELAY CONTROL SWITCH RED ORG ORG BRN WHT WHT WHT WHT BLK AH SENSOR RED WHT 1 2 3 CN F THERMISTOR CN B 1 3 2 SP1 T1 1 5 RY6 RY2 RY4 RY3 CONTROL PAN...

Page 41: ...ICRO OVEN LAMP TURNTABLE MOTOR BOTTOM HEATER TOP HEATER DOOR SWITCH FAN MOTOR CONVECTION MOTOR Q2 2SB1238 R4 27 R5 4 7k R3 510 1 2w R2 680 1 2w RY5 RY6 RY4 Q3 DTD143ES C5 10µ 35v RY3 RY2 R6 3 3k SP1 D5 D1 Q1 2SB1238 D1 4 11ES1 T1 D2 D4 c d a b D3 4 6 1 8 VRS1 J1 C1 0 1µ 50v C3 0 1µ 50v ZD1 R1 2 4k HZ16 1 D12 D11 RY1 D7 D10 D9 D8 C4 10µ 35v C2 1000µ 35v 10G471K D6 A 1 B 2 B 1 D 3 D 1 C12 C13 C17 C ...

Page 42: ...EG3 SEG2 SEG1 COM3 COM2 COM1 P81 P80 XIN XOUT VSS P27 P26 P25 P24 P23 P22 P21 P20 P17 P16 RESET INT1 INT0 SEG11 SEG12 SEG13 SEG14 SEG15 SEG16 SEG17 SEG18 SEG19 SEG20 SEG21 SEG22 SEG23 SEG24 SEG25 SEG26 SEG27 SEG28 SEG29 SEG30 SEG31 SEG32 SEG33 SEG34 SEG35 SEG36 SEG37 SEG38 SEG39 C10 47µ 16v C11 0 1µ 50v C13 0 1µ 50v C21 0 1µ 50v C12 0 1µ 50v R15 4 7k R31 15k R71 15k R70 15k R69 15k R82 10kF R83 15...

Page 43: ...igure S 4 Printed Wiring Board DIP D8 3 2 3 1 2 1 1 1 5 18 4 D6 R4 CN C CN D CN B CN A D5 R5 AC AC VRS1 6 FAN CON RY1 RY5 LOT NO F RY6 RY3 T H RY4 B H RY2 J1 T1 D12 D4 S 6 8 1 4 P D2 D7 5 MICRO SP1 R6 R3 C4 C3 C5 C2 B B B E E 1 E Q3 R2 R1 D1 D3 D11 C1 ZD1 Q2 Q1 D9 D10 ...

Page 44: ...H V fuse 0 75A 1 AQ CABINET PARTS 2 1 GCABDA097WRW0 Back plate 1 AW 2 2 GCABUA649WRP0 Outer case cabinet 1 AZ 2 3 GDAI A305WRW0 Base plate 1 AX 2 4 GLEGPA074WRE0 Leg 2 AC CONTROL PANEL PARTS 3 1 CPWBFA811WRK0 Power unit 1 BE 3 1A QCNCMA234DRE0 3 pin connector CN A 1 AC 3 1B QCNCMA275DRE0 2 pin connector CN B 1 AB 3 1C FW VZA238DRE0 9pin wire harness WH 1 WH 2 2 AK 3 1D QCNCMA410DRE0 2 pin connecto...

Page 45: ... separate angle 1 AX 4 32 MSPRCA113WRE0 H spring 2 AC 4 33 PCUSGA420WRP0 Cushion 1 AE 4 34 LANGQA489WRP0 Thermistor angle 1 AW 4 35 NFANMA047WRP0 Convection fan 1 AX 4 36 NFANMA048WRP0 Cooling fan 1 AX 4 37 PCUSUA499WRP0 Cushion 1 AC 4 38 PDUC A707WRW0 Convection duct 1 AR 4 39 PFPF A210WRE0 Thermal insulation 1 AM 4 40 PPIPFA030WRE0 Pipe 1 AK 4 41 PSKR A339WRP0 Convection air angle 2 AX 4 42 PSKR...

Page 46: ... PROTECTION SHEET SPADPA204WRE0 PACKING CASE SPAKCD170WRE0 Not Replaceable Items SCREWS NUTS AND WASHERS 7 1 XFPSD40P08K00 Screw 4mm x 8mm 14 AA 7 2 XEPSD40P25000 Screw 4mm x 25mm 2 AA 7 3 LX EZA042WRE0 Special screw 2 AB 7 4 LX NZ0061WRE0 Flange nut 4 AA 7 5 XBPWW30P05K00 Screw 3mm x 5mm 2 AA 7 6 XCTWW40P08000 Screw 4mm x 8mm 8 AB 7 7 XHPSD30P06000 Screw 3mm x 6mm 3 AA 7 8 XHTSD40P08RV0 Screw 4mm...

Page 47: ... 2 4 23 4 26 4 15 1 14 7 4 4 3 1 9 7 2 1 6 4 11 4 10 7 1 2 4 2 4 1 19 7 1 4 9 7 9 7 9 7 1 7 9 2 3 1 5 1 13 1 23 1 4 6 4 6 3 1 1 1 1 4 17 4 28 1 18 4 12 4 13 4 19 4 18 4 32 4 16 7 4 7 9 7 1 4 6 7 1 6 7 4 2 1 2 7 3 7 10 7 10 1 21 4 4 7 13 4 24 4 39 4 21 4 14 1 7 1 17 7 8 7 10 7 7 4 31 7 1 1 8 1 12 1 16 4 27 4 44 4 40 4 34 4 36 7 17 7 7 7 7 7 10 4 43 4 42 4 45 1 20 7 8 4 37 7 15 1 22 4 22 7 1 7 1 4 7...

Page 48: ... 2 3 6 4 5 1 2 3 A B C D E F G H A B C D E F G H DOOR PARTS MISCELLANEOUS CONTROL PANEL PARTS 5 8 5 3 5 6 5 4 5 5 5 1 5 9 6 13 3 2 5 7 5 2 6 1 6 10 6 11 6 2 Actual wire harness may be different than illustration 6 9 3 3 1 3 3 3 3 3 2 3 3 3 4 3 5 3 1 3 6 3 6 ...

Reviews: