background image

R-8000G

21

TEST PROCEDURES

PROCEDURE

LETTER

COMPONENT TEST

T

TOUCH CONTROL PANEL ASSEMBLY TEST

8. Reconnect all leads removed from components

during testing.

9. Reinstall the outer case (cabinet) and the back

plate.

10. Reconnect the power supply cord after the outer

case and the back plate are installed.

11. Run the oven and check all functions.

The following test procedure should be carried out with the microwave oven is a fully assembled
condition (outer case fitted).

It is difficult to measure the exact temperature in the convection oven. An accurate thermocouple type
temperature tester must be used. A low priced bi-metal type thermometer is not reliable or accurate.
The temperature should be checked with outer case cabinet installed, approx. 5 minutes after preheat
temperature is reached (audible signal sounds four times). The temperature experienced may be approx. 30˚F
more or less than indicated on the display, however, in most cases the food cooking results will be satisfactory.
Difference in power supply voltage will also affect the oven temperature. The Household power supply voltage
may sometimes become lower than the rated voltage (240 V) and cause under-cooking. If the power supply
voltage is 10% lower than the rated voltage, longer cooking time is required by 10% to 20%.

R

CHECKING TEMPERATURE IN THE CONVECTION MODE

The touch control panel consists of circuits including semiconductors such as LSI, ICs, etc. Therefore, unlike
conventional microwave ovens, proper maintenance cannot be performed with only a voltmeter and
ohmmeter.
In this service manual, troubleshooting by unit replacement is described according to the symptoms indicated.

Before testing,

1) Disconnect the power supply cord.
2) Remove the outer case cabinet, referring to "OUTER CASE CABINET REMOVAL".
3) Open the door and block it open.
4) Discharge high voltage capacitor.
5) Disconnect the leads to the primary of the power transformer.
6) Ensure that these leads remain isolated from other components and oven chassis by using insulation tape.

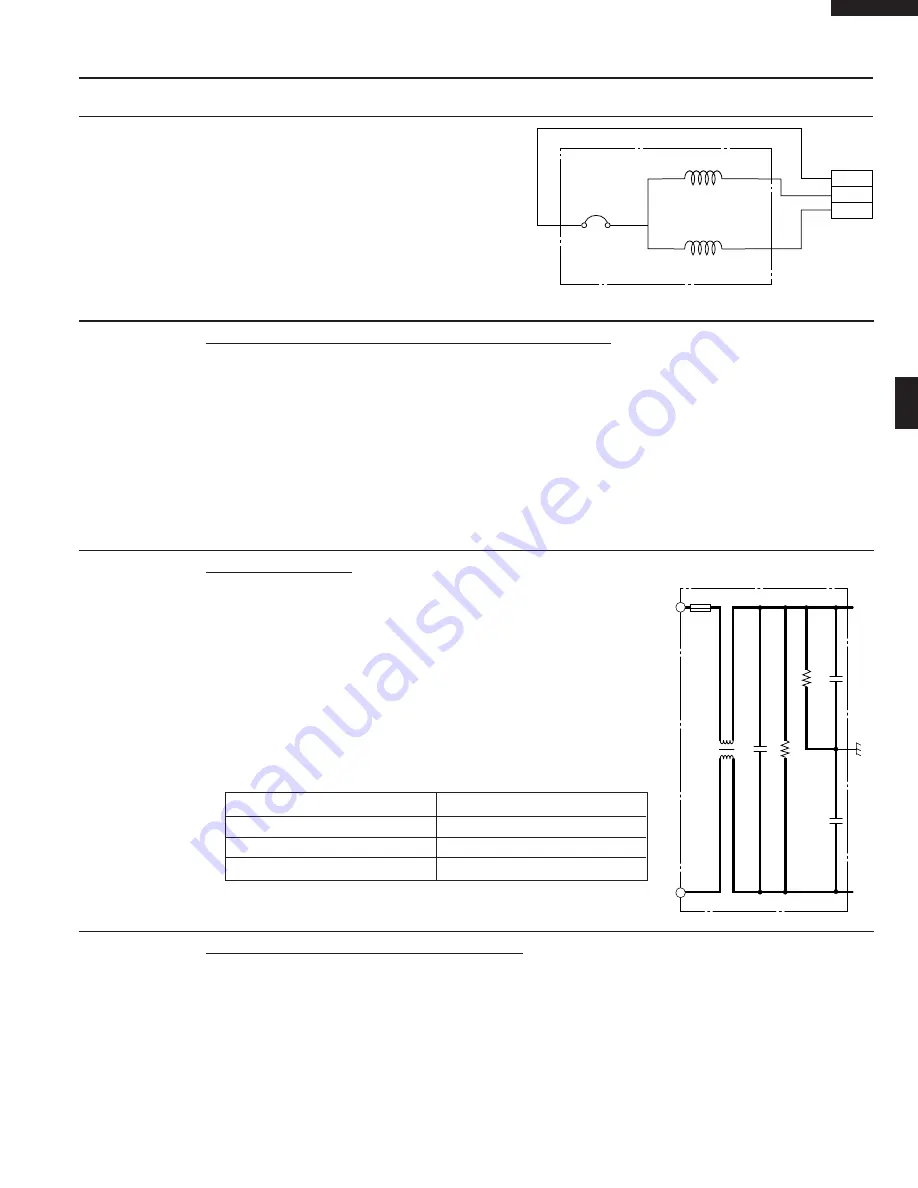
BLU

RED

WHT

Main Coil

3-pin 
Connector

Sub Coil

Thermal

Cut-out

130˚C OFF
100˚C ON

100

110

JET MOTOR

1. Disconnect the power supply cord.

2. Remove the outer case cabinet, referring to "OUTER CASE CABINET

REMOVAL".

3. Open the door and block it open.
4. Discharge high voltage capacitor.
5. Disconnect the lead wires from the terminal  the noise filter. Using an

ohmmeter, check between the terminals as described in the following
table. If incorrect reading are obtained, replace the noise filter.

6. Reconnect all leads removed from components during testing.
7. Reinstall the outer case (cabinet).
8. Reconnect the power supply cord after the outer case is installed.
9. Run the oven and check all functions.

S

NOISE FILTER TEST

MEASURING POINT

INDICATION OF OHMMETER

Between L and L

Approx. 680 k

Between terminal L and RED

Short circuit.

Between terminal L and GRY

Short circuit.

NOISE SUPRESSION COIL

LINE CROSS CAPACITOR 1.0

µ

F 275V

RESISTO 680k

 1/2W

RESISTO 10M

 1/2W

LINE BYPASS CAPACITOR

0.0033 

µ

F 250V

LINE BYPASS CAPACITOR

0.0033 

µ

F 250V

MONITOR
FUSE
20A

BLK

WHT

GRY

RED

L

L

Summary of Contents for R-8000G

Page 1: ...SIVE MICROWAVE ENERGY INSIDE FRONT COVER BEFORE SERVICING INSIDE FRONT COVER WARNING TO SERVICE PERSONNEL 1 MICROWAVE MEASUREMENT PROCEDURE 2 FOREWORD AND WARNING 3 PRODUCT SPECIFICATIONS 4 GENERAL INFORMATION 4 OPERATION 6 TROUBLESHOOTING GUIDE 13 TEST PROCEDURE 15 TOUCH CONTROL PANEL 25 PRECAUTIONS FOR USING LEAD FREE SOLDER 29 PROCEDURE FOR CHECKING SETTING TOTAL OPERATION TIME 30 COMPONENT REP...

Page 2: ...transmission systems shall be repaired replaced or adjusted by procedures described in this manual before the oven is released to the owner e A microwave leakage check to verify compliance with the Federal Performance Standard should be performed on each oven prior to release to the owner BEFORE SERVICING Before servicing an operative unit perform a microwave emission check as per the Microwave Me...

Page 3: ...water on the oven turntable close the door and set the power to HIGH and set the microwave timer for two 2 minutes When the two minutes has elapsed timer at zero carefully check that the water is now hot If the water remains cold carry out Before Servicing proce dure and re examine the connections to the component being tested When all service work is completed and the oven is fully assem bled the...

Page 4: ...e oven cavity The water container shall be a low form of 600 ml 20 oz beaker with an inside diameter of approx 8 5 cm 3 1 2 in and made of an electrically nonconductive material such as glass or plastic The placing of this standard load in the oven is important not only to protect the oven but also to insure that any leakage is measured accurately 4 Set the cooking control on Full Power Cooking Mo...

Page 5: ...hock and microwave radiation hazard WARNING Never operate the oven until the following points are ensured A The door is tightly closed B The door brackets and hinges are not defective C The door packing is not damaged D The door is not deformed or warped E There is no other visible damage with the oven Servicing and repair work must be carried out only by trained service personnel DANGER Certain i...

Page 6: ...USTOM HELP pad Number pads OVEN READY ON OFF pad SELECTA PROGRAM pad SET pad DOUBLE TRIPLE QTY pad START MINUTES PLUS pad STOP CLEAR pad Oven Cavity Light Yes Safety Standard UL Listed FCC Authorized DHHS Rules CFR Title 21 Chapter 1 Subchapter J NSF Certified GENERAL INFORMATION GROUNDING INSTRUCTIONS This appliance must be grounded This oven is equipped with a cord having a grounding wire with a...

Page 7: ...Door seals and sealing surfaces 6 Turntable motor shaft 7 Removable turntable support Carefully place the turntable support in the center of the oven floor After cooking always clean the turntable support especially around the rollers These must be free from food splashes and grease Built up splashes or grease may overheat and cause arcing begin to smoke or catch fire 8 Removable turntable Place t...

Page 8: ...ed from the open position the monitor switch contacts first open and the 3rd latch switch contacts close and then the contacts of the secondary interlock switch close And contacts of the relay RY1 open If the primary interlock relay RY2 and the secondary interlock switch fail with their contacts closed when the door is opened the closing of the monitor switch contacts will form a short circuit thr...

Page 9: ... the main supply voltage is applied to the top and side heating elements and the power transformer alternately NOTE After cooking the operation of the fan motors is the same as one of the convection cooking AUTOMATIC COOKING Automatic cooking will automatically compute the oven tempera ture microwave power and cooking time And the oven will cook according to the special cooking sequence FIRE SENSI...

Page 10: ...T C TRANSFORMER NOISE FILTER MONITOR FUSE 20A BLK WHT GRY RED B1 B2 E3 C2 C3 B3 B4 D7 D1 D5 D3 FM OL TTM FAN MOTOR RY1 RY2 FM RY3 JM COM FUSE F10A L L TOP HEATER THERMAL CUT OUT 170 C SIDE HEATER THERMAL CUT OUT 150 C MONITOR SWITCH OVEN LAMP CONTROL UNIT A8 A6 A4 A3 A2 E1 A1 D9 THER MISTOR DOOR SENSING SWITCH JET MOTOR JET MOTOR CAPACITOR TURNTABLE MOTOR TOP HEATIMG ELEMENT SIDE HEATIMG ELEMENT M...

Page 11: ...R BLK WHT GRY RED B1 B2 E3 C2 C3 B3 B4 D7 D1 D5 D3 FM OL TTM FAN MOTOR RY1 RY2 FM RY3 JM COM FUSE F10A L L 208V 60Hz NOISE FILTER MONITOR FUSE 20A Figure O 4 Oven Schematic High Speed Grill or Speed Grill Cooking Condition SCHEMATIC HIGH SPEED GRILL NOTE CONDITION OF OVEN 1 DOOR CLOSED 2 SELECTA PROGRAM PAD TOUCHED 4 TIMES 3 SET PAD TOUCHED 4 COOKING TIME PROGRAMMED 5 START PAD TOUCHED SCHEMATIC S...

Page 12: ...NSING SWITCH JET MOTOR JET MOTOR CAPACITOR TURNTABLE MOTOR TOP HEATIMG ELEMENT SIDE HEATIMG ELEMENT MAGNETRON POWER TRANSFORMER WITH 160 C THERMOSTAT IN PRIMARY WINDING H V RECTIFIER CAPACITOR 1µ AC 2300V RY5 RY6 SECONDARY INTERLOCK SWITCH 3RD LATCH SWITCH SOLID STATE RELAY SOLID STATE RELAY PRIMARY INTERLOCK RELAY NOISE SUPRESSION COIL LINE CROSS CAPACITOR 1 0µF 275V RESISTO 680kΩ 1 2W RESISTO 10...

Page 13: ...l cut out remains closed However when abnormally high temperature are reached within the side heating element unit the thermal cut out will open at 302 F 150 C causing the oven to shut down When the thermal cut out has cooled the thermal cut out closes at 266 F 130 C TOP HEATING ELEMENT The top heating element is located at the top of the oven cavity It is intended to heat air driven by the convec...

Page 14: ... the jet motor It then enters the inside of the oven through the vent holes provided on the top and left sides of the oven Next the hot air heats the food on the turntable and leaves the oven cavity through the vent in the center of the oven cavity back side wall Without leaving the oven this hot air is reheated by the heating elements passes through the convection passage and enters the inside of...

Page 15: ...the power supply cord disconnected It may in some cases be necessary to connect the power supply cord after the outer case has been removed in this event 1 Disconnect the power supply cord 2 Remove the outer case cabinet referring to OUTER CASE CABINET REMOVAL 3 Open the door and block it open 4 Discharge high voltage capacitor 5 Remove the back plate from the oven referring to BACK PLATE REMOVAL ...

Page 16: ...s MAXIMUM TIME EXCEEDED ap pears CHECK 1 appears Total opera tion time hours of magnetron ex ceeds 1250 hours CHECK 2 appears Total opera tion time hours of top heating ele ment exceeds 4000 hours CHECK 3 appears Total opera tion time hours of side heating element exceeds 4000 hours MAGNETRON POWER TRANSFORMER H V RECTIFIER ASSEMBLY HIGH VOLTAGE CAPACITOR SECONDARY INTERLOCK SWITCH 3RD LATCH SWITC...

Page 17: ...ER 100 selecting more than 60 seconds cook time Allow the water to heat for 60 seconds measuring with a stop watch second hand of a watch or the digital read out countdown 3 Remove the cup from the oven and again measure the temperature making sure to stir the thermometer or thermocouple through the water until the maximum temperature is recorded 4 Subtract the cold water temperature from the hot ...

Page 18: ...ect the power supply cord after the outer case is installed 9 Run the oven and check all functions TEST PROCEDURES PROCEDURE LETTER COMPONENT TEST D HIGH VOLTAGE CAPACITOR TEST 1 Disconnect the power supply cord 2 Remove the outer case cabinet referring to OUTER CASE CABINET REMOVAL 3 Open the oven door and block it open 4 Discharge the high voltage capacitor 5 Remove the back plate from the oven ...

Page 19: ...tch Screw driver Latch hook left BLK GRY WHT OHMMETER DOOR SENSING SWITCH 1 Disconnect the power supply cord 2 Remove the outer case cabinet referring to OUTER CASE CABINET REMOVAL 3 Open the door and block it open 4 Discharge high voltage capacitor 5 Isolate the switch and connect the ohmmeter to the common COM and normally open NO terminal of the switch The meter should indicate an open circuit ...

Page 20: ... power supply cord after the outer case is installed 9 Run the oven and check all functions CAUTION IF THE TEMPERATURE FUSE INDICATES AN OPEN CIRCUIT AT ROOM TEMPERATURE REPLACE TEMPERATURE FUSE K THERMAL CUT OUT TOP HEATER TEST 1 Disconnect the power supply cord 2 Remove the outer case cabinet referring to OUTER CASE CABINET REMOVAL 3 Open the door and block it open 4 Discharge high voltage capac...

Page 21: ...nstall the outer case cabinet 8 Reconnect the power supply cord after the outer case is installed 9 Run the oven and check all functions CAUTION IF THE THERMAL CUT OUT INDICATES AN OPEN CIRCUIT AT ROOM TEMPERATURE RE PLACE THERMAL CUT OUT L THERMAL CUT OUT SIDE HEATER TEST 1 Disconnect the power supply cord 2 Remove the outer case cabinet referring to OUTER CASE CABINET REMOVAL 3 Open the door and...

Page 22: ... capacitor 5 Remove the back plate from the oven referring to BACK PLATE REMOVAL 6 Disconnect connector E from the control unit Measure the resistance of the thermistor with an ohmmeter Connect the ohmmeter leads to Pin No s E 5 and E 6 Room Temperature Resistance 68 F 20 C 86 F 30 C Approx 360 kΩ 152 KΩ 7 If the meter does not indicate above resistance replace the thermistor 8 Reconnect all leads...

Page 23: ...onventional microwave ovens proper maintenance cannot be performed with only a voltmeter and ohmmeter In this service manual troubleshooting by unit replacement is described according to the symptoms indicated Before testing 1 Disconnect the power supply cord 2 Remove the outer case cabinet referring to OUTER CASE CABINET REMOVAL 3 Open the door and block it open 4 Discharge high voltage capacitor...

Page 24: ... The corresponding segments of all digits do not light up or they continue to light up e Wrong figure appears f A certain group of indicators do not light up g The figure of all digits flicker 2 2 Other possible problems caused by defective CPU unit a Cooking is not possible 3 Other possible problems caused by defective control unit switch unit a Buzzer does not sound or continues to sound 4 Other...

Page 25: ...After that procedure re connect the power supply cord 8 Remove the outer case and check voltage between Pin Nos 1 and 9 of the 5 pin connector CN D on the control unit with an A C voltmeter The meter should indicate 208 volts if not check oven circuit Shut off Cook and Heater Relays Test These relays are operated by D C voltage Check voltage at the relay coil with a D C voltmeter during the microw...

Page 26: ... oven chassis by using insulation tape 7 After that procedure re connect the power supply cord 8 Follow the troubleshooting guide given below for repair STEPS OCCURRENCE CAUSE OR CORRECTION 1 The rated AC voltage is not present to power Check supply voltage and oven power cord terminal of CPU connecter CN D 2 The rated AC voltage is present at primary Touch control transformer or secondary circuit...

Page 27: ...ch sound and completion sound 6 Temperature Measurement Circuit OVEN THERMISTOR The temperature in the oven cavity is sensed by the thermistor The variation of resistance according to sensed temperature is detected by the temperature measurement circuit and the result applied to LSI The LSI uses this information to control the relay and display units 7 Relay Operation Watching Circuit This circuit...

Page 28: ...ment 21 VSS IN Power source voltage 5V VS voltage of power source circuit input 22 Xin IN Internal clock oscillation frequency setting input The internal clock frequency is set by inserting the ceramic filter oscillation circuit with respect to Xout terminal 23 Xout OUT Internal clock oscillation frequency control output Output to control oscillation input of Xin 24 VCC IN Power source voltage 0V ...

Page 29: ...LD 25 63 P41 8 FLD 43 45 P23 26 FLD 8 80 2G 53 FLD 26 62 P40 9 FLD 44 44 P22 27 FLD 9 79 1G 54 FLD 27 61 P39 10 FLD 45 43 P21 28 FLD10 78 P1 59 FLD 28 60 P38 11 FLD 46 42 P20 29 FLD11 77 P2 60 FLD 29 59 P37 12 FLD 47 41 P19 30 FLD12 76 P3 61 FLD 30 58 P36 13 FLD 48 40 P18 31 FLD13 75 P4 62 FLD 31 57 P35 14 FLD 49 39 P17 32 FLD14 74 P5 63 FLD 32 56 P34 15 FLD 50 38 P16 33 FLD15 73 P6 64 FLD 33 55 P...

Page 30: ... oven and the precautions you must take when doing so To perform the servicing power to the touch control panel is available either from the power line of the oven itself or from an external power source 1 Servicing the touch control panel with power supply of the oven CAUTION THE HIGH VOLTAGE TRANSFORMER OF THE MICRO WAVE OVEN IS STILL LIVE DURING SERVICING AND PRESENTS A HAZARD Therefore before ...

Page 31: ... the input or output terminals 4 Attach connectors electrolytic capacitors etc to PWB making sure that all connections are tight 5 Be sure to use specified components where high precision is required 1 Employing lead free solder Main PWB of this model employs lead free solder The LF symbol indicates lead free solder and is attached on the PWBs and service manuals The alphabetical character followi...

Page 32: ...ice at step 6 above NOTE 2 To check the total operation time of the magnetron touch SELECTA PROGRAM 3 times at step 6 above PROCEDURE FOR CHECKING SETTING TOTAL OPERATION TIME Procedure for setting the total operation time e g 1000 hours of the top heating element STEP PROCEDURE DISPLAY CUSTOM HELP x 4 CUNTER CHECK 1 PRESS SET SET PRESS SET TO CHECK TOTAL 2 COUNT OR SELECT NUMBER PAD SET 123456 3 ...

Page 33: ...ement WARNING FOR WIRING 1 Disconnect the power supply cord 2 Make sure that a definite click can be heard when the microwave oven door is unlatched Pull down the door handle in a closed position with one hand then push the door with the other this causes the latch leads to rise it is then possible to hear a click as the door switches operate 3 Visually check the door and cavity face plate for dam...

Page 34: ... CASE TYPE REMOVAL Figure C 3 Positive lock connector Removal 1 Disconnect the power supply cord 2 Remove the outer case cabinet referring to OUTER CASE CABINET REMOVAL 3 Open the oven door and block it open 4 Discharge the high voltage capacitor 5 Remove the one 1 screw holding the green wire of the power supply cord to the bottom plate 6 Disconnect the black wire and the white wire of the power ...

Page 35: ...ire harness from the hole of the magnetron separator and the hook of the fan motor 10 Remove the three 3 screws holding the magnetron separator to the bottom plate and the thermal cover back 11 Remove the magnetron separator from the oven 12 Carefully remove the four 4 screws holding the magnetron to the waveguide When removing the screws hold the magnetron to prevent it from falling 13 Remove the...

Page 36: ...ch 10 Remove each one 1 screw holding the latch hook right and latch hook left from the oven cavity front plate 11 Remove each one 1 screw holding the right and left chassis supports to the oven cavity front plate 12 Remove the two 2 screws holding the exhaust duct to the oven cavity And remove it 13 Now exhaust duct is free HEATER DUCT LEFT ASSEMBLY REMOVAL 14 Remove the three 3 screws holding th...

Page 37: ...EMOVAL 6 Remove the heater duct left assembly from the oven cavity TOP HEATING ELEMENT REMOVAL referring to EXHAUST DUCT HEATER DUCT LEFT ASSEMBLY CONVECTIONDUCTASSEMBLYANDHEATER DUCT UPPER ASSEMBLY REMOVAL 7 Remove the one 1 screw holding the heater mounting angle A to the heater duct upper 8 Remove the two 2 nuts and the two 2 screws holding the top heating element to the heater duct upper 9 Now...

Page 38: ...k switch interrupt the circuit before the door can be opened 3 The monitor switch contacts close when the door is opened 4 The 3rd latch switch interrupt the circuit when the door is opened 5 Reinstall the outer case cabinet and check for microwave leakage around the door with an approved microwave survey meter Refer to Microwave Measurement Procedure Figure C 6 Latch Switch Adjustment Monitor swi...

Page 39: ... pin Right door cam pin Left door hinge pin Right door hinge pin 1 Disconnect the power supply cord 2 Remove the outer case cabinet referring to OUTER CASE CABINET REMOVAL 3 Open the oven door and block it open 4 Discharge the high voltage capacitor 5 Remove the door assembly referring to Door Replacement 6 Place the door assembly on a soft cloth with latch heads facing up NOTE As the engaging par...

Page 40: ...ssembly Choke Cover Door Frame Door Panel Assembly Putty Knife Control panel assembly 1 Disconnect the power supply cord 2 Remove the outer case cabinet referring to OUTER CASE CABINET REMOVAL 3 Open the oven door and block it open 4 Discharge the high voltage capacitor 5 Disconnect the harness assembly from the connector CN G on the power unit 6 Remove the four 4 screws holding the control panel ...

Page 41: ...R CASE CABINET REMOVAL 3 Open the oven door and block it open 4 Discharge the high voltage capacitor 5 Refer to the chapter of EXHAUST DUCT HEATER DUCT LEFT ASSEMBLY CONVECTION DUCT ASSEMBLY HEATER DUCT UPPER ASSEMBLY REMOVAL SIDE HEATING ELEMENT REMOVAL JET MOTOR REMOVAL and TOP HEATING ELEMENT REMOVAL And prepare so that the above portions are touched 6 Wipe and clean the above portions with a s...

Page 42: ... K O R G R E D R E D R E D R E D O R G DOOR SENSING SWITCH 3RD LATCH SWITCH BRN RED COM COM N O COM N C BLK ORG RED YLW WHT 8 7 6 5 4 3 2 1 BLU BRN 1 16 1 1 9 4 CN E 1 3 CN C 1 3 CN G COM CN D FUSE1 1 3 2 1 8 GRY WHT COM N C GRY WHT GRY WHT BLK G R Y G R Y G R Y O R G CN C CN D BLU GRN WHT 8 9 7 6 5 4 3 2 1 BRN GRY RY6 RY1 COM N O N O RED 1 1 10 16 RED WHT GRY BLK WHT GRY ORG ORG FAN MOTOR Power t...

Page 43: ...002L x4 D5 R6 6 8 1W 100u 10V C9 2200u 35V 0 1u 50V R5 300 1W I C O Q5 C1 10u 50V 10u 50V C11 Q2 DTA143ESA C4 0 01u 50 V 0 01u 50V 0 01u 50 V C50 C51 D21 D20 1N5817 D10 D13 D11 D14 D15 RY6 VE 24HE K RY3 RY5 FTR F3AA024E FTR F3AA024E RY1 DU18D1 1P M R S RY2 0 1u 50 V CN A J1 J2 Q1 DTA123EKA or KRA117S ZD1 R1 C3 R2 4 7K 4 7K 4 7K 4 7K 4 7K J10 J12 J14 J11 J13 J15 AN12 AN13 AN14 4 7K 4 7K 4 7K 4 7K 4...

Page 44: ... Display Tube 6 4 5 1 2 3 6 4 5 1 2 3 A B C D E F G H A B C D E F G H 1a 1G 2a 3a 1a 2a S1 S2 S3 S4 S5 S6 S7 S8 S9 3a 1a 2a 3a 1a 2a 3a 1a 2a 3a 1a 2a 3a 1a 2a 3a 1a 2a 3a Dp2 Dp3 Dp2 col1 col2 col1 col2 Dp3 Dp2 Dp2 Dp3 1a 2a 3a 1a 2a 3a 2G 3G 4G a b c d e g 1G 10G k j h r p n f 5G 6G 7G 8G 9G 10G ...

Page 45: ... 6 4 5 1 2 3 A B C D E F G H A B C D E F G H Figure S 5 a Printed Wiring Board of CPU Unit Component side Figure S 5 b Printed Wiring Board of CPU Unit Solder side Figure S 6 Printed Wiring Board of Control Unit Switch Unit ...

Page 46: ...deg C Side heater 150deg C OFF 130deg C ON 1 AK 1 22 RTRN A716WRZZ Power transformer 1 BS 1 23 RTRNPA003WRZZ Touch control transformer 1 AY 1 24 RV MZA294WRE0 Magnetron 1 BL 1 25 QTANDA001WRZZ Terminal board 1 AE CABINET PARTS 2 1 GCABDA104WRPZ Back plate 1 AZ 2 2 GDAI A356WRWZ Bottom plate 1 AW 2 3 GLEGPA096WREZ Front leg 2 AD 2 4 GCABUA906WRPZ Outer case cabinet 1 BH 2 5 GCOVHA449WRWZ Turntable ...

Page 47: ...ch hook Left 1 AL 4 45 GCOVHA460WRPZ Louver cover 1 AS 4 46 LANG A096WRPZ Transformer mounting angle 1 AN 4 47 LANGFA241WRWZ Chassis support 2 AS 4 48 LANGKB019WRWZ Magnetron guide 1 AV 4 49 MCAMPA115WRMZ Door cam Left 1 AP 4 50 MCAMPA116WRMZ Door cam Right 1 AP 4 51 MSPRTA219WREZ Door spring 2 AE 4 52 PCOVPA402WREZ Waveguide cover 1 AK 4 53 PCUSGA602WREZ Cushion 1 AG 4 54 GCOVHA446WREZ Screw cap ...

Page 48: ...heet 1 AL 6 9 FW VZB994WREZ Main wire harness 1 BK 6 10 FW VZB995WREZ Thermistor harness 1 AU 6 11 LBSHCA012WRE0 Cord bushing 1 AD 6 12 LHLDWA060WREZ Wire holder 1 AF 6 13 TCAUAA285WRRZ Monitor caution 1 AF 6 14 TCAUAA166WRR0 DHHS caution label 1 AB 6 15 TCAUAA276WRRZ User caution label 1 AH 6 16 PZET A011WRE0 Thermal insulator 1 AA 6 17 LHLDWA029WRE0 Cord holder 1 AB 6 18 LHLDWA013WRE0 Purse lock...

Page 49: ...d be returned as indicated in the Service Policy PACKING AND ACCESSORIES 6 4 TURNTABLE TRAY 6 7 INSTRUCTION BOOK 6 5 MANU LABEL 6 8 RECIPE SHEET 6 3 TURNTABLE SUPPORT DOOR PROTECTION SHEET SPADPA620WREZ MICROWAVE OVEN TOP PAD ASSEMBLY FPADBA549WRKZ PLASTIC BAG SSAKHA075WREZ TRAY PROTECT SPADPA629WREZ 6 1 HIGH RACK 6 2 LOW RACK BOTTOM PAD ASSEMBLY FPADBA550WRKZ Not replaceable items PACKING CASE SP...

Page 50: ...16 4 35 4 52 7 2 4 69 1 13 1 13 6 13 1 21 x2 7 13 4 32 4 10 7 13 7 7 4 39 4 59 x2 x4 6 4 7 14 4 70 4 7 4 11 6 3 7 4 7 7 4 38 7 8 2 3 2 3 4 29 2 2 7 12 7 8 7 13 7 7 7 17 1 15 4 64 7 7 4 47 7 21 4 73 4 7 2 5 4 41 4 29 4 51 4 51 4 49 4 46 7 2 x3 7 4 4 80 7 13 7 4 4 53 7 5 7 12 4 23 7 11 4 48 4 74 1 2 1 12 7 2 7 10 4 16 7 2 7 2 7 2 1 3 4 9 7 14 7 2 4 22 1 22 1 24 4 42 4 50 7 21 7 12 7 10 7 7 4 54 7 8 ...

Page 51: ... OF PURSE LOCK 6 18 Purse lock LL 6 18 Purse lock LL Main wire harness Main wire harness Touch control transformer Harness assembly Power unit 3 5 3 4 4 3 4 4 1 23 5 2 5 8 5 9 5 7 5 15 5 5 5 10 5 20 x2 x10 5 10 5 11 5 1 5 20 5 14 5 23 5 19 5 13 5 20 5 20 5 21 5 6 5 21 5 21 5 12 5 18 5 23 5 22 5 17 5 20 5 24 5 16 x2 5 21 5 6 1 6 16 6 18 6 2 6 9 6 10 5 14 5 22 5 17 5 4 5 3 MISCELLANEOUS CONTROL PANE...

Page 52: ... No part of this publication may be reproduced stored in retrieval systems or transmitted in any form or by any means electronic mechanical photocopying recording or otherwise without prior written permission of the publisher 04 SHARP CORP 1S1 700E Printed in U S A ...

Reviews: