background image

R-7N76(W)M
R-7N76(B)M

33

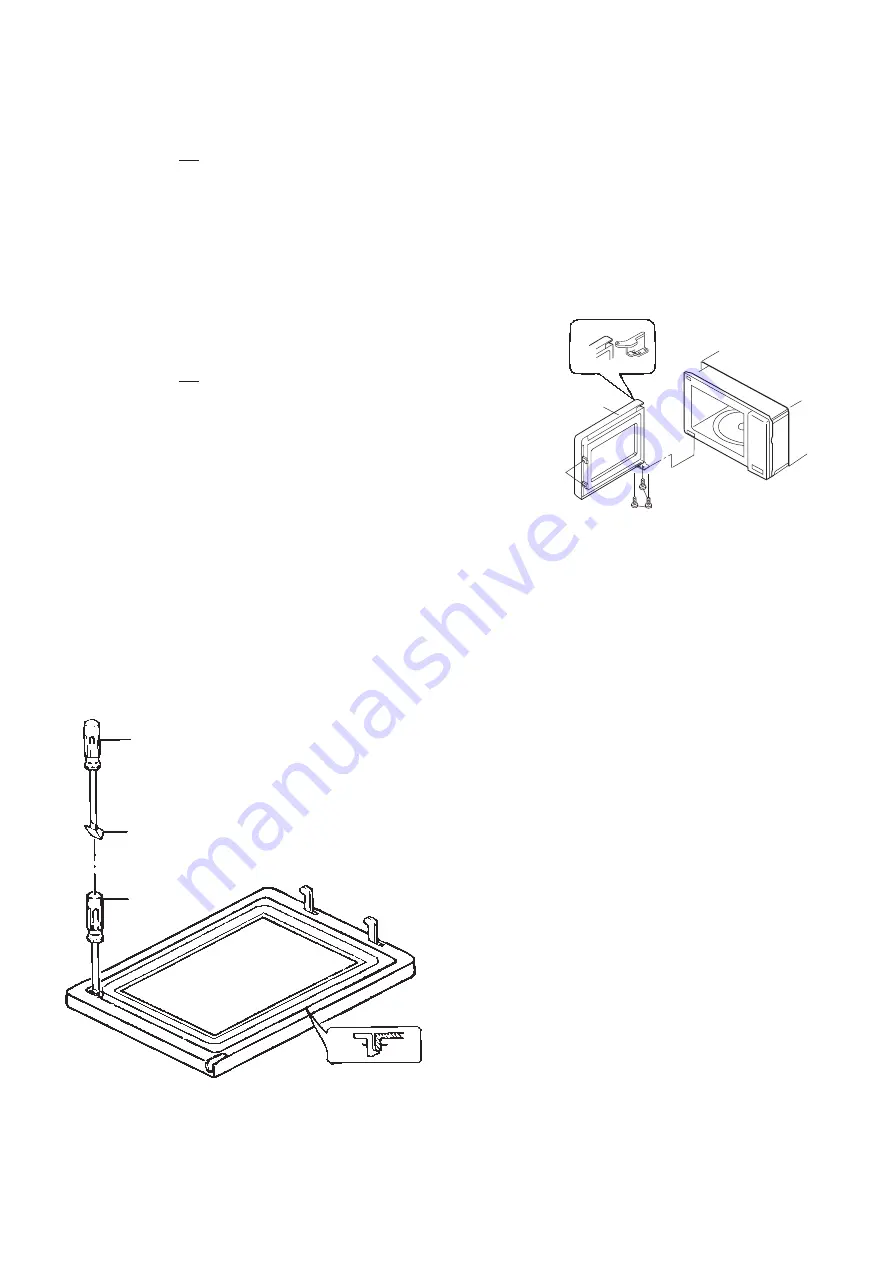
CHOKE COVER REMOVAL
1. Insert an iron plate (thickness of about 0.5mm) or flat type

screw driver to the gap between the choke cover and door
panel as shown figure to free the engaging part. The
protect sheet may be used not to damage the door panel.

2. Lift up the choke cover, now choke cove is free.

DOOR PARTS REMOVAL

DOOR FRAME AND GLASS REMOVAL
Remove the door assembly, referring to from item 1 through
item 4 of “DOOR REPLACEMENT”.
1. Place the door assembly on a soft cloth with facing up.
2. Remove the choke cover, referring to “CHOKE COVER

REMOVAL”.

3. Remove the four (4) screws holding the door frame to the

door panel assembly.

4. Release the glass stopper from the door frame.
5. Remove the door glass from the door frame.
6. Remove the door frame from the door panel by releasing

the three (3) tabs of door frame from door panel with flat
type screw driver

7. Lift up the door glass, now the door glass is free.

LATCH HEAD REMOVAL
1. Remove the door frame referring to "DOOR FRAME and

GLASS REMOVAL".

2. Release the latch spring from the tabs of the door panel.
3. Release the latch spring from the latch head.
4. Release the latch head from the door panel.
5. Now, the latch head is free.

DOOR REPLACEMENT AND ADJUSTMENT

REPLACEMENT
1. CARRY OUT 3D CHECKS
2. Remove three (3) screws holding the lower oven hinge to

the oven cavity.

3. Remove door assembly with lower oven hinge by pulling

it downward.

4. Separate the door assembly and lower oven hinge. Door

assembly is now free.

5. Re-install lower oven hinge to the new door assembly.
6. On re-installing new door assembly, secure the lower

oven hinge with the three (3) mounting screws to the oven
cavity. Make sure the door is parallel with bottom line of
the oven face plate and the latch head pass through the
latch holes correctly.

7. CARRY OUT 4R CHECKS
Note: After any service to the door, the approved microwave

survey meter should be used to assure in compliance
with proper microwave radiation  standards. (Refer to
Microwave Measurement Procedure.)

ADJUSTMENT
When removing and/or loosening hinges such as in door
replacement, the following adjustment criteria are taken.
Door is adjusted to meet the following three conditions by
keeping screws of hinge loose.

1. Adjust door latch heads at a position where they smoothly

catch the latch hook through the latch holes. Refer to
latch switch adjustments.

2. Deviation of the door alignment from horizontal line of

cavity face plate is to be less than 1.0mm.

3. The door is positioned with its face depressed toward the

cavity face plate.

4. Reinstall outer case and check for microwave leakage

around the door with an approved microwave survey
meter. (Refer to Microwave Measurement Procedure.)

Figure C-6. Door Assembly Replacement and  Adjustment

Figure C-8. Choke Cover Removal

FLAT TYPE
SCREW-DRIVER

PROTECT BY TAPE

FLAT TYPE
SCREW-DRIVER

CHOKE
COVER

DOOR
PANEL

OUTER CASE
CABINET

DOOR
ASSEMBLY

LATCH
HEADS

SCREWS

RE-INSTALL

Summary of Contents for R-7N76(B)M

Page 1: ... 6 SERVICING 9 TEST PROCEDURE 12 TOUCH CONTROL PANEL 21 COMPONENT REPLACEMENT AND ADJUSTMENT PROCEDURE 29 MICROWAVE MEASUREMENT 34 WIRING DIAGRAM 35 PICTORIAL DIAGRAM 38 CONTROL PANEL CIRCUIT 39 PRINTED WIRING DIAGRAM 40 PARTS LIST 41 R 7N76 W M R 7N76 B M E 850W JET convection grill GRILL MED LOW HIGH CONV Lbs Kg Pcs Oz TEMP COOK AUTO DEFROST 1O MIN MIN 1 SEC 1O Kg Lb g oz MORE LESS MICROWAVE POW...

Page 2: ...s waveguides flanges and gaskets must be secured Never operate the device without a microwave energy absorbing load attached Never look into an open waveguide or antenna while the device is energized WARNING Neveroperatetheovenuntilthefollowingpointsareensured A The door is tightly closed B The door brackets and hinges are not defective C The door packing is not damaged D The door is not deformed ...

Page 3: ...ns Width 520 mm Height 305 mm including foot Depth 478 mm Cooking Cavity Dimensions Width 342 mm Height 195 mm Depth 357 mm Turntable diameter 325mm Control Complement Touch Control System Microwave Cooking Control Repetition Rate HIGH Full power throughout the cooking time MEDIUM HIGH approx 70 of FULL Power MEDIUM approx 50 of FULL Power MEDIUM LOW DEFROST approx 30 of FULL Power LOW approx 10 o...

Page 4: ...OOK key 20 LESS MORE keys 21 CONVECTION TEMPERATURE key 22 DUAL CONVECTION GRILL key 23 AUTO MINUTE START key 24 WEIGHT CONVERSION key 25 CLOCK SETTING key 26 DOOR OPEN button Door Door hinges Grill heating elements Oven lamp Wave guide cover Control panel Coupling Door lock openings Oven cavity Door seals and sealing surfaces Safety door latches Power supply cord Ventilation openings Outer cabine...

Page 5: ...or are cut off when the 1st latch switch 2nd latch switch and stop switch are made open The circuit to the fan motor is cut off when the relay RY6 is made open The oven lamp remains on even if the oven door is opened after the cooking cycle has been interrupted because the relay RY1 stay closed Shown in the display is remaining time 6 MONITOR SWITCH CIRCUIT The monitor switch is mechanically contr...

Page 6: ...zed 4 The relay RY3 is energized if the cavity temperature is lowerthan210 Candgrillheatingelementisenergized Whenthecavitytemperaturereaches210 C relay RY4 and RY3 are de energized 5 Now the food is grilled by the grill heating elements DUAL COOKING ROAST BAKE CONDITION Microwave and Convection Figure O 5 Program desired cooking time and DUAL COOK ROAST BAKE mode by touching the TIME pads and DUA...

Page 7: ...e contacts of the thermal cut out will close again DOOR OPEN MECHANISM The door can be opened by pushing the open button on the control panel When the open button is pushed the open lever pushes lower latch head on the door upward The upper latch head is linked with the lower latch head so now the door can be opened Figure D 1 Door Open Mechanism 1ST LATCH SWITCH 2ND LATCH SWITCH AND STOP SWITCH 1...

Page 8: ...vapours given off from the heating foods It is then exhausted through the exhausting air vents at the oven cavity CONVECTION MOTOR The convection motor drives the convection fan and provide the heated air GRILL HEATING ELEMENT The grill heating element is provided to brown the food and is located on the top of the oven cavity CONVECTION HEATING ELEMENT The convection heating element is located at ...

Page 9: ...Imeasuresthevoltageacrossthetemperaturemeasure mentcircuitintermittentlywithina32 secondtimebaseafter since the oven is started in microwave cooking condition CONVECTION MOTOR THERMISTOR Sensing Voltage ON OFF ON OFF ON OFF 0 2 20 30 32 64 sec 3 sec Sensing the voltage across temperature measurement circuit motor is energized opening the damper door 1 3 When the damper is moved to the open positio...

Page 10: ...ds after the oven has been switched off Wait for 60 seconds and then short circuit the connection of the high voltage capacitor that is of the connecting lead of the high voltage rectifier against the chassis with the use of an insulated screwdriver Sharp recommend that wherever possible fault finding is carried out with the supply disconnected It may in some cases be necessary to connect the supp...

Page 11: ...at HIGH Oven does not seem to be operating properly during variable cooking condition Oven operates properly at HIGH Oven goes into cook cycle but shuts down before end of cooking cycle Convection heating element does not heat Oven seems to be operate when the temperature in the oven cavity is lower or higher than preset one Grill heating element does not heat Convection heating element does not s...

Page 12: ...VECTION HEATING ELEMENT THERMISTOR POWER SUPPLY CORD SHORTED WIRE HARNESS OPENED WIRE HARNESS OVEN LAMP OR SOCKET KEY UNIT TC TRANSFORMER TOUCH CONTROL PANEL BLOCKED VENTILATION OPENINGS WRONG OPERATION MIS ADJUSTMENT OF SWITCHES HOME FUSE OR BREAKER NO POWER AT WALL OUTLET BLOCKED CONVECTION FAN BLOCKED COOLING FAN RELAY RY1 2 3 4 5 6 7 FOIL PATTERN ...

Page 13: ...vessel having a maximum material thickness of 3 mm and an outside diameter of approximately 190 mm 2 Temperature of the oven and vessel The oven and the empty vessel are at ambient temperature prior to the start the test 3 Temperature of the water The initial temperature of the water is 10 2 C 4 Select the initial and final water temperature so that the maximum difference between the final water t...

Page 14: ... filament and secondary winding connections from the rest of the HV circuitry Using an ohmmeter set on a low range it is possible to check the continuity of all three windings The following readings should be obtained If the reading obtained are not stated above then the high voltage transformer is probably faulty and should be replaced CARRY OUT 4R CHECKS C HIGH VOLTAGE RECTIFIER ASSEMBLY TEST a ...

Page 15: ...M to NC Released O C S C Depressed S C O C COM Common terminal NO Normally open terminal NC Normally close terminal S C Short O C Open circuit If incorrect readings are obtained make the necessary switch or replace the switch CARRY OUT 4R CHECKS F MONITOR RESISTOR TEST CARRY OUT 3D CHECKS Disconnect the leads from the monitor resistor Using an ohmmeter and set on a low range Check between the term...

Page 16: ...n open circuit thermal cut out OVEN indicates that the oven cavity has overheated this may be due to no load operation An open circuit thermal cut out CONV indicates that the convection fan motor winding has overheated this may be due to resisted ventilation or locked cooling fan or locked convection fan motor H MOTOR WINDING TEST Table Resistance of Motor Motors Resistance Fan motor Approximately...

Page 17: ...N Only replace fuse M8A with the correct value replacement L CONVECTION HEATING ELEMENT AND GRILL HEATING ELEMENT TEST CARRY OUT 3D CHECKS Before carrying out the following tests make sure the heating element is cool completely 1 Resistance of heating element Disconnect the wire leads to the heating element to be tested Using ohmmeter with low resistance range Check the resistance across the termi...

Page 18: ...gure appears f A certain group of indicators do not light up g The figure of all digits flicker 2 3 Other possible problems caused by defective control unit a Buzzer does not sound or continues to sound b Clock does not operate properly c Cooking is not possible d Proper temperature measurement is not obtainned O KEY UNIT TEST If the display fails to clear when the STOP CLEAR pad is depressed firs...

Page 19: ...presence of layer short circuit check primary coil resistance If any abnormal condition is detected replace the defective parts CARRY OUT 4R CHECKS RELAY SYMBOL OPERATIONAL VOLTAGE CONNECTED COMPONENTS RY1 Approx 25 0V D C Oven lamp Turntable motor RY2 Approx 25 0V D C High voltage transformer RY3 Approx 25 0V D C Convection heater RY4 Approx 25 0V D C Grill heater RY5 Approx 25 5V D C Convection ...

Page 20: ... LOGICOOK DRINK pad once Now the oven is in the sensor cooking condition DRINK will appear and flash on and off in the display 5 The oven will operate for the first 16 seconds without generating microwave energy NOTE ERROR will appear if the door is opend or STOP CLEAR pad is touched during first stage of sensor cooking 6 After approximately 16 seconds microwave energy is produced oven should turn...

Page 21: ...f the above is proper the AH sensor is probably defective R1 R2 22 ohm 1 1 2W R3 10k ohm 5 1 2W R4 1M ohm 5 1 2W Sensor Dummy Resistor Circuit TEST PROCEDURES CONT D PROCEDURE LETTER COMPONENT TEST Plunger NC NO COM COM NO NC R3 R4 R1 R2 1 2 3 F 1 F 2 F 3 To connector F on Control Unit CONNECTOR ...

Page 22: ...ROL PANEL ASSEMBLY OUTLINE OF TOUCH CONTROL PANEL 3 Synchronizing Signal Circuit The power source synchronizing signal is available in order to compose a basic standard time in the clock circuit It accompanies a very small error because it works on commercial frequency 4 ACL Circuit A circuit to generate a signal which resets the LSI to the initial state when power is supplied 5 Buzzer Circuit The...

Page 23: ...level signal 0V GND Damper closed L level signal 5V VC 12 AN0 IN Input signal which communicates the door open close information to LSI Door closed H level signal 0V Door opened L level signal 5V 13 P55 OUT Damper motor relay driving signal To turn on and off shut off relay RY7 14 P54 OUT Oven lamp and turntable motor driving signal Square Waveform 50Hz To turn on and off the shut off relay RY1 Th...

Page 24: ...hen power is applied Set to L level the moment power is applied at this time the LSI is reset Thereafter set at H level 28 29 P71 P70 IN OUT Terminal not used 30 XIN IN Internal clock oscillation frequency setting input The internal clock frequency is set by inserting the ceramic filter oscillation circuit with respect to XOUT terminal 31 XOUT OUT Internal clock oscillation frequency control outpu...

Page 25: ...7terminalwhileone of G3 line keys on key matrix is touched 47 P11 OUT Segment data signal Signal similar to P15 Key strobe signal Signalappliedtotouch keysection ApulsesignalisinputtoP24 P27terminalwhileone of G4 line keys on key matrix is touched 48 P10 OUT Segment data signal Signal similar to P15 Key strobe signal Signalappliedtotouch keysection ApulsesignalisinputtoP24 P27terminalwhileone of G...

Page 26: ...S IN Connected to VC 5V 5 SDA IN OUT Serial data input output input outputs data to IC1 6 SCL IN Clock signal input input outputs serial data at every one pulse 7 TEST IN Connected to VC 5V 8 VCC IN Connected to GND Memory IC IC2 X24C02P is a 2K bit serial memory enabling CMOS to be erased written electrically This memory is constructed with 256 registers x 8 bits enabling individual access read a...

Page 27: ...r is supplied with a current to keep itself heated at about 150 C and the resultant heat is dissipated in the air and if the two thermistors are placed in different humidity conditions they show different degrees of heat conductivity leading to a potential difference between them causing an output voltage from the bridge circuit the intensity of which is increasedastheabsolutehumidityoftheairincre...

Page 28: ...ve it is here also possible to check the sensor related controls ofthetouchcontrolpanelbyusingthedummyresistor s 4 Servicing Tools Tools required when servicing the touch control panel assembly 1 Soldering iron 30W To prevent leaking current it is recommended to use a soldering iron with a grounding terminal 2 Oscilloscope Singlebeam frequencyrange DC 10MHz type or more advanced model 3 Others Han...

Page 29: ...arts are normal food is undercooked or overcooked in DRINK of LOGICOOK mode to improve the cooking result the gain can be reset in accordance with the following Table 2 or 3 When food is undercooked decrease the gain referring to the Table 2 When food is overcooked increase the gain referring to the Table 3 Table 2 To set the cooking condition more The gain is 1 0 now Table 3 To set the cooking co...

Page 30: ...ps on the cavity face plate 5 Lift the entire case from the oven 6 Discharge the H V capacitor before carrying out any further work 7 Do not operate the oven with the outer case removed N B Step 1 2 and 6 form the basis of the 3D checks CAUTION DISCHARGE HIGH VOLTAGE CAPACITOR BEFORE TOUCHING ANY OVEN COMPONENT OR WIRING CONTROL PANEL REMOVAL 1 CARRY OUT 3D CHECKS 2 Disconnect the connectors from ...

Page 31: ...ee CAUTION Do not use this removed fan blade again Because the hole for shaft of it may become bigger than a standard one to prevent it from falling 8 Remove the magnetron from the waveguide with care so the magnetron antenna is not hit by any metal object around the antenna 9 Remove the magnetron cushion from the magnetron 10 Remove the two 2 screws and two 2 nuts holding the fan motor to the fan...

Page 32: ...ulding cord stopper of power supply cord into the square hole of the rear cabinet referring to the Figure C 3 b 2 Install the earth wire lead of power supply cord and the earth angle to the oven cavity with one 1 screw and tight the screw 3 Connect the brown and blue wire leads of power supply cord to the noise filter correctly referring to the Pictorial Diagram 6 Now the convection fan duct is fr...

Page 33: ... the door should be less than 0 5mm 2 The 1st latch switch and stop switch interrupt the circuit before the door can be opened 3 The monitor switch contacts of COM NC close when the door is opened and the 2nd latch switch contacts of COM NO open when the door is opened 4 Re install outer case and check for microwave leakage around the door with an approved microwave survey meter Refer to Microwave...

Page 34: ...bly with lower oven hinge by pulling it downward 4 Separate the door assembly and lower oven hinge Door assembly is now free 5 Re install lower oven hinge to the new door assembly 6 On re installing new door assembly secure the lower ovenhingewiththethree 3 mountingscrewstotheoven cavity Make sure the door is parallel with bottom line of the oven face plate and the latch head pass through the latc...

Page 35: ...d for microwave ovens must be used for testing Recommended instruments are NARDA 8100 NARDA 8200 HOLADAY HI 1500 SIMPSON 380M 2 Place the oven tray into the oven cavity 3 Place the load of 275 15ml of water initially at 20 5 C in the centre of the oven tray The water container should be a low form of 600 ml beaker with inside diameter of approx 8 5cm and made of an electrically non conductive mate...

Page 36: ...H CONVECTION HEATING ELEMENT GRILL HEATING ELEMENT DM DAMPER MOTOR H5 H6 H7 H8 A3 H3 H1 B2 B1 B3 B4 B6 B5 A5 A7 A9 COM COM COM N O N O N O RY3 RY5 RY1 RY4 RY6 RY7 DAMPER SWITCH THER MISTOR RY2 NOISE FILTER MONITOR SWITCH 1ST LATCH SWITCH A1 FUSE M8A F1 F2 F3 AH SENSOR NO TTM SWITCH 220 230V 50Hz BLU 15 BRN 15 G Y 15 EARTH 0 22µ 250V FUSE 13A NOISE SUPPRESSION COIL 10M 0 5W 600K 0 5W 0 0047µ 250V 0...

Page 37: ... H V RECTIFIER MAGNETRON OL L N CH CONVECTION HEATING ELEMENT GRILL HEATING ELEMENT DM DAMPER MOTOR H5 H6 H7 H8 A3 H3 H1 B2 B1 B3 B6 B5 A5 A7 A9 COM COM COM N O N O N O RY3 RY5 RY1 RY4 RY6 RY7 DAMPER SWITCH THER MISTOR RY2 NOISE FILTER MONITOR SWITCH 1ST LATCH SWITCH A1 FUSE M8A B4 F1 F2 F3 AH SENSOR TURNTABLE MOTOR NO TTM SWITCH 220 230V 50Hz BLU 15 BRN 15 G Y 15 EARTH 0 22µ 250V FUSE 13A NOISE S...

Page 38: ...V RECTIFIER MAGNETRON OL L N CH CONVECTION HEATING ELEMENT GH GRILL HEATING ELEMENT DM DAMPER MOTOR H5 H6 H7 H8 A3 H3 H1 B2 B1 B3 B6 B5 A5 A7 A9 COM COM COM N O N O N O RY3 RY5 RY1 RY4 RY6 RY7 DAMPER SWITCH THER MISTOR RY2 NOISE FILTER MONITOR SWITCH 1ST LATCH SWITCH A1 FUSE M8A B4 F1 F2 F3 AH SENSOR TURNTABLE MOTOR NO TTM SWITCH 220 230V 50Hz BLU 15 BRN 15 G Y 15 EARTH 0 22µ 250V FUSE 13A NOISE S...

Page 39: ... SUPPLY CORD FUSE M8A ORG RED BRN 6 5 GRN 4 RED 3 2 1 COM BLU WHT WHT GRN BLK ORG CN B NO 2ND LATCH SWITCH STOP SWITCH NO COM NC COM MONITOR SWITCH 1ST LATCH SWITCH NO COM GRILL HEATING ELEMENT RED WHT CAPACITOR BLU W H T O R G BRN BRN BLU COM THERMISTOR BRN BRN BRN BLU ORG GRY WHT BLU B L U BRN DAMPER MOTOR WHT BLU BLU 1 2 ORG 3 RED 4 5 6 BRN YLW 7 GRY 8 BLU 1 2 ORG 3 4 5 6 RED BRN 7 8 GRY 9 CN A...

Page 40: ... G8 G1 G2 G3 G4 G5 G6 G7 D78 D77 D76 D75 D74 D73 IC3 IZA495DR 12 11 10 9 8 7 6 5 4 3 2 1 IC1 IZA627DR 1 5 10 15 20 25 30 32 33 35 40 45 50 55 60 64 VCC VEE AVSS VREF AN7 AN6 AN5 AN4 AN3 AN2 AN1 AN0 P55 P54 P53 P52 P51 P50 P47 P46 P45 P44 P43 P42 INT1 INT0 RESET P71 P70 XIN XOUT VSS P30 P31 P32 P33 P34 P35 P36 P37 P00 P01 P02 P03 P04 P05 P06 P07 P10 P11 P12 P13 P14 P15 P22 P23 P24 P25 P26 P16 P17 P...

Page 41: ...R 7N76 W M R 7N76 B M 40 Figure S 3 Printed Wiring Board 5 7 9 3 1 ...

Page 42: ...S A012DRE0 J Ceramic resonator CST4 00MGW 1 AD D1 RSRCDA013DRE0 J Diode S1NB10 1 AG ELECTRIC PARTS 1 1 FH HZA007WRE0 U Thermistor 1 AH 1 2 RTRN A402WRE0 J TC transformer 1 AW 1 3 QACCBA033WRE1 U Power supply cord assembly 1 AT 1 4 FH DZA035WRE0 U High voltage rectifier assembly 1 AP 1 5 FPWBFA242WRE0 U Noise filter 1 AW 1 6 RC QZA075WRE0 U High voltage capacitor 1 AX 1 7 QSOCLA011WRE0 J Oven lamp ...

Page 43: ...2EF153J J Resistor 15k ohm 1 4W 4 AA R80 VRD B12EF152J J Resistor 1 5k ohm 1 4W 1 AA R81 VRD B12EF512J J Resistor 5 1k ohm 1 4W 1 AA R90 VRS B13AA331J J Resistor 330 ohm 1W 1 AA RY1 RRLY A076DRE0 J Relay OMIF S 124LM 1 AK RY2 RRLY A081DRE0 J Relay VRB24 1 AL RY3 4 RRLY A076DRE0 J Relay OMIF S 124LM 2 AK OVEN PARTS 4 1 DOVN A418WRK0 U Oven cavity 1 BP 4 2 LBNDKA089WRP0 U Capacitor holder 1 AE 4 3 F...

Page 44: ... Thermistor angle 1 AE 4 39 MCAMPA076WRF1 U Damper cam 1 AB 4 40 LANGTA305WRP0 U Air separate angle 1 AF 4 41 PCUSUA398WRP0 U Cushion 2 AA 4 42 PCUSUA403WRP0 U Cushion 1 AA 4 43 PCUSGA313WRP0 U Cushion 1 AB 4 44 PSHT A008WRE0 U Sensor sheet 1 AC DOOR PARTS 5 CDORFA683WRK0 U Door assembly Brown 1 BM 5 CDORFA684WRK0 U Door assembly White 1 BM 5 1 DDORFA659WRY0 J Door panel assembly 1 AY 5 2 GCOVHA30...

Page 45: ...AA 7 10 XOTWW40P06000 J Screw 4mm x 6mm 2 AA 7 11 XPSSP20 20000 J Pin 1 AA 7 12 XWHUW40 08000 J Washer 4mm x 0 8mm 1 AA 7 13 XWSUW40 10000 J Washer 4mm x 1 0mm 1 AA 7 14 XBPSD40P25000 J Screw 4mm x 25mm 2 AA 7 15 XNESD40 32000 J Nut 4mm x 3 2mm 2 AA 7 16 LX EZA045WRE0 U Special screw 10 AA 7 17 XCPSD30P06000 J Screw 3mm x 6mm 7 AA 7 18 XFPSD40P08000 J Screw 4mm x 8mm 8 AA 7 19 XFPSD50P10KS0 J Scre...

Page 46: ...9 4 12 1 5 7 8 1 11 7 1 7 16 1 3 4 18 1 10 7 6 7 17 4 6 1 24 7 16 7 20 7 6 7 20 4 26 1 16 7 12 7 13 7 9 4 19 7 16 1 7 1 15 1 23 7 17 7 24 7 16 7 21 7 5 7 20 4 21 7 7 4 25 4 23 4 37 4 20 7 18 1 27 7 18 4 29 4 22 4 4 4 1 4 27 4 17 2 5 7 19 4 31 7 3 4 28 1 22 4 32 2 4 7 24 2 6 7 20 7 20 7 20 7 20 4 35 6 4 4 34 6 3 7 15 4 24 1 14 4 15 4 14 1 18 1 19 1 20 1 17 7 20 1 3 4 16 1 12 7 14 1 6 4 2 1 4 7 6 x2...

Page 47: ...R 7N76 W M R 7N76 B M 46 DOOR PARTS CONTROL PANEL PARTS 3 5 3 6 3 8 3 7 3 1 3 2 3 4 3 3 3 2 1 5 3 5 5 1 5 6 5 7 5 8 5 7 5 7 5 7 5 4 5 5 5 2 5 9 5 9 5 10 5 10 ...

Page 48: ...ACK LOW RACK INSTRUCTION BOOK SSAKHA045WRE0 ROLLER STAY TRAY PAD SPADPA474WRE1 TOP PAD ASSEMBLY FPADBA272WRK2 BOTTOM PAD ASSEMBLY FPADBA273WRK1 OVEN BAG SSAKHA044WRE0 DOOR PROTECTION SHEET SPADPA468WRE0 PACKING CASE SPAKCC537WRR0 R 7N76 B M SPAKCC538WRR0 R 7N76 W M N B ALL BROWN MICROWAVE OVENS MUST BE PACKED WITH A PAPER SHEET ON TOP OF THE OUTER WRAP COOK BOOK Not Replaceable Items ...

Page 49: ...R 7N76 W M R 7N76 B M 48 SHARP CORP 95 Printed in UK ...

Reviews: