7
BEFORE OPERATION
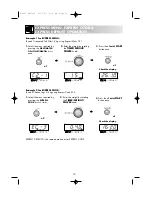
SETTING THE CLOCK
1.
Choose the clock function.
(12 hour clock).
Choose the 24 hour
clock.
3.
Press the
COOKING
MODE
button to change
from hours to minutes.
4.
Set the minutes. Rotate the
TIMER/WEIGHT/POWER
knob until the correct minute
is displayed (35).
5.
Press the
COOKING
MODE
button to start
the clock.
2.
Set the hours. Rotate the
TIMER/WEIGHT/
POWER
knob until the correct hour is
displayed (23).
x1
and hold for 3 seconds
x1
Example:
To set the 24 hour clock to 23:35
There are two setting modes: 12 hour clock and 24 hour clock.
1.
To set the 12 hour clock, hold the
COOKING MODE
button down for 3
seconds. will appear in the display.
2.
To set the 24 hour clock, press the
COOKING MODE
button
once more
after Step 1, in the example below
will appear in the display.
x1
and hold
for 3 secs.
To set the clock, follow the example below.
NOTES:
1. You can rotate the
TIMER/WEIGHT/POWER
knob clockwise or counter-clockwise.
2. Press the
STOP
button if you make a mistake
during programming.
3. If the electrical power supply to your microwave
oven is interrupted, the display will intermittently
show after the power is reinstated. If
this occurs during cooking, the programme will be
erased. The time of day will also be erased.
4. When you want to reset the time of day, follow the
above example again.
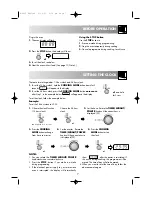
Plug in the oven.
1.
The oven display will flash:
2.
Press the
STOP
button, the display will show:
3.
To set the clock, see below.
4.
Heat the oven without food. (See page 10, Note 2).
Using the STOP button
Use the
STOP
button to:
1.
Erase a mistake during programming.
2.
Stop the oven temporarily during cooking.
3.
Cancel a programme during cooking, touch twice.
x1
x1
x1
R-64ST English 21/3/01 2:16 pm Page 7


