background image

17

CONVENIENT FUNCTIONS

Website:

http://www.sharp.co.uk/support

Help Line:

08705 274277 (office hours)

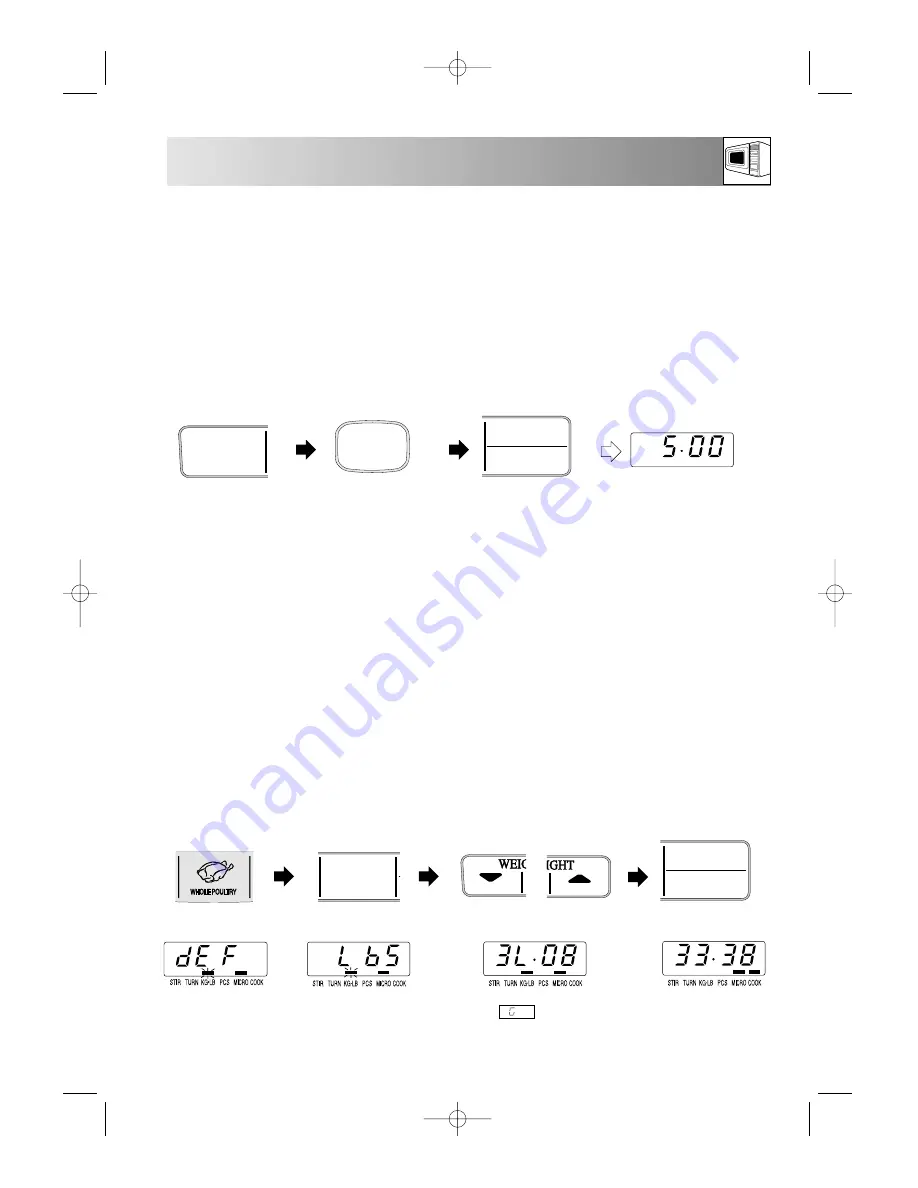
Example: 

To change from kg to lbs when using EXPRESS DEFROST “Whole Poultry” (3lb 8 oz).

x1

2. Press the 

WEIGHT

CONVERSION 

key to

change from kg to lbs.

1. Press the 

WHOLE

POULTRY 

key to

select poultry.

3. Enter the weight by pressing

the 

WEIGHT

keys.

x1

KG / LB

CONVERSION

DELAY START

CLOCK SET

TIMER

KITCHEN

DOWN

DOWN

UP

x1

4. Press the 

START/

AUTO MINUTE

key

once to begin cooking.

x1

DOWN

UP

x15

6. WEIGHT CONVERSION:

Your oven comes set for kg.
You can use the weight conversion function to convert kg to lbs or vice-versa. The oven memorises the weight
unit of the last operation, until you change it. To change from kg to lbs press the 

WEIGHT CONVERSION

key when the display shows the time of day or before entering the weight.

START

AUTO MINUTE

STOP

CLEAR

POWER

LEVEL

NOTE: 

If you change from lbs to kg, the display will show             .

2. Enter the desired

time by pressing
the 

1 MIN

key 5

times.

1. Press the 

KITCHEN

TIMER

key once.

3. Press the

START/AUTO
MINUTE 

key once.

The display will
count down. When
the display reaches
zero, the audible
signal will sound.

1min.

KG / LB

CONVERSION

DELAY START

CLOCK SET

TIMER

KITCHEN

5. KITCHEN TIMER:

You can use the KITCHEN TIMER for timing where microwave cooking is not involved. For example, to time
boiled eggs cooked on a conventional hob, to monitor the standing time for microwaved food or to remind
you of the time when making a phone call.

Example: 

To set the timer for 5 minutes.

You can enter any time up to 99 minutes, 90 seconds. To cancel the KITCHEN TIMER whilst counting
down, simply press the 

STOP/CLEAR

and the display will return to the time of day, if set.

NOTE:

The KITCHEN TIMER function cannot be used whilst cooking or when the DELAY START function is set.

START

AUTO MINUTE

STOP

CLEAR

POWER

LEVEL

x1

x5

x1

or

R-254M O/M + CkBk  13/3/01  11:13 am  Page 17

Summary of Contents for R-254M

Page 1: ...800W IEC 60705 R 254M MICROWAVE OVEN OPERATION MANUAL WITH COOKBOOK R 254M O M CkBk 13 3 01 11 12 am Page A ...

Page 2: ...R 254M O M CkBk 13 3 01 11 12 am Page B ...

Page 3: ...ice for Defrosting 21 Advice for Reheating 22 Cookbook 23 37 Aftercare Cleaning and Maintenance 38 Troubleshooting 38 39 To Replace the Mains Plug 39 Calling for Service 40 Guarantee 40 Specifications 41 OPERATION MANUAL This operation manual contains important information which you should read carefully before using your microwave oven IMPORTANT There may be a serious risk to health if this opera...

Page 4: ...perate the oven with the turntable and support fitted correctly This promotes thorough even cooking A badly fitted turntable may rattle may not rotate properly and damage the oven The turntable rotates clockwise or counter clockwise The rotary direction may change each time you start the oven This does not affect cooking performance When you order accessories please mention two details part name a...

Page 5: ... MORE keys Press to shorten lengthen cooking time 8 DELAY START CLOCK SET key Use to set the clock display the time or programme DELAY START 9 START AUTO MINUTE key Press to start a programme Press to cook on 100P for 1 minute or increase time during cooking in multiples of 1 minute 10 STOP CLEAR key Press once to stop a programme twice to cancel a programme 11 POWER LEVEL key Press to select micr...

Page 6: ...he plug properly into the socket Do not connect other appliances to the same socket using an adaptor plug If the plug or socket is loose or the power supply cord is damaged it must be replaced with a special cord The exchange must be made by an authorised SHARP service agent When removing the plug from the socket always grip the plug never the cord as this may damage the power supply cord and the ...

Page 7: ...off and unplug the appliance and keep the door closed in order to stifle any flames IMPORTANT SAFETY INSTRUCTION READ CAREFULLY AND KEEP FOR FUTURE REFERENCE MAFF HEATING CATEGORY E 800W The heating category a letter A to E developed by MAFF Ministry of Agriculture Fisheries and Food with microwave oven and food manufacturers indicates the ability of the oven to heat small quantities of food up to...

Page 8: ...EL key As long as your finger is pressing the POWER LEVEL key the power level will be displayed The oven continues to count down although the display will show the power level To change the power level for cooking enter the required time and then press the POWER LEVEL key For example Your oven has 5 power levels To choose the power level for cooking follow the advice given in the recipe section Ge...

Page 9: ...DELAY START CLOCK SET TIMER KITCHEN KG LB CONVERSION DELAY START CLOCK SET TIMER KITCHEN There are two setting modes 12 hour clock and 24 hour clock x2 x3 x2 10min 1min x5 x1 x3 10min 1min x1 KG LB CONVERSION DELAY START CLOCK SET TIMER KITCHEN KG LB CONVERSION DELAY START CLOCK SET TIMER KITCHEN KG LB CONVERSION DELAY START CLOCK SET TIMER KITCHEN NOTES To check the time of day during a cooking p...

Page 10: ...ble or place directly onto the turntable Close the door and press the START AUTO MINUTE key Stopping the oven If you wish to stop the oven during cooking press the STOP CLEAR key once or open the oven door If you wish to cancel the cooking programme press the STOP CLEAR key twice Example To cook for 2 minutes and 30 seconds on 70P microwave power NOTES Your oven can be programmed up to 99 minutes ...

Page 11: ... If the DOWN weight key is pressed the display will count down from the highest weight range each time the key is pressed If the UP weight key is pressed the display will count up from the lowest weight range each time the key is pressed You can enter the weight by holding down the WEIGHT keys as well as by pressing until the desired weight appears EXPRESS COOK EXPRESS DEFROST enables you to cook ...

Page 12: ...SS function for poultry This menu is only suitable for cooking whole poultry EXPRESS COOK WEIGHT RANGE Food weight should be rounded up to the nearest 0 1kg or 1oz for example 0 65kg to 0 7kg and 12 5oz to 13oz You are restricted to enter a weight within the range see the following charts To cook defrost weights above or below that range or foods not included in the charts below refer to the chart...

Page 13: ...at or poultry with flat pieces of aluminium foil This will prevent the areas from becoming warm during defrosting Ensure the foil does not touch the oven walls Do not cook the meat or poultry until thoroughly defrosted EXPRESS DEFROST MENU WEIGHT RANGE COOKING PROCEDURE Meat joint 0 5kg 1 5kg Place meat in a flan dish on the turntable Beef Lamb Pork Turn over when audible signal sounds Stand wrapp...

Page 14: ...continue cooking press the START AUTO MINUTE key The final temperature will vary according to the initial food temperature Check food is piping hot after cooking If necessary you can extend the cooking manually You can enter the weight in Lb oz or Kg g To convert to either weight range press the WEIGHT CONVERSION key once before entering the weight See page 17 If you use the AUTO MINUTE function d...

Page 15: ...ash on the display To continue cooking press the START AUTO MINUTE key You can use the LESS MORE keys see page 15 The final temperature will vary according to the initial food temperature Check the food is piping hot after cooking If necessary you can extend the cooking manually To cook menus or weights not included in the chart below cook manually If you use the AUTO MINUTE function during MEAL I...

Page 16: ...the power level press the POWER LEVEL key once STAGE 1 1 To input the time press the 1 MIN key 5 times STAGE 2 3 To input the time press the 10 MIN key once and then the 1 MIN key 6 times x1 1min x5 5 Press the START AUTO MINUTE key once to start 4 To input the power level press the POWER LEVEL key 4 times Example START AUTO MINUTE STOP CLEAR POWER LEVEL x2 AUTO MINUTE enables you To cook on 100P ...

Page 17: ...SS MORE simply press the same key again To change MORE to LESS simply press the LESS key To change LESS to MORE simply press the MORE key TO USE LESS AND MORE WITH MANUAL COOKING Press the LESS or MORE key to decrease or increase the cooking or defrosting time in multiples of 1 minute whilst the oven is in use The overall cooking time can be increased to a maximum of 99 minutes Example To cook on ...

Page 18: ... to programme the oven to cook at any time during the next 12 hours if the 12 hour clock is set next 24 hours if the 24 hour clock is set IMPORTANT It is recommended the oven is always attended when in use Check to ensure you have programmed the oven correctly Exceeding cooking times and use of excessive power levels can lead to food overheating and cause a risk of fire You can use DELAY START onl...

Page 19: ... CLEAR POWER LEVEL NOTE If you change from lbs to kg the display will show 2 Enter the desired time by pressing the 1 MIN key 5 times 1 Press the KITCHEN TIMER key once 3 Press the START AUTO MINUTE key once The display will count down When the display reaches zero the audible signal will sound 1min KG LB CONVERSION DELAY START CLOCK SET TIMER KITCHEN 5 KITCHEN TIMER You can use the KITCHEN TIMER ...

Page 20: ...n the turntable to prevent heat stress Follow manufacturer s instructions Be careful as these become very hot Popcorn Only use microwave popcorn in recommended packaging follow popcorn manufacturer s instructions Never use oil unless the manufacturer recommends and never cook for longer than instructed NO YES NO Use small pieces of aluminium foil to shield food from overheating Keep foil at least ...

Page 21: ...allow heat or steam to disperse When removing covers such as cling film opening roasting bags or popcorn packaging direct steam away from face and hands For even cooking stir turn or rearrange food during cooking Where recommended leave food to stand after cooking or defrosting The initial temperature of food affects the amount of cooking time needed eg chilled food requires more cooking than food...

Page 22: ...ded for example potatoes require more cooking than peas four potatoes will take longer to cook than two Food hygiene standards storage handling and preparation apply to microwaving Always store convenience foods as recommended by the food manufacturer and keep no longer than the Use By date WARNING Always attend the oven when in use Carefully follow the SHARP Operation Manual at all times If you e...

Page 23: ...hly defrosted NOTE Do not defrost poultry with giblets Place in a flan dish separate during defrosting and turn over at least 2 3 times Shield if necessary Place in a flan dish stir or turn over at least 3 4 times during defrosting remove defrosted parts each time Please refer to defrosting chart on page 24 Place in a flan dish separate during defrosting and turn over at least twice Shield if nece...

Page 24: ...follow the manufacturers instructions on the can Remove any poultry or meat portions reheat these separately see below Place smaller items of food to the centre of the plate larger and thicker foods to the edge Cover with vented microwave cling film and reheat on 50P stir rearrange halfway through reheating Ensure food is thoroughly reheated before serving Cover with vented microwave cling film or...

Page 25: ...stated Please note that all preparation times and serving quantities are approximate All ingredients are given in both metric and imperial measures Use either set but not a combination of both measures Cooking times in the charts and recipes are based on standard conditions Cooking results will vary according to the condition of foods utensils and the oven Please check the cooking result and if ne...

Page 26: ...ramming Stage 1 Defrost on 30P for the first quarter of cooking time Stage 2 Defrost on 10P for the remaining cooking time Turn over 3 4 times removing defrosted mince each time Place in a flan dish Turn 2 3 times separate during defrosting Shield Place in a flan dish Turn 2 3 times separate during defrosting Shield Place in a flan dish Turn 2 3 times separate during defrosting Shield Place in a f...

Page 27: ...a flan dish Turn over halfway through cooking Place in a flan dish Turn over halfway through cooking Place in a flan dish Turn over halfway through cooking Place in a flan dish Turn over halfway through cooking Place in a flan dish Turn over halfway through cooking Place in a flan dish Turn over halfway through cooking Place in a flan dish Turn over halfway through cooking Place in a flan dish Tur...

Page 28: ...0P 100P 100P 100P 100P 100P 100P 100P 100P 100P 100P 100P 100P Place in dish Add 30ml 2tbsp water Cover dish Stir halfway through cooking Place in dish Add 30ml 2tbsp water Cover dish Stir halfway through cooking Place in dish Add 45ml 3 tbsp water Cover Stir halfway through cooking Slice or break into florets Place in dish Add 30ml 2tbsp water Cover Stir halfway through cooking Place in dish Add ...

Page 29: ... 1 2 pint boiling water 100g 4oz pasta Do not cover Stir twice during cooking Add 300ml 1 2 pint boiling water 100g 4oz pasta Do not cover Stir twice during cooking Add 300ml 1 2 pint boiling water 100g 4oz pasta Do not cover Stir twice during cooking Add 300ml 1 2 pint boiling water 100g 4oz pasta Do not cover Stir twice during cooking 1 Whisk together eggs and milk Season 2 Place butter in a 25 ...

Page 30: ...utes Nil 30 Seconds 30 Seconds 1 2 Minutes 2 3 Minutes 2 3 Minutes 3 4 Minutes 1 Minute 1 2 Minutes 2 3 Minutes 70P 70P 70P 70P 70P 70P 50P PASTA BOLOGNESE Serves 4 75g 3oz onion finely chopped 50g 2oz celery finely chopped 2 cloves garlic crushed 1 bay leaf 200g 7 oz canned chopped tomatoes 15ml 1 tbsp tomato puree 300g 11oz lean minced beef 5ml 1 tsp dried mixed herbs 150ml 1 4 pint red wine 450...

Page 31: ...g 3oz carrot sliced 1 25ml 1 4 tsp cayenne pepper 2 5ml 1 2 tsp ground cumin grated rind of 1 2 lemon 50g 2oz canned sweetcorn drained 100g 4oz white long grain rice 400ml 2 3 pint hot vegetable stock salt and pepper to taste BEEF RISOTTO Serves 4 50g 2oz onion chopped 50g 2oz celery sliced 50g 2oz green pepper seeded and sliced 50g 2oz red pepper seeded and sliced 125g 5oz beef fillet thinly slic...

Page 32: ...ne salt and pepper to taste 30ml 2tbsp cornflour blended with water BEEF CASSEROLE Serves 4 300g 11oz braising steak diced 100g 4 oz carrots sliced 100g 4 oz courgettes sliced 75g 3 oz onion chopped 5ml 1 tsp dried mixed herbs 200g 7 oz potatoes chopped 300ml 1 2 pint hot beef stock 150ml 1 4 pint red wine salt and pepper to taste 30ml 2tbsp cornflour blended with water CHICKEN CASSEROLE Serves 4 ...

Page 33: ... dried basil salt and pepper to taste 150ml 1 4 pint double cream 1 Cook the onion mushrooms and butter together in a bowl on 100P for 5 minutes 2 Stir in the flour to form a paste gradually add the milk and the stock 3 Stir in the marjoram basil salt and pepper to taste Cook on 100P for 9 minutes stir after 5 minutes 4 Blend the soup and add the cream Cook on 100P for 7 minutes AVOCADO AU GRATIN ...

Page 34: ...00P for 14 minutes until soft enough to mash Mash with butter milk and seasoning 2 Place fish in a flan dish in a single layer cover and cook on 70P for 7 minutes Flake the fish and mix with the parsley sauce Pour into a flan or casserole dish Spread the potatoes on top and sprinkle with the grated cheese 3 Cook on 70P for 7 minutes until the cheese has melted BEEF STROGANOFF Serves 4 Preparation ...

Page 35: ... in dish top with 675g 11 2lb mashed potatoes Heat on 100P for 5 6 minutes Chilli Con Carne Make as the bolognese sauce At stage 3 add 450g 1lb drained canned red kidney beans and 5 15ml 1 3 tsp chilli powder to taste MOUSSAKA Serves 6 Preparation time 45 minutes 450g 1lb aubergines thinly sliced 30ml 2tbsp olive oil 225g 8oz onion chopped 15ml 1tbsp fresh parsley chopped 2 cloves garlic crushed 3...

Page 36: ...each 45ml 3tbsp clear honey 5ml 1tsp whole grain mustard 2 5 ml 1 2tsp dried tarragon 15ml 1tbsp tomato purée 150ml 1 4 pint chicken stock 15ml 1tbsp cornflour blended with water salt and pepper to taste 1 Place the chicken breasts in a casserole dish 2 Mix all remaining ingredients together and pour over the chicken 3 Cover and cook on 70P for 25 minutes Turnover and coat the chicken with the sau...

Page 37: ...tir 3 4 times during cooking Add the blended cornflour mix well and cook on 100P for 5 minutes Serve hot with rice or as a filling for tacos CHEESY JACKETS Serves 2 Preparation time 20 minutes 2 baking potatoes approx 250g 9oz each 50g 2oz butter 100g 4oz Double Gloucester cheese finely chopped 15ml 1tbsp fresh chives chopped 50g 2oz mushrooms finely chopped salt and pepper to taste 1 Prick each p...

Page 38: ...pper and parsley Mix well 2 Cook on 100P for 3 minutes Stir every minute until smooth and thick This dish is ideal served with meat or fish STRAWBERRY JAM Makes 675g 11 2lb Preparation time 15 minutes 675g 11 2lb strawberries hulled 45 ml 3tbsp lemon juice 675g 11 2lb preserving sugar 1 Place strawberries and lemon juice in a large bowl heat on 100P for 5 minutes or until the fruit has softened Ad...

Page 39: ...ow to cool before turning out 5 Place jam or syrup in a bowl heat on 100P for 30 seconds until runny and pour over the pudding MOIST CARROT CAKE Serves 4 6 Preparation time 12 14 minutes 300ml 1 2 pint sunflower oil 225g 8oz brown sugar 3 eggs size 3 175g 6oz self raising flour 5ml 1tsp bicarbonate of soda 10ml 2tsp cinnamon 175g 6oz carrot grated 100g 4oz walnut halves chopped TOPPING 225g 8oz lo...

Page 40: ...YES NO 3 Does the cooling fan work Check by placing your hand above the air vent openings YES NO 4 After 1 minute does the audible signal sound YES NO 5 Is the water in the cup hot YES NO If you answer NO to any question first check that the oven is plugged in properly and the fuse has not blown if there is no fault with either check against the Troubleshooting chart on page 39 OVEN INTERIOR Clean...

Page 41: ...he time the oven does not start Oven cooks too slowly Oven makes a noise Condensation forms in the oven and may drip from the door The wires in the mains cable are colour coded as shown opposite As the colours of the cores in the mains lead of your oven may not correspond with the coloured marking identifying the terminals in your plug connect the wires as described below Make sure the terminal sc...

Page 42: ... delay Failure to do this may affect the quality and safety of the product or prejudice your guarantee 5 In the unlikely event of your equipment requiring repair please contact the dealer or supplier from whom it was purchased You will need to provide proof of date of purchase to the repairing company Please keep your invoice or receipt which is supplied at the time of purchase Where it is not pos...

Page 43: ...9 336 EEC and 73 23 EEC as amended by 93 68 EEC As part of a policy of continuous improvement we reserve the right to alter design and specification without notice No part of this publication may be reproduced stored in a retrieval system or transmitted in any form electronically mechanically photocopied recorded translated or other means without prior permission from SHARP Electronics U K Ltd The...

Page 44: ... K 08705 274277 office hours Ireland 01 676 0648 office hours Website http www sharp co uk support PRINTED IN THE UK TINS A254URR0 100 of the pulp used in making this paper comes from sustainable forests R 254M O M CkBk 13 3 01 11 13 am Page 42 ...

Reviews: