background image

13

E

Turning Power On/Off

Caution

•  Turn on the monitor first before turning on the PC or 

playback device.

Turning on the main power

Main power switch

Caution

•  The main power must be turned on/off with the main power 

switch. Do not connect/disconnect the power cord or turn 

the breaker on/off while the main power switch is on.

•  When switching the main power switch or the POWER 

button off and back on, always wait for at least 5 seconds.

•  For a complete electrical disconnection, pull out the main 

plug.

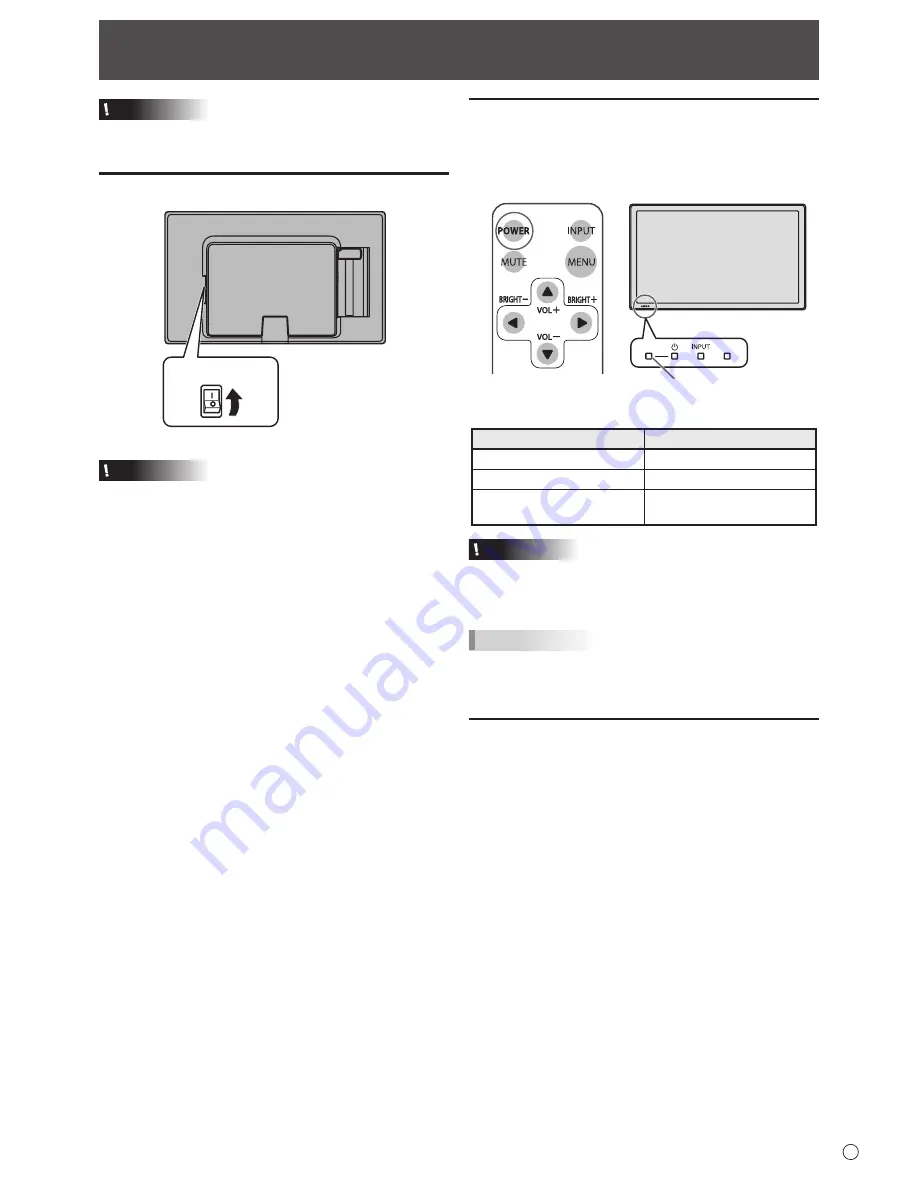
Turning power on/off

Press the POWER button or POWER switch to turn the power 

ON/OFF. When the main power is off, the power cannot be 

turned on with the POWER button.

Power LED

•  Status of the power LED

Status

Status of the monitor

Green lit

Power on

Orange lit

Power off (Standby mode)

Green flashing

Input signal waiting mode 

(DVI-D or D-SUB)

Caution

•  When switching the main power switch or the POWER 

button off and back on, always wait for at least 5 seconds. 

A short interval may result in a malfunction.

TIPS

•  If the monitor is in the input signal standby mode and you 

press the POWER button on the remote control unit, the 

monitor enters standby mode.

Disabling power on/off operations

Power on/power off operations can be disabled in order to 

protect the monitor from an accidental power off. Set the 

ADJUSTMENT LOCK in FUNCTION menu to “2”. (See page 

21.)

Summary of Contents for PN-T321

Page 1: ...PN T321 LCD MONITOR OPERATION MANUAL ...

Page 2: ...ORTANT To aid reporting in case of loss or theft please record the product s model and serial numbers in the space provided The numbers are located in the rear of the product Model No Serial No U S A ONLY ...

Page 3: ...difications to this equipment not expressly approved by the manufacturer could void the user s authority to operate this equipment NOTE This equipment has been tested and found to comply with the limits for Class A digital device pursuant to Part 15 of the FCC Rules These limits are designed to provide reasonable protection against harmful interference when the equipment is operated in a commercia...

Page 4: ...hem or objects from resting on them 10 The screen used in this product is made of glass Therefore it can break when the product is dropped or applied with impact Be careful not to be injured by broken glass pieces in case the screen breaks 11 Overloading Do not overload AC outlets or extension cords Overloading can cause fire or electric shock 12 Entering of objects and liquids Never insert an obj...

Page 5: ...s is a class A product In a domestic environment this product may cause radio interference in which case the user may be required to take adequate counter measures To maintain compliance with EMC regulations use shielded cables to connect to the following terminals PC AV DVI D input terminal PC AV HDMI input terminal PC D sub input terminal AV COMPONENT input terminal AV video AV audio input termi...

Page 6: ...ght Images cannot be rotated on this monitor When using in vertical orientation you will need to prepare appropriately orientated content in advance The AC outlet shall be installed near the equipment and shall be easily accessible The Power Cord Use only the power cord supplied with the monitor Do not damage the power cord nor place heavy objects on it stretch it or over bend it Also do not add e...

Page 7: ... fan or take other measures to keep the ambient temperature within the required range Temperature condition may change when using the display together with the optional equipments recommended by SHARP In such cases please check the temperature condition specified by the optional equipments Adhere to the following when installing the monitor in its vertical orientation Failing to adhere to the foll...

Page 8: ...ents 6 Part Names 7 Connecting Peripheral Equipment 9 Connection with a PC or AV equipment 9 USB flash drive connection 9 Connecting the Power Cord 10 Binding Cables 11 Setting the USB flash drive cover 11 Preparing the Remote Control Unit 12 Changing the battery 12 Remote control operation range 12 Turning Power On Off 13 Turning on the main power 13 Turning power on off 13 Disabling power on off...

Page 9: ...5 4 6 7 8 9 10 11 12 13 14 1 Speakers 2 USB flash drive cover 3 Vents 4 Main power switch See page 13 5 AC input terminal See page 10 6 USB port See page 9 7 RS 232C input terminal See page 9 8 Audio output terminal See page 9 9 AV video AV audio input terminal See page 9 10 AV COMPONENT input terminal See page 9 11 PC audio input terminal See page 9 12 PC D sub input terminal See page 9 13 PC AV ...

Page 10: ...mitter 2 POWER button See page 13 3 MUTE button See page 14 4 VOL buttons See page 14 BRIGHT buttons See page 14 Cursor control buttons 5 DISPLAY button See page 14 6 MODE button See page 14 7 INPUT button See page 14 8 MENU button See page 14 9 SIZE button See page 14 ...

Page 11: ...3 5 mm mini stereo jack cable or a 3 5 mm mini stereo jack and RCA conversion cable The output sound varies depending on the input mode The volume can be adjusted with the volume adjustment The volume of the output sound can be fixed by setting AUDIO OUTPUT on the OPTION menu It is not possible to control the sound output from the audio output terminal with the AUDIO menu 3 AV video AV audio input...

Page 12: ...lied into the AC input terminal 3 Plug the power cord supplied into the AC power outlet TIPS Insert the power code through the claw at the bottom of the monitor left side of the monitor if oriented vertically For the monitor in horizontal orientation For the monitor in vertical orientation AC input terminal 1 Main power switch Power cord Supplied For power outlet 2 3 ...

Page 13: ...re with the provided screw Insert the claw 1 into the monitor and while pressing in the direction of 2 insert the claw 3 into the monitor 2 3 3 1 Screw black USB flash drive cover Cable clamp Cable TIPS If the USB flash drive will be attached use a USB flash drive with dimensions no greater than 3 1 8 inch 80 mm L 15 16 inch 25 mm W 7 16 inch 12 mm H To remove the USB flash drive cover reverse the...

Page 14: ...control operation range The operation range of the remote control unit is approx 16 4 feet 5 m at an angle of approx 10 from the center to the top bottom right left of the remote control sensor 10 10 10 10 Remote control sensor 16 4 feet 5 m TIPS Do not expose the remote control unit to shock by dropping or stepping on it This could lead to a malfunction Do not sit with the remote control in your ...

Page 15: ...ower ON OFF When the main power is off the power cannot be turned on with the POWER button Power LED Status of the power LED Status Status of the monitor Green lit Power on Orange lit Power off Standby mode Green flashing Input signal waiting mode DVI D or D SUB Caution When switching the main power switch or the POWER button off and back on always wait for at least 5 seconds A short interval may ...

Page 16: ... you do not press any buttons for about 4 seconds the VOLUME menu automatically disappears 5 BRIGHT Backlight adjustment Pressing or displays the BRIGHT menu when the menu screen is not displayed 15 BRIGHT Press or to adjust the brightness If you do not press any buttons for about 4 seconds the BRIGHT menu automatically disappears 6 SIZE Screen size selection The menu is displayed Press or to sele...

Page 17: ... infringe on the rights of the creators as protected by Copyright Law so please be careful The appearance of the original video may change if you select a screen size with a different aspect ratio than the original image e g TV broadcast or video input from external equipment When an ordinary non wide image 4 3 is viewed with the whole screen using the screen size switching function of this monito...

Page 18: ...kHz WMA Bit rate 32 kbps to 192 kbps Sampling frequency 32kHz 44 1kHz 48kHz WMA9 files are not supported In some cases it may not be possible to play the above files Use half width alphanumeric characters for the folder name or file name It may not be displayed correctly Up to 600 files can be handled in the slideshow folder When file names or folder names are long some characters may not appear i...

Page 19: ... or to select PICTURE and press PICTURE menu is displayed 3 Press or to select CONTRAST 4 Press or to adjust the setting For items that have press make settings and then press 5 Press twice to close the menu screen TIPS The menu will differ depending on the input mode The menu screen will close automatically if no operation is performed for about 15 seconds nMenu screen display 1 3 2 4 1 Name of t...

Page 20: ...st the vertical position of the image RESET Press to reset the values of the SCREEN menu items to the factory preset values nPICTURE CONTRAST Adjusts the brightness of the image BLACK LEVEL Adjusts the entire brightness of the video signals TINT AV signal input Adjusts the hue Selecting changes the color towards green and selecting changes it towards magenta COLORS AV signal input Adjusts the colo...

Page 21: ... size of the image files the interval may not always be fixed LIST Shows the list screen In the list screen you can change the folder used for the slideshow List screen nSpecifying a folder and presenting a slideshow In the list screen you can specify the folder to be used for a slideshow If you want to play music while presenting the slideshow select the audio file first and then the image file E...

Page 22: ...adjustments in the SCREEN menu or PICTURE menu display an image to brighten the entire screen If you are using a Windows PC use the adjustment pattern on the supplied CD ROM Opening the adjustment pattern The following example is performed in Windows 7 1 Load the supplied CD ROM into the computer s CD ROM drive 2 Open CD Drive in Computer In Windows XP open CD Drive in My Computer 3 Double click A...

Page 23: ... Disables all operations other than FUNCTION menu not even power on off RS 232C Specifies whether to allow control via RS 232C see pages 22 OSD DISPLAY Shows ON hides OFF menus and other screens The FUNCTION menu screen appears regardless of the setting LED Specifies whether to light the power LED TEMPERATURE ALERT Selects the notification method for an abnormal temperature OFF Do not notify about...

Page 24: ... None Communication procedure nCommand format When a command is sent from the PC to the monitor the monitor operates according to the received command and sends a response message to the PC C1 C2 C3 C4 P1 P2 P3 P4 Return code Command field 4 prescribed alphanumerical characters Parameter field 4 character string comprised of 0 9 space Example VOLM0030 VOLM 30 Be sure to input 4 characters for the ...

Page 25: ...DH 0AH When the following commands are used WAIT is returned In this case a value will be returned if you wait a while Do not send any command during this period Commands which return WAIT When one of the following commands is used RSET INPS ASNC WIDE POWR When control via RS 232C is locked to prevent use using the operation lock function see page 21 E C D K O L Return code 0DH 0AH nCommunication ...

Page 26: ...andby mode 1 Normal mode 2 Input signal waiting mode INPUT MODE SELECTION INPS W 0 Toggle change for input mode Yes 1 DVI D 2 D SUB 3 COMPONENT 4 VIDEO 9 HDMI 11 USB R 1 DVI D 2 D SUB 3 COMPONENT 4 VIDEO 9 HDMI 11 USB SCREEN menu Function Command Direction Parameter Reply Control Response contents Auto ASNC W 1 Only when the input mode is D SUB No PICTURE menu Function Command Direction Parameter ...

Page 27: ...Temperature is normal now but it was abnormal during operation 3 Internal temperature abnormal Brightness of the backlight decreases 4 Temperature sensor abnormal Temperature acquisition ERRT R Value Temperature at temperature sensors are returned in the following forms Sensor 1 Sensor 2 Sensor 3 This monitor does not have sensors 2 and 3 All return the same value as sensor 1 Indicates a temperatu...

Page 28: ... is no picture Load noises from outside may be interfering with normal operation Turn off the power and turn it on after waiting at least 5 seconds and then check the operation When AUTO DIMMING is displayed When the internal temperature of the monitor rises excessively the brightness of the backlight automatically decreases in order to prevent a further temperature rise If you attempt to use to a...

Page 29: ...USB flash drive x 1 for slideshow Output terminal Audio 3 5 mm mini stereo jack x 1 Speaker output 8 W 8 W Power requirement AC 100 V 240 V 50 60 Hz Operating temperature 3 32 F to 104 F 0 C to 40 C Operating humidity 20 to 80 no condensation Power consumption input signal waiting mode standby mode 82 W 0 9 W 4 0 9 W Dimensions excluding protrusions inch mm Approx 30 1 4 W x 1 15 16 D x 18 1 8 H 7...

Page 30: ...or more the weight of the monitor nPower management This monitor conforms to VESA DPMS and DVI DMPM Both your video card and computer must support the same standard in order for the monitor s power management function to work DPMS Display Power Management Signaling DPMS Screen Power consumption Hsync Vsync ON STATE Display 82 W Yes Yes STANDBY No display 0 9 W No Yes SUSPEND Yes No OFF STATE No No...

Page 31: ...z 33 75MHz 65 0MHz 75 0MHz 78 75MHz 108 0MHz 79 5MHz 102 25MHz 83 5MHz 108 0MHz 108 0MHz 135 0MHz 85 5MHz 121 75MHz 106 5MHz 162 0MHz 146 25MHz 74 4MHz 85 383MHz 148 5MHz 148 5MHz 28 3MHz 64 13MHz 70 4MHz 74 25MHz 94 88MHz 108 23MHz 117 01MHz 134 99MHz 135 76MHz Yes Yes Yes Yes Yes Yes Yes Yes Yes Yes Yes Yes Yes Yes Yes Yes Yes Yes Yes Yes Yes Yes Yes 2 Yes Yes Yes 3 Yes Analog Yes Yes Yes Yes Ye...

Page 32: ...nector No Function No Function 1 TMDS data 2 11 TMDS clock shield 2 TMDS data 2 shield 12 TMDS clock 3 TMDS data 2 13 CEC 4 TMDS data 1 14 N C 5 TMDS data 1 shield 15 SCL 6 TMDS data 1 16 SDA 7 TMDS data 0 17 DDC CEC GND 8 TMDS data 0 shield 18 5V 9 TMDS data 0 19 Hot plug detection 10 TMDS clock nRS 232C input terminal pins D sub 9 pin No Function No Function 1 N C 6 N C 2 Transmitted data 7 N C ...

Page 33: ...PN T321 M EN10M 1 ...

Reviews: