background image

Summary of Contents for PN-C703B

Page 1: ...PN C703B LCD MONITOR MONITEUR LCD MONITOR LCD SETUP MANUAL MANUEL D INSTALLATION MANUAL DE INSTALACIÓN ENGLISH E1 FRANÇAIS F1 ESPAÑOL S1 ENGLISH FRANÇAIS ESPAÑOL ENGLISH FRANÇAIS ESPAÑOL ...

Page 2: ...ORTANT To aid reporting in case of loss or theft please record the product s model and serial numbers in the space provided The numbers are located in the rear of the product Model No Serial No U S A ONLY ...

Page 3: ...ARP CUSTOMER 1 SAFETY PRECAUTIONS 2 IMPORTANT SAFETY INSTRUCTIONS 3 SAFETY INSTRUCTION 4 MOUNTING PRECAUTIONS 4 Supplied Components 5 Preparing the Remote Control Unit 5 Connections 6 Turning Power On Off 7 Specifications 8 Mounting Precautions For SHARP dealers and service engineers 8 WARNING FCC Regulations state that any unauthorized changes or modifications to this equipment not expressly appr...

Page 4: ...rnal parts For the same reason do not spill water or liquid on the product 13 Servicing Do not attempt to service the product yourself Removing covers can expose you to high voltage and other dangerous conditions Request a qualified service person to perform servicing 14 Repair If any of the following conditions occurs unplug the power cord from the AC outlet and request a qualified service person...

Page 5: ... dangers of climbing on furniture to reach the monitor or its controls Especially for child safety Don t allow children to climb on or play with the monitor Don t place the monitor on furniture that can easily be used as steps such as a chest of drawers Remember that children can become excited while watching a program especially on a larger than life monitor Care should be taken to place or insta...

Page 6: ... installing the monitor affix the stand hole protection covers SAFETY INSTRUCTION Do not use the monitor where there is a lot of dust where humidity is high or where the monitor may come into contact with oil or steam Do not use in an environment where there are corrosive gases sulfur dioxide hydrogen sulfide nitrogen dioxide chlorine ammonia ozone etc As this could lead to fire Ensure that the mo...

Page 7: ...eries 1 Press the cover gently and slide it in the direction of the arrow 2 See the instructions in the compartment and put in the supplied batteries R 6 AA size x 2 with their plus and minus sides oriented correctly 3 Close the cover Liquid Crystal Display Monitor 1 Power cord 1 Remote control unit 1 Remote control unit battery R 6 AA size 2 CD ROM Utility Disk 1 Setup Manual this manual 1 Touch ...

Page 8: ... monitor must be connected to a computer using a USB cable The touch panel operates with the standard Window driver The terms HDMI and HDMI High Definition Multimedia Interface and the HDMI Logo are trademarks or registered trademarks of HDMI Licensing LLC in the United States and other countries 1 AC input terminal 2 Power cord Supplied 3 HDMI 3 input terminal INPUT3 4 HDMI 2 input terminal INPUT...

Page 9: ...n off 1 Press the POWER button on the side of the monitor to turn on the power The power LED lights green Remote control sensor Power LED Status Status of the monitor Off Power off Green lit Power on Red lit Standby mode 2 Turn the power on and off with the POWER button on the remote control Point the remote control unit toward the remote control sensor on the monitor and press the POWER button Ca...

Page 10: ...o not use an impact driver After mounting please carefully ensure the monitor is secure and not able to come loose from the wall or mount Do not use any screw holes other than VESA holes for installation nAttaching the Tray Secure the tray using 5 tray mounting screws M3 supplied Specifications Model PN C703B Power requirement AC 100 V 240 V 2 7 A 50 60 Hz Operating temperature 41 F to 95 F 5 C to...

Page 11: ... PRÉCAUTIONS DE SÉCURITÉ 2 CONSIGNES DE SÉCURITÉ IMPORTANTES 3 MESURES DE SÉCURITÉ 4 PRÉCAUTIONS POUR LE MONTAGE 4 Composants fournis 5 Préparation de la télécommande 5 Connexions 6 Mise sous tension et hors tension 7 Caractéristiques 8 Précautions pour le montage À l attention des revendeurs et techniciens SHARP 8 AVERTISSEMENT Les lois FCC établissent que tout changement ou modification non autor...

Page 12: ...liquide sur l appareil 13 Entretien N essayez pas de réparer vous même l appareil La dépose des couvercles peut vous exposer à une haute tension ou à d autres dangers Confiez toute réparation à un personnel qualifié 14 Réparation Dans les cas suivants débranchez le cordon d alimentation au niveau de la prise secteur et demandez à un personnel qualifié d effectuer les réparations a Dégât sur le cor...

Page 13: ...sformer en marches comme une commode avec tiroirs Souvenez vous que les enfants s excitent souvent en visionnant un programme surtout sur un moniteur plus grand que la normale Il faut faire en sorte d installer le moniteur là où il ne peut pas être poussé tiré ni basculé Il faut faire en sorte de placer les fils et les câbles connectés au moniteur de façon à ce que des enfants curieux ne puissent ...

Page 14: ...p de poussières où le degré d humidité est élevé ou encore là où il pourrait se trouver en contact avec de l huile ou de la vapeur Ne l utilisez pas non plus dans un environnement contenant des gaz corrosifs dioxyde de soufre sulfure d hydrogène dioxyde d azote chlore ammoniac ozone etc Cela pourrait provoquer un début d incendie Assurez vous que le moniteur ne se trouve pas en contact avec de l e...

Page 15: ...le capot et faites le glisser dans la direction de la flèche 2 Reportez vous aux instructions dans le compartiment et insérez les piles fournies 2 piles du format R 6 ou AA avec leurs pôles positifs et négatifs orientés correctement 3 Refermer le capot Moniteur à cristaux liquides 1 Cordon d alimentation 1 Télécommande 1 Pile de la télécommande R 6 format AA 2 CD ROM Utility Disk 1 Manuel d Instal...

Page 16: ...r à l aide d un câble USB L écran tactile fonctionne avec le pilote Windows standard Les termes HDMI et HDMI High Definition Multimedia Interface sont des marques commerciales ou déposées de HDMI Licensing LLC aux États Unis et ou dans d autres pays Vers la prise d alimentation secteur 4 5 8 9 11 12 13 6 7 3 10 Câble USB 1 2 1 Borne d entrée secteur 2 Cordon d alimentation fourni 3 Borne d entrée ...

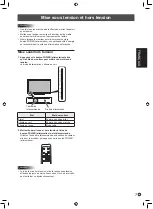
Page 17: ...pour mettre ce dernier sous tension La diode d alimentation s allume en vert Capteur de télécommande Diode d alimentation État État du moniteur Éteint Power en position arrêt Allumé en vert Power en position marche Allumé en rouge Mode veille 2 Mettez l appareil sous et hors tension à l aide du bouton POWER alimentation de la télécommande Orientez l unité de la télécommande en direction du capteur...

Page 18: ...mm N utilisez pas de tournevis à percussion Après le montage assurez vous que le moniteur est bien fixé au mur ou au support sans risque de relâche N utilisez pas de trous de vis autres que les trous standard VESA pour l installation Précautions pour le montage À l attention des revendeurs et techniciens SHARP nFixation du plateau Fixez le plateau en utilisant 5 vis de montage de plateau M3 fourni...

Page 19: ... ESTIMADO CLIENTE DE SHARP 1 PRECAUCIONES DE SEGURIDAD 2 INSTRUCCIONES DE SEGURIDAD IMPORTANTES 3 INSTRUCCIONES DE SEGURIDAD 4 PRECAUCIONES DE MONTAJE 4 Componentes suministrados 5 Preparación de la Unidad de control remoto 5 Conexiones 6 Encendido apagado 7 Especificaciones 8 Precauciones de montaje para distribuidores y técnicos de servicio de SHARP 8 ADVERTENCIA La normativa de la FCC establece...

Page 20: ...o intente reparar usted mismo el producto La retirada de las tapas podría exponerle a alto voltaje y otras circunstancias peligrosas Solicite cualquier reparación a un técnico de servicio calificado 14 Reparación Si se produjera cualquiera de las circunstancias siguientes desenchufe el cable de alimentación de la toma de corriente y solicite la reparación a un técnico de servicio calificado a Cuan...

Page 21: ...jones de una cómoda Recuerde que los niños se pueden agitar mientras ven un programa especialmente en un monitor en el que las cosas se ven más grandes que en la vida real Deberá tenerse cuidado de colocar o instalar el monitor en lugares en los que no se pueda empujar mover o tirar al suelo Deberá procurarse enrutar todos los cables conectados al monitor de modo que los niños curiosos no puedan t...

Page 22: ...RIDAD No emplee el monitor en lugares con un nivel elevado de polvo o humedad ni donde éste pueda entrar en contacto con aceite o vapor Tampoco lo utilice en un entorno en el que haya gases corrosivos dióxido de azufre sulfuro de hidrógeno dióxido de nitrógeno cloro amoniaco ozono etc ya que esto podría provocar un incendio Asegúrese de que el monitor no entre en contacto con agua ni otros líquido...

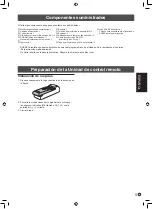
Page 23: ...ontrol remoto 1 Pila del control remoto R 6 tamaño AA 2 CD ROM Disco de utilidades 1 Manual de Instalación este manual 1 Lápiz táctil 1 Bandeja 1 Tornillos de montaje de la bandeja M3 5 Borrador 1 Abrazadera para cable de tipo adhesivo 2 Cable de conversión RS 232C mini clavija de 3 5 mm 1 Tapa de protección de orificio del pedestal 2 Logo SHARP de cubierta 1 Coloque esta etiqueta sobre el logotip...

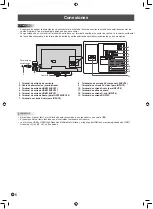
Page 24: ... el terminal de entrada con el terminal de salida al conectar los cables La inversión accidental de los cables conectados a los terminales de entrada y salida podría causar malfuncionamientos y otros problemas 4 5 8 9 11 12 13 6 7 3 10 1 2 Para toma de alimentación Cable USB 1 Terminal de entrada de corriente 2 Cable de alimentación suministrado 3 Terminal de entrada HDMI3 INPUT3 4 Terminal de ent...

Page 25: ...al del monitor para encender la alimentación El LED indicador de conexión se ilumina en verde Sensor de control remoto LED indicador de conexión Estado Estado del monitor Apagado Alimentación apagada Encendido en verde Alimentación encendida Encendido en rojo Modo de reposo 2 Encienda y apague la alimentación con el botón POWER Encendido del control remoto Apunte con el control remoto hacia el sen...

Page 26: ...acto Una vez efectuado el montaje asegúrese de que el monitor está instalado de forma segura y que no se puede aflojar de la pared o el soporte No utilice orificios de tornillos que no sean orificios VESA para la instalación Precauciones de montaje para distribuidores y técnicos de servicio de SHARP nColocación de la bandeja Asegure la bandeja usando 5 tornillos de montaje de la bandeja M3 suminis...

Page 27: ......

Page 28: ...Printed in China Imprimé en Chine Impreso en China 15D TINS GxxxWJZZ 1 ...

Reviews: