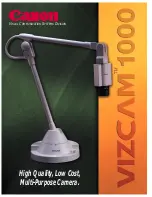
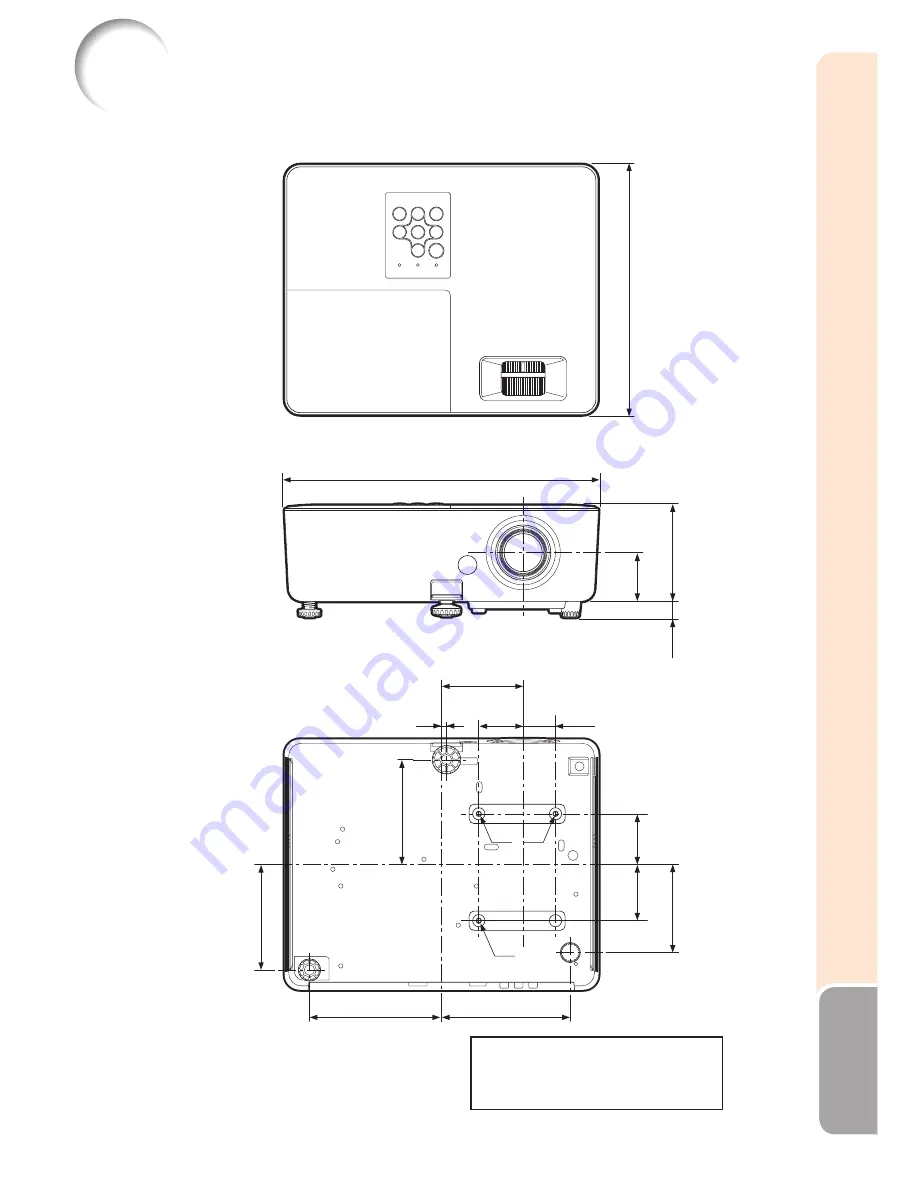
background image

71

Appendix

Dimensions

Units: inches (mm)

M4

M4

M4

21

/

32 

(

245

)

12 

3

/

32 

(307)

7

/

8

(

47.6

)

45

/

64 

(

94

)

25

/

64 

(

86

)

5

/

8

(

15.5

)

5

/

32 

(80)

1

/

4

(31.5)

13

/

64

(5)

23

/

32

(43.5)

3

/

32 

(129)

31

/

32 

(126)

61

/

64

(

49.5

)

5

/

32

(

54.5

)

3

/

64 

(

102.5

)

1

/

16 

(

103

)

Screw hole specs: 75 mm × 104 mm
Depth of mounting holes: 8 mm
Standard screw: M4 (pitch 0.7 mm)
Quantity: 3


Summary of Contents for PG-LW2000

Page 1: ...Introduction Easy Start Setup Connections Basic Operation Useful Features Appendix OPERATION MANUAL DATA PROJECTOR MODEL PG LW2000 ...

Page 2: ...medi ately and disposed of in a safe manner Under no circumstances should the cut off plug be inserted elsewhere into a 13A socket outlet as a serious electric shock may occur To fit an appropriate plug to the mains lead follow the instructions below WARNING THIS APPARATUS MUST BE EARTHED IMPORTANT The wires in this mains lead are coloured in accordance with the following code Green and yellow Eart...

Page 3: ...o operate this equipment U S A ONLY WARNING This is a Class A product In a domestic environment this product may cause radio interference in which case the user may be required to take adequate measures The lightning flash with arrowhead sym bol within an equilateral triangle is in tended to alert the user to the presence of uninsulated dangerous voltage within the product s enclosure that may be o...

Page 4: ...cracking When the lamp replacement indicator and on screen display icon are illuminated it is recommended that the lamp be replaced with a new one immediately even if the lamp appears to be operating normally Should the lamp break there is also a possibility that glass particles may spread inside of the projector In such a case it is recommended you contact your nearest Sharp Authorized Projector ...

Page 5: ...Z CD ROM UDSKAA137WJN1 Remote control RRMCGB015WJSA Two LR03 batteries AAA size UM SUM 4 HP 16 or similar RGB cable 6 1 8 m QCNWGA173WJPZ Codes in are Replacement parts codes Note Optional accessories Lamp unit Ceiling mount adaptor Ceiling mount bracket Ceiling mount unit Ceiling mount extension tube 3 RCA to mini D sub 15 pin cable 10n 3 0 m AN LX20LP AN 60KT AN XRCM30 for U S A only AN TK201 fo...

Page 6: ...g the Color Temperature 39 Adjusting the Colors 39 Selecting the Film Mode 40 Reducing Image Noise DNR 40 Eco Quiet 40 Signal Adjustment SIG ADJ Menu 41 Adjusting the Computer Image 41 Resolution Setting 41 Signal Type Setting 41 Selecting the Dynamic Range 41 Setting the Video System 42 Setting the Video Setup 42 Checking the Input Signal 42 Adjusting the Projected Image SCR ADJ Menu 43 Setting t...

Page 7: ... Function 51 Appendix 51 Using 3D Viewing Mode 52 Reference Appendix Maintenance 53 Maintenance Indicators 54 Regarding the Lamp 56 Lamp 56 Caution Concerning the Lamp 56 Replacing the Lamp 56 Removing and Installing the Lamp Unit 57 Resetting the Lamp Timer 58 RS 232C Specifications and Commands 59 Compatibility Chart 64 Troubleshooting 66 For SHARP Assistance 69 Specifications 70 Dimensions 71 Ind...

Page 8: ...cturer 9 Transportation A product and cart combination should be moved with care Quick stops excessive force and uneven surfaces may cause the product and cart combination to overturn 10 Ventilation Slots and openings in the cabinet are provided for ventilation to ensure reliable operation of the product and to protect it from overheating and these openings must not be blocked or covered The openi...

Page 9: ...dicates a need for service 19 Replacement Parts When replacement parts are required be sure the service technician has used replacement parts specified by the manufacturer or have the same characteristics as the original part Unauthorized substitutions may result in fire electric shock or other hazards 20 Safety Check Upon completion of any service or repairs to this product ask the service technici...

Page 10: ...t may appear when the power is first turned on This is normal and is not a malfunction It will disappear after the projector is used for a while When using the projector in high altitude areas such as mountains at altitudes of approximately 1 500 meters 4 900 feet or more When you use the projector in high altitude areas with thin air set Fan Mode to High Neglecting this can affect the longevity of...

Page 11: ...ademark of Bitstream Inc Permission is hereby granted free of charge to any person obtaining a copy of the fonts accompanying this license Fonts and associated documentation files the Font Software to reproduce and distribute the Font Software including without limitation the rights to use copy merge publish distribute and or sell copies of the Font Software and to permit persons to whom the Font S...

Page 12: ... items selected or adjusted on the menu 6 VOL Volume buttons O Q 27 For adjusting the speaker sound level 7 AUTO SYNC button 31 For automatically adjusting images when connected to a computer 8 Adjustment buttons P R O Q 35 For selecting menu items 9 INPUT buttons P R 27 For switching Input mode 10 MENU button 35 For displaying adjustment and setting screens Top View 11 Zoom ring 25 For enlarging ...

Page 13: ... signals 5 RS 232C terminal 22 Terminal for controlling the projector using a computer 6 Exhaust vent 53 7 Speaker 46 8 Kensington Security Standard connector 9 Rear adjustment foot 25 10 AC socket 21 Connect the supplied power cord Using the Kensington Lock This projector has a Kensington Security Standard connector for use with a Kensington MicroSaver Security System Refer to the information tha...

Page 14: ...C button 31 46 For automatically adjusting images when connected to a computer 16 FUNCTION button 49 For operating and executing a function assigned to FUNCTION Button 12 ECO QUIET button 30 For lowering the noise of the cooling fan and extending the lamp life 21 FREEZE button 31 For freezing images 4 AV MUTE button 27 For temporarily displaying a black screen and turning off the sound 6 VOL Volum...

Page 15: ...e them to leak Battery fluid from leaked batteries is harmful to skin therefore ensure you wipe them first and then remove them using a cloth The batteries included with this projector may run down in a short period depending on how they are kept Be sure to replace them as soon as possible with new batteries Remove the batteries from the remote control if you will not be using the remote control for...

Page 16: ...utton 5 3 ON button 6 INPUT buttons 5 Adjustment buttons P R O Q O Q buttons 6 STANDBY ON button 3 8 Focus ring 4 HEIGHT ADJUST lever 4 Zoom ring 4 INPUT buttons 6 6 1 Place the projector facing a wall or a screen _P 16 When connecting equipment other than a computer see pages 20 and 21 2 Connect the projector to the computer and plug the power cord into the AC socket of the projector _PP 19 21 Pr...

Page 17: ...ks upper side Shrinks lower side 5 Correct trapezoidal distortion _P 26 Press INPUT P R to display the INPUT list Use INPUT P R to select the Input mode On the projector On the remote control INPUT list Audio INPUT H V COMPUTER HDMI VIDEO When you select HDMI input use O Q to select the audio input terminal HDMI or AUDIO 6 Select the Input mode _P 27 7 Turn the computer on Press STANDBY ON on the ...

Page 18: ...rovide the best image quality See page 26 Standard Setup Front Projection Place the projector at the required distance from the screen according to the desired picture size See page 17 Indication of the Projection Image Size and Projection Distance Example 16 10 Signal Input Normal Mode 300 762 cm 200 508 cm 100 254 cm 40 102 cm 4 4 5 3 1 3 m 1 6 m 1 0 1 1 1 3 2 3 3 m 4 0 m 2 1 1 0 2 6 4 6 7 m 8 0...

Page 19: ...m 37 1 13 6 m 44 9 7 cm 2 29 32 250 635 cm 508 cm 200 381 cm 150 9 4 m 30 11 11 4 m 37 3 6 cm 2 27 64 200 508 cm 406 cm 160 305 cm 120 7 5 m 24 9 9 1 m 29 10 5 cm 1 15 16 150 381 cm 305 cm 120 229 cm 90 5 7 m 18 7 6 8 m 22 4 4 cm 1 29 64 120 305 cm 244 cm 96 183 cm 72 4 5 m 14 10 5 5 m 17 11 3 cm 1 11 64 100 254 cm 203 cm 80 152 cm 60 3 8 m 12 4 4 5 m 14 11 2 cm 0 31 32 80 203 cm 163 cm 64 122 cm ...

Page 20: ...ble mounted rear projection with a translucent screen Menu item Rear Ceiling mounted front projection Menu item Ceiling Front Ceiling mounted rear projection with a translucent screen Menu item Ceiling Rear a Ceiling Mount Setup It is recommended that you use the optional Sharp ceiling mount adaptor and unit for this installation Before mounting the projector contact your nearest Sharp Authorized ...

Page 21: ...er RGB output terminal RGB cable supplied COMPUTER COMPONENT HDMI output terminal HDMI cable commercially available HDMI Depending on specifications of equipment or the DVIÙHDMI digital cable the signal transmission may not work property The HDMI specification does not support all connections to equipment that has digital output terminal using a DVIÙHDMI digital cable See page 64 Compatibility Chart...

Page 22: ...gital cable the signal transmission may not work property The HDMI specification does not support all connections to equipment that has digital output terminal using a DVIÙHDMI digital cable HDMI High Definition Multimedia Interface is a digital AV interface that can deliver a high definition video signal multi channel audio signal and bi directional control signal all in just one cable Because it is...

Page 23: ...able commercially available HDMI You can select HDMI or AUDIO in the INPUT list See page 27 Note This projector is able to process the following signals when connected to HDMI equipment Video signal For details see Digital Support in the list of Compatibility Chart on page 64 Audio signal Linear PCM audio Sampling frequency 48kHz 44 1kHz 32kHz Connecting the Power Cord Plug the supplied power cord...

Page 24: ...uter or projector Do not connect or disconnect an RS 232C serial control cable to or from the computer while it is on This may damage your computer RS 232C Terminal D sub 9 pin male connector Pin No Signal Name I O Reference 1 2 3 4 5 6 7 8 9 RD SD SG RS CS Receive Data Send Data Signal Ground Request to Send Clear to Send Input Output Not connected Connected to internal circuit Connected to inter...

Page 25: ...n again the lamp may take some time to start projection When System Lock is set the keycode input box appears To cancel the keycode setting input the keycode that you have already set See page 47 for details Note Turning the Power Off Putting the Projector into Standby Mode Press STANDBY ON on the projector or STANDBY on the remote control then press that button again while the confirmation message...

Page 26: ... 3 ZOOM 4 ENTER 2 HEIGHT ADJUST However you can adjust the focus height angle or zoom regardless of the highlighted item If you do not want to display the Setup Guide for the next time set Menu SCR ADJ Setup Guide to Off See page 45 Note Adjusting the Projected Image 1 Adjusting the Focus You can adjust the focus with the focus ring on the projector Rotate the focus ring to adjust the focus while ...

Page 27: ... degrees from the standard position When adjusting the height of the projector trapezoidal distortion occurs Follow the procedures in Keystone Correction to correct the distortion See pages 26 and 43 Note 3 Adjusting the Picture Size You can adjust the picture size using the zoom ring on the projector Rotate the zoom ring to enlarge or shrink the picture size Using the knob on the zoom ring will m...

Page 28: ... to enter the Keystone Correction mode 2 Press P Q or O R to adjust the Keystone Correction To return to the default setting press RETURN while the on screen display of the Keystone Correction mode is on the screen Note 3 Press KEYSTONE The on screen display of the Keystone Correction mode will disappear 1 2 3 KEYSTONE button Adjustment buttons P R O Q RETURN button On screen display Keystone Corr...

Page 29: ...nput mode for the connected equipment Press INPUT P R to display the INPUT list Use INPUT P R to select the Input mode When you select HDMI input use O Q to select the audio input terminal HDMI or AUDIO Adjusting the Volume Press VOL on the remote control or O Q on the projector to adjust the volume Pressing VOL O will lower the volume Pressing VOL Q will raise the volume Note VOL Volume buttons I...

Page 30: ...0 1360 768 1280 722 1360 768 1366 768 1280 720 1366 768 1280 768 1280 768 1280 720 1280 800 1280 800 Input signal Output screen image Computer Image type NORMAL FULL NATIVE 16 9 Resolution XGA and below 4 3 aspect ratio 1 Resolution higher than XGA 3 SXGA 1280 1024 5 4 aspect ratio 1 1280 720 16 9 aspect ratio 1 2 2 1360 768 1366 768 16 9 aspect ratio 1280 768 15 9 aspect ratio 1 2 1 1280 800 16 1...

Page 31: ...e is not included in the original signals 1 The Image Shift function can be used for these images 2 Same as NORMAL mode About Copyrights When using the Resize function to select an image size with a different aspect ratio to a TV program or video image the image will look different from its original appearance Keep this in mind while choosing an image size The use of the Resize or Keystone Correct...

Page 32: ...able while the projector is operating the following functions Auto Sync Freeze AV Mute Input Search Note 1 2 Displaying the Pointer 1 Press POINTER and press P R O Q on the remote control to move the pointer Press EFFECT to change the pointer icon 5 types Star Finger1 Finger2 Heart Underline 2 Press POINTER again The pointer will disappear Using the Spot Function 1 Press SPOT and press P R O Q on ...

Page 33: ... page 38 for details on the Picture mode Note sRGB is displayed only when RGB signal is input 1 2 Displaying an Enlarged Portion of an Image Graphs tables and other portions of projected images can be enlarged This is helpful when providing more detailed explanations 1 Press MAGNIFY on the remote control Enlarges the image Pressing or MAGNIFY enlarges or reduces the projected image 1 2 3 4 Press P...

Page 34: ...n Movie Game sRGB Picture Mode Red Blue Page 40 DNR Level 1 Level 2 Level 3 C M S Hue C M S Saturation C M S Value Page 39 Page 39 Page 39 Reset Return 30 30 R 30 30 30 30 30 30 30 30 30 30 C G B Y M Reset Quick Start Menu Main menu Normal Full Native Area Zoom V Stretch Border 16 9 Quick Start Menu Input Search Start Resolution Eco Quiet On Off Resize Information Go To Complete Menu Keystone 80 8...

Page 35: ...ront Rear Ceiling Rear Normal Full Native Area Zoom V Stretch Border 16 9 Keystone 80 80 Page 43 40 40 English Deutsch Español Nederlands Français Italiano Svenska Português polski Magyar Türkçe Tiếng Việt Signal adjustment SIG ADJ menu Main menu Sub menu SIG ADJ Page 41 Page 41 Page 41 Page 41 Page 41 Page 42 Signal Type Video Setup Signal Info Auto RGB YPbPr Resolution 0 IRE 7 5 IRE Page 42 Page...

Page 36: ...uto Restart On Off Page 46 Auto Power Off On Off Page 46 Page 46 Auto Sync On Off Page 46 Main menu Sub menu Page 49 Page 49 Page 49 Page 49 Page 49 Page 49 PRJ ADJ2 FUNCTION Button Input Search Audio Mute Image Shift Signal Info STANDBY Mode Quick Start Eco All Reset Lamp Timer Life Page 49 DLP LinkTM On Off DLP LinkTM Invert Quick Start Menu On Off Page 46 Menu Items Continued ...

Page 37: ...ess P R O Q to adjust the item selected then press ENTER Info To display the advanced settings and adjustments select Go To Complete Menu Press ENTER to display the Complete Menu screen If you do not want to display the Quick Start Menu set Go To Complete Menu PRJ ADJ2 Quick Start Menu to Off See page 49 1 2 3 Example SEL ADJ ENTER END Input Search Start Resolution Resize 0 Eco Quiet Language Keys...

Page 38: ...ption thereby prolonging the operating life of the lamp See page 40 Language Selects the language displayed on the screen See page 45 Information Displays the input signal lamp use time remaining lamp life etc Go To Complete Menu Displays the Complete Menu for advanced settings and adjustments The setting of Resize mode will be made independently for each Input mode The setting of Eco Quiet mode w...

Page 39: ...G SCR PRJ1 PRJ2 Picture Items to be adjusted The item displayed by itself Press ENTER 0 Bright Picture SEL ADJ Rtn Menu END Picture Mode Standard SEL ADJ Single ADJ END Resize Image Shift 0 0 Keystone Normal Picture Mode Contrast 0 0 Standard SEL ADJ END 0 0 Red Blue CLR Temp BrilliantColorTM C M S Setting C M S Eco Quiet 0 1 On Off Reset Bright 0 DNR Level 2 Picture Pict SCR ADJ SIG PRJ1 PRJ2 SIG...

Page 40: ...l tint to the projected image 1 0 On Game Gives sharpness to the projected image 0 1 Off sRGB For high fidelity reproduction of images from a computer Off sRGB is displayed only when RGB signal is input You can set or adjust each item in the Picture menu to your preference Any changes you make are retained in memory You can also press PICTURE MODE on the remote control to select the Picture mode Se...

Page 41: ... purposes Note 4 Adjusting the Colors This function adjusts each of the six main colors that comprise the color wheel altering their Hue Saturation or Value Selectable items Description C M S Hue Sets the hue of the main colors C M S Saturation Sets the saturation of the main colors C M S Value Sets the brightness of the main colors Reset The adjustments of Hue Saturation and Value of all colors a...

Page 42: ...Noise DNR Video digital noise reduction DNR provides high quality images with minimal dot crawl and cross color noise Selectable items Description Level 1 Sets the DNR level for viewing a clearer picture Level 2 Level 3 This function is not available for some signals Note Picture Adjustment Picture Menu Continued Menu operation n Page 36 7 Eco Quiet Selectable items Brightness and Power consumptio...

Page 43: ...input signal is detected and the correct Resolution mode is automatically selected However for some signals the optimal Resolution mode in Resolution may need to be selected to match the computer display mode See Checking the Input Signal on page 42 for information on the currently selected input signal Note 3 Signal Type Setting This function allows you to select the input signal type RGB or Comp...

Page 44: ... set in VIDEO mode When Video System is set to Auto you may not receive a clear picture due to signal differences Should this occur switch to the video system of the source signal Note Signal Adjustment SIG ADJ Menu Continued Menu operation n Page 36 6 Setting the Video Setup Selectable items Description 0 IRE Sets the black level to 0 IRE 7 5 IRE Sets the black level to 7 5 IRE This function is a...

Page 45: ...ze mode See page 28 Note 2 Adjusting the Image Position You can move the projected image vertically Q button O button This function only works in some Resize modes See pages 28 and 29 Note 3 Keystone Correction When the image is projected either from the top or from the bottom towards the screen at an angle the image becomes distorted trapezoidally The function for correcting trapezoidal distortio...

Page 46: ... when the Resize mode is set to Border This function is available in the following cases only Resize mode Keystone Correction Normal Area Zoom V Stretch 40 40 16 9 12 12 Closed Caption is a system which allows conversations narration and sound effects in TV programs Limited regions and home videos to be viewed as captions on the screen Not all programs and videos will offer closed captioning Pleas...

Page 47: ...cted from the rear of the screen or with a mirror Ceiling Rear Reversed and inverted image Projected with a mirror See page 18 for details of Projection PRJ Mode Menu operation n Page 36 0 Selecting the Wall Color This function allows you to project the image to a colored white or dark green surface or wall without using a screen Selectable items Description Off The Wall Color function is not acti...

Page 48: ...tes before the projector enters Standby mode the message Enter STANDBY mode in X min will appear on the screen to indicate the remaining minutes Note Q PRJ ADJ2 Pict SCR PRJ ADJ2 SIG SEL ADJ ENTER END DLP Link TM h Off FUNCTION Button Input Search STANDBY Mode Quick Start 0 min 0 Lamp Timer Life 100 DLP Link TM Invert Quick Start Menu On PRJ1 All Reset 8 9 0 3 Auto Restart Function Selectable item...

Page 49: ...code the cursor returns to the first point of the Old Code The preset keycode is 4 R buttons on the projector When you press the R button four times the keycode input screen disappears Note 1 2 3 Menu operation n Page 36 4 Press the 4 buttons on the remote control or on the projector to enter the new keycode in New Code You cannot use the following buttons for keycode STANDBY ON ON STANDBY ENTER RE...

Page 50: ...eylock by holding down ENTER on the projector for about 5 seconds PRJ ADJ1 Return On SEL ENTER END 2 Select On then press ENTER On screen display The Keylock function does not affect the operation with the remote control buttons You cannot use the Keylock function while the projector is warming up 1 2 Taking the Keylock Off Hold down ENTER on the projector for about 5 seconds On screen display Inf...

Page 51: ...n Eco Power consumption is reduced in Standby mode Quick Start The period of startup time is reduced DLP LinkTM See Using 3D Viewing Mode on page 52 for details DLP LinkTM Invert See Using 3D Viewing Mode on page 52 for details Menu operation n Page 36 Returning to the Default Settings This function allows you to initialize the settings you have made in the projector The following items or menu ca...

Page 52: ...ent Adjust the projected image to the most comfortable viewing size by zooming Projecting images on the smallest or largest screen size possible may eliminate the stereoscopic effect and strain your eyes Use the DLP Link Invert function to properly set the video for your left and right eyes For details on using DLP Link Invert see the section on its operation in this operation manual The following...

Page 53: ...nt being displayed The stereoscopic effect varies with the individual 3D viewing is possible within the range that the 3D LCD shutter glasses are able to receive light signals reflected by the screen However most 3D images are manufactured to be viewed from directly in front of the screen so 3D viewing is recommended directly in front of the screen as much as possible The range for receiving signal...

Page 54: ...mote control to display the 3D MODE menu Info If An invalid button has been pressed is displayed a 3D compatible signal is not being input Check the output signal on the playback equipment 7 Press Q to set DLP Link to On 8 Press ENTER to switch the mode and enable more natural 3D image viewing Warning If the projector 3D video playback equipment and 3D LCD shutter glasses are not properly set you ...

Page 55: ...ojector Strong cleaning detergents may discolor warp or damage the coating on the projector Make sure to test on a small inconspicuous area on the projector before use M i l d d e t e r g e n t Mild detergent diluted with water Thinner Wax Cleaning the lens Use a commercially available blower or lens cleaning paper for glasses and camera lenses for cleaning the lens Do not use any liquid type clea...

Page 56: ...off the cooling fan will run and then the projector will enter Standby mode When you find the temperature warning indicator blinking be sure to perform the measures described on page 55 About the lamp indicator When the remaining lamp life becomes 5 or less yellow and Change The Lamp will be displayed on the screen When the percentage becomes 0 it will change to red the lamp will automatically turn...

Page 57: ...he lamp does not illuminate Burnt out lamp Lamp circuit failure Power indicator Green on Red on Green blinks Cooling Red blinks The power indicator blinks in red when the projector is on The lamp unit cover is open If the power indicator blinks in red even when the lamp unit cover are securely installed contact your nearest Sharp Authorized Projector Dealer or Service Center see page 69 for advice...

Page 58: ...ition and the frequency of use It is important to note that failure can often result in the bulb cracking When the lamp replacement indicator and on screen display icon are illuminated it is recommended that the lamp be replaced with a new one immediately even if the lamp appears to be operating normally Should the lamp break there is also a possibility that glass particles may spread inside of th...

Page 59: ...er and lamp unit 1 Press STANDBY ON on the projector or STANDBY on the remote control to put the projector into Standby mode 2 Disconnect the power cord Unplug the power cord from the AC socket Leave the lamp until it has fully cooled down about 1 hour 3 Remove the lamp unit cover Loosen the user service screw 1 that secures the lamp unit cover Slide the lamp unit cover in the direction of the arr...

Page 60: ... cord is connected to the projector Resetting the Lamp Timer Reset the lamp timer after replacing the lamp Info Make sure to reset the lamp timer only when replacing the lamp If you reset the lamp timer and continue to use the same lamp this may cause the lamp to become damaged or explode 1 Connect the power cord Plug the power cord into the AC socket of the projector 2 Reset the lamp timer While ...

Page 61: ...mands from a computer wait for at least 30 seconds after the power has been turned on and then transmit the commands After sending an input selection or picture adjustment command and then receiving an OK response code the projector may take some time to process the command If a second command is sent while the projector is still processing the first command you may receive an ERR response code If ...

Page 62: ... P J N 2 OK or ERR Projector Name Setting 3 Last 4 characters 1 P J N 3 OK or ERR Projector Name Check P J N 0 _ _ _ 1 Projector Name Input Change COMPUTER I R G B _ _ _ 1 OK or ERR ERR HDMI I R G B _ _ _ 2 OK or ERR ERR VIDEO I V E D _ _ _ 1 OK or ERR ERR Input RGB Check I R G B 1 COMPUTER 2 HDMI ERR ERR Input Video Check I V E D 1 VIDEO ERR ERR Input Mode Check I M O D 1 RGB 2 VIDEO ERR Input Ch...

Page 63: ...or ERR ERR Level 3 R A N R _ _ _ 3 OK or ERR ERR Picture Reset R A R E _ _ _ 1 OK or ERR ERR Signal Type Auto I A S I _ _ _ 0 OK or ERR ERR RGB I A S I _ _ _ 1 OK or ERR ERR YPbPr I A S I _ _ _ 2 OK or ERR ERR HDMI Input Standard R B P S _ _ 1 0 OK or ERR ERR Presentation R B P S _ _ 1 1 OK or ERR ERR Movie R B P S _ _ 1 2 OK or ERR ERR Game R B P S _ _ 1 3 OK or ERR ERR sRGB R B P S _ _ 1 4 OK or...

Page 64: ...ow C M S Y _ OK or ERR ERR Green C M S G _ OK or ERR ERR Cyan C M S C _ OK or ERR ERR Blue C M S B _ OK or ERR ERR Magenta C M S M _ OK or ERR ERR Reset C M R E _ _ _ 3 OK or ERR ERR Value Red C M V R _ OK or ERR ERR Yellow C M V Y _ OK or ERR ERR Green C M V G _ OK or ERR ERR Cyan C M V C _ OK or ERR ERR Blue C M V B _ OK or ERR ERR Magenta C M V M _ OK or ERR ERR Reset C M R E _ _ _ 4 OK or ERR ...

Page 65: ... ERR Magyar M E L A _ _ 1 7 OK or ERR ERR Tiếng Việt M E L A _ _ 1 8 OK or ERR ERR Setup Guide On S E G U _ _ _ 1 OK or ERR ERR Off S E G U _ _ _ 0 OK or ERR ERR Internal Speaker On A S P K _ _ _ 1 OK or ERR ERR Off A S P K _ _ _ 0 OK or ERR ERR RGB Frequency Check Horizontal T F R Q _ _ _ 1 kHz or ERR ERR Vertical T F R Q _ _ _ 2 Hz or ERR ERR Fan Mode Normal H L M D _ _ _ 0 OK or ERR ERR High H ...

Page 66: ...60 65 3 60 WSXGA 1680 1050 65 3 60 UXGA 1600 1200 75 0 60 MAC 13 VGA 640 480 34 9 67 Upscale MAC 16 SVGA 832 624 49 7 75 MAC 19 XGA 1024 768 60 2 75 MAC 21 SXGA 1152 870 68 7 75 Intelligent Compression Optimum image quality will be achieved by matching your computer s output resolution to the resolution that corresponds to TRUE in the Display column shown above When Screen resolution of the comput...

Page 67: ... Please check with your computer graphic card specifications or call your computer manufacturer to ensure this capability Note DTV Signal Horizontal Frequency kHz Vertical Frequency Hz Analog Support Digital Support Signal Horizontal Frequency kHz Vertical Frequency Hz Analog Support Digital Support 480I 15 7 60 1080I 28 1 50 480P 31 5 60 1080I 33 8 60 540P 33 8 60 1080P 27 0 24 576I 15 6 50 1080P ...

Page 68: ...RGB Component is incorrectly set 42 41 Picture is blurred noise appears Adjust the focus 24 The projection distance exceeds the focus range 17 There is fog on the lens If the projector is carried from a cold room into a warm room or if it is suddenly heated condensation may form on the surface of the lens and the image will become blurred Set up the projector at least one hour before it is to be u...

Page 69: ...ing projection The image sometimes flickers Cables are incorrectly connected to the projector or the connected equipment works improperly If this happens frequently replace the lamp 19 22 57 The lamp needs much time to turn on The lamp will eventually need to be changed While the remaining lamp life draws to a close replace the lamp 57 Picture is dark The remote control cannot be used Operate the r...

Page 70: ...in resolutions that support 3D To support 3D your 3D application must be configured to run at the correct settings for this projector For details on the supported signals see 3D Supported Signals of the Compatibility Chart 65 If the projector is connected to a computer for 3D image playback check that a stereoscopically enabled application is being used Use the applicable software Set the applicabl...

Page 71: ... se www sharp fi Denmark SHARP Electronics Nordic AB 0 70 230 810 helpdesksverige sharp se www sharp dk Austria SHARP Electronics Europe GmbH 0820 50 08 20 EUR 0 145 min Anrufe aus dem Mobilfunknetz können teurer sein www sharp at Benelux SHARP Electronics Benelux BV 0900 SHARPCE 0900 7427723 Nederland 9900 0159 Belgium http www sharp nl http www sharp be http www sharp lu Australia Sharp Corporati...

Page 72: ...ic Dimensions main body only W H D 12 3 32 3 45 64 9 21 32 307 94 245 mm Weight approx 5 1 lbs 2 3 kg As a part of policy of continuous improvement SHARP reserves the right to make design and specification changes for product improvement without prior notice The performance specification figures indicated are nominal values of production units There may be some deviations from these values in individ...

Page 73: ...3 32 307 1 7 8 47 6 3 45 64 94 3 25 64 86 5 8 15 5 3 5 32 80 1 1 4 31 5 13 64 5 1 23 32 43 5 5 3 32 129 4 31 32 126 1 61 64 49 5 2 5 32 54 5 4 3 64 102 5 4 1 16 103 Screw hole specs 75 mm 104 mm Depth of mounting holes 8 mm Standard screw M4 pitch 0 7 mm Quantity 3 ...

Page 74: ...Start 36 Intake vent 10 53 Kensington Security Standard connector 11 Keycode 47 Keylock 48 KEYSTONE button 26 Keystone Correction 26 43 Lamp 56 Lamp indicator 54 Lamp Timer Life 49 Lamp unit 57 Language on screen display language 45 MAGNIFY buttons 31 MENU button 35 NATIVE 28 NORMAL 28 29 ON button 23 Optional accessories 3 OSD Display 44 Overscan 44 Phase 41 Picture Adjustment 38 Picture Mode 31 ...

Page 75: ......

Reviews: