E-26
Operation
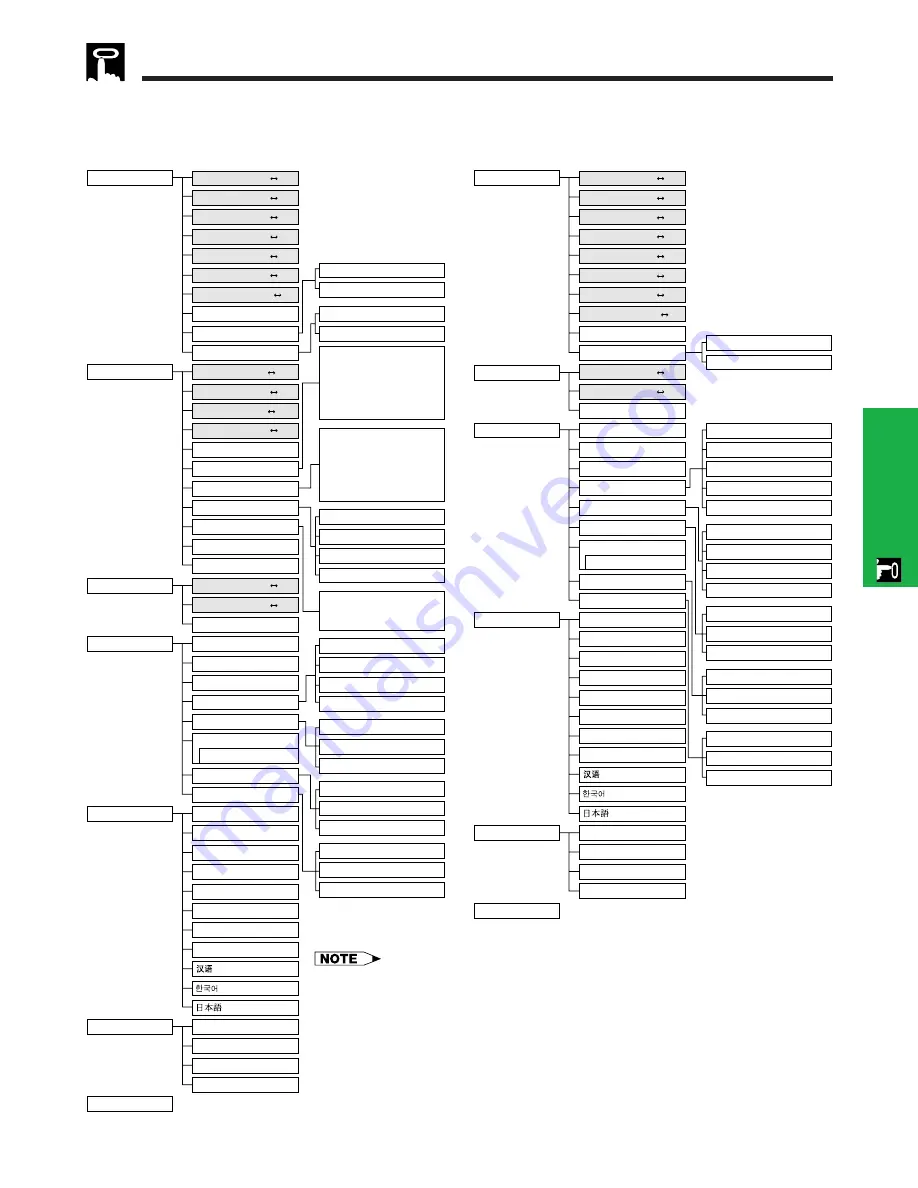
Items on the INPUT 1 or INPUT 2 Mode Menu Bar
Using the GUI (Graphical User Interface) Menu Screens
Items on the INPUT 3 (VIDEO) or INPUT 4 (S-VIDEO)
Mode Menu Bar
Main menu
Main menu
1024
⳯
864
1152
⳯
864
1152
⳯
870
1152
⳯
882
Tint
Auto Sync
Fine Sync
Audio
Ⳮ
30
ⳮ
30
Color
Ⳮ
30
ⳮ
30
Clock
Ⳮ
150
ⳮ
150
Ⳮ
150
ⳮ
150
Treble
Options
Lamp Timer
Language
English
PRJ Mode
Status
Ceiling
Ⳮ
Front
Ceiling
Ⳮ
Rear
Deutsch
Español
Nederlands
Français
Italiano
Svenska
Português
Economy Mode
Front
Rear
BLK SCRN Disp
OSD Display
Background
[ON/OFF]
[ON/OFF]
Auto Sync Disp [ON/OFF]
[ON/OFF]
Auto Power Off [ON/OFF]
Sharp
Sharp
Custom
Custom
Blue
None
Computer/RGB
Component
Interlaced
Progressive
None
Ⳮ
30
ⳮ
30
Bass
Ⳮ
30
ⳮ
30
Phase
Ⳮ
60
ⳮ
60
H-Pos
V-Pos
Reset
Reset
Save Setting
Select Setting
1
2
•
•
7
Resolution
800
⳯
600
640
⳯
480
Vert Freq
75 Hz
72 Hz
Special Modes
Ⳮ
60
ⳮ
60
Contrast
Picture
Ⳮ
30
ⳮ
30
Bright
Ⳮ
30
ⳮ
30
Red
Ⳮ
30
ⳮ
30
Blue
Reset
Ⳮ
30
ⳮ
30
1
2
•
•
7
Resolution
800
⳯
600
640
⳯
480
Vert Freq
75 Hz
72 Hz
Startup Image
CLR Temp
I/P Conversion
Signal Type
Ⳮ
3
ⳮ
3
Resolution
Hor Freq
Vert Freq
640
⳯
480
37.5 kHz
72 Hz
Signal Info
Normal
Level A
Level B
Keylock Level
Old Password
New Password
Reconfirm
Password
Contrast
Audio
Options
Video System
Language
English
PRJ Mode
Status
Ceiling
Ⳮ
Front
Ceiling
Ⳮ
Rear
Deutsch
Español
Nederlands
Français
Italiano
Svenska
Português
Front
Rear
Background
Startup Image
Interlaced
Progressive
SECAM
NTSC4.43
NTSC3.58
Sharp
Custom
Blue
None
Password
New Password
Reconfirm
Keylock Level
Level A
Level B
Old Password
Normal
Sharp
Custom
None
Lamp Timer
BLK SCRN Disp
OSD Display
[ON/OFF]
[ON/OFF]
Bright
Ⳮ
30
ⳮ
30
Color
Ⳮ
30
ⳮ
30
Tint
Ⳮ
30
ⳮ
30
Picture
I/P Conversion
CLR Temp
Ⳮ
3
ⳮ
3
Ⳮ
30
ⳮ
30
Sharp
Ⳮ
30
ⳮ
30
Red
Ⳮ
30
ⳮ
30
Blue
Ⳮ
30
ⳮ
30
Treble
Ⳮ
30
ⳮ
30
Bass
Ⳮ
30
ⳮ
30
Reset
Reset
Auto
PAL (50/60Hz)
Economy Mode
Auto Power Off [ON/OFF]
• The resolution, vertical frequency and horizontal frequency figures displayed above
are for example purposes only.
• “Color” and “Tint” appear only when Component input is selected in INPUT 1 or 2
mode.
• Only the items highlighted in the tree charts above can be adjusted.
• To adjust the items under the sub menu, press
©
after selecting the sub menu.
Summary of Contents for Notevision XG-C40XU
Page 12: ...E 11 Setup Connections Setup Connections ...
Page 63: ...SHARP CORPORATION ...


