background image

15

H

H

H

H

H

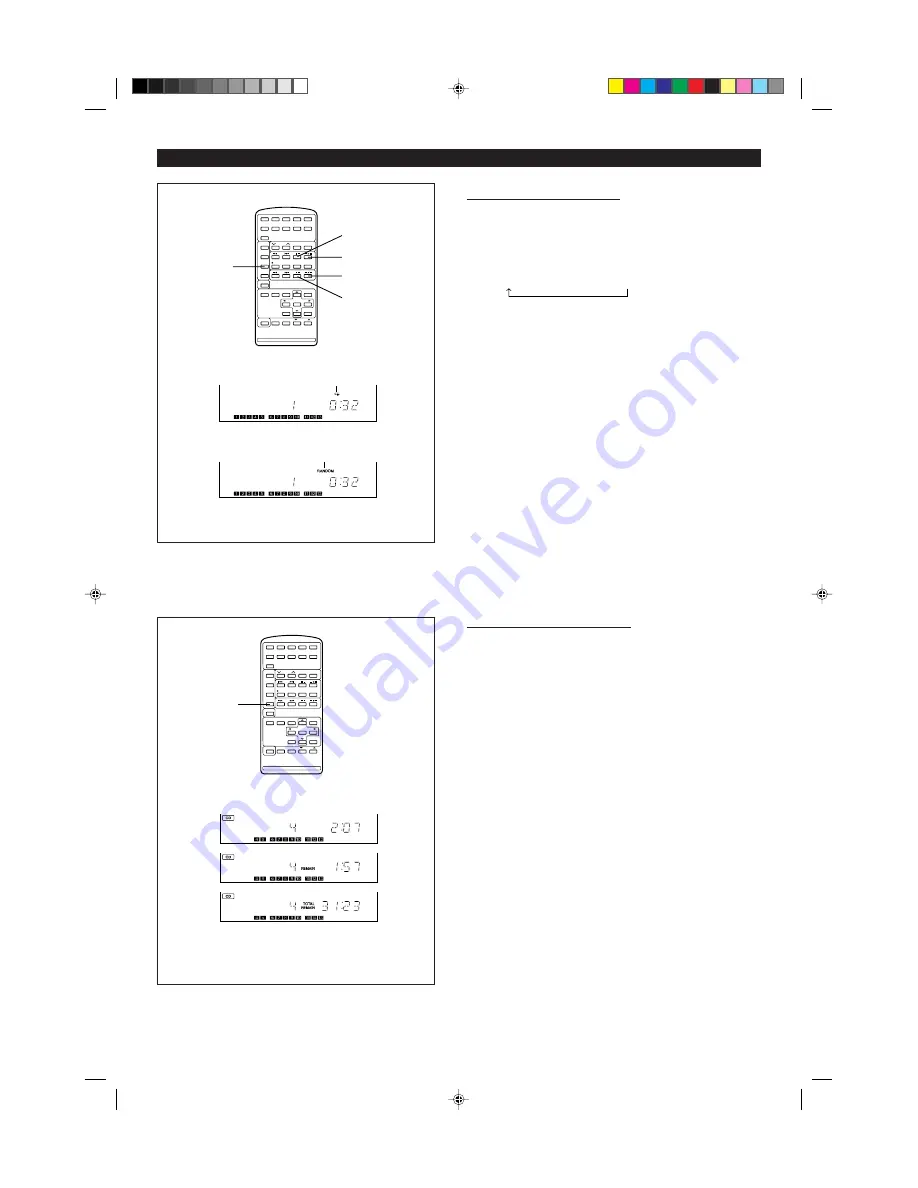
Random and repeat play

1

Select the desired program source, CD or  MD, by pressing the CD 

H

or MD 

H

 button.

2

Press the P-MODE button.

I

Each time this button is pressed, the mode will change in the following
order:

Repeat play 

 Random play 

 Normal play

3

Press the 

06

 button to start playback.

I

Repeat play

Play will continue until it is stopped.

I

Random play

Play will stop after all the tracks have been played once. (The same
track will not be played twice.)

To stop playback:

Press the CD 

H

 or MD 

H

 button.

To cancel repeat playback or random play:

Press the P-MODE button until the 

R

 or "RANDOM" display disappears.

To repeat playback of selected tracks:

Enter the program for the tracks you want and start repeat play.
You can program a single track and play it repeatedly.

Notes:

I

During APMS play, random play is not possible.

I

Repeat play will continue until you stop it. Therefore, do not forget to
cancel repeat play.

H

H

H

H

H

Switching the time display

Each time the TIME button is pressed during playback or pause, the display
will change as described below.

See the diagram to the left.

1

The elapsed play time for each track will be displayed.

2

The remaining play time for the current track will be displayed.

3

The total remaining play time for the disc from the point being played at
that time will be displayed.

Notes:

I

During random play, the total remaining play time displayed for the disc
will be from the point being played at that time. The display cannot be
switched.

I

Depending on a CD or MD to be played, the play time display may not
match the play time indicated on the CD or MD jacket, because the time
between the tracks is not included.

(Continued)

1

1

2

3

3

Repeat play

Random play

TIME

1

2

3

*01-21

98.6.23, 10:09 AM

15

Summary of Contents for MD X5

Page 1: ...TROUBLESHOOTING 38 40 MAINTENANCE 41 SPECIFICATIONS 41 CALLING FOR SERVICE Back cover LIMITED WARRANTY Back cover A0006 Note Parts and accessories mentioned in this operation manual other than those detailed above are not included CONTENTS A0004 Page IMPORTANT SAFEGUARDS 1 SPECIAL NOTES 1 2 PRECAUTIONS 2 NAMES OF CONTROLS AND INDICATORS 3 4 PREPARATION FOR USE 5 6 SOUND CONTROL 7 SETTING THE CLOCK...

Page 2: ...r surface that may block the ventilation openings or placed in a built in installation such as a bookcase or cabinet that may impede the flow of air through the ventilation openings 7 Heat The appliance should be situated away from heat sources such as radiators heat registers stoves or other appliances including amplifiers that produce heat 8 Power Sources The appliance should be connected to a p...

Page 3: ...e unit on a firm level surface free from vibration I If the unit does not work properly while in use press the POWER buttontoturnthepoweroff thendisconnecttheACpowercordfrom the AC outlet Plug the AC power cord back in and then press the POWER button to turn the power on I If an electrical storm is taking place near you it is suggested that you disconnect the AC power cord from the AC outlet for s...

Page 4: ...OWER 27 Recording Mode Button REC MODE 28 CD Track Select Button TRACK 29 CD 0 0 0 0 0MD Edit Button 30 Volume Up Down Buttons 31 5 5 5 5 5 4 4 4 4 4 Buttons 32 Tuner Call Band Select Button TUNER BAND 33 Auxiliary Select Button AUX 34 Extra Bass Button X BASS 35 Keyboard Input Terminal 36 MD Eject Button 7 7 7 7 7 37 MD Record Button I I I I I REC 38 MD Play Pause Button 06 06 06 06 06 39 MD Stop...

Page 5: ...H H H 18 MD Play Pause Button 06 06 06 06 06 19 Sound Synchro Button S SYNC 20 Recording Mode Button REC MODE 21 Auto Mark Button A MARK 22 CD Play Pause Button 06 06 06 06 06 23 CD Stop Button H H H H H 24 CD Track Up Down Cue Review Buttons 5 5 5 5 5 4 4 4 4 4 25 Display Button DISPLAY 26 1 0 1 0 1 0 1 0 1 0Buttons 27 Message Button MESSAGE 28 Enter Button ENTER 29 Volume Up Down Buttons 30 Pre ...

Page 6: ...ns I Connect the black wire to the minus terminal and the red wire to the plus terminal I Donotmixtherightchannelandleftchannelwiringwhenconnectingthe speakers to the unit I Do not let bare speaker wires touch each other as this may damage the amplifier and or speakers Note I The speaker grille is not removable PREPARATION FOR USE I Unplug the AC power cord from the AC outlet before connecting or ...

Page 7: ...I Remove the batteries if they are weak or if the unit is not in use for long periods to prevent potential damage due to battery leakage Caution Do not use rechargeable batteries nickel cadmium battery etc H H H H H To change the brightness of the display Turn the power on and keep pressing the DISPLAY button for more than two seconds The DIMMER ON display will appear and the display will be dimme...

Page 8: ...tedly FLAT The sound is not modified HEAVY 2 Bass and treble are emphasized a lot HEAVY 1 Bass and treble are slightly emphasized VOCAL Vocals midrange tones are emphasized SOFT 2 Treble is reduced a lot SOFT 1 Treble is cut a little H H H H H Extra bass X BASS Press the X BASS button to emphasize the bass region of the frequency spectrum X BASS ON will appear Press the X BASS button again to canc...

Page 9: ... PM 12 Press the ENTER button to set the hour 13 Adjust the minute by pressing the 1 or 0 button I Press the button once to increase or decrease the minutes by one When the button is held down the time will change in increments of 5 minutes 14 Press the ENTER button to set the minute I The clock will start operating I When about 3 seconds have elapsed the original display will reappear Notes I In ...

Page 10: ...n the unit pressing the CD 06 button turns the power on and begins playback COMPACT DISC OPERATION Cautions I Do not carry the unit with a disc left in the disc tray The disc may come loose inside the unit and be damaged or cause damage to the unit This may also cause malfunctions I Do not place two CDs in the disc tray I Do not push the disc tray while it is moving I If the power fails while the ...

Page 11: ...utton To remove a MiniDisc Press the 7 button I The MiniDisc will be ejected Notes I Although vibration will not normally cause a MiniDisc to skip you may hear a skip in the sound if there is continuous vibration I When you listen to MiniDiscs near a radio or a TV set the radio or the TV set may pick up noise Keep the unit as far away as possible from tuners After use Press the POWER button to tur...

Page 12: ...FM stereo press the ST MODE button on the remote control so that the STEREO indicator appears I ST will appear when an FM broadcast is in stereo 5 If the FM stereo reception is weak press the ST MODE button so that the STEREO indicator goes out I Although the reception changes to monaural the sound becomes clearer After use Press the POWER button to turn the power off Direct playback Just pressing...

Page 13: ...et numbers 11 to 40 Press the Y10 button first then press the preset number For example to select 35 1 Press the Y10 button 2 Within 5 seconds press the 3 button 3 Within 5 seconds press the 5 button Note I After a prolonged power failure the contents of the memory will be lost When power is restored enter your selections in memory again For power failures of just a few hours or less the contents ...

Page 14: ...layed Press the 5 button for less than 0 5 seconds during playback To move to the beginning of the next track Press the 4 button for less than 0 5 seconds during playback I To skip a number of tracks at one time press the 5 or 4 button repeatedly until the desired track number is shown I Tostartplaybackfromadesiredtrack pressthe 5 or4 buttonwhile in the stop mode to select the track number and the...

Page 15: ...cks can be selected and they will be stored after the last track you entered To clear the programmed selections Press the CLEAR button while PRGM is flashing I Each time the button is pressed one track will be cleared beginning with the last track programmed To cancel the APMS While the unit is stopped in the APMS mode press the CLEAR button I The program contents will be erased I When you open th...

Page 16: ...it repeatedly Notes I During APMS play random play is not possible I Repeat play will continue until you stop it Therefore do not forget to cancel repeat play H H H H H Switching the time display EachtimetheTIMEbuttonispressedduringplaybackorpause thedisplay will change as described below See the diagram to the left 1 The elapsed play time for each track will be displayed 2 The remaining play time...

Page 17: ...anged TOC is not yet recorded on the MiniDisc at this time The TOC is recorded when you stop recording you switch to another input source you eject the MiniDisc you turn the power off DoNOTunplugthepowercordwhiletheTOCisbeingrecorded TOC is flashing Also do not subject the unit to any shocks or sharp jolts Otherwise the TOC will not be correctly recorded and consequently proper playback may not be...

Page 18: ...Page 14 RECORDING H H H H H About monaural long play mode When a recording is made in the monaural long play mode the length of the recording can be double that of a stereo recording for the same amount of space on the MD The monaural long play mode is very useful for recording songs that were originally recorded in monaural or for recording talk programs Press the REC MODE button I Each time the ...

Page 19: ...y mode To record on only those tracks which can be recorded press the CD 0 MD button To cancel operation Before pressing the CD 0 MD button press the CD H or MD H button To stop recording Press the CD H button After recording the track number playback and recording will stop It is not possible to pause recording 6 2 1 1 4 5 3 3 4 5 Start track number End track number Selected tracks Continued To r...

Page 20: ...nit and adjust the radio reception so that the AM station is tuned in clearly To interrupt recording Press the MD 06 button during recording Press the MD 06 button again to resume recording The track number increases To record the track number during recording Press the I REC button To stop recording Press the MD H button After recording the track number recording stops Notes I The contents of a s...

Page 21: ...ge 24 Move The order of the recorded tracks can be changed This feature is different from program play A new track order can be recorded directly on the disc When the power is turned off the revised order will not be changed Page 23 Programmed move function This function allows the track numbers to be automatically rearranged in the order specified for programmed playback The track numbers will be...

Page 22: ...C D E F G H A B C D D Talk E Live performance Live performance STEP2 STEP3 STEP4 STEP1 D E A C B H F G STEP5 Recording tracks to be edited on an MD Putting the space between tracks in order Cutting unnecessary sections Rearranging tracks in your preferred order Finish by putting names on the disc and tracks Disc name Track name The tracks are rearranged using the program move function The track is...

Page 23: ...T button and then select COMBINE using the or button 3 Within 10 seconds press the ENTER button I To cancel the operation press the MD H button 4 Press the ENTER button again I The two tracks are combined and the unit is stopped at the beginning of the combined track I The numbers assigned to the tracks following the combined track are automatically decreased by one When both tracks have a name I ...

Page 24: ...When a track has been moved the other tracks which are affected will be assigned new track numbers automatically Programmed move 1 Select the tracks you want to move and enter them into a program Page 14 2 Make sure that the PRGM indicator is lit and then press the NAME TOC EDIT button 3 Within 10 seconds press the ENTER button I To cancel the operation press the MD H button 4 Press the ENTER butt...

Page 25: ...d to the tracks following the erased track will be automatically decreased by one Notes I Once a track has been erased it cannot be recovered Double check the track number before erasing it I When a track is erased the track name will be erased at the same time To erase all of the tracks at once 1 Press the MD H button I The total number of tracks and the total playing time for the MD will be disp...

Page 26: ...ish using the 1 0 buttons I When the or button is pressed the following 5 letters will appear I Each time the 1 or 0 button is pressed the cursor will move to the next letter 6 Press the ENTER button to enter the character I Repeat steps 4 to 6 above to enter the characters of the name When the next character s type is the same as the previous character step 4 can be skipped 7 After entering all o...

Page 27: ...fore you finish recording the track If the end of the recording is reached before you have entered the complete name only the characters entered before the recording ended will be recorded H H H H H To erase track names After performing steps 1 to 2 mentioned above do the following 1 Press the TIMER DELETE button for at least 2 seconds I The NAME CLEAR display will appear 2 Press the ENTER button ...

Page 28: ...t message is ENJOY MUSIC Thiscanbechangedtoanyothermessageyouchoose upto20characters in length 1 Press the MESSAGE button I The unit will enter the character input mode 2 Press the DISPLAY button to select the type of characters you want to use Page 25 3 Select the character you wish using the 1 0 buttons 4 Press the ENTER button to enter the character I Repeat steps 2 to 4 above to enter the char...

Page 29: ...teps 1 3 on page 27 I To change the message displayed when the power is turned off Perform step 1 on page 27 4 Then enter the characters you want from the keyboard Keys you can use Entering characters Normally lower case letters are entered Shift key When the shift key is held down and any letter key is pressed an upper case letter will be entered Space key Enters a space and moves the cursor one ...

Page 30: ...ER button and then select the preset number using the 1 or 0 button 9 Press the ENTER button 10 Adjust the volume level using the 1 or 0 button 11 Press the ENTER button I Timer playback setting is complete Note I Ifyoudonotperformthenextoperationwithin10seconds theoperation will be canceled If this happens try the operation again from the beginning Setting timer playback 1 Press the TIMER DELETE ...

Page 31: ...n 10 Adjust the volume level using the 1 or 0 button 11 Press the ENTER button I Timer recording setting is complete Note I Ifyoudonotperformthenextoperationwithin10seconds theoperation will be canceled If this happens try the operation agein from the beginning Setting timer recording 1 Press the TIMER DELETE button I Press the or button so that the T STANDBY display appears 2 Press the ENTER butt...

Page 32: ...ll reappear H H H H H To cancel the timer operation If the power is turned on the timer will be canceled The timer operation can also be canceled as follows 1 While in the timer standby mode press the TIMER DELETE button 2 Press the or button so that the TIMER CANCEL display appears 3 Within 10 seconds press the ENTER button I The timer operation will be canceled TIMER or TIMER REC will go off The...

Page 33: ... the setting is changed I This sleep functions of this unit cannot be used to control equipment connected to this unit You must use the sleep functions of the other equipment if it has them To confirm the sleep timer setting 1 Press the TIMER DELETE button 2 Press the or button so that the SLEEP display and setting time appear To cancel the sleep operation If the power is turned off the sleep oper...

Page 34: ...can output analog signals Note I When audio input and output signals of an external unit are connected to this unit oscillation may occur In such a case disconnect either the input or output connection I I I I I Red plug To RIGHT I I I I I White plug To LEFT AUX DIGITAL IN DIGITAL1 OPTICAL DIGITAL2 COAXIAL DAT Optical digital cable AD M3DC sold separately Optical digital cable AD M1DC sold separat...

Page 35: ...t your headphones have a 1 8 3 5 mm diameter plug and are between 16 ohms and 50 ohms impedance The recom mended impedance is 32 ohms I When headphones are connected the speakers are disabled automatically Adjust the VOLUME control for the desired volume Headphones PHONES 22 34 98 6 23 10 11 AM 34 ...

Page 36: ...t the recording level usingtheINPUTLEVELcontrol Thisisonlynecessarywhenrecording from analog inputs I In the case of digital inputs it is not necessary to adjust the recording level I The maximum level should not exceed 0 dB I Adjust the recording level and then stop the external unit 4 Press the S SYNC button 5 Start playing the music you want to record on the external unit I Recording will start...

Page 37: ...The unit will enter the recording stand by mode I When you do not want to use the auto mark function press the A MARK button on the remote control 4 Start playing the music you want to record on the external unit 5 Adjust the recording level using the INPUT LEVEL control This is only necessary when recording from analog inputs I The maximum level should not exceed 0 dB I In the case of digital inp...

Page 38: ...disassemble a MiniDisc H H H H H Adaptive TRansform Acoustic Coding ATRAC ATRAC Adaptive TRansform Acoustic Coding is a new technology that is designed to eliminate the information in sounds which you can not hear andtocompresstheremainingsounddatasothattherecordingusesabout 1 5 of the original sound information Sound data is analyzed and filtered to take advantage of psycho acoustic masking The a...

Page 39: ... no recording will be placed in those sections Therefore recording time will be reduced TROUBLESHOOTING H H H H H If a problem occurs If this unit functions abnormally during operation first check the following items If the unit continues to function abnormally or if an abnormality appears other than listed below turn off the player s power and disconnect the AC power plug then consult your SHARP ...

Page 40: ...ower turned on The unit should function properly in about 1 hour POSSIBLE CAUSE The unit is placed near the TV or computer The antenna direction is not placed properly Did a power failure occur REMEDY Place the unit apart from the noise Correct the antenna direction Preset the channel again POSSIBLE CAUSE The batteries polarity are not inserted properly The batteries inside the remote control are ...

Page 41: ...rack name exceeds 100 NO DISC A disc has not been loaded Load a disc The disc data cannot be read Reload the disc NOT AUDIO The data recorded on this disc is not audio data Select another track Replace the disc PLAYBACK MD You tried to record on a playback only disc Replace it with a recordable disc PROTECT The unit has determined that it is out of order by performing a Turn the power off and back...

Page 42: ... H H Speaker section Type 2 way 4 3 4 120 mm woofer and 2 50 mm tweeter type Maximum input power 25 W Rated input power 12 5 W Impedance 6 ohms Dimensions Width 5 3 4 146 mm Height 9 1 2 241 mm Depth 9 1 8 229 mm Weight 4 9 lbs 2 2 kg each H H H H H Main unit section MiniDisc recorder section Type MiniDisc recorder Signal readout Non contact 3 beam semi conductor laser pick up Audio channel Stereo...

Page 43: ...42 MEMO 35 40 98 6 23 10 11 AM 42 ...

Page 44: ...The warranties described above shall be the sole and exclusive warranties granted by Sharp and shall be the sole and exclusive remedy available to the purchaser Correction of defects in the manner and for the period of time described herein shall constitute complete fulfillment of all liabilities and responsibilities of Sharp to the purchaser with respect to the Product and shall constitute full s...

Reviews: