background image

23

Specifications

Product specifications

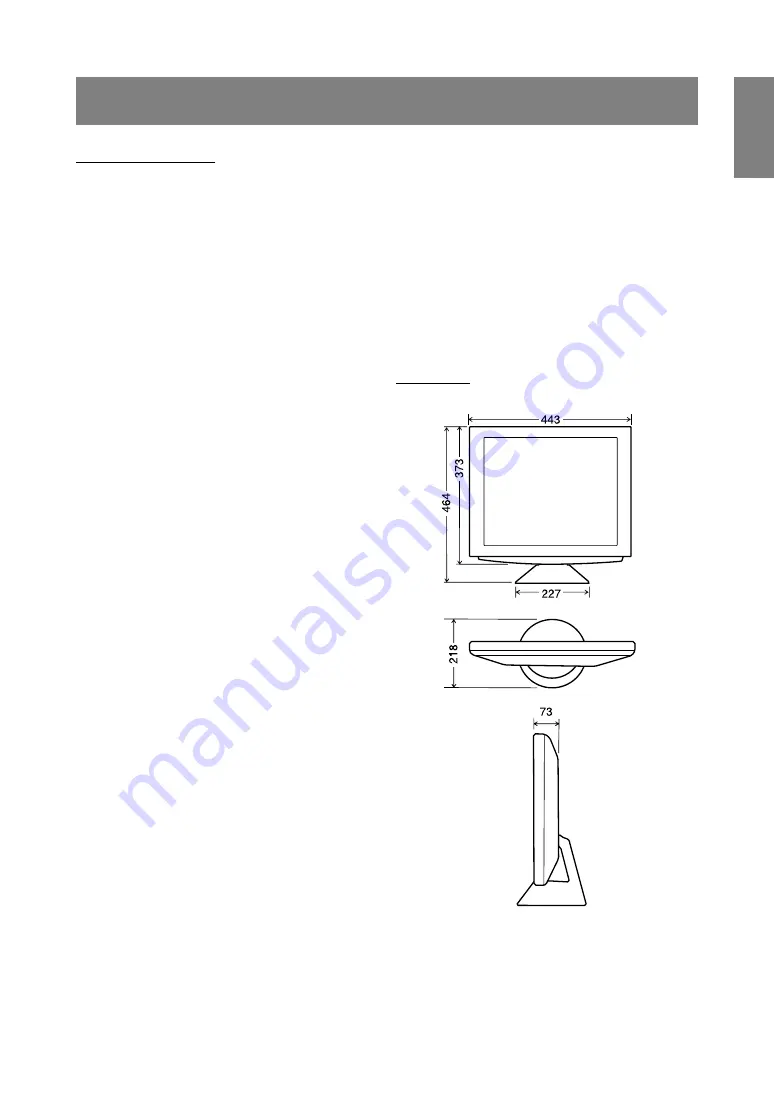
Dimensions 

(Units: mm)

LCD display

18.1 inches (46 cm measured diagonally)
Super-V and Anti Glare Low Reflection TFT LCD
module

Resolution (max.)

SXGA 1280 x 1024 pixels

Displayable colors (max.)

16.77 million colors (8 bit)

Dot pitch

0.2805(H)  0.2805(V) mm

Brightness (max.)

200cd/m

2

Contrast ratio

350:1

Angle of visibility

Left-right 150°; Up-down 150°

Screen display size

Horizontal 359 mm x Vertical 287.2 mm

Video signal

Analog RGB (0.7Vp-p) [75

]

Sync signal

Separate Sync (TTL level: +/-), Sync on
Green, Composite Sync (TTL level: +/-)

Frequencies

Refer to relevant signal timing (next page)

Automatic screen adjustment options

Clock, Phase, H-position, V-position

Expansion compensation

Digital screening (enlargement of display to
correct VGA/SVGA/XGA)

Plug & Play

VESA:

DDC1/DDC2B compatible

Power management

VESA:

based on DPMS

User adjustment options

Brightness, Contrast, Clock, Phase, screen
position (horizontal, vertical), screen colors

Computer signal input terminal

2 x 15 pin mini D-sub (3 rows)

USB hub function

1 upstream port, 2 downstream ports (bus-
powered hub based on USB standard Rev 1.1)

Screen tilt

Upward 0° -30°; downward 0° - 5°

Screen swivel

90° from left through right

Power supply

AC100-240V (Use special AC adapter)

Temperature of operating environment

5 - 35°C

Power consumption

54W (4.5W when in power-saving mode)

Dimensions (W x D x H, excluding rubber base)

443 mm x 218 mm x 464 mm

Weight

Approx. 10.4 kg (excluding AC adapter)

Downloaded from: 

http://www.usersmanualguide.com/

Summary of Contents for LL-T1810A

Page 1: ...LCD MONITOR LCD FARBMONITOR MONITEUR LCD MONITOR LCD LL T1810A OPERATION MANUAL BEDIENUNGSANLEITUNG MODE D EMPLOI MANUALE D USO Downloaded from http www usersmanualguide com ...

Page 2: ...Connecting the monitor to a computer PC etc 13 Connecting to a second computer 13 Connecting a USB device 13 Turning the power on 14 Changing between input terminals INPUT 1 2 14 Turning the power off 14 Adjusting the screen display 17 Automatic screen adjustment 18 Adjusting the backlight 18 Manual screen adjustment 19 Monitor care and repair 22 Monitor care 22 Storage 22 Troubleshooting 22 Speci...

Page 3: ...ceivingantenna Increasethedistancebetweentheequipmentandreceiver Connect the equipment into an outlet on a circuit different from that to which the receiver is connected Consultthedealeroranexperiencedradio TVtechnicianforhelp Use nothing but the included cables and AC cord to insure compliance with FCC regulation for Class B computing equipment Declaration of Conformity SHARP LCD Color Monitor LL...

Page 4: ...e requirements for the TCO 99 scheme which provides for international and environ mental labelling of personal computers The labelling scheme was developed as a joint effort by the TCO The Swedish Confederation of Professional Employees Svenska Naturskyddsforeningen The Swedish Society for Nature Conservation and Statens Energimyndighet The Swedish National Energy Administra tion Approval requirem...

Page 5: ...igh doses The relevant TCO 99 require ment states that batteries the colour generating layers of display screens and the electrical or electronics components must not contain any cadmium Mercury Mercury is sometimes found in batteries relays and switches It damages the nervous system and is toxic in high doses The relevant TCO 99 requirement states that batteries may not contain any mercury It als...

Page 6: ...mento obedece às exigências das directivas 89 336 CEE e 73 23 CEE na sua versão corrigida pela directiva 93 68 CEE Este aparato satisface las exigencias de las Directivas 89 336 CEE y 73 23 CEE modificadas por medio de la 93 68 CEE Denna utrustning uppfyller kraven enligt riktlinjerna 89 336 EEC och 73 23 EEC så som komplette ras av 93 68 EEC Dette produktet oppfyller betingelsene i direktivene 89...

Page 7: ...ty earth or coloured green or green and yellow The wire which is coloured BLUE must be connected to the terminal which is marked with the letter N or coloured black The wire which is coloured BROWN must be connected to the terminal which is marked with the letter L or coloured red Ensure that your equipment is connected correctly if you are in any doubt consult a qualified electrician WARNING THIS...

Page 8: ...s or in unsafe places Do not allow the monitor to come into contact with strong shocks or vibrations Causing the monitor to fall or topple over may damage it Do not use in places where the monitor will be subject to direct sunlight near heating equipment or anywhere else where there is likelihood of high temperature as this may lead to generation of excessive heat and outbreak of fire The Power Co...

Page 9: ...ptions when the OSD Menu is displayed MENU button p 19 This button is used to pop up select and close the OSD Menu INPUT button p 14 Use this button to switch between input signal terminals INPUT 1 INPUT 2 When the On Screen Display OSD Menu is displayed These buttons are used to increase or decrease the value of a selected option p 19 When the OSD Menu is not displayed These buttons are used to a...

Page 10: ... INPUT 2 and USB port INPUT 2 terminal p 13 A second computer can be connected here USB port Downstream Port 2 p 13 A USB device can be connected here USB port Upstream Port 1 p 13 A USB ready computer or self powered USB hub can be connected here RGB signal cable INPUT 1 p 13 This is to be connected to the computer s i e PC etc analog RGB output terminal Security lock anchor By connecting a secur...

Page 11: ...ver 5 Connect power cord to AC adapter Fitting the AC adapter inside the stand Wind the cord Place adapter inside stand cavity 6 Replace stand cover Stand cover 7 Place power plug into AC outlet Connecting the monitor to a power source Use only the AC adapter supplied 1 Remove the stand cover Connecting the monitor and turning the monitor on and off Power cord Downloaded from http www usersmanualg...

Page 12: ... computer are switched off Connecting to a second computer A RGB signal cable to be purchased separately is needed to connect a second computer 1 Remove the cover 3 Replace the cover Connecting a USB device This monitor can be used with hubs which use the USB standard Rev 1 1 Downstream 2 ports USB devices such as keyboard and mouse can be connected here Up to 100mA of power is able to be supplied...

Page 13: ...matic screen adjustment before use p 18 Power LED Green light In use Orange light Power saving mode or signal failure Lamp off Power OFF Press power button USB port Downstream 2 ports USB port Upstream 1 port INPUT button Pushing this button switches between input signal terminals so that the screen changes to display any of the machines connected Turning the power off Turn off device to which mon...

Page 14: ...tallation commands beginning from 2 above 6 Remove the Monitor Settings Adjustment Disk from the A drive If the Add New Hardware Wizard has not ap peared 1 Place the Monitor Settings Adjustment Disk in the computer s A drive 2 Click on the Start button From Settings choose Control Panel 3 Double click on Display 4 Click on Settings Advanced and Monitor 5 In Options check Automatically detect Plug ...

Page 15: ...py manufacturer s files from is A and click OK 9 Select the monitor from the list displayed and click Next 10 Click Next confirm that the monitor s name appears on the screen and click Finish If Digital Signature Not Found appears click Yes 11 Click on Close 12 Click OK and close the window 13 Remove the Monitor Settings Adjustment Disk from the A drive Installing the ICC profile Installing the mo...

Page 16: ...control buttons are disabled It is not possible to reset values when the adjustment lock is in place Remove the adjustment lock before attempting to operate control buttons Adjustment lock function By disabling the control buttons i e setting the lock any attempted changes to adjusted values will be voided 1 Turn off the monitor power 2 While pressing the MENU button press the power button i e tur...

Page 17: ...ay look colored This is due to the input signal specification and is not a malfunction Adjusting the screen automatically 1 Press the MENU button The ADJUSTMENT Menu will be displayed 2 Press the button The screen will become dark and ADJUSTING will be displayed After a few seconds the ADJUSTMENT Menu will return The automatic adjustment is now complete 3 Press the MENU button 4 times to make the ...

Page 18: ...DJUSTMENT CLOCK PHASE H POS horizontal positioning and V POS vertical positioning MENU 2 GAIN CONTROL BRIGHT brightness CONT contrast MENU 3 WHITE BALANCE R CONT blue green to red G CONT purple to green B CONT yellow to blue MENU 4 MODE SELECT INPUT input mode 400LINE resolution EXPAND screen expansion LEVEL level of scaling The screen display during adjustment If using Windows the Adjustment Patt...

Page 19: ...changed BRIGHT brightness Total screen brightness can be adjusted while watching the color pattern buttons CONT Contrast While watching the color pattern adjustments can be made so that all graduations appear buttons Color pattern MENU 3 WHITE BALANCE WHITE BALANCE can be adjusted as necessary As adjustments are made before shipment there is no real necessity for further alteration Notes Not all g...

Page 20: ...esolution input for other than 400 lines is done automatically there is no need to set it EXPAND Screen expansion For display modes of less than 1280 X 1024 pixels the display can be expanded if desired buttons OFF Expansion off ON Expansion on Notes Display modes of 1280 X 1024 pixels cannot be changed If a resolution of 1280 X 1024 pixels cannot be achieved even after expansion is attempted the ...

Page 21: ...ld leave marks or result in malfunction Storage If the monitor will not be used for a long period of time be sure to remove the power plug from the AC outlet CAUTION Do not leave the monitor in contact with rubber or plastic items for long periods of time as this could lead to color change or change in shape Troubleshooting If you think the monitor may be faulty please check the following points b...

Page 22: ...Clock Phase H position V position Expansion compensation Digital screening enlargement of display to correct VGA SVGA XGA Plug Play VESA DDC1 DDC2B compatible Power management VESA based on DPMS User adjustment options Brightness Contrast Clock Phase screen position horizontal vertical screen colors Computer signal input terminal 2 x 15 pin mini D sub 3 rows USB hub function 1 upstream port 2 down...

Page 23: ...ng any signal synch signal NO SIGNAL will appear The connector pin Input connector diagram Mini D sub connector with 15 pins Number Function 1 Red video signal input 2 Green video signal input 3 Blue video signal input 4 GND 5 GND 6 For red video signal GND 7 For green video signal GND 8 For blue video signal GND 9 N C 10 GND 11 GND 12 DDCdata 13 For Hsync signal input 14 For Vsync signal input 15...

Page 24: ...ss than Yes No 4 5W OFF No No DDC Plug Play This monitor supports the VESA DDC Display Data Channel standard DDC is a signal standard for carrying out Plug Play functions on the monitor or PC It transfers information such as degree of resolution between the monitor and PC You can use this function if your PC is DDC compliant and if it is set so that it can detect the Plug Play monitor There are ma...

Page 25: ...o refer to the installation instructions in the operation manual included with the arm or stand 1 Spread out a soft cloth on a suitable horizontal surface 2 Being careful not to damage the monitor gently lay the monitor on it display side down 3 Remove the stand cover and the covers to the left and to the right 4 Remove the two screws and remove the cover 5 Remove the four screws and then remove t...

Page 26: ...Downloaded from http www usersmanualguide com ...

Page 27: ...SHARP CORPORATION 2001 SHARP CORPORATION 01C DSN2 TINSM1017MPZZ 2 Downloaded from http www usersmanualguide com ...

Page 28: ... tv dvd and othes Manual users user manuals user guide manual owners manual instruction manual manual owner manual owner s manual guide manual operation operating manual user s manual operating instructions manual operators manual operator manual product documentation manual user maintenance brochure user reference pdf manual Downloaded from http www usersmanualguide com ...

Reviews: