background image

5

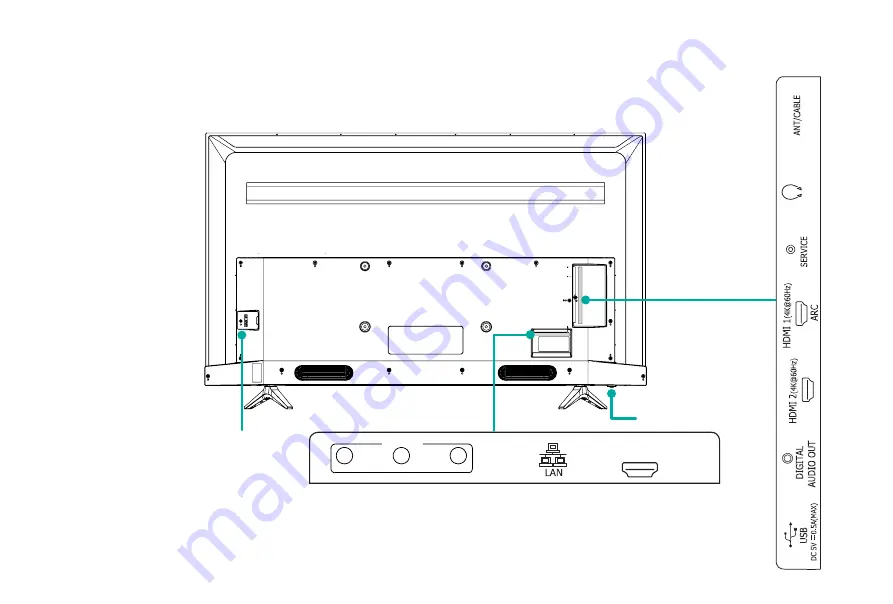
Step 2. Connect devices to your TV

Check to ensure that you have selected the right cables for the ports and that they are connected securely. 
Loose connections can affect the quality of the picture image and color.

Back View of the TV

TV Bottom View

TV Bottom Panel

Power Input

HDMI 3

(

4K@60Hz

)

AV IN

VIDEO

L

R


TV Side View

HEADPHONE

Summary of Contents for LC65N7004U

Page 1: ...ent by reducing paper waste For detailed instructions and feature descriptions access the full User Manual online Before using the TV please read this guide carefully and keep it for future reference 4K HDR Smart TV Quick Setup Guide ...

Page 2: ...iaries This product is sold to you under one or more license agreements between Sharp Corporation and Hisense International Hong Kong America Investment Co Ltd All other trademarks are the property of their respective holders Disclaimer Disclaimer Subscriptions or other payments may be required to access content through some applications Some or all of the included or downloaded application servic...

Page 3: ...C This Quick Setup Guide supports the following models LC 65N7004U ...

Page 4: ...mount 3 Step 2 Connect devices to your TV 5 Step 3 Get your remote ready 8 Step 4 Power on the TV 10 Step 5 Complete the first time setup 10 Step 6 Establish a network connection 11 Step 7 Enjoy your TV 13 Troubleshooting 14 Product Specifications 15 Certification and Compliance 17 ...

Page 5: ...e Email support sharptvusa com http www sharptvusa com support www sharptvusa com support productreg asp No need to register CANADA Phone 1 855 271 6271 Hours of Operation Monday Friday 8 AM to 8 PM EST Service Email Canadasupport sharp canada ca http www sharp canada ca support MEXICO Phone 01 800 999 7277 Hours of Operation Service Email servicio SHARPTV com mx http www SHARPTV com mx support ht...

Page 6: ...will also need the following items which are not included to set up your TV Wireless router not included for Internet connectivity Phillips screwdriver not included to secure the TV stand HDMI and other types of cables not included to connect external devices to the TV Wall mount bracket not included if you prefer to mount the TV to the wall Please check foam for accessories before discarding Veui...

Page 7: ...play on your TV is fragile Make sure the TV screen is not scratched or damaged by hard objects or from pressure on the front of your TV Attach the TV stand To attach the TV stand legs to your TV 1 Carefully place your TV face down on a clean soft flat surface 2 Insert the TV Base Stand into the bottom slots on your TV 3 Use the screws provided to secure each leg tightly Base Stand Base Stand Screw...

Page 8: ...ed To prevent internal damage to the TV and ensure it is mounted securely be sure to use fixing screws not provided that are 9 5 11 5 mm in length when measured from the attaching surface of the mounting hook Wall mount hole pattern mm 400 200 Wall mount screw size mm M6 Follow instructions provided with the Wall mount bracket To complete the installation please contact the wall mount manufacturer...

Page 9: ... selected the right cables for the ports and that they are connected securely Loose connections can affect the quality of the picture image and color Back View of the TV TV Bottom View TV Bottom Panel Power Input HDMI 3 4K 60Hz AV IN VIDEO L R TV Side View HEADPHONE ...

Page 10: ...Set top Box Satellite Receiver Satellite antenna cable VCR Video Camera AV IN VIDEO Yellow Connect a composite video cable and left right audio cables from an external AV device L White R Red DIGITAL AUDIO OUT Speaker Connect an optical cable from an external digital audio system Connect a High Definition Multimedia Interface HDMI cable from an external device ...

Page 11: ...et cable to access a network or the Internet The TV also has a wireless connectivity feature SERVICE This port is not available for you to connect an external device It can only be used by our factory for testing purposes Connect a USB device for browsing photos music and movies Hard disks with a total current consumption or impulse current consumption greater than 500mA are not supported ...

Page 12: ...n buttons TV Live TV The button for the Quick setup menu D pad up down left right navigation buttons OK Confirmation button Return to the previous place in the menu or app SLEEP Adjust sleep timer setting BUTTON DESCRIPTION Display the Home screen VOL Volume up down CH Channel up down Mute and restore sound MTS Set the audio language MTS Media content control function buttons NRT Choose to leave t...

Page 13: ...ol can work at a distance of up to 26 feet in front of the TV set It can work at a 30 degree horizontal or vertical angle Program Your Universal Cable or Satellite Remote Control to Operate Your New Television only for USA If you would like to program your other household remote controls to your new television please refer to the User Manual supplied by your Cable or Satellite provider It should i...

Page 14: ...e D pad arrows of your remote choose your Language Region and Time Zone End User License Agreement Choose Agree or Decline then select Continue icon and press OK Usage Mode Select Home Mode which appears by default Note Store Mode and Store Mode Video Demo Only should only be selected by Retailers who plan to demonstrate the TV Network Connection If your TV does not automatically detect an Etherne...

Page 15: ...lish a wired network connection Automatically obtain an IP address 1 Select Wired LAN The TV will automatically obtain an IP address and connect to the network NOTE The default option of IP Settings Mode is DHCP 2 If the connection fails then Disconnected will display for the Ethernet status Retry or enter the IP Settings select Manual to input the information again Manually enter the IP Settings ...

Page 16: ... Select a wireless network from the list input the password and select Connect 3 If the network connection does not appear in the list select Refresh to refresh the list or select Add to manually enter SSID and Security mode selection Close the network connection Select Off The network connection will close Wireless router with DHCP LAN Cable Wireless LAN Adapter built in TV set ...

Page 17: ... screen is your starting point for using your TV Your SHARP TV provides a variety of entertainment options so you ll always find something new Use your TV to watch live channels access video on demand to watch movies and much more Press the Home button on your remote to get started ...

Page 18: ...ings Check if Mute mode is set to On Sound but no picture or black and white picture If the picture is black and white unplug the TV from the AC outlet and replug it after 60 seconds Check that the Color is set to 50 or higher Try different TV channels The sound and or picture is distorted or appears wavy An electric appliance may be affecting the TV Turn off any appliances that are nearby and mov...

Page 19: ... 2 160 Audio Power 15 W 15 W Power consumption 170W Power Supply 120 V 60 Hz Connectivity Built in Wireless feature 2x2 dual band Ports 3 HDMI ports 1 USB port 1 LAN port for Ethernet 1 Digital Audio Output 1 RF Input 1 Headphone Audio Output 1 RCA Composite Video Input 1 left right Audio Input for Composite Receiving Channels VHF 2 13 UHF 14 69 CATV 1 125 Digital Terrestrial Broadcast 8VSB 2 69 D...

Page 20: ...densing Storage Temperature 15 C to 45 C 5 F to 113 F Storage Humidity 10 to 70 non condensing Disclaimer All products product specifications and data are subject to change without notice to improve reliability function design or otherwise ...

Page 21: ... the dealer or an experienced radio TV technician for help NOTE The manufacturer is not responsible for any radio or TV interference caused by unauthorized modifications to this equipment Such modifications could void the user s authority to operate the equipment The Wi Fi Module complies with FCC radiation exposure limits set forth for an uncontrolled environment This device should be installed a...

Page 22: ...bol are trademarks of Dolby Laboratories 2019 All rights reserved Hisense and the Hisense logo are registered trademarks of Hisense Other brand and product names are registered trademarks of their respective owners Environmental Protection This mark indicates that this product should not be disposed together with other domestic garbage to avoid damage to the environment or human health due to the ...

Page 23: ...ES G182606 2 ...

Reviews: