background image

20

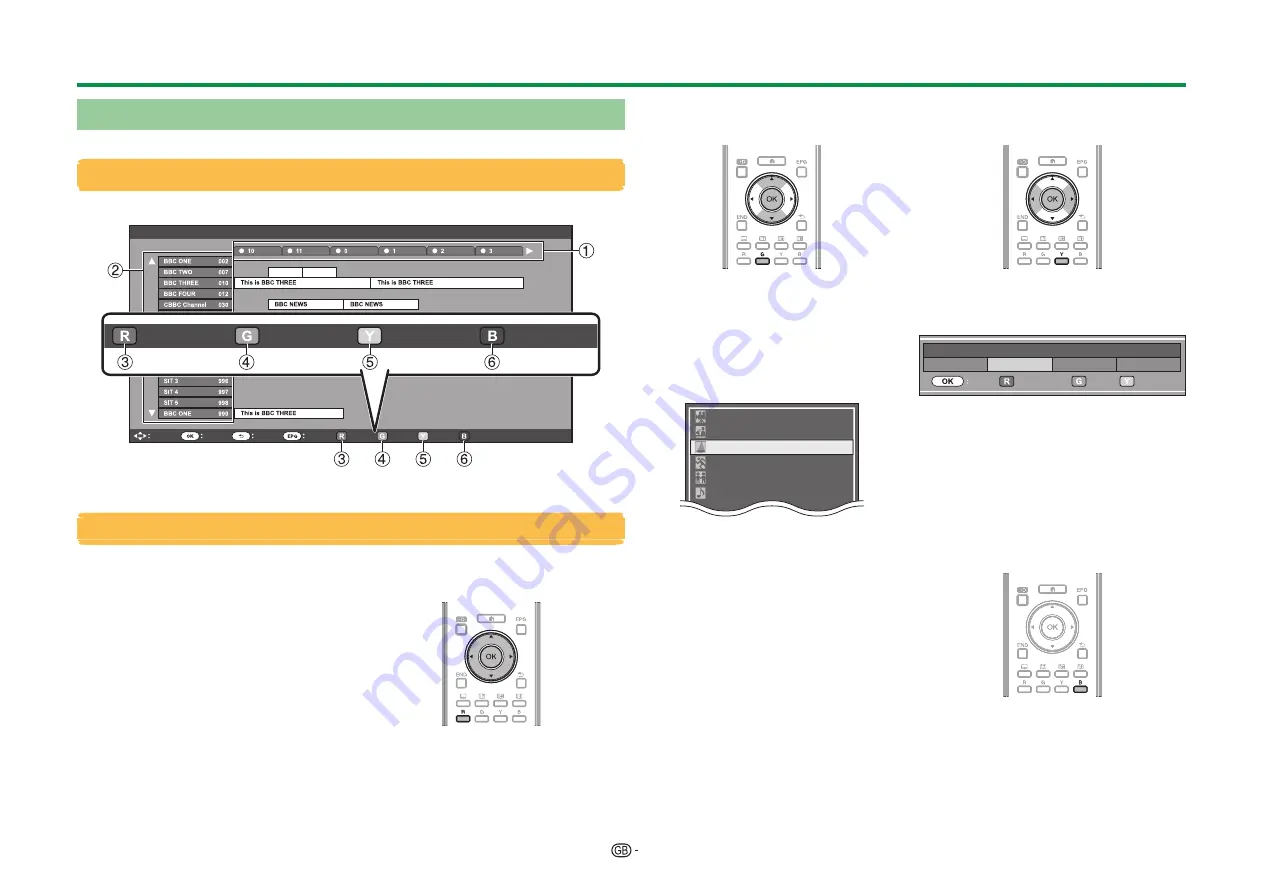
Selecting a programme using EPG

The illustrations on this page are explained using three digit services.

Display/Close the EPG screen

Press 

EPG

.

Select

Enter

Back

Exit

AM

PM

Programme info.

Search by genre

Search by date

Timer list

NOTE

•  You can also display the EPG screen from “TV Menu” > “EPG” > “EPG”.

 Select a programme


1

Select the time span

Press 

c/d

 to select the time span 

you want to search.

•  Continue to press 

d

 to display 

programmes in the next time span.


2

Select the desired 
programme

Press 

a/b

 to select the desired 

programme.

• If 

a

 or 

b

 are displayed on the left of 

the services, continue to press 

a/b


to display next or previous screen.


3

Check programme 
information


1

Press 

a/b/c/d

 to select the 

programme you want to check.


2

Press 

R

, and then press 

;

 to tune 

to the selected programme.


4

Search a programme in a 
category


1

Press 

G

.


2

Press 

a/b

 to select the desired 

genre, and then press 

;

.


3

Press 

a/b

 to select a programme 

you want to watch, and then press 

;

.

•  Refer to page 19 for the genre setting.

News/Current affairs

Movie/Drama

Show/Game show

Sports
Children’s/Youth programmes
Music/Ballet/Dance

NOTE

•  You can also display this setting screen 

from “TV Menu” > “EPG” > “Search by 
genre”.


5

Search for a programme by 
date/time


1

Press 

Y

.


2

Press 

c/d

 to select the desired 

time span, and then press 

;

.

Back to EPG

Enter

Enter

+1 Week

Today

0 AM - 6 AM

6 AM - 0 PM

0 PM - 6 PM

6 PM - 0 AM


3

Press 

a/b

 to select the desired 

programme, and then press 

;

.

NOTE

•  You can also display this setting screen 

from “TV Menu” > “EPG” > “Search by 
date”.


6

 Display the timer list for TV 
programmes

Press 

B

.

•  Refer to page 21 for the timer setup.

Watching TV

Summary of Contents for LC-60UD20E

Page 1: ...MODEL LC 70UD20E LC 70UD20EN LC 70UD20KN LC 60UD20E LC 60UD20EN LC 60UD20KN OPERATION MANUAL LCD COLOUR TELEVISION ...

Page 2: ... of conformity may be consulted at http www sharp eu documents of conformity NOTE This LCD TV is designed for indoor use only CE Statement Hereby SHARP Electronics declares that the 3D glasses are in compliance with the essential requirements and other relevant provisions of Directive 1999 5 EC The declaration of conformity may be consulted at http www sharp eu documents of conformity ...

Page 3: ... 43 Additional features 46 Miracast Mirroring 48 Other useful features 49 USB recording 49 How to operate USB recording 50 SD USB media Home network 53 Selecting the picture size for photo mode 54 USB device compatibility 56 Home network server compatibility 56 Selecting the picture size for video mode 56 Connecting a PC 57 Connecting a PC 57 Displaying a PC image on the TV 57 PC control of the TV...

Page 4: ...shock hazard do not place the AC cord under the TV set or other heavy items Headphones Do not set the volume at a high level Hearing experts advise against extended listening at high volume levels Do not display a still picture for a long time as this could cause an afterimage to remain There is power consumption always if main plug is connected Servicing Do not attempt to service the product your...

Page 5: ... poles and when loading the battery Follow the correct procedure when loading the battery Loading the battery incorrectly may damage the battery or cause it to leak battery fluid which could result in a fire injury or damage Handling the 3D glasses Do not drop exert pressure on or step on the 3D glasses Doing so may damage the glass section which may result in injury Be careful not to trap your fi...

Page 6: ... to storage conditions If you will not be using the remote control unit for an extended period of time remove the batteries from it Note on disposing batteries The batteries provided contain no harmful materials such as cadmium lead or mercury Regulations concerning used batteries stipulate that batteries may no longer be thrown out with the household rubbish Deposit any used batteries free of cha...

Page 7: ... be viewed via HDMI4 only WARNING Excessive sound pressure from earphones and headphones can cause hearing loss Do not set the volume at a high level Hearing experts advise against extended listening at high volume levels NOTE Use a product with the specified dimensions for optimal connection to HDMI cable USB device HDMI Body depth 12 mm or less length 32 mm or less USB Body depth 10 mm or less l...

Page 8: ... command ATV DTV SAT Display CH list when no other Menu screen is running E ATV DTV SAT Exit the Menu screen AQUOS NET Return to the start page RCONTROL Pages 50 52 and 55 Display a panel to operate some functions on the screen Tp Display information Page 17 Display the station information channel number signal etc on the screen P INFO Display programme information transmitted through digital vide...

Page 9: ...EC 169 2 75 q coaxial cable o Connect the satellite antenna cable p Insert a CA card into the CI slot to watch scrambled broadcasts Page 9 q Plug in the AC cord 2 Preparation Setting the TV n Press a on the TV Page 16 o Run the initial auto installation Page 12 w Language setting w Home Store setting w Country setting w PIN setting w Channel search setting Digital search Terrestrial Cable Analogue...

Page 10: ...Be sure to turn off the TV and any devices before making any connections Switch input sources Page 16 2 Enjoy photos music and video stored in SD USB media Home network Pages 53_56 3 Display a PC image on the TV screen Pages 57_61 4 Enjoy internet service with the TV Pages 10 and 62_64 The following service is now available YouTube Page 10 Net TV Pages 62 64 5 Watch 3D images Pages 65_74 Some menu...

Page 11: ...d played back CI plus 1 3 Standard CI Plus is an advanced development of the DVB Common Interface Standard 1 Regarding security There are some regulations in recording functions The playback of encrypted programmes is strongly dependent on which CA module is used The playback of encrypted recordings may sometimes not be possible or only during limited time Programme providers who use the CI Plus s...

Page 12: ...RP Corporation for clearly displaying easy to read characters on LCD screens Tips HOME menu contents Main information display zone Featured and recommended function zone Other function icons Main information display zone Various information including the time currently displayed programming and current setting status are shown Switching between the current setting status can be done using the colo...

Page 13: ...d input modes but the operating procedures are the same Items with 4 cannot be selected for various reasons Some items cannot be selected depending on signal types optional settings or connected devices Using Software keyboard Use the software keyboard when you need to input text Char Set Caps Done Cancel SP Delete Clear Cursor Left Caps Char Set Cursor Right 1 8 7 6 2 3 4 9 10 11 5 1 Char Set Cha...

Page 14: ...ng is skipped 2 Enter a four digit number as a PIN using the 0 9 buttons 3 Enter the same four digit number as in step 2 to confirm 4 Press NOTE When France or Italy is selected in the country setting the PIN code setting cannot be skipped 0000 cannot be set as the PIN code When the PIN code setting is skipped the default PIN code 1234 will automatically be set To change the PIN setting refer to I...

Page 15: ...ls the screen switches to the Satellite search setting Page 14 Menu Description Selectable items Scrambled stations Specifies if you need to add pay TV services Yes No Search method Specifies how you search for channels 2 Channel Frequency Quick Start frequency From 47 0_858 0 MHz Network ID Specifies the network 3 None 0_65535 Symbol rate 1 Symbol rate 2 1 Input the value received for CATV 4 1000...

Page 16: ...nna follow the procedure below in order to supply the voltage specified by your service provider etc Go to TV Menu Setup View setting Channel settings Antenna setup DIGITAL Satellite setup Change setting Communal satellite system E Search start DVB S S2 channel searching 1 Press c d to select Yes and then press To change the settings for Scrambled stations press a b to select the item to be reconf...

Page 17: ...meric buttons Channel strength of DVB T T2 Supply voltage CH No Current Max Signal strength MHz Signal strength Frequency Channel strength Current Max Quality Channel strength of DVB C Supply voltage Current Max Signal strength MHz Signal strength Frequency Symbol rate QAM modulation Channel strength Current Max Quality Channel strength of DVB S S2 Current Max Signal strength MHz Signal strength F...

Page 18: ...g digital broadcasts Watching analogue broadcasts Watching satellite broadcasts NOTE If multiple satellite services are set each time you press the SAT button the channel switches as follows SAT1 SAT2 SAT3 SAT4 Changing channels With r s With 0_9 Selecting an external video source Once the connection is made press b to display the INPUT screen and then press b or a b to switch over to the appropri...

Page 19: ... p on the remote control unit DTV mode ATV mode Audio ENG STEREO Video Subtitle Off New information MONO Auto Subtitle I Four digit numbers e g 0001 are displayed after selecting the five Nordic countries in the country setting or for some cable operators Also operator profiles use four digits SAT mode Audio ENG STEREO Video Subtitle Off New information J Satellite channels are displayed by four d...

Page 20: ...etting Manual adjust this will be deleted from both the CH list and My favourite list Selecting channels from My favourite list 1 How to move between My favourite list and CH list 1 Press the button when you watching DTV or SAT to bring up the CH list 2 Press the d key and select My favourite list 2 Move up and down the displayed channel list by using the a b keys then press the button to select t...

Page 21: ...splay on the screen Go to TV Menu Setup Option EPG setup Display range setup Item Mode 1 Wide angle Displays six hours of programme information Mode 2 Zoom Displays three hours of programme information Mode 3 Vertical angle Changes to the EPG display format with a vertical time span Option Genre icon setup You can grey out or place a mark on desired genres and smoothly search for programmes you fr...

Page 22: ... programme you want to check 2 Press R and then press to tune to the selected programme 4 Search a programme in a category 1 Press G 2 Press a b to select the desired genre and then press 3 Press a b to select a programme you want to watch and then press Refer to page 19 for the genre setting News Current affairs Movie Drama Show Game show Sports Children s Youth programmes Music Ballet Dance NOTE...

Page 23: ...on A CAM CI Plus v1 3 PIN code may be necessary to record broadcasts scrambled due to parental rate settings When a CAM PIN code is required for recording a programme it is necessary to enter the CAM PIN code in advance Page 9 If a CAM PIN code is not entered or is entered incorrectly the programme may not be able to be recorded played back Cancelling the timer setup 1 Press EPG 2 Press a b c d to...

Page 24: ...ill not work in 3D mode Buttons for teletext operations Buttons Description r s Increase or decrease the page number Numeric buttons 0_9 Directly select any page from 100 to 899 by using the 0_9 numeric buttons Colour R G Y B Select a group or block of pages displayed in the coloured brackets at the bottom of the screen by pressing the corresponding colour R G Y B on the remote control unit k Reve...

Page 25: ...ion Please navigate HOME Network setup View setting Data service setting Set the HbbTV service starting settings On Off Go to TV Menu Setup View setting Data service setting NOTE If Data service setting is set to On the TV will load the Hbb TV pages automatically To avoid automatic loading you can set to Off Subtitles for teletext may not display when HbbTV service is started In such cases set to ...

Page 26: ...visual quality to maximise the potential of the TV and the connected device Connection method for other devices w PC Æ Page 57 w USB HDD Æ Page 49 w SD USB media Æ Page 53 w Internet Æ Pages 62 and 63 NOTE You can connect 4K equipment to all HDMI terminals Please use HDMI cable of high speed type when connecting 4K equipment Connecting external devices Audio device Page 27 Video recording device P...

Page 27: ...pending on the type of HDMI cable connected refer to page 44 for details HDMI certified cable 1 Press b to select HDMI 3 from the INPUT menu and then press 2 Go to TV Menu Setup Option Terminal setting Audio select select HDMI DVI HDMI cable 1 Press b to select HDMI 3 from the INPUT menu and then press 2 Go to TV Menu Setup Option Terminal setting Audio select select HDMI Analogue NOTE If a connec...

Page 28: ... SCART cable commercially available If you change TV channels during recording from the external devices or turn off the power on the TV the recorded content may change or be interrupted The external output may not be performed depending on the status of use You will enjoy accurate colour reproduction and high quality images through the EXT 2 terminal when connecting a DVD player recorder or other...

Page 29: ...your hearing NOTE If the image is not in sync with the audio check the settings of the connected surround system E After connecting Digital audio output setting After connecting an amplifier with digital audio input and external speakers as shown you should set an audio output format compatible with the programme you are watching or the device connected Go to TV Menu Setup Option Terminal setting ...

Page 30: ...INK w Multiple control of HDMI devices You can select which HDMI device to operate using the Link operation menu NOTE When you use AQUOS LINK make sure to use a certified HDMI cable Point the remote control unit toward the TV not to the connected HDMI device Video noise may occur depending on the type of HDMI cable used Make sure to use a certified HDMI cable Up to three HDMI recording devices one...

Page 31: ...hen using the HDMI 1 terminal NOTE Refer to the operation manual of the device to be connected for further details After unplugging connection cables or changing the connection pattern turn on the power of the TV after all relevant devices power have been turned on Change the external input source by pressing b select the appropriate external source and verify the audiovisual output The cables ill...

Page 32: ... can send audio data for video content shown on the TV to a connected audio device with just one ARC compatible cable Using this function eliminates the need to use a separate digital or analogue audio cable Connection for using Audio return channel You need to use ARC compatible cables devices and connect to the HDMI 1 terminal to activate this function The connection method is the same as Connec...

Page 33: ... can call up the CEC compatible recorder s EPG and preset timer recordings using the TV s remote control 1 Press a b to select Recorder EPG and then press The external input source switches and the recorder s EPG is displayed 2 Select the programme to record Refer to the operation manual of the recorder for details Change audio output device By AQUOS audio SP You can choose to listen to the TV sou...

Page 34: ...lly This function operates when AQUOS LINK Control is set to On See page 30 E Auto Input Selection When an MHL compatible device is connected while the TV is on the input mode is selected automatically This function operates when AQUOS LINK Control is set to On See page 30 E Operation Using the Remote Control The remote control of the TV can be used to operate a portable device a b c d 0 9 etc The...

Page 35: ...illumination or ambient brightness GAME For playing of video games PC 1 For PC PHOTO Optimum picture for viewing a photo you have taken by digital camera USER Allows you to customise settings as desired You can set the mode for each input source DYNAMIC For a clear cut image emphasising high contrast for sports viewing DYNAMIC Fixed For a clear cut image emphasising high contrast for sports viewin...

Page 36: ...s function adjusts the brightness of a selected colour using a six colour adjustment system Resolution This function adjusts the finess of images for each portion Item Detail Enhance the resolution feeling of finest portion Narrow edge Enhance the resolution feeling of fine portion Wide edge Enhance the resolution feeling of smooth portion Local contrast control This function adjust a sense of con...

Page 37: ...ormal viewing mode Active contrast Automatically adjusts the contrast of an image according to the scene On Off NOTE Active contrast is not available in case of 4K input DNR DNR produces a clearer image Auto High Middle Low Off NOTE This function may not be available depending on the input signal type Range of OPC The brightness level range of the OPC sensor s automatic adjustments can be set acco...

Page 38: ...sound quality by extending the selected range All Range The low range will be extended and the sounds in the medium and high ranges which have been lost due to the data being compressed will be restored This setting is effective when playing back audio through a wireless interface such as when using Bluetooth playback Low Range The low range will be extended Off No adjustment Audio Clear voice Thi...

Page 39: ...s not work when AV mode is set to DYNAMIC Fixed or MOVIE THX E Energy save status icons Icon Description Energy save is set to Standard Energy save is set to Advanced When Energy save is set to Standard or Advanced Energy save status icons appear in the Picture menu and channel information windows ECO No signal off When set to Enable the TV will automatically enter standby mode if there is no sign...

Page 40: ...yed Refer to the Satellite search setting on page 14 NOTE After selecting Next in the DVB S S2 setting screen you need to select your preferred satellite broadcast to start searching View setting Programme setup You can reconfigure the DTV service settings automatically or manually 1 Go to TV Menu Setup View setting Channel settings Programme setup 2 Press a b to select the broadcast standard you ...

Page 41: ...rvices automatically after Digital search in the Auto installation menu has been completed Follow steps 1 to 5 in Searching for cable broadcasts on page 13 E Manual search Normal Add new services within a specified frequency band After setting the items on the following screen the TV starts searching Special Use this option only when no channels can be found by Normal Refer to the table about menu...

Page 42: ...t each character of the new name for the channel with using the software keyboard Page 11 NOTE The name can be five characters or less Skip Channels with Skip set to On are passed over when using r s even if selected while watching the image from the TV Lock You can block the viewing of any channel NOTE See PIN for setting a PIN When Lock is set to On for a channel Child lock has been activated di...

Page 43: ...rental rating This function allows DTV services to be restricted It prevents children from watching violent or sexual scenes that may be harmful 1 Go to TV Menu Setup View setting Individual setting Parental rating 2 Repeat steps 1 to 4 in when selecting Yes to the left NOTE Universal viewing and Parental approval pref are ratings used exclusively in France Refer to page 84 for details about ratin...

Page 44: ...s E 1st language E 2nd language E For hearing impaired E Switching subtitle languages Each time you press on the remote control unit the subtitle switches Off 1st language 2nd language E Set For hearing impaired to Yes Subtitles for the hearing impaired have priority over each of the subtitle language settings e g 1st language 2nd language etc EXAMPLE 1st language For hearing impaired 1st language...

Page 45: ...e source has lower resolution The items will be diplayed in ATV DTV SAT mode Item for HD High Definition signals Full Displays with an overscan image Crops all sides of screen Underscan Displays with an underscan image only when receiving a 720p signal Displays with the High Definition image adjusted optimally Noise may appear on the edge of the screen with some programmes Dot by Dot Displays an i...

Page 46: ...nected external equipment Press OK to reset the related skipping setting so that the input terminal becomes available Input source settings Option Input select For setting the signal type of external equipment 1 Press b to select the input source for setting the input signal EXT1 from the INPUT menu and then press 2 Go to TV Menu Setup Option Terminal setting Input select Item EXT1 Y C CVBS RGB EX...

Page 47: ...ing the headphones Audio outputs from the speakers regardless of the settings Option Colour system You can change the colour system to one that is compatible with the image on the screen Go to TV Menu Setup Option Colour system NOTE The factory preset value is Auto If Auto is selected the colour system for each channel is automatically set If an image does not display clearly select another colour...

Page 48: ...n the memory all the images will be displayed in a slideshow NOTE Images are displayed as a slideshow in 3 minute intervals As a USB device or SD memory card cannot be detected immediately after the TV is turned on from standby mode the wallpaper pre installed in the TV may be displayed even when Data source is set to SD USB To display the SD USB Wallpaper turn on the power and wait 10 seconds bef...

Page 49: ...rtphone to the TV by Bluetooth you can listen its sound through the TV E Addition of a Bluetooth Device Go to TV Menu Setup View Setting Bluetooth setup Pairing new device You can connect 3 kinds of Bluetooth devices listed below Keyboard device Mouse device Audio input device Connection Selection Procedure 1 Press to select the device you want to connect 2 Press to select Search and then press OK...

Page 50: ...t device Miracast function has two connection modes PUSH Button Mode and PIN code Mode User can select connection method in TV menu When the connection is made device screen will be displayed in the TV E PUSH Button mode 1 Change input source to Miracast by pressing b on R C 2 In Miracast device smartphone tablet enable Miracast function The device starts to search for the TV with Miracast in stan...

Page 51: ...eatedly USB HDD registration It is necessary to first perform USB HDD registration for USB HDDs used for USB recording Directly connect only one USB HDD to the USB port while registering the USB HDD when two or more USB HDDs are connected USB HDD registration is not available The screen prompt pops up When the USB HDD is connected to the TV Register the USB HDD Follow the on screen instructions to...

Page 52: ... reverse speed changes in three levels J Fast forward each time you press this button the fast forward speed changes in three levels K Jump backward to the previous chapter point L Jump forward to the next chapter point a Playback will resume after jumping backward by the time interval you set in Jump time setting Page 52 b Playback will resume after jumping forward by the time interval you set in...

Page 53: ... be necessary to record broadcasts scrambled due to parental rate settings When a CAM PIN code is required for recording a programme it is necessary to enter the CAM PIN code in advance Page 9 If a CAM PIN code is not entered or is entered incorrectly the programme will not be able to be recorded played back EPG timer setup You can select the programme you want to record and set the timer setting ...

Page 54: ...he remote control unit or select Control USB REC from TV Menu Setup Option Option for view View setting Auto input selection You can choose whether or not to switch the input source automatically when receiving an AQUOS LINK or an Euro SCART compatible signal on the TV during USB recording operations Go to TV Menu Setup View setting USB REC setting Auto input selection Item Enable Release USB reco...

Page 55: ...has a file size limitation of 30 MB Selecting the mode Common operation Select SD USB media or Home network from the HOME or INPUT menu to enter this mode Selecting modes and drives servers 1 Press B When the SD USB media menu is displayed 1 Press a b to select Select USB drive and then press The available selections are Select USB drive and Folder display setting 2 Press a b c d to select the USB...

Page 56: ...use music B button Display USB media menu Set all BGM Reset all BGM USB device removal Wide mode The mode selected in Folder display setting NOTE Slide show BGM will be reset in the cases below Select Reset all BGM by pressing B during selecting music files Go back to the top menu Change the INPUT When there are invalid music files the g mark will be displayed for the file The displayed play time ...

Page 57: ...media mode Buttons Description When video is being played Pause the video When video is paused Play the video a Cursor Go to the beginning of a file by pressing a once and the previous file by pressing a twice b Cursor Go to the next file c d Cursor Reverse fast forward a video 6 Go back to the file selection screen 3D Switch between 2D and 3D modes R button Start playback from the previously stop...

Page 58: ...MKV DivX 3 11 4 x 5 1 6 0 XviD H 264 MPEG4 MP3 Dolby Digital DTS LPCM ADPCM asf wmv ASF DivX 3 11 4 x 5 1 6 0 XviD MPEG4 VC 1 Windows Media Video v9 MP3 Dolby Digital LPCM WMA mp4 mov MP4 H 264 MPEG4 Motion Jpeg MP3 Dolby Digital Dolby Digital Plus AAC mpg mpeg PS MPEG2 MPEG1 Dolby Digital MPEG LPCM flv FLV Sorenson H 264 MP3 AAC NOTE Progressive format jpeg files are not supported Files in USB 1 ...

Page 59: ...nection via the PC terminal a cable with ferrite cores is recommended The PC input terminals are DDC 2B compatible Refer to page 59 for a list of PC signals compatible with the TV Displaying a PC image on the TV Selecting the picture size You can select the picture size 1 Press f The Wide mode menu displays 2 Press f or a b to select the desired item EXAMPLE Normal Full Item Normal Keeps the origi...

Page 60: ...D images converted from 2D images or normal 2D images Adjusting the PC image manually Option Fine sync Ordinarily you can easily adjust the picture as necessary to change image position using Auto sync In some cases however manual adjustment is needed to optimise the image 1 Press b to select PC from the INPUT menu and then press 2 Go to TV Menu Setup Option Terminal setting PC signal setting Fine...

Page 61: ...GA 1 600 x 1 200 75 0 kHz 60 Hz 1080p 1 920 x 1 080 67 5 kHz 60 Hz 2160p 4K 3 840 x 2 160 24 Hz 25 Hz 30 Hz 60 Hz VGA SVGA XGA WXGA SXGA SXGA and UXGA are registered trademarks of International Business Machines Corporation NOTE This TV has only limited PC compatibility correct operation can only be guaranteed if the video card conforms exactly to the VESA 60 Hz standard Any variations from this s...

Page 62: ... then press OK Communication conditions for RS 232C RS 232C serial control cable cross type commercially available Set the RS 232C communications settings on the PC to match the TV s communications conditions The TV s communications settings are as follows Baud rate 9 600 bps Data length 8 bits Parity bit None Stop bit 1 bit Flow control None Communication procedure Send the control commands from ...

Page 63: ...0 WIDE MODE W I D E 0 _ _ _ TOGGLE AV W I D E 1 _ _ _ NORMAL AV W I D E 2 _ _ _ ZOOM 14 9 AV W I D E 3 _ _ _ PANORAMA AV W I D E 4 _ _ _ FULL AV USB Video Home network Video W I D E 5 _ _ _ CINEMA 16 9 AV W I D E 6 _ _ _ CINEMA 14 9 AV W I D E 7 _ _ _ NORMAL PC W I D E 8 _ _ _ CINEMA PC W I D E 9 _ _ _ FULL PC W I D E 1 0 _ _ DOT by DOT AV PC W I D E 1 1 _ _ UNDERSCAN AV W I D E 1 2 _ _ AUTO USB V...

Page 64: ...le connection speed is required to play back streaming content Use an Ethernet connection if the wireless LAN speed is unstable Please use Category 5 ETHERNET cable Wired installation Use an ETHERNET cable to connect the ETHERNET terminal on the TV to your broadcast router as shown below This is recommended when enjoying services which require stable connection speeds such as streaming media E Wir...

Page 65: ... 4 Confirm the WPS location and then press to go to the next step 5 Perform Connection test after the connection is completed Press c d to select Yes and then press 6 The connection test result will be displayed on the screen Follow the on screen instructions for the settings after this step NOTE When not using Push button perform the settings from Network setup Manual setup Connection type To con...

Page 66: ...te Netflix refer to Netflix help on page 78 Operations in Net TV Basic operation The illustrations on this page are for explanation purposes They are subject to change without notice E Display the start page Go to HOME AQUOS NET NOTE When switching to Net TV a message which requests a software update may display in some cases E Select a service Press a b c d to select the desired service and then ...

Page 67: ...eyesight before viewing 3D images The 3D glasses can be worn over eyeglasses When viewing 3D images keep the 3D glasses horizontally level with the TV screen If you tilt the 3D glasses with respect to the TV screen the images viewed by the left and right eyes may appear significantly different or images may appear overlapping View 3D images at the appropriate distance from the TV screen The recomm...

Page 68: ...er button is pressed for less than 2 seconds with the power off the 3D glasses will turn to standby When the 3D glasses are in 3D mode with the power on pressing the power button for less than 2 seconds will turn the 3D glasses to 2D mode When the 3D glasses are in 2D mode with the power on pressing the power button for less than two seconds will turn the 3D glasses to 3D mode When paired the 3D g...

Page 69: ... are being used nearby In such case turn off other devices and try pairing again Switching to 3D and 2D Mode When viewing 3D images you can press the power button to switch between 2D and 3D modes This is useful when several people are viewing 3D images on the same TV with some people wanting to watch in 3D and some people wanting to watch in 2D E Viewing 2D images When you press and hold for less...

Page 70: ...he battery holder Pull the battery holder all the way out 3 Replace the battery 1 Use the tip of a ballpoint pen or similar object to remove the battery 2 Insert a new battery Insert the battery with the negative side facing up 4 Align the battery holder with the battery slot on the 3D glasses and slide it back into place Press it in until it locks NOTE Take care not to reverse the battery poles a...

Page 71: ...g other than 3D images If you lie on your side while watching the TV with 3D glasses the picture may look dark or may not be visible Be sure to stay within the viewing angle and optimum TV viewing distance when watching 3D images Otherwise you may not be able to enjoy the full 3D effect The 3D glasses may not work properly if there is any other 3D product or electronic devices turned on near the g...

Page 72: ...ottom Creates 3D images from 3D images displayed on the top and bottom The image is split into a top and bottom image and then the images are stretched and displayed sequentially to create a 3D image 2D mode without using the 3D glasses Side by Side s 2D Creates 2D images from 3D images displayed side by side Only the left image is stretched and displayed The image does not appear in 3D Top and Bo...

Page 73: ...to 2D mode 1 Press 3D during the 3D mode 2 Select Yes and then press to switch to 2D mode 3 Take off the 3D glasses and turn off the power of the 3D glasses NOTE If the input signal switches to 2D 2D images are displayed automatically 3D mode is canceled automatically when the setting is changed input source is changed the input signal resolution is changed or the power is turned off Receiving a 3...

Page 74: ...d buttons to make the necessary settings Buttons Description G button Surround Page 36 The surround mode changes each time you press G Y button 2D s 3D convert effect Page 73 2D s 3D convert effect is available only when selecting 2D s 3D refer to Watching 2D images in 3D shown to the left B button 3D setup Page 73 Configuring the TV settings to enhance 3D image viewing You can make various settin...

Page 75: ...10 0 is the level where no adjustment is made factory preset value NOTE This function can be adjusted when viewing 3D still images in USB media mode If you experience discomfort while viewing 3D images immediately discontinue viewing 2D s 3D convert effect You can adjust the 3D effect when converting images from 2D mode to 3D mode Select a desired level of convert effect from e1 to e16 NOTE This f...

Page 76: ...3D to switch to 3D mode Page 73 If 3D auto change is set to Mode1 or Mode2 but no 3D images are displayed check the display format of the content being viewed Some 3D image signals may not be recognized as 3D images automatically Press 3D to select the appropriate display format for the 3D image Page 73 Is the power of the 3D glasses turned on Press the power button for at least 2 seconds to turn ...

Page 77: ...e 59 Is the picture adjustment correct Pages 33_35 Is the antenna connected properly Page 7 Refer to Picture Audio test Page 77 No sound Is the volume too low If you do not clearly hear the sound for the visually impaired go to TV Menu Setup Audio Audio description setting Mix level and select the upper level to turn up the volume Make sure that headphones are not connected Check if you pressed e ...

Page 78: ...ues 1 Go to TV Menu Setup View setting Reset 2 Press c d to select Yes and then press Now TV will restart automatically OK displays on the screen 3 Press c d to select Yes and then press Now initialising displays on the screen and blinks After the reset has completed the power shuts off and then comes back on The screen will have returned to its original settings NOTE PIN input is required when ex...

Page 79: ...carry out other operations while downloading Cancels the download by pressing on the remote control unit when Discontinue is displayed on the screen during the update No Does not perform downloading The download will start at the date and time for the scheduled download Turn on the power of the TV before the scheduled time for downloading or keep it in standby mode NOTE Updating the software may t...

Page 80: ...update You can also update the software through the network Go to TV Menu Setup Information Software update Network update and follow the on screen instruction A broadband connection and Network setup are required to update the software using the internet Pages 62 63 2 Press and then insert the USB device containing the software update file CAUTION Be sure to insert the USB device correctly into t...

Page 81: ...ogle Inc The Wi Fi CERTIFIED Logo is a certification mark of the Wi Fi Alliance The Wi Fi Protected Setup Mark is a mark of the Wi Fi Alliance Wi Fi CERTIFIED Miracast and Miracast are trademarks of Wi Fi Alliance DLNA the DLNA Logo and DLNA CERTIFIED are trademarks service marks or certification marks of the Digital Living Network Alliance MHL the MHL Logo and Mobile High Definition Link are trad...

Page 82: ...ademark Office and may be registered in certain jurisdictions Tioga is a trademark of Monotype Imaging Inc and may be registered in certain jurisdictions Letter Gothic is a trademark of The Monotype Corp and may be registered in certain jurisdictions iType is a trademark of Monotype Imaging Inc registered in the United States Patent and Trademark Office and may be registered in certain jurisdictio...

Page 83: ... USB DC 5 V 500 mA ETHERNET Network connector HDMI 3 PC AUDIO L R Ø 3 5 mm jack 2 DIGITAL AUDIO OUTPUT Optical S PDIF digital audio output C I Common Interface EN50221 R206001 CI Plus specification OUTPUT Headphones RCA pin AUDIO L R Ø 3 5 mm jack audio output SD CARD SD SDHC memory card OSD language Arabic Bulgarian Chinese Croatian Czech Danish Dutch English Estonian Finnish French German Greek ...

Page 84: ... metal When placed near objects that obstruct the signal When used with other wireless devices that emit the same frecuency When used in the vicinity of microwave ovens and other devices that emit a magnetic field electrostatic charge or electromagnetic interference When there is significant interference in the 2 4_GHz frequency such as from other wireless LAN devices Bluetooth devices 2 4_GHz cor...

Page 85: ...V Please purchase them at your nearest shop Mounting the LCD colour TV requires special skills and should only be performed by qualified service personnel Customers should not attempt to do the work themselves SHARP bears no responsibility for improper mounting or mounting that results in accident or injury You can ask qualified service personnel about using an optional bracket to mount the TV to ...

Page 86: ...ion DTV Digital TV DVB C Digital Video Broadcasting Cable DVB S Digital Video Broadcasting Satellite DVB S2 Digital Video Broadcasting Satellite Second Generation DVB T Digital Video Broadcasting Terrestrial DVB T2 Digital Video Broadcasting Terrestrial Version 2 DVI Digital Visual Interface EPG Electronic Programme Guide HbbTV Hybrit Broadcast Broadband TV HDCP High bandwidth Digital Content Prot...

Page 87: ...ensional drawings I Active area J Thinnest part except of terminal height NOTE Dimensions do not include protrusions such as screws and some parts LC 60UD20E LC 60UD20EN LC 60UD20KN LC 70UD20E LC 70UD20EN LC 70UD20KN ...

Page 88: ... purchasing decision that contributes to the protection of the environment and to a lower carbon society The figure below shows the advanced label design and explains the information included For further information please visit the Sharp internet homepage http www sharp eu The retailer or online shop where you purchased your television from would have displayed the label and its corresponding rat...

Page 89: ...14P09 PL NE ...

Reviews: