background image

21

LC-43LB601U / LC-50LB601U / LC-43LB601C / LC-50LB601C

43" / 50" Full HD LED 1080p Sharp Roku TV

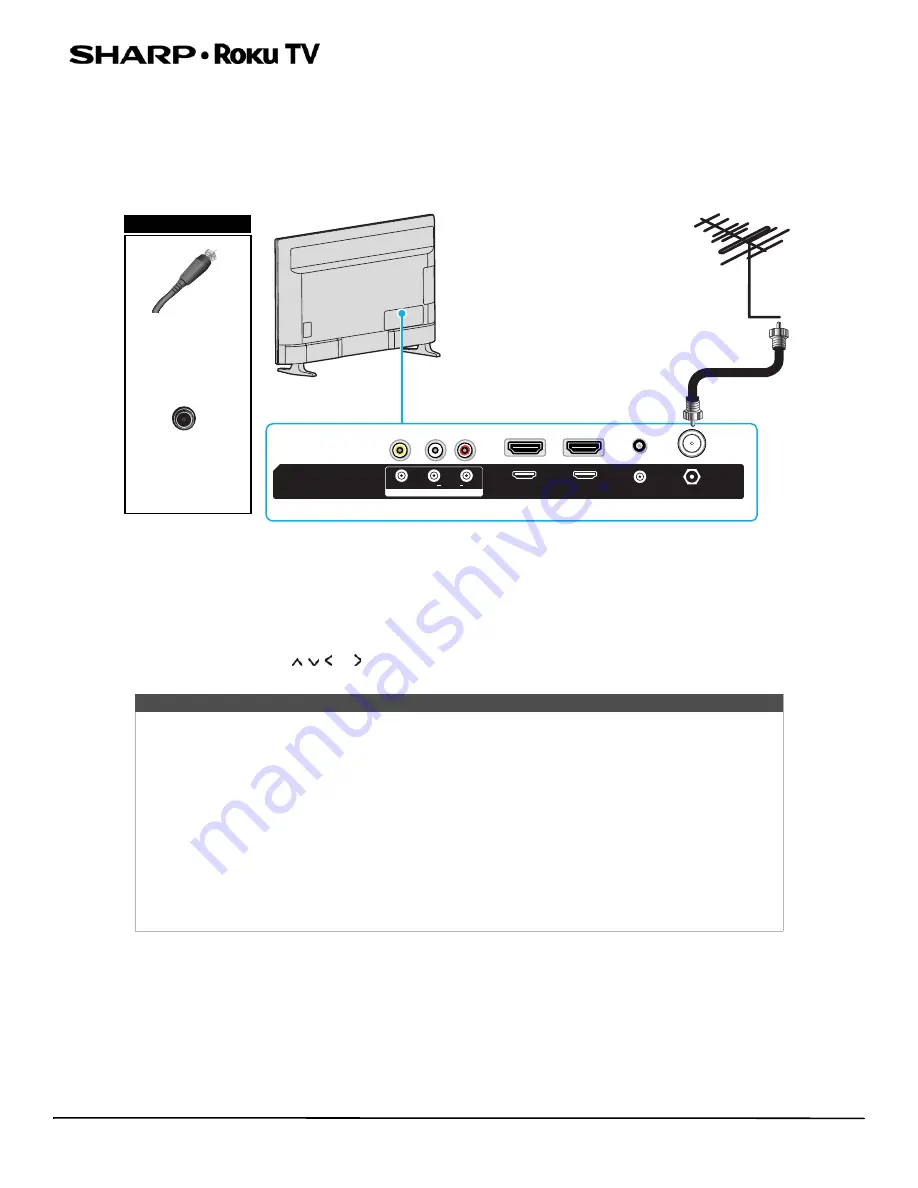
Connecting an antenna or cable TV (no box)

1

Make sure that your TV’s power cord is unplugged and all connected devices are turned off.

2

Connect a coaxial cable (not provided) to the 

ANT/CABLE IN 

jack on the back of your TV and to the antenna or cable TV 

wall jack.

3

Plug your TV’s power cord into a power outlet, then turn on your TV.

4

On the 

Home

 screen, press       or   to highlight the 

Antenna TV

 tile, then press 

OK

. If you have not set up the TV 

tuner, follow the on-screeen instructions.

AUDIO OUT

AV IN

VIDEO

AUDIO

L

R

ANT

/

CABLE

HDMI2

HDMI1(ARC)

Coaxial cable

Antenna or cable TV 

(no box)

Back TV

Coaxial cable 

connector

ANT/CABLE 

jack

On your TV

Notes

• Use a coaxial cable to eliminate interference and noise from radio waves.
• Do not bundle the coaxial cable with the power cord or other cables.
• If the antenna is not installed correctly, contact qualified service personnel to correct the problem.
• If the signal level for a channel is weak, the picture may be distorted. Adjust the antenna or use a 

highly directional outdoor or set-top antenna with a built-in amplifier.

• If the picture quality is good on some channels and poor on others, the problem may be caused by 

a poor or weak signal from the broadcaster or cable TV provider.

• If you connect to cable TV without a set-top box and experience poor picture quality, you may 

need to install a set-top box to improve signal reception and picture quality. Contact your cable TV 
provider about upgrading to a set-top box.

• Many high-definition (HD) channels upscale standard-definition (SD) content. The picture 

displayed on your TV is still displayed as SD, thus the picture quality will not be as clear or crisp as it 
would be if the content was originally recorded in HD.

Summary of Contents for LC-43LB601C

Page 1: ...USER GUIDE Before using your new product please read these instructions to prevent any damage Full HD LED 1080p TV LC 43LB601U LC 50LB601U LC 43LB601C LC 50LB601C 43 50 CLASS 42 5 Diagonal 49 5 Diagonal ...

Page 2: ... 15 What connection should I use 17 Connecting a cable or satellite box 18 HDMI best 18 AV good 19 Coaxial good 20 Connecting an antenna or cable TV no box 21 Connecting a DVD or Blu ray player 22 HDMI best 22 AV good 23 Connecting a game console 24 HDMI best 24 AV good 25 Connecting a computer 26 Connecting a USB flash drive 27 Connecting headphones 28 Connecting external speakers or a sound bar ...

Page 3: ... your TV 35 Maintaining 35 Cleaning your TV cabinet 35 Cleaning your TV screen 35 Troubleshooting 36 FAQ 36 Video and audio 36 Remote control 39 General 40 Roku 41 Network 41 CEC compatible devices 42 Specifications 44 43 inch LC 43LB601U 44 50 inch LC 50LB601U 45 Legal notices 46 One year limited warranty Sharp Televisions 50 ...

Page 4: ...d over pulled or grabbed WALL OR CEILING MOUNT YOUR TELEVISION ALWAYS contact your retailer about professional installation if you have any doubts about your ability to safely mount your television ALWAYS use a mount that has been recommended by the television manufacturer and has a safety certification by an independent laboratory such as UL CSA ETL ALWAYS follow all instructions supplied by the ...

Page 5: ... holes on the back If you attach a wall mount bracket or TV stand to the back of your TV the bracket or stand must be securely attached using all four holes If you do not use all four mounting holes your TV may fall and cause property damage or personal injury See the documentation that came with your wall mount or TV stand for complete mounting instructions WARNING Electric shock hazard To reduce...

Page 6: ...of the National Electrical Code ANSI NFPA No 70 provides information with respect to correct grounding of the mast and supporting structure grounding of the lead in wire to an antenna discharge unit size of grounding conductors location of the antenna discharge unit connection to grounding electrodes and requirements for the grounding electrode Note to CATV system installer Article 820 of the Nati...

Page 7: ...een Put your favorite broadcast TV streaming channels gaming console and other devices front and center on the Home screen No more flipping through inputs or wading through complicated menus You can even personalize the names of each input and move tiles around so your most often used devices and streaming channels are only a click away 4 Search for your favorite movie TV show actor or director Af...

Page 8: ...ures work with top mobile devices Go to http support roku com for device compatibility information Let s get started Accessibility U S models only Your TV provides audio descriptions of menus and some remote control functions Depending on the broadcaster audio narration of key elements in programs may also be available Visit http go roku com tvmanual for more information or contact us at 1 855 544...

Page 9: ...ntertainment center go to Installing the stands If you want to mount your TV on a wall go to Installing a wall mount bracket Installing the stands 1 Carefully place your TV face down on a cushioned clean surface to protect the screen Notes If you plan to wall mount your TV do not install the stands Store the stands and stand screws in case you decide to use the stands in the future ...

Page 10: ...80p Sharp Roku TV 2 Align the TV stands with the screw holes on the bottom of the TV Make sure that the arrows on the stands are pointing towards the front of the TV Secure the stands to the TV with the four provided screws Screw type Screw length of screws M4 20 mm 4 L R ...

Page 11: ... TV Warnings Your TV has four VESA mounting holes on the back If you attach a wall mount bracket to the back of your TV the bracket must be securely attached using all four holes If you do not use all four mounting holes your TV may fall and cause property damage or personal injury See the documentation that came with your wall mount for complete mounting instructions Your TV is intended to be sup...

Page 12: ...See the instructions that came with the wall mount bracket for information about how to correctly hang your TV Notes The length of the wall mount screws vary depending on the wall mount bracket you purchased See the instructions that came with the wall mount bracket for screw lengths The mounting holes on the back of your TV take type M6 screws 14 mm 7 87 in 200 mm 7 87 in 200 mm ...

Page 13: ...hen your TV is off turns off when your TV is on or blinks when receiving commands from the remote control Side jacks Item Description 1 RESET Press and hold reset for 15 seconds for factory reset 2 headphones Connect headphones to this jack See Connecting headphones on page 28 3 USB Connect a USB flash drive to this jack to view compatible photos and video listen to music files or pause live TV Fo...

Page 14: ...analog soundbar speaker system or home theater system to this jack to listen to TV audio through external speakers For more information see Analog audio using the AUDIO OUT jack on page 31 4 ANT CABLE Connect an antenna or cable TV to this jack For more information see Coaxial good on page 20 or Connecting an antenna or cable TV no box on page 21 5 INPUT Press to turn your TV on or off standby mod...

Page 15: ... remaining sleep time if any or Sleep timer is off Subsequent presses cycle among the preset sleep time intervals 30 minutes 1 hour 1 5 hours 2 hours and 3 hours After it is set the Sleep timer remains in effect regardless of what you are watching 6 rewind When playing streaming video that supports this feature or broadcastTV if LiveTV Pause is enabled cycles through 1 2 and 3 rewind speeds When p...

Page 16: ...ume up Turnsthevolumeuponesettingwitheachpress Press and hold to turn the volume up rapidly A volume indicator shows the volume level while you are adjusting thevolume andfor a fewsecondsafterward Note If yourTV is muted pressing unmutes the sound Button Description 13 volumedown Turns the volume down one setting with each press Press and hold to turn the volume down rapidly A volume indicator sho...

Page 17: ...e HDMI HDMI video audio Good AV composite video requires an audio connection Good Coaxial video audio Connection type and jack Cable connector Digital optical audio output Analog audio input 3 5mm analog audio output Cautions Check the jacks for position and type before making any connections Loose connections can cause poor audio or video quality Make sure that all connections are tight and secur...

Page 18: ... the cable wall jack to the cable in jack on the cable or satellite box 3 Connect an HDMI cable not provided to an HDMI jack on side or back of your TV and to the HDMI OUT jack on the cable or satellite box 4 Plug your TV s power cord into a power outlet turn on your TV then turn on the cable or satellite box 5 On the Home screen press or to highlight the HDMI 1 HDMI 2 or HDMI 3 tile then press OK...

Page 19: ...ur TV and to the AV and audio out jacks on the cable or satellite box 4 Plug your TV s power cord into a power outlet turn on your TV then turn on the cable or satellite box 5 On the Home screen press or to highlight the AV tile then press OK Notes Cables are often color coded to match color coded jacks Note When you connect the audio using the L and R AUDIO jacks the audio output is analog AUDIO ...

Page 20: ... jack on the cable or satellite box 4 Plug your TV s power cord into a power outlet turn on your TV then turn on the cable or satellite box 5 On the Home screen press or to highlight the Antenna TV tile then press OK If you have not set up the TV tuner follow the on screeen instructions Notes Use a coaxial cable to eliminate interference and noise from radio waves Do not bundle the coaxial cable w...

Page 21: ... radio waves Do not bundle the coaxial cable with the power cord or other cables If the antenna is not installed correctly contact qualified service personnel to correct the problem If the signal level for a channel is weak the picture may be distorted Adjust the antenna or use a highly directional outdoor or set top antenna with a built in amplifier If the picture quality is good on some channels...

Page 22: ...player is turned off 2 Connect an HDMI cable not provided to an HDMI jack on the side or back of your TV and to the HDMI OUT jack on the DVD or Blu ray player 3 Plug your TV s power cord into a power outlet then turn on your TV and DVD or Blu ray player 4 On the Home screen press or to highlight the HDMI 1 HDMI 2 or HDMI 3 tile then press OK Note For better picture quality we recommend that you us...

Page 23: ...he DVD or Blu ray player 3 Plug your TV s power cord into a power outlet then turn on your TV and DVD or Blu ray player 4 On the Home screen press or to highlight the AV tile then press OK Note Cables are often color coded to match color coded jacks Note When you connect the audio using the L and R AUDIO jacks the audio output is analog AUDIO OUT AV IN VIDEO AUDIO L R ANT CABLE HDMI2 HDMI1 ARC AV ...

Page 24: ...is turned off 2 Connect an HDMI cable not provided to an HDMI jack on the side or back of your TV and to the HDMI OUT jack on the game console 3 Plug your TV s power cord into a power outlet then turn on your TV and the game console 4 On the Home screen press or to highlight the HDMI 1 HDMI 2 or HDMI 3 tile then press OK Note For better picture quality we recommend that you use cables designated a...

Page 25: ...outlet then turn on your TV and the game console 4 On the Home screen press or to highlight the AV tile then press OK Note Cables are often color coded to match color coded jacks Note Some older game consoles come with a special AV cable See the documentation that came with your game console or check the manufacturer s website When you connect the audio using the L and R AUDIO jacks the audio outp...

Page 26: ...back of your TV and to the HDMI OUT jack on the computer 3 Plug your TV s power cord into a power outlet then turn on your TV and the computer 4 On the Home screen press or to highlight the HDMI 1 HDMI 2 or HDMI 3 tile then press OK 5 Adjust the display properties on the computer if necessary Note For better picture quality we recommend that you use cables designated as High Speed HDMI cables RESE...

Page 27: ...r you can use the Live TV Pause feature to pause live TV for up to 90 minutes 1 Plug a USB flash drive into the USB port on the side of your TV 2 Press or to highlight the Roku Media Player or USB Media Player tile then press OK Caution Do not remove the USB flash drive or turn off your TV while using the USB flash drive You may lose data or damage the USB flash drive RESET RESET HDMI3 USB USB DIG...

Page 28: ...rough the headphones Connect the headphones to the jack on the side of your TV Warning Loud noise can damage your hearing When using headphones use the lowest volume setting on your headphones that still lets you hear the sound Note You can also connect a home theater system sound bar or external speaker system to the jack RESET RESET HDMI3 USB USB DIGITAL OPTICAL OUTPUT HDMI3 Side of TV ...

Page 29: ...able not provided to the DIGITAL OUTPUT OPTICAL jack on the side of your TV and to the digital optical AUDIO IN jack on the digital speaker system or sound bar 3 Plug your TV s power cord into a power outlet then turn on your TV 4 Turn on the digital speaker system or sound bar then set it to the correct source For more information see the documentation that came with the digital speaker system or...

Page 30: ...o a power outlet then turn on your TV 4 Turn on the digital speaker system or sound bar then set it to the correct source For more information see the documentation that came with the digital speaker system or sound bar 5 To turn off your TV speakers on the Home menu press or to highlight Settings then press OK Highlight Audio then press OK Highlight TV speakers then press OK Press OK to remove th...

Page 31: ...lug your TV s power cord into a power outlet then turn on your TV 4 Turn on the analog speaker system or soundbar then set it to the correct source For more information see the documentation that came with the analog speaker system or soundbar 5 To turn off your TV speakers on the Home menu press or to highlight Settings then press OK Highlight Audio then press OK Highlight TV speakers then press ...

Page 32: ...ou make depend on the video and audio jacks available on your devices Refer to the documentation that came with your devices for connection information Just remember to use the best connection types available for the best picture and sound For information about connection types see What connection should I use on page 17 DVD or Blu ray player Cable or satellite box AV receiver Antenna or cable TV ...

Page 33: ...es make sure that the power cord is unplugged from the power outlet 1 Connect the power cord to the power connector on the back of your TV 2 Connect the other end of the cord to a power outlet Caution Your TV should only be operated from the power source indicated on the label Always unplug the power cord from the power outlet when you will not be using your TV for an extended period of time ...

Page 34: ...ntrol towards the remote sensor on the front of your TV Cautions Batteries should not be exposed to excessive heat such as sunshine heat registers or fire Battery chemicals can cause a rash If the batteries leak clean the battery compartment with a cloth If chemicals touch your skin wash immediately Make sure that batteries are disposed of correctly Do not burn or incinerate Notes Do not mix batte...

Page 35: ... your TV in areas that are too hot or too cold because the cabinet may warp or the screen may malfunction Your TV works best in temperatures that are comfortable to you Storage temperatures are 5 to 113 F 15 to 45 C Working temperatures are 41 to 95 F 5 to 35 C Do not place your TV in direct sunlight or near a heat source Cleaning your TV cabinet Clean the cabinet with a soft lint free cloth If th...

Page 36: ... and that your TV is turned on Your TV has a light on the front that indicates if your TV is turned off Cables are not connected correctly Make sure that the video cables are connected correctly and securely to your TV Make sure that the antenna or cable TV is connected correctly and securely See Connecting a cable or satellite box on page 18 or Connecting an antenna or cable TV no box on page 21 ...

Page 37: ...cing problems If you are using an antenna and the signal strength is low adjust the antenna or use a highly directional outdoor antenna or set top antenna with a built in amplifier Cables are not connected correctly Make sure that the antenna or cable TV is connected correctly and securely See Connecting a cable or satellite box on page 18 or Connecting an antenna or cable TV no box on page 21 Mak...

Page 38: ...ht or dark spots on an TV screen is normal It does not affect the operation of your TV Good picture but no sound Volume is down or muted Increase the volume Make sure that the sound is not muted Headphones may be connected Make sure that you do not have headphones connected When headphones are connected no sound comes from your TV speakers TV speakers may be turned off If you want sound to play th...

Page 39: ...s correctly connected to both your TV power connector and power outlet See Connecting power on page 33 You should see an LED in the front of the TV panel when a button on the remote is pressed If you see no LED activity try another outlet or check your fuse box Line of sight obstructed Make sure that no objects or pets are obstructing the line of sight from the remote control to the remote sensor ...

Page 40: ...ry replacing the cable between the antenna cable or cable satellite box and your TV Broadcast TV may not be set up Make sure that Antenna TV is set up One or more channels do not display Channels may be blocked or hidden Make sure that the channels are not blocked Make sure that the channels are not hidden The channel may have been deleted from the channel list You can add the channel back to the ...

Page 41: ...ake up or turn on your TV I can t find my TV with the Roku mobile app TV and mobile app not on same wireless network Make sure that your TV and the mobile app are on the same network TV not powered or working normally Make sure that yourTV is connected to a working power outlet and that your TV is turned on See Connecting power on page 33 Symptom Possible cause Try this I cannot connect to the Int...

Page 42: ...documentation that came with the device CEC control may not be set up correctly Make sure that your TV has searched for CEC devices Connected audio device may not be set up correctly If you are using a home theater system soundbar or external speaker system make sure that it is set to the correct source If you are using a home theater system soundbar or external speaker system and have connected i...

Page 43: ...CEC device See the documentation that came with the device Connected device may not support some or all CEC features The device may not support this feature See the documentation that came with the device for more information CEC control may not be set up correctly Make sure that your TV has searched for CEC devices Make sure that system standby is turned on My TV does not turn on when I turn on m...

Page 44: ...cal viewing angle 178 Analog NTSC Digital ATSC Clear QAM HDMI 3 Composite video 1 WiFi Yes built in Dual band 802 11 A B G N USB 1 Supports image format JPEG PNG GIF audio format AAC MP3 WMA WAV PCM FLAC AIFF AC3 Dolby Digital video format MKV MP4 MOV Antenna Cable 1 Headphone 1 Analog audio 1 Digital audio 1 optical WiFi Yes Ethernet No Audio enhancement DTSTruSurround Speakers Number 2 Watts per...

Page 45: ... viewing angle 178 Analog NTSC Digital ATSC Clear QAM HDMI 3 Composite video 1 WiFi Yes built in Dual band 802 11 A B G N USB 1 Supports image format JPEG PNG GIF audio format AAC MP3 WMA WAV PCM FLAC AIFF AC3 Dolby Digital video format MKV MP4 MOV Antenna Cable 1 Headphone 1 Analog audio 1 Digital audio 1 optical WiFi Yes Ethernet No Audio enhancement DTSTruSurround Speakers Number 2 Watts per ch...

Page 46: ...all Sharp be liable whether in contract or tort for any direct indirect incidental special or consequential damages attorney fees expenses or any other damages arising out of or in connection with any information contained in or as a result of the use of the device or any content or service accessed by you or any third party even if advised of the possibility of such damages Third party services m...

Page 47: ...patibility with other updates to ROKU S products or services and may be required for security reasons by using the TELEVISION you hereby AGREE to receive such updates Separately Licensed Code Certain software components of the Software are provided under separate third party license terms Separately Licensed Code and your right to use such components is governed by such license terms Please visit ...

Page 48: ...ll proceedings to resolve such Claim must be brought exclusively in a federal court of competent jurisdiction in the Northern District of California or in a state court in Santa Clara County California You hereby irrevocably consent to the exclusive jurisdiction and venue of such courts 6 30 Day Right to Opt Out You have the right to opt out of this agreement to arbitrate by sending a written noti...

Page 49: ...d 7 050 698 Dolby License Notice and Trademark Acknowledgement Manufactured under license from Dolby Laboratories Dolby Dolby Audio and the double D symbol are trademarks of Dolby Laboratories DTS TruSurround For DTS Patents see http patents dts com Manufactured under license from DTS Licensing Limited DTS the Symbol DTS and the Symbol together are registered trademarks and DTS TruSurround is a tr...

Page 50: ...y does not cover Customer instruction education Installation Set up adjustments Cosmetic damage Damage due to acts of God such as power surges Accident s Misuse unintentional or intentional Abuse unintentional or intentional Negligence Commercial purposes use including but not limited to use in a place of business or in communal areas of a multiple dwelling condominium or apartment complex or othe...

Page 51: ... distributed and warranted by Best Buy Purchasing LLC 7601 Penn Avenue South Richfield Minnesota U S A 55423 3645 under brand license by SHARP Corporation 2018 Best Buy China LTD All rights reserved SHARP is a registered trademark of Sharp Corporation used under license by Hisense International Hong Kong America Investment Co Limited All other trademarks are property of their respective owners V1 ...

Reviews: