background image


33

Other useful features

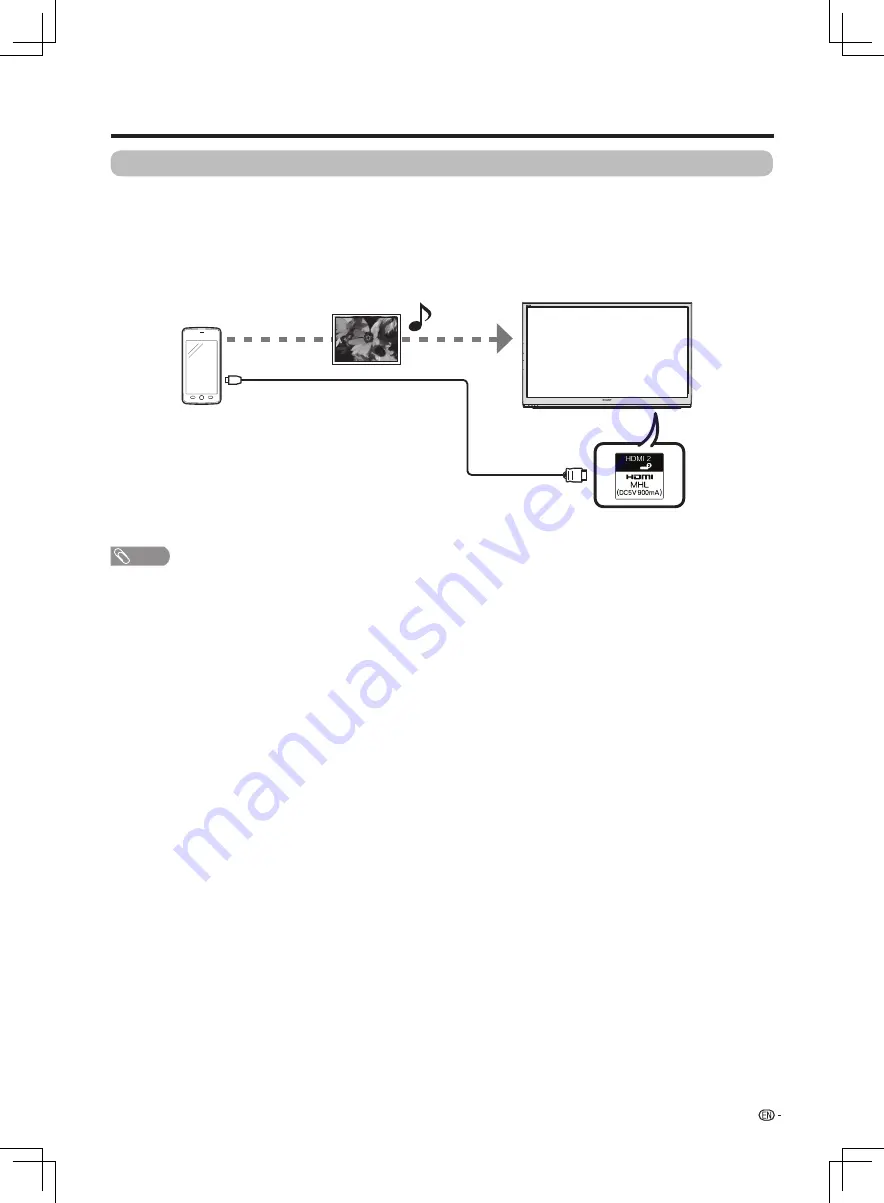
Using a Smartphone with the TV

This function enables you to connect a smartphone that supports Mobile High-Definition Link (MHL) to the TV 

using an MHL-compatible cable.

To connect your MHL-compatible smartphone to the TV , be sure to use an MHL-compatible cable (Commercially 

available). Connect the device to the 

HDMI 2 (HDMI 2 / MHL

 terminal). Press 

TV/VIDEO

 on the remote control unit, 

and then select HDMI 2 source.

• You can view pictures and video on a large screen.

• You can play music files.

MHL-compatible

 cable 

(Commercially available)

HDMI 2(HDMI 2 / MHL terminal)

NOTE

•  A MHL-compatible portable device is required to use this function. 

•  Can connect via its MHL1 connection.

LX360H_en_ID6-201400313.indd   33

2014/3/15   10:12:55

Summary of Contents for LC-40LX360H-BK

Page 1: ... Part names 9 TV Side Front 9 TV Rear 10 Remote control unit 11 Before turning on the power 12 Connecting external devices 13 Inserting the batteries 14 Using the remote control unit 14 Cautions regarding the remote control unit 14 Turning the TV on off 15 Turning on off the power 15 Standby mode 15 Initial auto installation 15 Set up the DTV antenna 16 Watching TV Programme setup 17 Auto installa...

Page 2: ...ns 27 FREEZE COLOUR ADJ 27 A Flash Back 27 e Mute 28 MPX 28 SLEEP 28 INFO 28 Connecting a PC PC control of the TV 29 Communication conditions for RS 232C 29 RS 232C Commands List 29 Connecting a USB memory device Connecting a USB memory device 30 Playing back files on a USB memory device 30 Buttons for USB media operation 31 List of file formats compatible with USB mode 32 Other useful features Us...

Page 3: ...me substances Therefore keep it away from volatile substances such as insecticide In addition do not let it come into contact with objects made of rubber resin etc for a long time Maintenance of the LCD panel Before cleaning the LCD panel be sure to turn off the TV set and unplug the power cord from the outlet When cleaning the LCD panel use a dry and soft cloth made of cotton floss etc to clean t...

Page 4: ...plifiers To prevent fire never place any type of candle or naked flames on the top or near the TV set To prevent fire or shock hazard do not place the AC power cord under the TV set or other heavy items Do not place heavy objects on this product or stand on it Doing so could cause injury if the product overturns Take special care near children and pets The LCD panel is a very high technology produ...

Page 5: ...ubsidiary of Rovi Corporation This is an official DivX Certified device that has passed rigorous testing to verify that it plays DivX video Visit divx com for more information and software tools to convert your files into DivX videos ABOUT DIVX VIDEO ON DEMAND This DivX Certified device must be registered in order to play purchased DivX Video on Demand VOD movies To obtain your registration code l...

Page 6: ... g2 Screws B g2 Make sure the following accessories are provided with the product Remote control unit AAA size battery g2 Stand unit Used with batteries inserted Page 11 Page 14 Operation manual Page 7 LX360H_en_ID6 201400313 indd 6 2014 3 15 10 12 36 ...

Page 7: ...NOTE When installing the stand you need to put your TV on a flat surface Before that put a soft cushion on the surface To detach the stand unit perform the steps in reverse order The angle of the stand is not adjustable A screwdriver is not supplied with this product During installation please be careful to avoid getting your hand trapped between the TV bottom and the floor 1 Confirm that there ar...

Page 8: ...at should only be performed by qualified service personnel Customers should not attempt to do the work themselves SHARP bears no responsibility for improper mounting or mounting that results in accident or injury Using a SHARP recommended bracket to mount the TV You can ask a qualified service professional about using a SHARP recommended bracket to mount the TV to the wall Carefully read the instr...

Page 9: ...s and may vary slightly from the actual operations TV Side Front 1 POWER On Off button 2 MENU button 3 TV VIDEO button 4 CH r s Channel up down buttons 5 VOL k l Volume up down buttons 6 Remote control sensor 7 Dummy 8 POWER indicator 9 SLEEP indicator 1 2 3 4 5 6 7 8 9 LX360H_en_ID6 201400313 indd 9 2014 3 15 10 12 41 ...

Page 10: ...eadphones are plugged in The Audio menu cannot be operated when headphones are plugged in Volume display when headphones are plugged in 30 Headphone AUDIO R L terminal HDMI 1 terminal HDMI 2 HDMI 2 MHL terminal 1 USB terminal 1 Mobile High Definition Link MHL can also be used See page 33 INPUT 3 COMPONENT AUDIO VIDEO AUDIO terminal INPUT 4 VIDEO AUDIO terminal RS 232C terminal HDMI 1 AUDIO INPUT R...

Page 11: ...17 TV VIDEO INPUT SOURCE Select an input source DTV ATV HDMI1 HDMI2 INPUT3 INPUT4 USB See pages 13 30 18 DISPLAY Displays the channel or input information 19 FREEZE COLOUR ADJ Freeze a motion picture on the screen and adjust the colour See page 27 20 CHr s TV input mode Select the channel 21 AV MODE Select a AV MODE See page 19 22 MENU Displays the menu screen 23 RETURN MENU mode Return to the pre...

Page 12: ...n to the AC outlet Place the TV close to the AC outlet and keep the power plug within reach Disconnect the AC cord from the AC outlet if the TV will not be used for a long period of time TV rear view Connecting the antenna cable To enjoy a clearer picture use an outdoor antenna The following is a brief explanation of the types of connections that are used for coaxial cable Standard DIN45325 plug I...

Page 13: ... Camcorder DVD Player When using HDMI cable commercially available Digital TV STB VCR Game console Camcorder DVD Player PC When using a DVI HDMI adaptor input the audio signal from the AUDIO INPUT terminal See page 25 for Audio select Some commercially available devices may have not been properly certified When they are connected to the TV via HDMI2 there may be no sound at all In this case it is ...

Page 14: ...ations in the battery compartment 2 Insert the two supplied AAA size alkaline batteries 3 Close the battery cover Use the remote control unit by pointing it towards the remote sensor window Objects between the remote control unit and sensor window may prevent proper operation Cautions regarding the remote control unit Do not subject the remote control unit to shock In addition do not soak the remo...

Page 15: ...wer Is the antenna cable connected Is the AC cord plugged in Press a b to select the desired language and then press ENTER 2 Press a b to select HOME or STORE and then press ENTER 3 HOME STANDARD will be the default value for the AV mode setting STORE DYNAMIC FIXED will be the default value for the AV mode setting If the AV mode is changed the TV will automatically switch back to DYNAMIC FIXED whe...

Page 16: ...and the MENU screen displays 2 1 Press c d to select Programme setup 3 Press a b to select Digital setting and then press ENTER Position and align the antenna so that the maximum possible values for Signal strength and Signal quality are obtained 4 NOTE The values of Signal strength and Signal quality indicate when to check the appropriate alignment of the antenna w 5V Antenna Power Press a b to s...

Page 17: ...t here See page 22 for setting a password Press a b to select Auto installation and then press ENTER If you have already set the password enter it here See page 22 for setting a password The TV searches for sorts and stores all the receivable TV stations according to their settings and the connected antenna To abort the initial auto installation in progress press MENU 3 3 6 2 2 Press c d to select...

Page 18: ...ave w Skip Channels with Skip set to On are passed over when using CHr s even if selected while watching the image from the TV Press 4 to skip the selected channel Press 4 again to cancel the skip w Lock You can block the viewing of any selected channel Press 5 to lock the selected channel Press 5 again to unlock the locked channel If a channel is set to Lock the image and sound of the channel is ...

Page 19: ...ess MENU and the MENU screen displays 1 Press c d to select Picture Press a b to select the desired menu item 4 Press c d to adjust the item 5 Picture adjust You can adjust the picture to your preference 2 Press a b to select Picture adjust and then press ENTER 3 w Adjustment items Selected item cbutton dbutton Backlight The screen dims The screen brightens Contrast For less contrast For more cont...

Page 20: ... each side and you may also see bars on the top and bottom with some programmes Panorama In this mode the picture is progressively stretched toward each side of the screen Full For 16 9 squeeze pictures Cinema 16 9 For 16 9 letterbox pictures Bars may appear on the top and bottom with some programmes Cinema 14 9 For 14 9 letterbox pictures Bars may appear on the top and bottom with some programmes...

Page 21: ...ss MENU and the MENU screen displays 1 Press c d to select Audio Press a b to select Yes and then press ENTER 4 2 Press a b to select Reset and then press ENTER 3 ECO No signal off You can set the TV to automatically power off in about 15 minutes after the TV goes into a state of receiving no programme signals such as the end of a broadcast day Press MENU and the MENU screen displays 1 Press a b t...

Page 22: ...me setup Programme edit is set to On you must enter a password See this page When you select a locked channel a password prompt message pops up Press ENTER to display the password input window Press MENU and the MENU screen displays 1 Press c d to select Setup 2 Press a b to select Clear password 4 w Clear password Allows you to clear your password Press c d to select Yes and then press ENTER to d...

Page 23: ...MENU screen displays 1 Press c d to select Setup 2 Press a b to select Link operation and then press ENTER 3 Press a b to select On or Off 4 Auto wide The Auto wide allows a television to switch automatically among the different screen formats Press MENU and the MENU screen displays 1 Press c d to select Setup 2 Press a b to select Auto wide and then press ENTER 3 Press a b to select On or Off 4 N...

Page 24: ...en press ENTER Press a b to select 1st language or 2nd language 1 2 3 Press c d to select the desired language w For hearing impaired If the broadcast includes subtitles for the hearing impaired they will take precedence over other subtitles NOTE If the broadcast includes no subtitles for the hearing impaired they will not be displayed even when set to On 1 Press a b to select For hearing impaired...

Page 25: ... no sound output Output jack select Press MENU and the MENU screen displays 1 Press a b to select Output jack select and then press ENTER 3 Press c d to select Option 2 Press a b to select Headphone or Audio out 4 Auto volume Press MENU and the MENU screen displays 1 Press a b to select Auto volume and then press ENTER 3 Press c d to select Option 2 Press a b to select On or Off 4 Different sound ...

Page 26: ...d to select Option 2 This function allows you to transform to the latest software via a USB device or OAD function Press a b to select USB update or OAD and then press ENTER 4 w USB update Press a b to select Yes to update the system and then press ENTER The TV restarts automatically and the software updating will be completed This operation may take a while 2 Insert the USB device containing the ...

Page 27: ...tion sent by the TV station The added instruction for R C buttons FREEZE COLOUR ADJ Press FREEZE COLOUR ADJ A still image is displayed on screen meanwhile it also shows the colour adjustment menu The still image is captured from active image when you press FREEZE COLOUR ADJ 1 After finish colour adjustment you can press FREEZE COLOUR ADJ to exit the still image 3 Press a b c d to adjust colour amo...

Page 28: ...ONO MPX You can switch between multiple audio modes when watching a multiple audio or stereo broadcast programme Each time you press MPX the mode switches as follows In the NICAM TV broadcasts In the TV mode of A2 TV broadcasts Signal Mode switch When receiving a stereo signal STEREO MONO When receiving a bilingual signal CH A CH B CH AB When receiving a monaural signal MONO 1 2 Press SLEEP Remain...

Page 29: ...e format O K Normal response Return code 0DH E R R Problem response communication error or incorrect command Return code 0DH RS 232C Commands List RS 232C Commands Commands not indicated here are not guaranteed to operate CONTROL ITEM COMMAND PARAMETER CONTROL CONTENTS POWER SETTING P O W R 0 _ _ _ POWER OFF STANDBY INPUT SELECTION I T G D _ _ _ _ INPUT SWITCHING TOGGLE I T V D _ _ _ _ TV CHANNEL ...

Page 30: ...necting a USB memory device Playing back files on a USB memory device You can connect the TV to a USB memory device to enjoy viewing pictures listening to music and watching videos Connect a commercially available USB to the USB port of the TV Select USB using TV VIDEO on the remote control unit or on the TV 1 Press c d to select the drive where you want to find your files and then press ENTER Pre...

Page 31: ...und music should be saved in the same folder with the photo 3 Playlist Select a file from the playlist to start playback 3 3 3 Display file information 3 3 3 r Slow forward Each time you press ENTER the speed will change 3 Step Each time you press ENTER the picture will change to the next still picture 3 Go to time Set a start point of playing 3 3 Rotate the photo by 90 degrees to the right 3 Rota...

Page 32: ...4 Xvid 1 00 1 01 1 02 1 03 1920 1080 MP3 Dolby Digital 30 8 H 264 1920 1080 30 20 vob VOB MPEG2 1920 1080 MP3 Dolby Digital 30 20 mpg mpeg PS MPEG2 1920 1080 MP3 Dolby Digital 30 20 MPEG1 1920 1080 30 20 rm rmvb RM RM codec RV 8 9 10 1280 720 Real Audio 30 10 ts trp tp TS H 264 1920 1080 MP3 Dolby Digital 30 20 MPEG2 1920 1080 30 20 dat DAT MPEG2 1920 1080 MP3 Dolby Digital 30 8 MPEG1 1920 1080 30...

Page 33: ...compatible cable Commercially available Connect the device to the HDMI 2 HDMI 2 MHL terminal Press TV VIDEO on the remote control unit and then select HDMI 2 source You can view pictures and video on a large screen You can play music files MHL compatible cable Commercially available HDMI 2 HDMI 2 MHL terminal NOTE A MHL compatible portable device is required to use this function Can connect via it...

Page 34: ...ee pages 12 13 and 25 Is the picture adjustment correct See pages 19 and 20 Is the antenna connected properly See page 12 Is On selected in Audio only See page 25 No sound Is the volume too low See page 11 Make sure that headphones are not connected See page 10 The TV sometimes makes a cracking noise This is not a malfunction This happens when the cabinet slightly expands and contracts according t...

Page 35: ...C 40LX360H BK LC 40LX360H WH 1 Active area 2 Thinnest part 3 Refer to the data in the brackets when mounting the TV on the wall 936 584 313 30 55 79 202 52 678 139 495 886 300 300 188 1 1 2 3 3 LX360H_en_ID6 201400313 indd 35 2014 3 15 10 12 56 ...

Page 36: ...80I 60Hz 1080P 50Hz 1080P 60Hz 1080P 24Hz Rear HDMI 2 MHL HDMI HDMI input 480I 576I 480P 576P 720P 50Hz 720P 60Hz 1080I 50Hz 1080I 60Hz 1080P 50Hz 1080P 60Hz 1080P 24Hz MHL is not applicable INPUT3 COMPONENT in 480I 576I 480P 576P 720P 50Hz 720P 60Hz 1080I 50Hz 1080I 60Hz AUDIO in VIDEO in AUDIO in INPUT4 VIDEO in AUDIO in RS 232C 9 pin D Sub male connector Analogue antenna UHF VHF 75 q Din type D...

Reviews: