background image

10

fig 1

fig 2

TV

TV

Viewing angle

Viewing angle

INCORRECT

CORRECT

Securing the TV to a Wall/Wall Mounting

Wall Mounting

IMPORTANT - Before drilling any holes in the wall ensure you are not drilling 
where there could be any electrical wires, water or gas pipes.

1) Remove the four screws highlighted that are supplied in the wall mounting 
holes.

2) The wall mount can now be easily attached to the mounting holes on the 
rear of the TV. 

For VESA wall mounting information please refer to the Technical 
Specifi cation page.

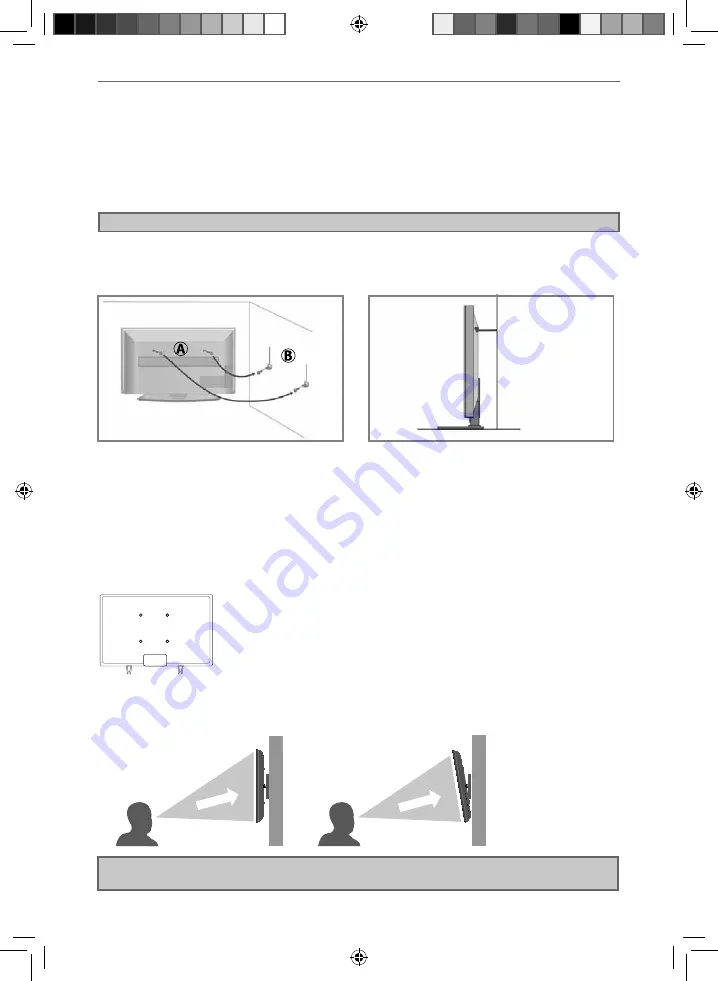
For optimum viewing, if wall mounting the TV higher than eye level, the TV should be tilted downwards 
so that the TV’s screen is ‘face on’. See fi g 1 and 2.

Important – If wall mounting this TV, only use the screws already provided in the wall mounting holes. 
Using other screws which are longer could cause irreparable damage to internal parts.

SECURING THE TV TO A WALL


Note - Please ensure that children do not climb on the TV set.

Securing the TV to a wall with anti-tip straps

For maximum security in the home when using a TV with its stand anti-tip straps should be fi tted. These 
are available from supermarket websites and other websites and are an easy, inexpensive and effective 
way of ensuring your TV stays safely upright. Straps are designed to be attached to the rear of the TV and 
then tethered to the wall or the furniture the TV is stood on.

The Royal Society for the Prevention of Accidents is urging people to take care with fl at-screen televisions. 

RoSPA stated in 2010 that “Toddlers are particularly at risk of pulling fl at-screen televisions on to 
themselves. They are unsteady on their feet and are attracted by colourful television images.”

The risk is increased as televisions become lighter.

A)

 Using one or both of the top wall-mounting 

holes and screws (the screws are already supplied 
in the wall mounting holes) fasten one end of the 
fastening cord/s to the TV.

B)

 Secure the other end of the fastening cord/s to 

your wall. (you will need screws/fi xings suitable 
for your wall type - available separately from most 
DIY stores).

Sharp - User Guide - 5221K - SHA-MAN-0145.indd   Sec1:10

Sharp - User Guide - 5221K - SHA-MAN-0145.indd   Sec1:10

09/05/2016   16:39:30

09/05/2016   16:39:30

Summary of Contents for LC-40CFF5221K

Page 1: ...LED TV with Freeview HD Saorview USB PVR Model No User Guide LC 40CFF5221K LC 43CFF5221K LC 49CFF5221K ...

Page 2: ...er of the television set Only use furniture that can safely support the television set Ensure the television set is not overhanging the edge of the supporting furniture Do not place the television set on tall furniture for example cupboards or bookcases without anchoring both the furniture and the television set to a suitable support Do not place the television set on cloth or other materials that...

Page 3: ...se screen burn are as follows this is not an exhaustive list TV channel logos e g shopping channel logos and pricing displays especially if they are bright and stationary Moving or low contrast graphics are less likely to cause ageing of the screen Time displays Teletext Do not view a stationary page for a long period of time TV DVD menus e g listings of DVD disc content Pause mode Do not leave th...

Page 4: ...go is a trademark of DIGITALEUROPE DVB The DVB logo is the registered trademark of the Digital Video Broadcasting DVB project FREEVIEW The FREEVIEW words and logos are trade marks of DTV Services LTD DTV Services Ltd SAORVIEW SAORVIEW is a registered trademark owned by RTÉ Manufactured under license from Dolby Laboratories Dolby Dolby Audio and the double D symbol are trademarks of Dolby Laborator...

Page 5: ...menu 22 Network menu 23 7 day TV guide and channel list 25 USB record Freeview Saorview 26 USB mode media player 27 General information 28 33 Frequently asked questions 28 29 Technical specifications 30 33 For DTS patents see http patents dts com Manufactured under license from DTS Licensing Limited DTS the Symbol DTS and the Symbol together are registered trademarks and DTS TruSurround is a tradem...

Page 6: ...ng What is included in the box WHAT IS INCLUDED IN THE BOX 1 x User guide 1 x Quick start guide 1 x TV 1 x Remote control and 2 x AAA batteries User guide Quick start guide 1 x RF cable Accessories Included with this TV are the following accessories 1 x Stand installation pack 1 x Mini component YPbPr cable 4 x 1 x L left 1 x R right 1 x Mini composite AV cable Sharp User Guide 5221K SHA MAN 0145 ...

Page 7: ...left and R right fig 2 Secure the stand feet to the underside of the TV set using the 4 screws provided L R 4 x 3 4 1 2 L R 1 2 3 fig 2 When the stand feet are installed correctly the stand feet will be angled away from each other at the front of the TV set Detaching the stand Remove the screws highlighted then remove the stand feet from the underside of the TV set TV panel must be facing downwards ...

Page 8: ...aximum security in the home when using a TV with its stand anti tip straps should be fitted These are available from supermarket websites and other websites and are an easy inexpensive and effective way of ensuring your TV stays safely upright Straps are designed to be attached to the rear of the TV and then tethered to the wall or the furniture the TV is stood on The Royal Society for the Preventi...

Page 9: ...peatedly to cycle through the sleep options TEXT To enter exit Teletext Analogue TV SUBTITLE To switch the dialogue at the bottom of the screen on off ASPECT To switch the screen between the different picture formats TV Switch to digital source MEDIA Access the USB media function RADIO Switch to radio whilst in digital TV source RECORD Access the USB record function REC LIST Opens the list of what...

Page 10: ... menu to switch between input connections A Using the buttons on the remote control 1 Press SOURCE The source menu will appear 2 Press or to select the input you require 3 Press OK B Using the buttons on the Television 1 Press SOURCE 2 Scroll up down using CH CH buttons to the input source you require 3 Press Vol to change input source to the one selected For further information on input connectio...

Page 11: ...I input HDMI 2 HDMI input RF IN RF TV Aerial Input HDMI 3 HDMI input USB x 2 USB port CI card in Common interface module AV In Audio Video input YPbPr HD input Ypbpr A J L I B K H C D E F G C The Ethernet LAN port is used for Freeview HD services J Sharp User Guide 5221K SHA MAN 0145 indd Sec1 13 Sharp User Guide 5221K SHA MAN 0145 indd Sec1 13 09 05 2016 16 39 31 09 05 2016 16 39 31 ...

Page 12: ... only and may not be included Please check What Is Included In The Box page Scart Scart Connecting to a device with HDMI output A HDMI cable can output both video and audio and enables you to enjoy digital quality video and audio with minimal loss of quality TV source should be set to the corresponding HDMI port HDMI 1 HDMI 2 etc HDMI HDMI Sharp User Guide 5221K SHA MAN 0145 indd Sec1 14 Sharp Use...

Page 13: ... Connecting to an external audio device Amplifiers Surround Sound Sound Bars etc When connecting via the TV s 3 5mm earphone output this will disable the TV speakers 3 5mm earphone OPTION 1 for 3 5mm EARPHONE Output OPTION 2 for Digital Optical Audio Output Digital audio out optical 3 5mm audio in Digital audio in optical Connecting an Ethernet Network cable The LAN Ethernet port is used for Freevi...

Page 14: ... the balance between black and white Brightness Increase or decrease the brightness of the picture Colour Increases the colour from black and white Tint Lets you increase or decrease the level of tint within the picture only available for NTSC input signal Sharpness Increase or decrease the sharpness of the picture Colour Temperature Choose from the following presets Normal Default settings Warm I...

Page 15: ...Aspect Ratio Within the UK the picture format varies depending on the channel broadcast There are a number of different options to best meet your needs Choose from the following settings Noise Reduction Allows you to switch noise reduction ON or OFF MPEG Noise Reduction Allows you to reduce visible interference caused by MPEG compression Active Contrast Automatically optimises the backlight and co...

Page 16: ...s Auto Volume Level AVL When on is selected the volume will attempt to stay at a constant level regardless of TV programme and advertisements DTS TruSurround Choose from the following presets Off Off On On TruSurround creates an immersive feature rich surround sound experience from two speakers complete with rich bass high frequency detail and clear dialog For DTS patents see http patents dts com ...

Page 17: ...t Choose from the following options Audio Description This allows the user to switch Audio Description ON or OFF Audio Description is a service available on certain programmes It provides a description of what is happening during the selected programme for a person who is visually impaired AD Volume This allows the user to increase and decrease the AD Audio Description volume level Sharp User Guid...

Page 18: ...to manually tune your analogue signal Freeview Saorview Manual Tuning Allows you to manually tune your digital signal Channel Edit Allows you to delete move skip and select favourite channels Important To receive Freeview Saorview channels in particular HD channels you will need a Digital TV aerial and be in a good Freeview Saorview coverage area You can check the coverage for your area at www fre...

Page 19: ...gs and clears all the TV channels from the television Store Mode switch ON OFF shop demonstration mode available only if store mode was selected during first time installation Time Menu Choose from the following options Auto Sync When this option is set to ON the TV will automatically set the time select OFF to access the Time option and manually set the time Time Allows you to manually set the tim...

Page 20: ... to adjust and set the maximum volume Source Lock Allows you to lock the source menu Network menu Choose from the following options The Network connection is only intended to access Pay TV services from your Freeview Saorview broadcaster Please note the TV cannot be used for internet access For the network configuration to work the TV will need to be connected to your home network via an ethernet c...

Page 21: ...e installed on the TV set Select disk Select USB port and disk partition TimeShift Size Set size time of shift buffer Format Start You can format connected USB storage device to FAT 32 file system WARNING ALL DATA ON THE USB DEVICE WILL BE DELETED Speed check Tests write speed of connected USB storage devices PVR File System PVR Recording options Note For further support with software updates conta...

Page 22: ...day by pressing YELLOW View the next day by pressing BLUE 3 Press EXIT to exit the 7 day TV Guide 7 Day TV Guide and Channel List Channel List To view the channel list please ensure that the TV is set to either the analogue or digital source and no menus or TV notifications are displayed 1 Press OK on the remote control and the channel list menu will appear 2 Press LEFT RIGHT arrow to filter desired...

Page 23: ... to use a USB portable hard drive larger than 32GB please refer to the FAQ section at the rear of this user guide Tip When you switch the TV to standby or change channel the time shift memory is wiped To restart time shift you must press play pause button Pause live TV time shift Pausing Live TV is very simple Press the play pause button and the television will pause and the live content will be r...

Page 24: ...rience a playback issue please ensure the files being used are the correct format example the picture plays but no sound See technical specification page for compatible file types Note USB extension cables are not recommended as they can cause a reduction in picture audio quality and stoppages during play back of USB content 3 You can now access the item Press OK to view Fig A 4 Whilst viewing your m...

Page 25: ... the rear of the TV and then turn the TV back on again 3 Using the remote control press Menu followed by 8 8 8 8 to enter the initial setup first time installation menu 4 Press OK let the TV run the full tuning process 5 Once completed turn off the TV reconnect the RF Aerial cable then turn the TV back on again 6 Repeat steps 3 4 VCR DVD Recorder I have connected the TV to my VCR or DVD Recorder v...

Page 26: ...econd HD channels require the read speed of 80 MB s Mega Byte per second and a write speed of 40 MB s Mega Byte per second USB 3 0 sticks should be used where possible Pairing the remote control Remote control does not work with the TV set when first time installation is on the TV screen During first time installation press and hold the GREEN and YELLOW buttons on the remote control for a few seco...

Page 27: ...Sharp Model ID LC 40CFF5221K Energy efficiency class A Visible screen size diagonal 100 cm 40 inches On mode power consumption 45 0 W Annual energy consumption 1 66 kWh Standby power consumption 2 0 50 W Off mode power consumption n a Screen resolution 1920 H x 1080 V 1 Energy consumption XYZ kWh per year based on the power consumption of the television operating 4 hours per day for 365 days The a...

Page 28: ... Sharp Model ID LC 43CFF5221K Energy efficiency class A Visible screen size diagonal 109 cm 43 inches On mode power consumption 41 0 W Annual energy consumption 1 60 kWh Standby power consumption 2 0 50 W Off mode power consumption n a Screen resolution 1920 H x 1080 V 1 Energy consumption XYZ kWh per year based on the power consumption of the television operating 4 hours per day for 365 days The ...

Page 29: ...k Sharp Model ID LC 49CFF5221K Energy efficiency class A Visible screen size diagonal 123 cm 49 inches On mode power consumption 67 0 W Annual energy consumption 1 98 kWh Standby power consumption 2 0 50 W Off mode power consumption n a Screen resolution 1920 H x 1080 V 1 Energy consumption XYZ kWh per year based on the power consumption of the television operating 4 hours per day for 365 days The...

Page 30: ...tereo PHOTO jpg Progressive JPEG Max Resolution 1024 768 jpeg Baseline JPEG Max Resolution 15360 8640 bmp BMP Max Resolution 9600 6400 Pixel Depth 1 4 8 16 24 32 bpp png Non Interlaced Max Resolution 9600 6400 Interlaced Max Resolution 1280 800 SUBTITLE srt SubRip ssa ass SubStation Alpha smi SAMI sub SubViewer MicroDVD DVDSubtitleSystem SubIdx VobSub SubViewer 1 0 2 0 Only txt TMPlayer mpg avi MP...

Page 31: ...land sp z o o Ostaszewo 57B 87 148 Łysomice Poland Assembled in Europe SHA MAN 0145 Sharp User Guide 5221K SHA MAN 0145 indd Sec1 36 Sharp User Guide 5221K SHA MAN 0145 indd Sec1 36 09 05 2016 16 39 33 09 05 2016 16 39 33 ...

Reviews: