background image

45

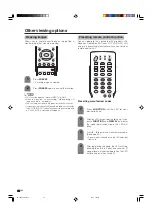
Other viewing options

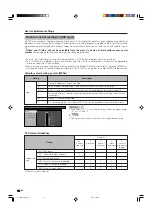
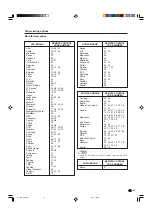
Manufacturer codes

Akai
Audio
Broksonic
Canon
Capehart
Craig
Curtis Mathis
Daewoo
DBX
Dynatech
Emerson
Fisher
Funai
G.E.
Goldstar
Hitachi
Instant Replay
JC Penney
JVC
Kenwood
Lloyds
Magnavox
Magnin
Marantz
Memorex
Minolta
Mitsubishi
Montgomery Ward
Multitech
NEC
Panasonic
Pentax
Philco
Philips
RCA
Realistic
Samsung
Sanyo
Scott
Sears
Sharp
Shintom
Sony
Sound Design
Sylvania
Symphonic
Tatung
Teac
Teknika
Thomas
TMK
Toshiba
Video Concepts
Yamaha
Zenith

25, 26, 37
15, 22, 30
32
04
34
10, 31
04
34
15, 22, 30
29
21, 32, 35
09, 10, 11
28, 29
04
24
06, 47
04
04, 06, 24, 30
15, 41, 42, 53
14, 15
29
04, 05, 08
31
30
04, 10, 24, 29
06
17, 18, 39, 40
02, 43
29
15, 22, 30
44, 45
05, 06
05
05, 08
06, 07, 33, 51
01, 02, 10, 24
23, 31
10, 14, 52
20
06, 11, 24
01, 02, 03
36
12, 13, 38
29
05, 08
29
15
15, 29
27, 29
29
21
19, 20
30
15, 29, 30
16

VCR BRAND

REMOTE CONTROL

CODE NUMBER

Denon
JVC
Kenwood
Magnavox
Marantz
Mitsubishi
Panasonic
Philips
Pioneer
Proscan
RCA
Samsung
Sharp
Sony
Toshiba
Yamaha
Zenith

02
09, 13
21
04
04
06
02, 22
04, 23
08, 11, 20
03
03, 24
07, 12
01, 10
05, 25
04
02
04

DVD/LD BRAND

REMOTE CONTROL

CODE NUMBER

Anvision
Cable Star
Eagle
General Instrument

Jerrold

Magnavox

Oak Sigma
Panasonic
Philips

Pioneer
Randtek
RCA
Scientific Atlanta
Sony
Viewstar

Zenith

04, 05
04, 05
05
02, 03, 07, 12, 13, 14,
19, 22
02, 03, 07, 12, 13, 14,
19, 22, 31, 32, 33, 34,
35, 36, 37, 38, 39, 40
04, 05, 09, 14, 17, 18,
20, 21, 24, 25
8
16, 23
04, 05, 09, 15, 17, 18,
20, 21, 24, 25
08, 10, 29, 30, 43*, 46
04, 05
16, 27, 44*, 45*
01, 26
28
04, 05, 09, 15, 17, 18,
20, 21, 24, 25
06, 14

CATV/SAT BRAND

REMOTE CONTROL

CODE NUMBER

Sharp

01

AUDIO BRAND

REMOTE CONTROL

CODE NUMBER

NOTE

• Numbers marked with * are SAT codes, all others are CATV

codes.

LC-37DB5U(E)-44-47

05.8.1, 1:18 PM

45

Summary of Contents for LC-37DB5U

Page 1: ...within the product s enclosure that may be of sufficient magnitude to constitute a risk of electric shock to persons The exclamation point within a triangle is intended to alert the user to the presence of important operating and maintenance servicing instructions in the literature accompanying the product IMPORTANT To aid reporting in case of loss or theft please record the TV s model and serial ...

Page 2: ...not installed and used in accordance with the instructions may cause harmful interference to radio communications However there is no guarantee that interference will not occur in a particular installation If this equipment does cause harmful interference to radio or television reception which can be determined by turning the equipment off and on the user is encouraged to try to correct the interf...

Page 3: ...been damaged in any way such as power supply cord or plug is damaged liquid has been spilled or objects have fallen into the apparatus the apparatus has been exposed to rain or moisture does not operate normally or has been dropped Additioinal Safety Information 15 Power Sources This product should be operated only from the type of power source indicated on the marking label If you are not sure of...

Page 4: ...refore it can break when the product is dropped or applied with impact Be careful not to be injured by broken glass pieces in case the panel breaks The Liquid Crystal panel is a very high technology product with 3 147 264 thin film transistors giving you fine picture details Occasionally a few non active pixels may appear on the screen as a fixed point of blue green or red Please note that this do...

Page 5: ...C SERVICE EQUIPMENT NEC NATIONAL ELECTRICAL CODE To prevent fire never place any type of candle or flames on the top or near the TV set To prevent fire or shock hazard do not expose this product to dripping or splashing No objects filled with liquids such as vases should be placed on the product To prevent fire or shock hazard do not place the AC cord under the TV set or other heavy items Turn off...

Page 6: ...r cabinet use the same method Do not use liquid or aerosol cleaners The screen is glass and can be scratched or broken when dropped or impacted QUICK INSTALLATION TIPS 1 Facing the back of the AQUOS television remove the terminal cover Press down the upper hooks to remove the cover toward you 2 Attach your antenna to the back of the TV See page 13 3 Connect the AC plug for the AQUOS television int...

Page 7: ...th skin can cause a rash If you find any chemical leakage wipe thoroughly with a cloth The batteries supplied with this product may have a shorter life expectancy due to storage conditions If you will not be using the remote control unit for an extended period of time remove batteries from it IMPORTANT The POWER indicator on the AQUOS television should light GREEN indicating you have power to the ...

Page 8: ...mage position 30 Moving the picture on the screen 30 Input Select 31 Input Label 32 Picture flip 32 AV MODE 33 View mode for 4 3 Programs 33 Digital Noise Reduction 34 Audio Only 34 Output Select 34 Quick Shoot 34 Color System 35 Program Title Display 35 Sleep Timer 35 Closed Captions and Digital Closed Captions 36 Caption Setup 37 Secret number setting for parental control 38 Parental control set...

Page 9: ...V AC cord enclosed in this product is for 110 125V In using it on the 125 240V AC please consult to the following SHARP ELECTRONICS CORPORATION 6100 Blue Lagoon Drive Suite 230 Miami Florida 33126 U S A Remote control unit g1 AAA size battery g2 Page 7 Page 7 Operation manual g1 Cable Clamp g1 Cable tie g1 Page 6 Page 6 LC 37DB5U E 01 13 05 8 1 0 34 PM 9 ...

Page 10: ...r TV Front POWER On Off button INPUT button Volume buttons VOLl k Channel buttons CHs r Remote control sensor OPC Optical Picture Control See page 23 OPC indicator NOTE See page 14 for TV status indicator LC 37DB5U E 01 13 05 8 1 0 34 PM 10 ...

Page 11: ...Press SYSTEM RESET if the TV does not operate after starting up NOTE Pressing RESET will not work if the TV is in standby mode Pressing RESET will not delete channel preset or secret number See page 39 for clearing the secret number when you know it See page 54 for initializing to the factory preset values when you forget your secret number AC INPUT terminal RS 232C terminal INPUT 2 terminals INPU...

Page 12: ... 15 LIGHT When pressed all buttons on the remote control unit will light The lighting will turn off if no operations are performed within about 5 seconds This button is used for performing operations in low light situations 16 VIEW MODE Select the screen size See page 33 17 ENT Enters a channel selection when choosing with the 0 9 buttons 18 FLASHBACK Return to the previous channel or input extern...

Page 13: ...n be attached to a 75 ohm terminal through a 300 75 ohm adapter Commercially available F type connector 75 ohm coaxial cable round 300 ohm twin lead cable flat F type connector 75 ohm coaxial cable When connecting the RF cable to the TV set do not tighten F type connector with tools If tools are used it may cause damage to your TV set The breaking of internal circuit etc F type connector should be...

Page 14: ...ff the power Press POWER on the TV or TV POWER on the remote control The TV enters standby mode and the image on the screen disappears The POWER indicator on the TV gradually turns off NOTE If you are not going to use this TV for a long period of time be sure to remove the AC cord from the power outlet Weak electric power is still consumed even when POWER is turned off TV POWER On Standby See page...

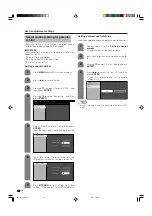
Page 15: ...by Mode CH Search Air ANALOG Language setting Select from among 3 languages English French and Spanish Antenna setting Make sure what kind of connection is made with your TV when selecting Air or Cable Example Press c d to select Yes for ANALOG then press b to move down Press c d to select Yes for DIGITAL Air then press b to move down Select Search Start and then press ENTER ANALOG Yes DIGITAL Air...

Page 16: ...n selecting a 1 digit channel number it is not necessary to press 0 before the number When you enter 0 9 only channel selection will be made if there is no operation for a few seconds To select a 3 digit channel number e g Channel 115 Press 1s1s5 NOTE When you enter 0 9 only channel selection will be made if there is no operation for a few seconds If you push 0 by itself nothing will happen Comple...

Page 17: ...ol unit Mutes the current sound output Press MUTE M will be displayed on the screen for 30 minutes and the sound is silenced NOTE Within 30 minutes of pressing MUTE mute can be canceled by using one of the methods below Mute will cancel if you press VOL l k or MUTE Mute will be canceled after 30 minutes have passed However the TV will not suddenly output a loud sound as the volume level is set to ...

Page 18: ... dynamic stereo sound SAP broadcasts Receive TV broadcasts in either MAIN or SAP sound MAIN sound The normal program soundtrack either in mono or stereo SAP sound Listen to second language supplementary commentary and other information SAP is mono sound If stereo sound is difficult to hear Obtain a clearer sound by manually switching to fixed mono sound mode Setting Digital broadcasting audio mode...

Page 19: ...Setup Page 20 CH Setup Page 20 Antenna Setup DIGITAL Page 21 Input Label Page 32 Parental CTRL Pages 38 43 Position Page 30 Picture Flip Page 32 Standby Mode Page 22 Language Page 22 Treble Page 25 Bass Page 25 Balance Page 25 Surround Page 25 Audio Only Page 34 Digital Noise Reduction Page 34 HDMI Setup Page 29 Input Select Page 31 Output Select Page 34 Quick Shoot Page 34 Color System Page 35 Ca...

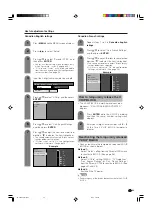
Page 20: ... from among 3 languages English French and Spanish Channel search Channel auto search makes the TV look for all channels viewable in the set area Channel Setup If initial setup does not memorize all the channels in your region follow the instructions below to manually memorize the channels Press MENU and the MENU screen displays Press c d to select Setup 1 2 3 Channel search Channel auto search ma...

Page 21: ...tenna to obtain the maximum signal strength 1 2 Press MENU and the MENU screen displays Press c d to select Setup Press a b to select Antenna Setup DIGITAL and then press ENTER If you already set the Secret No input the 4 digit secret number here See page 38 for setting a secret number 4 3 Press a b to select Signal Strength The signal strength of the DIGITAL Air antenna is displayed The signal in...

Page 22: ... to select Setup Press a b to select Standby Mode and then press ENTER 4 Press a b to select Mode1 or Mode2 and then press ENTER Selected item Description Mode1 Mode2 Starting TV is quick from standby Power consumption is small at the standby Basic adjustment settings Press a b c d to select the channel you want to delete and then press ENTER 3 ANALOG 3 ANALOG 18 D Air 10 1 A B C D ANALOG 3 A B C ...

Page 23: ... a specific adjustment item Press c d to adjust the item to your desired position Press c d to select Picture NOTE For resetting all adjustment items to factory preset values press a b to select Reset press ENTER press c d to select Yes and then press ENTER OPC setting Automatically adjusts the brightness of the screen Press c d to select Picture 2 Press MENU and the MENU screen displays 1 Press a...

Page 24: ...frames second analyzes it then recreates each still film frame for high definition picture quality Description Normal viewing mode Detects analyzes converts film source Selected item Off On Advanced picture adjustments This TV provides various advanced functions for optimizing the picture quality Press MENU and the MENU screen displays Press c d to select Picture Press a b to select Advanced and t...

Page 25: ...rayed out when Output Select is set to Variable For resetting all adjustment items to factory preset values press a b to select Reset press ENTER press c d to select Yes and then press ENTER Press c d to select Audio Press a b to select Surround and then press ENTER Press c d to select On and then press ENTER 2 3 4 Press MENU and the MENU screen displays 1 Surround Surround effects can be set usin...

Page 26: ...in No signal off 2 1 Disable Enable 3 2 1 Power Control Power control setting allows you to save energy Digital Setup This setting allows you to optimize the settings of Digital broadcasting Audio Setup You can output digital audio to an AV amplifier or similar device whose DIGITAL AUDIO INPUT terminal is connected to the DIGITAL AUDIO OUTPUT terminal on the TV Please select an audio output format...

Page 27: ...nput source toggles Refer to your external equipment operation manual for the signal type Displaying an external equipment image Explanation here is for the setting when connecting DVD to INPUT1 terminal INPUT button To watch a DVD image select INPUT1 from INPUT SOURCE menu using INPUT on the remote control unit or on the TV See page 31 INPUT SOURCE TV INPUT1 INPUT2 INPUT3 INPUT4 1 Auto COMPONENT ...

Page 28: ...e conveniently connected using the INPUT 1 to 3 terminals S video cable commercially available NOTE The S video terminal has priority over the video terminals INPUT 3 only To optical digital input of external audio devices Optical fiber cable Using Digital Audio Output It is possible to output audio through the DIGITAL AUDIO OUTPUT terminal See page 26 for details PCM audio outputs from the termin...

Page 29: ... and press ENTER Press a b c d to select the desired setting and press ENTER 6 NOTE Refer to your external equipment operation manual for the signal type When using an HDMI DVI conversion cable input the audio signal to AUDIO terminal of INPUT4 Selectable items RGB YCbCr 4 4 4 YCbCr 4 2 2 ITU601 ITU709 Standard Out of standard Enable Disable Digital Analog HDMI Setup items Signal Type Color Matrix...

Page 30: ...e previously memorized position Moving the picture on the screen You can move the picture around on the screen Press a b c d to move an image on the screen to the desired position Press ENTER to return to the original image position NOTE While pressing a b c d an on screen image Adjusting Position displays to the desired position This setting cannot be stored Once the TV shuts down or enters stand...

Page 31: ...ype For setting the signal type of external equipment connected to INPUT 1 or 2 terminals 4 Press a b to select a signal type you want to set and then press ENTER If the selected signal type is incorrect images are not displayed or displayed without any color NOTE If you set INPUT1 and INPUT2 to Auto the TV will automatically select the input signal Check the operation manual of the external equip...

Page 32: ...r the input mode and then press ENTER Example NOTE You cannot change labels if the INPUT SOURCE is TV Press MENU and the MENU screen displays 1 Press a b to select the desired mode and then press ENTER Press a b to select Picture Flip and then press ENTER Standard normal image ABC A B C ABC ABC Picture flip You can set the orientation of the picture Press INPUT to select the desired input source 1...

Page 33: ... TV INPUT 1 to 4 terminals Example AV MODE MOVIE AV MODE STANDARD AV MODE DYNAMIC AV MODE GAME AV MODE USER AV MODE DYNAMIC Fixed View mode for 4 3 Programs Press VIEW MODE The View mode menu displays The menu lists the view mode options selectable for the type of video signal currently received Side Bar Suitable for viewing conventional 4 3 programs in their normal format S Stretch Smart stretch ...

Page 34: ...justed with VOL k l on the remote control unit or VOL l k on the TV Sound via the MONITOR OUTPUT terminal is not adjustable and constantly outputs Sound via the MONITOR OUTPUT terminal is adjusted with VOL k l on the remote control unit or VOL l k on the TV Sound via speaker is muted Selected item Fixed Variable Output Select Allows you to select what controls the audio output Press MENU and the M...

Page 35: ...timer The TV will enter the standby mode when the remaining time reaches zero Sleep Timer Remaining 30 Color System Select the optimum color systems to receive Auto NTSC PAL M PAL N Press a b to select Color System and then press ENTER Press a b to select a compatible video signal system of your equipment and then press ENTER Program Title Display Select the CH display when changing channels for d...

Page 36: ...which you prefer Depending on the number of caption services in the signal being received you will see information such as 1 2 or 1 4 displayed 1 2 means the first of two services Example If a program has three services Digital CC ENG CC1 and Text1 the closed caption display will toggle in this sequence 1 3 ENG 2 3 CC1 3 3 Text1 OFF The CC button keeps a record of the last service selected in its ...

Page 37: ...Background Color Default Background Opacity Default Character Edge Default Reset A B C 123 4 1 2 3 Description The font specified by broadcasting station or default font Proportional font used in the MENU screen Monospaced with serifs Proportionally spaced with serifs Monospaced without serifs Proportionally spaced without serifs Casual font type Cursive font type Small capitals Selected item Defa...

Page 38: ...en as in step 5 to confirm 6 Setting parental control status Used to enable or disable the parental control function Press a b to select Status and then press ENTER Press c d to select On or Off and then press ENTER Select On to enable and Off to disable Parental CTRL V Chip Secret No Status On Off Repeat steps 1 to 3 in Setting a secret number Secret number setting menu displays 1 2 Input the 4 d...

Page 39: ...ct Secret No and then press ENTER Press c d to select Yes and then press ENTER Your secret number is cleared Press a b to select Secret No Clear and then press ENTER NOTE See page 38 for re registering with a new secret number after being cleared As a precautionary measure make a note of your secret number and keep it in a familiar place If you lose or forget your secret number initialize the TV t...

Page 40: ...ck MPAA rated movies Voluntary movie rating system MPAA Rating Age G PG PG 13 R NC 17 X General audiences All ages admitted Parental guidance suggested Some material may not be suitable for children Parents strongly cautioned Some material may be inappropriate for children under 13 Restricted Under 17 requires accompanying parent or adult guardian age varies in some jurisdictions No one 17 and und...

Page 41: ...rench Ratings PG 13 R NC 17 X NONE PG G TV Parental Guidelines TV Guidelines Repeat steps 1 to 5 in Voluntary movie rating system MPAA 1 2 Press a b to select TV Guidelines and then press ENTER Press a b to adjust the item to your desired position indicates the item is blocked The setting automatically enters Block for any ratings below your selection 3 MPAA TV Guidelines Can English Ratings Can F...

Page 42: ...ce but may not be suitable for younger children under the age of 8 because it could contain controversial themes or issues Over 14 Years Could contain themes where violence is one of the dominant elements of the storyline but it must be integral to the development of plot or character Language usage could be profane and nudity present within the context of the theme Adults Intended for viewers 18 ...

Page 43: ...ctable from the menu if you do not first configure your secret number See page 38 5 Press a b to select V Chip and then press ENTER 6 4 7 How to temporarily release the V CHIP BLOCK The V CHIP BLOCK is working and censors a broadcast V CHIP HAS BEEN ACTIVATED displays Reactivating the temporarily released V CHIP BLOCK You can reactivate the temporarily released V CHIP BLOCK as shown below Method 1...

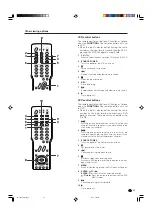
Page 44: ...our remote control unit Presetting manufacturer codes Press FUNCTION until the LED for your device lights up After the LED for your device lights up if you press FUNCTION and DISPLAY and enter the code registration mode the LED will blink Press 0 9 to enter the manufacturer code See page 45 Preset mode is finished once the LED no longer lights up 1 2 3 After registering the code the LED will stop ...

Page 45: ...1 02 03 36 12 13 38 29 05 08 29 15 15 29 27 29 29 21 19 20 30 15 29 30 16 VCR BRAND REMOTE CONTROL CODE NUMBER Denon JVC Kenwood Magnavox Marantz Mitsubishi Panasonic Philips Pioneer Proscan RCA Samsung Sharp Sony Toshiba Yamaha Zenith 02 09 13 21 04 04 06 02 22 04 23 08 11 20 03 03 24 07 12 01 10 05 25 04 02 04 DVD LD BRAND REMOTE CONTROL CODE NUMBER Anvision Cable Star Eagle General Instrument J...

Page 46: ... before 4 CH r s Press CH r or CH s to tune in a higher or lower channel Some manufacturers do not preset FLASHBACK NOTE CABLE and SAT cannot be selected at the same time 1 2 3 4 1 2 3 SAT control buttons 1 SOURCE POWER Turns the Satellite broadcast tuner power on and off 2 0 9 DOT Press a button or buttons that corresponds to the channel that you wish to watch 3 ENTER a b c d ENTER Press to activ...

Page 47: ...he input selector button having the same number as the input terminal connecting a DVD player is pressed these players can operate using 1 to 10 1 U Pressing quickly once takes you to the start of the next chapter Each time you press it you move ahead to the start of the next chapter 2 T Pressing quickly once takes you to the start of the chapter currently playing Each time you press it you move b...

Page 48: ...ce personnel Customers should not attempt to do the work themselves SHARP bears no responsibility for improper mounting or mounting that results in accident or injury Using an optional bracket to mount the TV You can ask a qualified service professional about using an optional bracket to mount the TV to the wall Carefully read the instructions that come with the bracket before beginning work Verti...

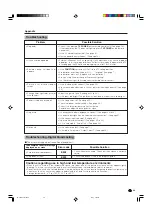
Page 49: ...sleep timer set See page 35 Check the power control settings See page 26 The unit s internal temperature has increased Remove any objects blocking vent or clean Is connection to other components correct See pages 28 to 29 Is correct input signal source selected after connection See page 31 Is the correct input selected See page 31 Is picture adjustment correct See pages 23 to 24 Is On selected in ...

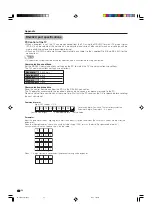
Page 50: ...gth Stop bit Flow control 9 600 bps 8 bits None 1 bit None Appendix Command format Communication procedure Send the control commands from the PC via the RS 232C connector The TV operates according to the received command and sends a response message to the PC Do not send multiple commands at the same time Wait until the PC receives the OK response before sending the next command Eight ASCII codes ...

Page 51: ... N P 1 INPUT SELECTION A TOGGLE INPUT SELECTION B AV MODE SELECTION VOLUME POSITION VIEWMODE SLEEP TIMER CHANNEL CC DIRECT ANALOG DIGITAL CH UP CH DOWN CHANNEL H POSITION H POSITION V POSITION INPUT 1 A V M D V O L M H P O S V P O S O F T M D C C H C H U P C H D W C L C P W I D E 0 x x 0 1 2 0 0 x x x 1 0 1 2 3 4 1 2 3 4 5 6 _ _ _ _ _ _ _ _ _ _ _ _ _ _ _ _ _ _ _ _ _ _ _ _ _ _ _ _ _ _ _ _ _ _ _ _ _...

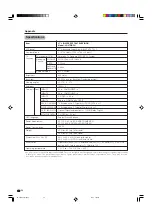
Page 52: ...provement without prior notice The performance specification figures indicated are nominal values of production units There may be some deviations from these values in individual units Specifications LCD panel 37o Advanced Super View BLACK TFT LCD Number of dots 3 147 264 dots 1366 m 768 m 3 dots Brightness 450 cd m2 Backlight 60 000 hours at Backlight Standard position Viewing angles H 170 V 170 ...

Page 53: ...rawings 2613 32 671 431 2 1105 323 8 822 6 77 8 200 123 64 306 431 64 114 41 8 105 7 7 8 200 4 1 64 104 22 1 8 562 3 11 32 85 25 15 32 647 18 17 64 463 9 14 31 64 367 8 Unit inch mm LC 37DB5U E 48 56 05 8 1 1 19 PM 53 ...

Page 54: ...mber You can run the EZ Setup again by using the following steps 1 Turn on the power of the TV 2 Press MENU Make sure the menu screen displays 3 Press c d to select Setup 4 Press a b to select EZ Setup 5 Press ENTER NOTE If the secret number setting screen displays you need to enter your secret number If you forget your secret number refer to HOW TO SET THE FACTORY PRESETS above NOTE As a precauti...

Page 55: ...od of time described herein shall constitute complete fulfillment of all liabilities and responsibilities of Sharp to the purchaser with respect to the Product and shall constitute full satisfaction of all claims whether based on contract negligence strict liability or otherwise In no event shall Sharp be liable or in any way responsible for any damages or defects in the Product which were caused ...

Page 56: ...ranty service may be obtained upon delivery of the Sharp product together with proof of purchase and a copy of this LIMITED WARRANTY statement to an Authorized Sharp Service Centre or an Authorized Sharp Servicing Dealer In home warranty service may be provided at Sharp s discretion on any Sharp television with the screen size of 27 or larger and on any Sharp Over the Range Microwave Oven This war...

Reviews: