background image

English

   - 20 -

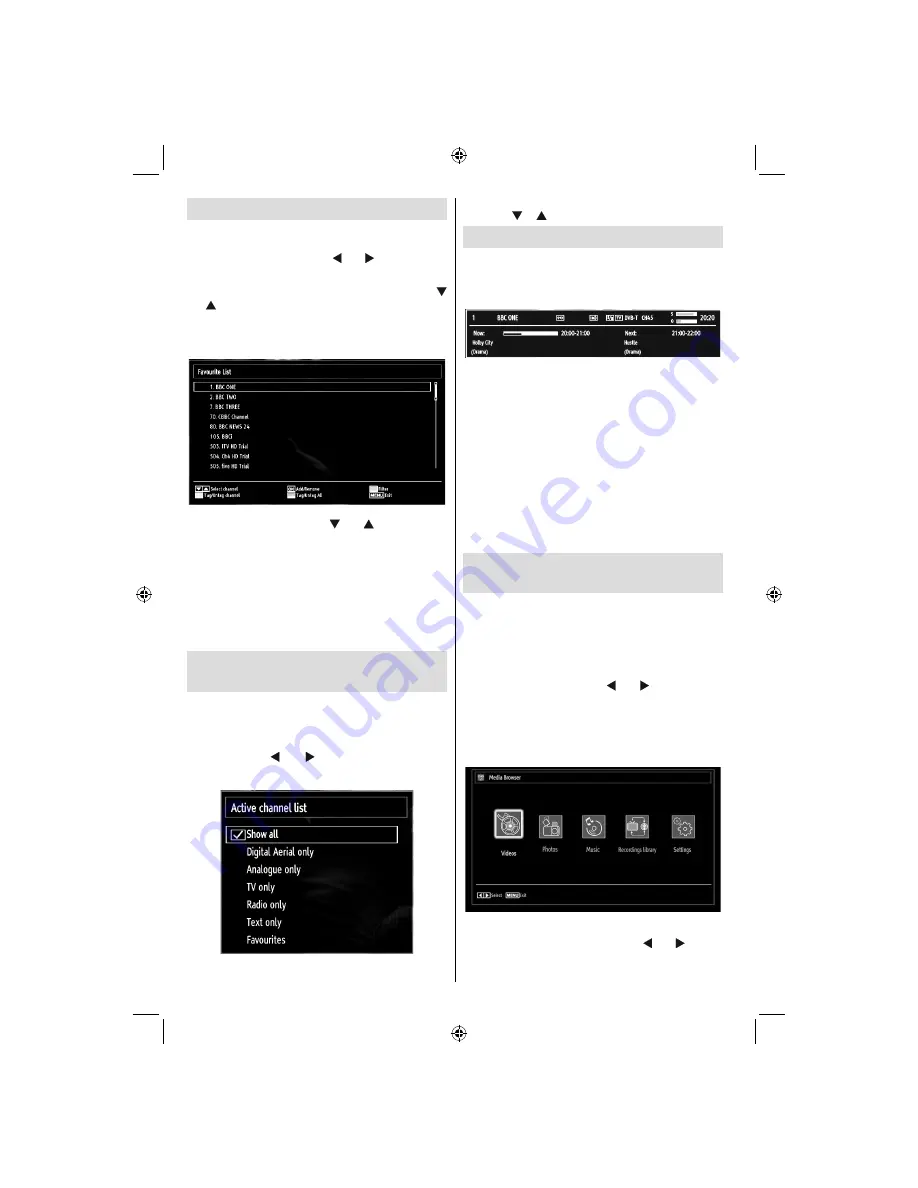
Managing Stations: Favourites

You can create a list of favourite programmes.

Press 

• 

“MENU”

 button to view main menu. Select 

Channel List item by using “ ” or “ ” button. Press 

OK

 to view menu contents.

Select 

• 

Favourites

 to manage favourite list. Use “

”/“ ” and 

OK

 buttons to select 

Favourites

.

You can set various channels as favourites so that 

• 

only the favourite channels are navigated.

Select a channel by using “

• 

” or “ ” button. Press 

OK

 button to add selected channel to favourites list. 

Press 

OK

 button again to remove. 

Button Functions

OK

• 

: Add/remove a station.

YELLOW

• 

: Tag/untag a channel.

GREEN

• 

: Tag/untag all channels.

BLUE

• 

: Displays 

fi

 ltering options.

Managing Stations: Sorting 
Channel List

You can select broadcasts to be listed in the channel 
list. To display speci

fi

 c types of broadcast, you should 

use Active channel list setting.

Select Active channel list from the Channel list 
menu by using “ ” or “ ” button. Press 

OK

 button 

to continue.

You can select a broadcast type option from the list 
by using “ ” /“ ” and

 OK

 buttons.

On-Screen Information

You can press 

“INFO”

 button to display on-screen 

information. Details of the station and current 
programme will be displayed on the information 
banner.

The information banner gives information on the 
channel selected and the programmes on it. The 
name of the channel is displayed, along with its 
channel list number. 

Hint: Not all channels broadcast 

the programme data. If the name and time of the 
programme are not available, then information banner 
will be displayed with blanks.


If the selected channel is locked, you must enter the 
correct four-digit numeric code to view the channel 
(default code is 

0000

). “

Enter PIN

” will be displayed 

on the screen in such a case:

Note: If the Country option is set to France, you can 
use 4725 as the default code.

Media Playback Using Media 
Browser

If the USB stick is not recognized after power off/on 
or First Time Installation, 

fi

 rst, plug the USB device 

out and power off/on the TV set. Plug the USB device 
in again.

To display Media Browser window, press either 

MENU

” button on the remote control and then select 

Media Browser by pressing “ ” or “ ” button. Press 

OK

 button to continue. Media Browser menu options 

will be displayed. 

Also, when you plug USB devices, media browser 
screen will be displayed automatically:

You can play music, picture and video 

fi

 les from the 

connected USB memory stick. Use “ ” or “ ” button 
to select Videos, Photos, Music, Recording Library 
or Settings. 

A01_MB61_[GB]_1910UK_IDTV_TC_PVR_BRONZE16_32942LED_100Hz_ROCKER_10072539_50185773.indd   20

A01_MB61_[GB]_1910UK_IDTV_TC_PVR_BRONZE16_32942LED_100Hz_ROCKER_10072539_50185773.indd   20

21.07.2011   14:30:22

21.07.2011   14:30:22

Summary of Contents for LC-32LE530E

Page 1: ...ATION MANUAL ENGLISH 50185773 SHARP ELECTRONICS Europe GmbH Sonninstraße 3 D 20097 Hamburg SHARP CORPORATION http www sharp eu com DEUTSCH FRANÇAIS LCD FARB TV BEDIENUNGSANLEITUNG TÉLÉVISEUR LCD COULEUR MODE D EMPLOI LC 32LE530E ...

Page 2: ...Managing Stations Sorting Channel List 20 On Screen Information 20 Media Playback Using Media Browser 20 Viewing Videos via USB 21 Viewing Photos via USB 21 Slideshow Options 21 Playing Music via USB 22 Recordings Library 22 Media Browser Settings 22 Timeshift Recording 23 Instant Recording 23 Watching Recorded Programmes 23 Changing Image Size Picture Formats 24 Configuring Picture Settings 25 Op...

Page 3: ...elow IMPORTANT The wires in the mains lead are coloured in accordance with the following code Blue Neutral Brown Live As the colours of the wires in the mains lead of this product may not correspond with the coloured markings identifying the terminals in your plug proceed as follows The wire which is coloured blue must be connected to the plug terminal which is marked N or coloured black The wire ...

Page 4: ...r to the first usage of the device even when the usage of electronic devices is familiar to you Notice especially the chapter SAFETY PRECAUTIONS Carefully keep the handbook as future reference When selling the device or giving it away absolutely give these direction for use Thank you for choosing this product This manual will guide you for the proper operation of your TV Before operating the TV pl...

Page 5: ... such as a bookcase or rack unless proper ventilation is provided or the manufacturer s instructions are followed The LCD panel used in this product is made of glass Therefore it can break when the product is dropped or impact applied If the LCD panel is broken be careful not to be injured by broken glass Heat sources Keep the product away from heat sources such as radiators heaters stoves and oth...

Page 6: ... heat such as sunshine fire or the like Lightning In case of storm and lightning or when going on holiday disconnect the power cord from the wall outlet Replacement Parts When replacement parts are required make sure that the service technician has used replacement parts which are specified by the manufacturer or have the same specifications as the original one Unauthorized substitutions may resul...

Page 7: ...fire the power cord should principally be separated from the mains socket prior to a longer period of non usage i e during vacations HDMI the HDMI logo and High Definition Multimedia Interface are trademarks or registered trademarks of HDMI Licensing LLC Manufactured under license from Dolby Laboratories The HD TV 1080p Logo is a trademark of EICTA The DVB logo is the registered trademark of the D...

Page 8: ...to optimum level Note that some picture settings will be unavailable to be changed when the TV is in Power Save Mode When the TV is not used please switch off at the rear rocker switch to further reduce power consumption Disconnect the TV from the mains socket when it will not be used for prolonged periods When the TV is left in stand by it consumes a small amount of power switching off at the rea...

Page 9: ...owser Loop Shuffle in Media Browser Picture mode selection Changes picture mode 21 in Media Browser video mode No function 22 Teletext Mix in TXT mode 23 Subtitle on off in DVB channels 24 Previous programme 25 AV Source selection 26 Menu on off 27 Okay Confirm Hold in TXT mode Edit 28 Channel List Exit Return Index page in TXT mode 29 No function 30 Info Reveal in TXT mode 31 Volume Up Down 32 No...

Page 10: ...ct the component video cables between the COMPONENT VIDEO INPUTS on on the TV and the component video outputs of your device While connecting be sure that the letters on your TV Y Pb Pr correspond with your device s connectors PC YPbPr Audio Inputs 4 are used for connecting audio signals of a PC or a device that connects to the TV via YPbPr Connect the PC audio cable between the AUDIO INPUTS on th...

Page 11: ... connecting video and audio signals of external devices To make a video connection you must use the supplied AV connection cable for enabling connection First plug singular jack of the cable to the TV s Side AV socket Afterwards insert your video cable s not supplied connector into the YELLOW input located on the plural side of the supplied AV connection cable Colours of the connected jacks should...

Page 12: ...al damage to the USB player and especially the USB device itself Do not pull out USB module while playing or recording a file Programme Recording To record a programme you should first connect a USB disk to your TV while the TV is switched off You should then switch on the TV to enable recording feature IMPORTANT When using a new USB hard disk drive it is recommended that you first format the disk...

Page 13: ...ns on a HDD unit can be supported Some stream packets may not be recorded because of signal problems so sometimes video may freezes during playback Record Play Pause Display for PlayListDialog keys could not be used when teletext is ON If a recording starts from timer when teletext is ON teletext is automatically turned off Also teletext usage is disabled when there is ongoing recording or playbac...

Page 14: ...uivalent type batteries inside Observe the correct polarity when inserting batteries and replace the battery cover Note Remove the battery from remote control handset when it is not to be used for a long period Otherwise it can be damaged due to any leakage of batteries Remote range is approximately 7m 23ft Switching On Off To Switch the TV On Connect the power cord to the 220 240V AC 50 Hz Switch...

Page 15: ...e level scale slider will be displayed on the screen Programme Selection Previous or Next Programme Press CH button to select the previous programme Press CH button to select the next programme Programme Selection Direct Access Press numeric buttons on the remote control to select programmes between 0 and 9 The TV will switch to the selected programme To select programmes between press the numeric...

Page 16: ...nu Using this feature you can search the programme guide database in accordance with the genre Info available in the programme guide will be searched and results matching your criteria will be listed SWAP Now Shows the current programme Recording via EPG Screen IMPORTANT To record a programme you should first connect a USB disk to your TV while the TV is switched off You should then switch on the ...

Page 17: ...u want to set and press button to highlight Teletext Language option Use or button to select desired Teletext Language Press button after setting Teletext Language option Scan Encrypted will be then highlighted You can set Scan Encrypted as Yes if you want to scan coded stations Afterwards select the desired Teletext Language Press OK button on the remote control to continue and the following mess...

Page 18: ...ppear on the screen To start installation process select Yes to cancel select No by using or and OK button After auto channel scan type is set and selected and confirmed installation process will start and progress bar will move along Press MENU button to cancel process In such a case located channels are not stored Manual Tuning HINT This feature can be used for direct broadcast entry Select Manu...

Page 19: ...to continue or select No to cancel If you start Digital Aerial scan process automatic scanning will start You can press MENU button to cancel If you start Digital Cable scan process the following screen will be displayed You can select frequency ranges from this screen For highlighting lines you see use or button You can enter the frequency range manually by using the numeric buttons on the remote...

Page 20: ... all channels YELLOW button to tag untag channel Select the channel that you want to delete and select Delete option Press OK button to continue A warning screen will appear Select YES to delete select No to cancel Press OK button to continue Renaming a Channel Select the channel that you want to rename and select Edit Name option Press OK button to continue Pressing or button moves to the previou...

Page 21: ...e channel selected and the programmes on it The name of the channel is displayed along with its channel list number Hint Not all channels broadcast the programme data If the name and time of the programme are not available then information banner will be displayed with blanks If the selected channel is locked you must enter the correct four digit numeric code to view the channel default code is 00...

Page 22: ...ward button Goes forward Subtitle Audio LANG button Sets subtitle Audio Jump GREEN button Jumps to time Use numeric buttons to type the desired time and press GREEN button again to proceed Yellow Opens subtitle time correction menu Press SWAP button to switch back to previous menu Viewing Photos via USB When you select Photos from the main options available image files will be filtered and listed ...

Page 23: ...switched off You should then switch on the TV to enable recording feature Otherwise recording feature will not be available To view the list of recordings select Recordings Library and press the OK button Recordings Library will then be displayed with available recordings All the recordings are kept in a list in the recordings library RED button Delete Erases the selected recording GREEN button Ed...

Page 24: ...ecording IMPORTANT To record a programme you should first connect a USB disk to your TV while the TV is switched off You should then switch on the TV to enable recording feature Otherwise recording feature will not be available Press RECORD button to start recording an event instantly while watching a programme The following OSD appears on the screen Record OSD will then be displayed for a short t...

Page 25: ...e is completely independent of WSS information which could be included in the broadcast signal or the signal from an external device Note Auto mode only will be available in HDMI YPbPr and DTV sources 16 9 This uniformly stretches the left and right sides of a normal picture 4 3 aspect ratio to fill the wide TV screen For 16 9 aspect ratio pictures that have been squeezed into a normal picture 4 3...

Page 26: ...ural Contrast Sets the lightness and darkness values of the screen Brightness Sets the brightness value for the screen Sharpness Sets the sharpness value for the objects displayed on the screen Colour Sets the colour value adjusting the colors Colour Shift Adjust the desired colour tone Colour Temp Sets the desired colour tone Setting Cool option gives white colours a slight blue stress For normal...

Page 27: ...ntical to the settings explained in main menu system PC Position Select this to display PC position menu items Autoposition Automatically optimizes the display Press OK to optimize H Position This item shifts the image horizontally to right hand side or left hand side of the screen V Position This item shifts the image vertically towards the top or bottom of the screen Dot Clock Dot Clock adjustme...

Page 28: ... Using a Conditional Access Module IMPORTANT Insert or remove the CI module only when the TV is SWITCHED OFF In order to watch certain digital channels a conditional access module CAM can be necessary This module must be inserted in the CI slot of your TV Obtain the Conditional Access Module CAM and the viewing card by subscribing to a pay channel company then insert those to the TV using the foll...

Page 29: ...onfiguration menu highlight the Language Settings item by pressing or buttons Press OK and Language Settings submenu will be displayed on the screen Use or buttons to highlight the menu item that will be adjusted and then press or button to set Notes System Language determines the on screen menu language Audio Language is used for selecting the soundtrack of a channels Primary settings are the fir...

Page 30: ...tting Sleep Timer This setting is used for setting the TV to turn off after a certain time Highlight Sleep Timer by using or button Use or button to set The timer can be programmed between Off and 2 00 hours 120 minutes in steps of 30 minutes Setting Programme Timers You can set programme timers for a particular programme using this feature Press button to set timers on an event Programme timer fu...

Page 31: ... to France you can use 4725 as the default code After you enter the pin a pop up menu appears on the screen to ensure that the hard disk should be formatted select YES and press OK to format the hard disk Select NO and press OK to cancel Ensure you back up important recordings before you format the USB disk unit Hard Disk Info To view the details about the USB disk highlight Hard Disk Info by usin...

Page 32: ...ode You can enable or disable automatic upgrade by setting Automatic Scanning option You can manually search for new software by selecting Scan for upgrade Hard of Hearing If the broadcaster enables any special signal concerning the audio you can set this setting as On to receive such signals Audio Description Audio description refers to an additional narration track for blind and visually impaire...

Page 33: ...e channel is changed Teletext The teletext system transmits information such as news sports and weather on your TV Note that if the signal degrades for example in poor adverse weather conditions some text errors may occur or the teletext mode may be aborted Teletext function buttons are listed below TXT Teletext Mix Activates teletext mode when pressed once Press again to place the teletext screen...

Page 34: ... the aerial If you are in doubt consult your dealer No Picture means that your TV is not receiving a transmission Have you selected the correct button on the remote control Try once more Also make sure the correct input source has been selected Sound You can not hear any sound Did you perhaps interrupt the sound pressing the button Sound is coming from only one of the speakers Is the balance set t...

Page 35: ... NTSC 60 O RGB 50 O RGB 60 O EXT 2 SCART 2 PAL 50 60 O NTSC 60 O RGB 50 X RGB 60 X SIDE AV PAL 50 60 O NTSC 60 O YPbPr 480I 60Hz O 480P 60Hz O 576I 50Hz O 576P 50Hz O 720P 50Hz O 720P 60Hz O 1080I 50Hz O 1080I 60Hz O 1080P 50Hz O 1080P 60Hz O HDMI1 HDMI2 480I 60Hz O 480P 60Hz O 576I 50Hz O 576P 50Hz O 720P 50Hz O 720P 60Hz O 1080I 50Hz O 1080I 60Hz O 1080P 50Hz O 1080P 60Hz O 1080P 24Hz O X Not Av...

Page 36: ... Video Decoder MSVD Audio Decoder MSAD Audio MP3 None MP3 Audio WAV AIFF None LPCM Windows Media optional WMA ASF VC1 WMA MPEG1 Program Stream MPEG 1 MPEG1 MP3 AC 3 and PCM MPEG2 Program Stream MPEG 2 MPEG2 MP3 AC 3 and PCM MPEG4 MPEG 4 H264 in MP4 container H264 and MPEG4 AAC AVI Xvid XVID MPEG4 MP3 AC 3 and PCM A01_MB61_ GB _1910UK_IDTV_TC_PVR_BRONZE16_32942LED_100Hz_ROCKER_10072539_50185773 ind...

Page 37: ...ration Reboot is the last step in software upgrade operation if download of new software is finished successfully During reboot TV makes final initializations In reboot sequence panel power is closed and front led indicates the activity with blinking Around 5 minutes later TV restarts with new software activated If your TV fails to restart in 10 minutes unplug power for 10 minutes and re plug agai...

Page 38: ...pport compliant with ISO IEC 135818 6 and UK DTT profile UK only Frequency range 474 850 MHz for UK models II VIDEO H 264 MPEG 4 part 10 main and high profile level 4 1 MPEG 2 MP HL video decoder HD display multi format capable 1080i 720p 576p CVBS analogue output In HD channels this will not be available III AUDIO MPEG 1 layer I II MPEG 2 layer II AAC HEAAC AC3 E AC3 Sampling frequencies supporte...

Page 39: ...awings A01_MB61_ GB _1910UK_IDTV_TC_PVR_BRONZE16_32942LED_100Hz_ROCKER_10072539_50185773 indd 38 A01_MB61_ GB _1910UK_IDTV_TC_PVR_BRONZE16_32942LED_100Hz_ROCKER_10072539_50185773 indd 38 21 07 2011 14 30 31 21 07 2011 14 30 31 ...

Page 40: ...sposal A01_MB61_ GB _1910UK_IDTV_TC_PVR_BRONZE16_32942LED_100Hz_ROCKER_10072539_50185773 indd 39 A01_MB61_ GB _1910UK_IDTV_TC_PVR_BRONZE16_32942LED_100Hz_ROCKER_10072539_50185773 indd 39 21 07 2011 14 30 38 21 07 2011 14 30 38 ...

Page 41: ...Unscrew the 4 screws that attach the foot assembly to the panel and remove the foot assembly from the panel A01_MB61_ GB _1910UK_IDTV_TC_PVR_BRONZE16_32942LED_100Hz_ROCKER_10072539_50185773 indd 40 A01_MB61_ GB _1910UK_IDTV_TC_PVR_BRONZE16_32942LED_100Hz_ROCKER_10072539_50185773 indd 40 21 07 2011 14 30 39 21 07 2011 14 30 39 ...

Page 42: ... To the product LC 32LE510E LC 32LE530E Ø4 30 8 To the wall M4 18 4 To the product LC 40LE510E LC 40LE530E Ø4 30 8 To the wall M8 30 4 To the product LC 32SH130E LC 32SH130K LC 32SH340E Ø4 30 8 To the wall M6 30 4 To the product LC 40SH340E LC 40SH340K Ø4 30 8 To the wall M6 30 4 To the product A01_MB61_ GB _1910UK_IDTV_TC_PVR_BRONZE16_32942LED_100Hz_ROCKER_10072539_50185773 indd 41 A01_MB61_ GB _...

Reviews: