background image


12

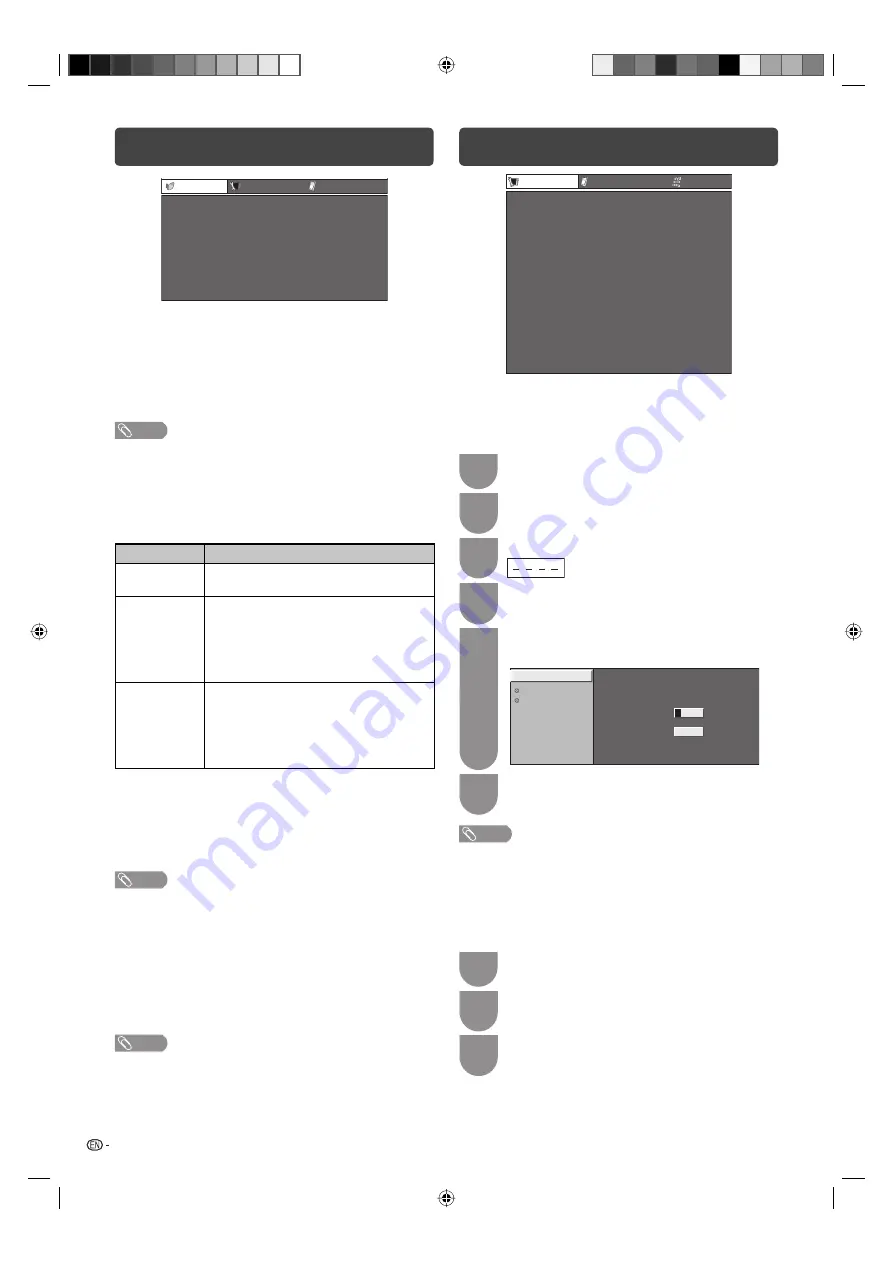
ECO menu

[ 3hr.]

No operation off

Ecology

Option

Power management

4

Setup

[ Enable]

No signal off

ECO

H

 No signal off

You can set the TV to automatically power off in about 
15 minutes after the TV goes into a state of receiving 
no programme signals, such as the end of a broadcast 
day. (Enable, Disable)

• Five minutes before the power shuts down, the remaining 

time displays every minute.

NOTE 

• “Disable” is the factory preset value.
• When a TV programme fi nishes, and the TV receives signal 

input, this function may not operate.

H

 Power management (PC input mode only)

You can set the TV to automatically power off when no
image is displayed on PC.

Selected item

Description

Off

• No power management 
• Factory preset value.

Mode1

• If no signal inputs for approximately

8 minutes, the power shuts down.

• Even if you start using the PC and the 

signal inputs again, the TV stays off.

• The TV turns on again by pressing 

POWER

. (See page 7.)

Mode2

• If no signal inputs for approximately

8 seconds, the power shuts down.

• When you start using the PC and the 

signal inputs again, the TV turns on.

• The TV turns on again by pressing 

POWER

. (See page 7.)

H

 No operation off

You can set the TV to automatically power off when no 
TV operation is performed for more than 3 hours.
(30 min., 3 hr., Disable)

• Five minutes before the power shuts down, the remaining 

time displays every minute.

NOTE 

• “Disable” is the factory preset value.

H

 Ecology

When set to “Yes”, the TV activates the following 
power saving mode.

• “OPC” set to “On” (Page 11)
• “No signal off” set to “Enable” (Page  12)
• “Power management” set to “Mode1” (Page 12)
• “No operation off” set to “3 hr.” (Page 12)
• “Quick start” set to “Off” (Page 14).

NOTE 

• Ecology mode cannot be deactivated by selecting “No”. 

Each setting must be changed individually to deactivate 
Ecology mode.

Setup menu

Auto installation

Analogue programme setup

Digital programme setup

Input skip

Input label

4

4

Position

4

Text language

Identification

Reset

[ On]

[ Panorama]

[ Off]

[ West Europe]

Setup

Option

HDMI auto view

WSS

4:3 mode

Quick start

Child lock

Digital setup

H

 Child lock (ATV and DTV input mode only)

Allows you to use a password to protect certain 
settings from being accidentally changed.

Setting a password

1

Repeat steps 1 to 2 in 

Menu operation

.

2

Press 

a

/

b

 to select “Child lock”, and then 

press 

ENTER

3

If you already set the password, enter it here.

4

Press 

a

/

b

 to select “Change password”, and 

then press 

ENTER

.

5

Enter the 4-digit number as a password using 

0 — 9

.

New password

–  –  –  –

Reconfirm

Change password

Clear password

Parental rating

– 

 –  –  –

Enter your new password. Use 4 digits

6

Enter the same 4-digit number as in step 5 to 
confi rm.

NOTE 

• To view a locked channel (Lock setting in Analogue 

programme setup “Manual adjust” is set to “On”), you must 
enter a password. When you select a locked channel, “Child 
lock has been activated” is displayed.

• Press 

ENTER

 to display the password input window.

Clearing the password

Allow you to clear your password.

1

Repeat steps 1 to 3 in 

Setting a password

.

2

Press 

a

/

b

 to select “Clear password”, and 

then press 

ENTER

3

Press 

c

/

d

 to select “Yes”, and then press 

ENTER

LC32L450X_EN.indb   12

LC32L450X_EN.indb   12

05/08/10   02:54:33 PM

05/08/10   02:54:33 PM

Summary of Contents for LC-32L450X

Page 1: ...MODEL LC 32L450X LC 40L550X LC 40L650X LCD COLOUR TELEVISION OPERATION MANUAL Only for LC 40L550X LC 40L650X Cover_LC32L450X indd 1 Cover_LC32L450X indd 1 09 08 10 10 24 32 AM 09 08 10 10 24 32 AM ...

Page 2: ...Cover_LC32L400X indd 2 Cover_LC32L400X indd 2 22 07 10 02 22 38 PM 22 07 10 02 22 38 PM ...

Page 3: ...cture menu 11 Audio menu 11 ECO menu 12 Page Setup menu 12 Option menu 14 Digital setup menu 16 Programme Guide 17 Info 17 ATV Analogue DTV RADIO buttons 18 Switching the analogue audio format 18 EPG 20 Picture and still image 21 Wide Mode 21 Teletext function 22 PC Control of the TV 22 PC compatibility chart 23 RS 232C commands list 23 USB Media Player 24 Appendix 28 Specifications 29 Protection ...

Page 4: ...within product specifications and does not constitute a fault Precautions when transporting the TV When transporting the TV never carry it by holding or otherwise putting pressure onto the display Be sure to always carry the TV by two people holding it with two hands one hand on each side of the TV Do not display a still picture for a long time as this could cause an afterimage to remain Install t...

Page 5: ...th hands Put one hand on the TV and rotate the screen while steadying the stand with your other hand The TV can be rotated up to 15 degrees to the right or left Setting the TV Connecting the antenna cable To enjoy a clearer picture use an outdoor antenna AC INPUT AC INPUT To AC INPUT terminal Standard DIN45325 plug IEC169 2 75 ohm coaxial cable round cable Room antenna terminal 75 ohm type Antenna...

Page 6: ...necting a DVD player Digital TV STB Set Top Box You can use the INPUT 1 INPUT 2 INPUT 3 HDMI or INPUT 6 terminals when connecting to a DVD player Digital TV STB Set Top Box and other audiovisual equipment When using HDMI certified cable commercially available When using component cable commercially available AC INPUT DVD player Digital TV STB Set Top Box AC INPUT Y PB CB PR CR AUDIO L R 6 6 L R AU...

Page 7: ...Set the area of magnification See page 22 25 DTV Press to access DTV mode See page 18 26 ATV Press to access ATV mode See page 18 1 e Mute Press e s Mutes sound Press e again s Restores sound Mute will be cancelled after 30 minutes However the TV will not suddenly output loud sound as the volume level will be set to 0 automatically Increase the volume level by pressing VOL k 2 0 9 Set the channel ...

Page 8: ...jack 3 5 mm The INPUT 1 and INPUT 7 terminals can both use the same analogue audio input terminal However the proper item must be selected in the PC audio select menu See page 14 USB terminal use for USB Media Player See page 24 The illustrations in this operation manual are for explanation purposes and may vary slightly from the actual operations The illustrations used throughout this manual are ...

Page 9: ... refer to page 14 to reset the unit Checking Signal information If you install a DVB T antenna for the first time or relocate it you should adjust the alignment of the antenna to receive a good reception while checking the antenna setup screen 1 Press MENU and the MENU screen displays 2 Press c d to select Setup 3 Press a b to select Digital programme setup and then press ENTER Turning the TV on o...

Page 10: ...e service CH Skip G Services with Skip are passed over when pressing r s in the TV remote control unit Sort B The item position of services can be sorted Checking Signal information Continued H Checking Signal information Press a b to select Signal information Signal information Auto search Manual search Manual adjust Antenna power Signal strength Signal quality Current Maximum Channel number 100 ...

Page 11: ...t to On for a channel Child lock has been activated is displayed when you select the channel and the image and sound of the channel is blocked When pressing ENTER while Child lock has been activated is displayed password input menu will be displayed Inputting the correct password lifts the child lock temporarily until the power is turned off Programme setup Continued The item position of services ...

Page 12: ...nder the AV mode selection Menu operation 1 Press MENU and the MENU screen displays 2 Press c d to select the desired menu Picture Audio ECO Setup Option Digital setup 3 Press a b to select the desired menu item Press ENTER to proceed if necessary 4 Press a b or c d to select the desired item or adjust the item to the desired level Press ENTER if necessary Programme setup Continued H Sort Analogue...

Page 13: ...eset values press a b to select Reset press ENTER press c d to select Yes and then press ENTER Picture menu 16 30 40 30 30 10 Picture Audio ECO AV mode OPC Backlight Contrast Brightness Colour Tint Sharpness Advanced Reset STANDARD Off 0 16 16 30 0 0 4 2 30 30 30 10 H OPC Optical Picture Control setting You can set the TV to automatically adjust the screen to suitable backlight brightness accordin...

Page 14: ... set to On Page 11 No signal off set to Enable Page 12 Power management set to Mode1 Page 12 No operation off set to 3 hr Page 12 Quick start set to Off Page 14 NOTE Ecology mode cannot be deactivated by selecting No Each setting must be changed individually to deactivate Ecology mode Setup menu Auto installation Analogue programme setup Digital programme setup Input skip Input label 4 4 Position ...

Page 15: ... signal Setup menu Continued Parental rating This function allows TV channels to be restricted It prevents children from watching violent or sexual scenes that may be considered inappropriate 1 Repeat steps 1 to 3 in Setting a password 2 Press a b to select Parental rating and then press ENTER 3 Press a b to select your desired rating and then press ENTER When the country setting is set to Austral...

Page 16: ...Selectable item INPUT4 Auto S VIDEO VIDEO H PC audio select When using the INPUT7 terminal or HDMI1 terminal you must select which terminal uses the AUDIO R L jack for analogue audio input Selected item Description HDMI1 When connecting devices including a PC with DVI HDMI cable to the INPUT1 terminal and inputting analogue audio signals from the AUDIO R L jack INPUT7 RGB When connecting a PC to t...

Page 17: ...me signal resolution is input again 1280 g 768 1360 g 768 Option menu Continued H Digital audio output This function allows you to select your favourite audio output system Selected item Description PCM The optical output format is normally in PCM Dolby Digital Dolby Digital audio will be output when there is a Dolby Digital audio signal The output will be in PCM when there is no Dolby Digital aud...

Page 18: ...ause the upgrade to fail If problem arises ask a qualified service personnel before the software upgrade period expires Digital setup menu Option Audio language Subtitle language Hearing impaired Time zone Summer time OAD setup Off Off Off Digital setup H Selecting the language Set up to two preferred multi audio languages to display if the audio languages are available 1 Press MENU and the MENU s...

Page 19: ...e Guide You can check the current schedule of DTV events and view detailed information about current events 1 Press GUIDE to display the programme guide list 2 Press a b to display your desired programme and then press ENTER When you press ENTER the TV jumps to the channel Channel list Mon 18 6 13 27 020 ABC HDTV Dorothy The Dinosaur 002 ABC TV Sydne 020 ABC HDTV 021 ABC2 Page up down Select chann...

Page 20: ...nal Each time you press MPX the mode switches between NICAM MONO and MONO Monaural mode B G MONO 01 BBC1 B G MONO PAL NICAM PAL 01 ATV ATV BBC1 ATV Analogue DTV RADIO buttons Use the following buttons on the remote control to operate the menu ATV Press to switch to ATV mode After switching from DTV radio or external input mode to ATV mode the TV jumps to the most recently viewed ATV channel DTV Pr...

Page 21: ... receiving a bilingual signal Each time you press MPX the mode switches among CH A CH B and CH AB Bilingual mode B G CH A 01 BBC1 B G CH B PAL PAL 01 ATV ATV BBC1 B G CH AB PAL 01 ATV BBC1 When receiving a monaural signal When you press MPX MONO displays Monaural mode B G MONO PAL 01 ATV BBC1 NOTE BBC1 01 and PAL are tentative network name channel and colour system LC32L450X_EN indb 19 LC32L450X_E...

Page 22: ...2 Press c d R G to select the time span you want to search Continue to press d to display programmes in the next time span 3 Press a b to select the desired programme H Close the EPG screen 4 Press EPG again or MENU to exit NOTE For New Zealand delivery model the EPG screen and operation differ due to the use of MHEG EPG The EPG screen and operation vary depending on the broadcasts Reminder timer ...

Page 23: ...of pixels on the screen only when receiving a 1080i 1080p SXGA SXGA signal for LC 40L550X LC 40L650X Underscan Display with an Underscan image only when receiving a 720p 1080i 1080p signal only for LC 32L450X a 720p signal only for LC 40L550X LC 40L650X Display with the High Definition image adjusted optimally Noise may appear on the edge of the screen with some programmes NOTE Some picture size m...

Page 24: ...nt by network Not used to convert between languages PC Control of the TV When a programme is set the TV can be controlled from the PC using the RS 232C terminal The input signal PC video can be selected the volume can be adjusted and various other adjustments and settings can be made enabling automatic programmed playing Attach an RS 232C cable cross type commercially available to the Din D sub RS...

Page 25: ... Sub Digital HDMI VGA 720 g 400 31 5 kHz 70 Hz 640 g 480 31 5 kHz 60 Hz SVGA 800 g 600 37 9 kHz 60 Hz XGA 1024 g 768 48 4 kHz 60 Hz WXGA 1360 g 768 47 7 kHz 60 Hz SXGA 1280 g 1024 64 0 kHz 60 Hz SXGA 1400 g 1050 65 3 kHz 60 Hz for LC 40L550X LC 40L650X RS 232C commands list DDC is a registered trademark of Video Electronics Standards Association Power Management is a registered trademark of Sun Mi...

Page 26: ...e based on LC 40L550X CAUTION Do not use a USB extension cable when connecting a USB device to the USB terminal of the TV Using a USB extension cable may prevent the TV from performing correctly USB media Press TV VIDEO to select the USB mode or the TV automatically switches to the USB mode when a USB device is connected to the TV USB media In this mode you can enjoy viewing photos listening to mu...

Page 27: ...tons for full screen display operation Buttons Description ENTER Play Pause the video a Cursor Go to the previous file b Cursor Go to the next file d Cursor The FWD speed changes every time you press d After playing to the end the player goes to the next file and starts to play c Cursor The REW speed changes every time you press c After going back to the beginning the player starts to play the sam...

Page 28: ...s a b c d to select the desired folder and then press ENTER 4 Press a b c d to select the desired photo and then press ENTER Buttons for thumbnail operations Buttons Description ENTER When selecting a folder icon Enter this directory When selecting a photo thumbnail Display the photo in full screen a b c d Cursor Select a desired item R button Previous page G button Next page Y button Selecting BG...

Page 29: ...ass File system FAT FAT32 NTFS Photo file format JPEG jpg DCF2 0 compliant Music file format MP3 mp3 Bitrate 32 k 40 k 48 k 56 k 64 k 80 k 96 k 112 k 128 k 160 k 192 k 224 k 256 k 320 kbps Sampling frequency 32 k 44 1 k 48 kHz Video file format File extension Container Video avi AVI DivX 3 11 4 4 12 5 x 6 XviD H 264 MPEG2 mkv MKV H 264 MPEG2 MPEG1 mp4 MP4 DivX 3 11 4 4 12 5 x 6 XviD H 264 vob VOB ...

Page 30: ...ting See page 15 Check the HDMI auto view setting See page 13 Power is suddenly turned off The unit s internal temperature has increased Remove any objects blocking the vent or clean Check the ECO setting See page 12 Is the sleep timer set See page 5 No picture Is the connection to external equipment correct See page 4 Has the input signal setup been performed correctly after connection See page 1...

Page 31: ...out Headphone φ 3 5 mm stereo OSD language English Power Requirement AC 110 240 V 50 60 Hz Power Consumption 119 W 0 9 W Standby 172 W 0 8 W Standby 174 W 0 8 W Standby Dimensions without stand mm 797 W g 535 H g 115 D 986 W g 640 H g 115 D with stand mm 797 W g 580 H g 262 D 986 W g 685 H g 311 8 D Weight without stand with stand 10 5 kg 11 5kg 16 0 kg 16 5 kg Operating Temperature 0 C 40 C As a ...

Page 32: ...rews for attaching clamps supplied 2 Fix the TV to the wall using extrastrong ties commercially available Fixing the TV to the table 1 Lay the TV down on cushioning such as a blanket over a table 2 Attach the band supplied to the bottom of the stand using the screw supplied 3 Transfer the product to the table where you intend to fix the TV 4 Fix the TV to the table by the band with a screw commerc...

Page 33: ...80 200 43 7 92 115 262 535 Unit mm Dimensional drawings POWER MENU TV VIDEO CH VOL 400 400 155 390 685 640 887 8 478 9 500 3 121 4 115 311 8 986 LC 40L550X LC 40L650X LC 32L450X LC32L450X_EN indb 31 LC32L450X_EN indb 31 05 08 10 02 54 51 PM 05 08 10 02 54 51 PM ...

Page 34: ... ENTER and the password input screen display 3 If you enter 3001 using 0 9 the Child lock setting menu will be displayed 4 Enter the 4 digit number as a password using 0 9 The new password is now set NOTE As a precautionary measure make a note of your password above remove it from this manual and keep it in a familiar place The Password is LC32L450X_EN indb 32 LC32L450X_EN indb 32 05 08 10 02 54 5...

Page 35: ...Cover_LC32L400X indd 3 Cover_LC32L400X indd 3 22 07 10 02 22 38 PM 22 07 10 02 22 38 PM ...

Page 36: ...Printed in Malaysia TINS E727WJZZ 10P08 MA NF Cover_LC32L400X indd 4 Cover_LC32L400X indd 4 22 07 10 02 22 39 PM 22 07 10 02 22 39 PM ...

Reviews: