background image

33

33

General Information

USING YOUR TV WITH A SKY DIGITAL SET TOP BOX

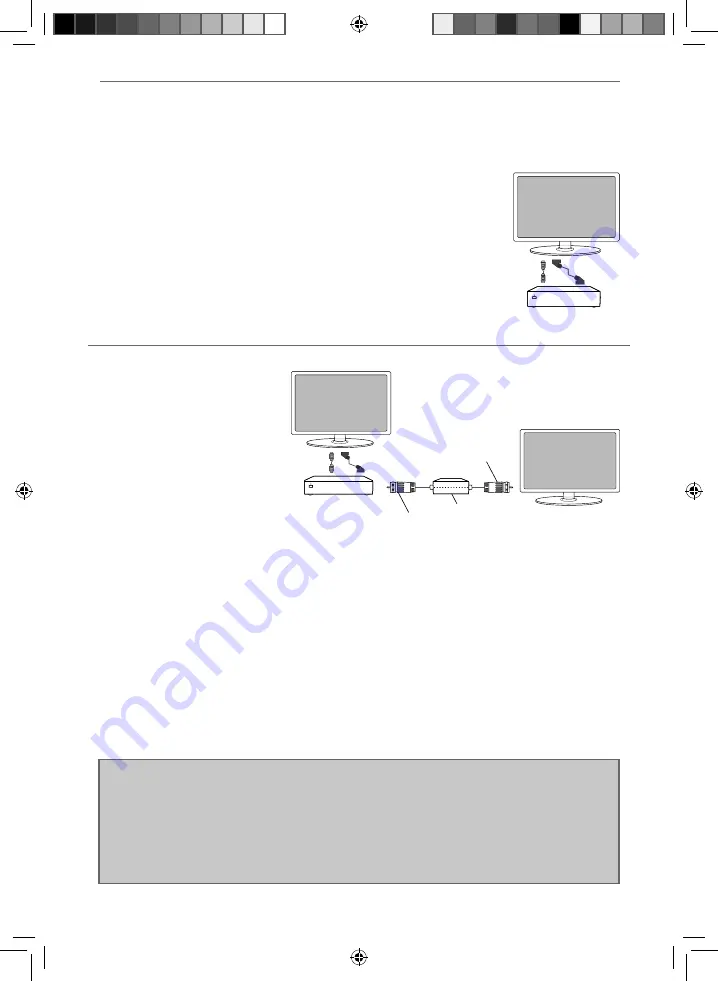
Option 1) Connecting your TV to your Sky box (when both the TV and Sky Box are located 
in the same room) 

Depending on your Sky Box & TV model, connect either by SCART or HDMI cables 
(available separately) .

If connecting by SCART, select the ‘Input source’ on the TV as SCART. If your TV does 
not have SCART, please refer to ‘Connections’ pages in this user guide for alternative 
ways to connect.

If connecting by HDMI, select the ‘Input source’ on the TV as HDMI (if the TV has more 
than 1 HDMI port, ensure you select the input source to match the HDMI numbered port 
on the rear of the TV). 

If you wish to use your Sky remote to operate the TV’s functions, you will need a Sky 
remote control (Revision 9 or later) and you will need to program a 4 digit code into it.  
See bottom of this page. 

Option 2) Connecting your TV 
to your Sky box (when your 
Sky box is located in a different 
room to the TV) 

Please note, if you are adding a ‘Magic 
Eye/TV Link’ to your system so that 
you can use your Sky remote control 
to change the Sky channel in the room 
where the 2nd TV is located, please 
refer to the instructions included 
with the TV link/magic eye in order to 
ensure the RF or RF2 output on your 
Sky box is powered on. (The red LED 
light on the TV link/magic eye will light 
up if the RF / RF2 output is correctly set 
up)  If you do not have the instructions that came with the TV link/magic eye, instructions on how to do it can be 
found on our web site. 

1) To tune the TV to the Sky box, on the 2nd TV, select the ‘Analogue’ input source. 
2) Select the channel that you wish to store the Sky box/channel on. (If you do not use channels 1-5 because you 
no longer have analogue terrestrial channels after digital switchover, you may choose to select channel 1 to store 
the Sky box/channel, if you still have and use analogue channels 1-5, you may for example decide that channel 6 is 
the best option for you)  
3) Press the corresponding number on the remote control to select the desired analogue channel chosen as per 
point 2 above. 
4) On the TV remote control, press Menu. Now navigate through the menus to select Manual Tuning or Analogue 
Manual tuning (refer to the Tuning/Channel menu section of this user guide if necessary) 
5) Manually tune in the channel (usually, the Sky box is at a frequency between 800Mhz and 850Mhz) once the 
Sky box/channel is found, press ‘OK’ to store it. 

If you wish to use your Sky remote to operate the TV’s functions, you will need a Sky remote control (Revision 9 or 
later) and you will need to programme a 4 digit code into it.  See below. 

Sky Box

SCART adapter  
or HDMI cable

RF/COAX cable from 
Sky Box to 2nd TV

Connect to RF 
or RF2 output 
on the Sky box

Connect to the 
Aerial/RF input 
on the 2nd TV

TV Link/Magic Eye 
(optional)

2nd TV in 
another room

Sky Box

HDMI cable or
SCART adapter 


Using a Sky remote or a universal remote to operate your TV 

Sky remote control

 - If you wish to use your Sky remote to operate the basic functions of your TV, you need to 

program a 4 digit code into it. Please note - you will need a Sky Revision 9 remote control (or later).

 The code 

required for this television is 2134.

 If you wish to upgrade/replace your existing Sky remote control to the latest 

version, you can do so on our website.  

Universal remote control

 - If you wish to use a Universal remote control to operate your TV, please refer to the 

website for a full list of codes.  (Please note we only have codes for One for All branded remote controls, if you 
have an alternative brand of Universal remote, please refer to the manufacturer for the code.)

Sharp - User Guide - SHA-MAN-0269 - SmartTV - 5141K models.indd   Sec1:33

Sharp - User Guide - SHA-MAN-0269 - SmartTV - 5141K models.indd   Sec1:33

25/08/2017   10:43:43

25/08/2017   10:43:43

Summary of Contents for LC-32HG5141K

Page 1: ...LED SMART TV with Freeview Saorview USB PVR Model No User Guide LC 32HG5141K LC 32HG5142K LC 40FG5141K LC 40FG5142K ...

Page 2: ...es particularly to children can be avoided by taking simple precautions such as Use cabinets or stands recommended by the manufacturer of the television set Only use furniture that can safely support the television set Ensure the television set is not overhanging the edge of the supporting furniture Do not place the television set on tall furniture for example cupboards or bookcases without anchor...

Page 3: ... are as follows this is not an exhaustive list TV channel logos e g shopping channel logos and pricing displays especially if they are bright and stationary Moving or low contrast graphics are less likely to cause ageing of the screen Time displays Teletext Do not view a stationary page for a long period of time TV DVD menus e g listings of DVD disc content Pause mode Do not leave the TV in pause ...

Page 4: ...re trademarks of Google Inc Wi Fi The Wi Fi CERTIFIED Logo is a certification mark of the Wi Fi Alliance Miracast Wi Fi CERTIFIED Miracast and Miracast are trademarks of Wi Fi Alliance DLNA DLNA the DLNA Logo and DLNA CERTIFIED are trademarks service marks or certification marks of the Digital Living Network Alliance For DTS patents see http patents dts com Manufactured under license from DTS Lice...

Page 5: ...tion 18 29 Picture menu 18 19 Sound menu 20 21 Channel menu 22 Network menu 23 Time menu 24 Lock menu 25 Setup menu 26 More Apps menu 27 28 Media menu 28 29 7 day TV guide and channel list 30 USB record Freeview Saorview 31 General information 33 38 Using your TV with a Sky digital set top box 33 Frequently asked questions 34 35 Technical specifications 36 38 Sharp User Guide SHA MAN 0269 SmartTV 5...

Page 6: ...ick start guide 1 x TV User guide Quick start guide Accessories Included with this TV are the following accessories 1 x Stand installation pack 4 x 1 x L left 1 x R right 1 x Remote Control and 2 x AAA Batteries 1 x Mini Component YPbPr 1 x Mini AV Composite cable 7 8 9 0 1 2 3 4 5 6 TV GUIDE VOL CH SOURCE SOUND PICTURE ON OFF MUTE TEXT SUBTITLE INFO TV BACK FAV NET GOTO DVD SETUP DVD MENU A B 3D ...

Page 7: ...stand To complete the stand feet installation you will require a cross head screw driver Detaching the stand Remove the screws highlighted then remove the stand feet from the underside of the TV set TV panel must be facing downwards TV panel must be facing downwards TV panel must be facing downwards 4 x 3 4 1 2 L R 4 x 3 4 1 2 L R Screws that are included 4 x Sharp User Guide SHA MAN 0269 SmartTV ...

Page 8: ...ed to the wall or the furniture the TV is stood on these are fitted as follows The Royal Society for the Prevention of Accidents is urging people to take care with flat screen televisions RoSPA stated in 2010 that Toddlers are particularly at risk of pulling flat screen televisions on to themselves They are unsteady on their feet and are attracted by colourful television images The risk is increased ...

Page 9: ...programme TEXT To enter exit Text SUBTITLE To switch the dialogue at the bottom of the screen on off TV To switch to Digital Channels YOUTUBE Access the Youtube App NETFLIX Access the Netflix App NET Access the Aquos NET Smart Portal RECORD DVD MENU Access the USB record function Access the DVD menu of the DVD inserted must be set to the DVD source REC LIST DVD SETUP Opens the list of previously re...

Page 10: ...ween input connections A Using the buttons on the remote control 1 Press SOURCE The source menu will appear 2 Press or to select the input you require 3 Press OK B Using the buttons on the Television 1 Press SOURCE 2 Scroll right left using VOL VOL buttons to the input source you require 3 Press SOURCE to change input source to the one selected For further information on input connections please v...

Page 11: ...rors the screen of your mobile device so will work with all applications whilst connected it will also charge your device too A C D E F G B Ethernet LAN Network Connection HDMI 1 HDMI input HDMI 2 ARC HDMI input Mini SCART Mini SCART input SAT IN Satellite input RF IN RF TV Aerial Input Optical Digital Audio Digital Audio output HDMI 3 MHL HDMI input 2 x USB USB port Earphone Earphone Input AV IN ...

Page 12: ... to Composite AV Mini AV in L white R red Video yellow Connections Connecting to a device with HDMI output A HDMI cable can output both video and audio and enables you to enjoy digital quality video and audio with minimal loss of quality TV Source should be set to the corresponding HDMI port HDMI 1 HDMI 2 etc CONNECTIONS Note Connecting cables are shown for example only and may not be included Ple...

Page 13: ...en connecting via the TV s 3 5mm Earphone output this will disable the TV speakers There are two options when connecting a device via the 3 5mm Earphone Output and the Digital Optical Audio Output 3 5mm earphone OPTION 1 for 3 5mm EARPHONE Output OPTION 2 for Digital Optical Audio Output Digital audio out optical 3 5mm audio in Digital audio in optical Connecting an Ethernet Network cable The Ethe...

Page 14: ...hlight and select Wi Fi Auto Search 5 The TV will then automatically search for networks 6 Select the preferred type of network connection then enter the network password 7 The TV will then establish a connection Note An icon will appear in the top right hand side of the Application menu to show you if the TV is connected to the internet When you first power on your new SMART TV there will be an op...

Page 15: ...e Brightness Increase or decrease the brightness of the picture Colour Increases the colour from black and white Tint Lets you increase or decrease the level of tint within the picture only available for NTSC source signal Sharpness Increase or decrease the sharpness of the picture Colour Temperature Choose from the following presets Normal Default settings Warm Increases red within the picture Co...

Page 16: ...en with a regular 16 9 signal and 4 3 picture format will be stretched to fill the screen Aspect Ratio Within the UK the picture format varies depending on the channel broadcast There are a number of different options to best meet your needs Choose from the following settings Noise Reduction Allows you to switch noise reduction ON or OFF Choose one of the following presets low middle high and Off A...

Page 17: ... live and full sound for movies Sports Emphasises sound for sports Personal Selects your personal sound settings Any adjustments made automatically sets the sound mode to Personal To access this menu press MENU button on the remote control and scroll right To select a sub menu press OK If you wish to make changes to any of the default settings use the scroll buttons To confirm any settings press OK...

Page 18: ...nc picture and audio for external speakers connected via digital audio output To access this menu press MENU button on the remote control and scroll right To select a sub menu press OK If you wish to make changes to any of the default settings use the scroll buttons To confirm any settings press OK button To exit this menu at anytime press EXIT button Off To turn off Digital Output Auto Selects the...

Page 19: ...list without removing any channels or affecting your favourites list Channel Edit Allows you to delete move skip and select favourite channels Tip If you do not press any buttons for 30 seconds the menu will automatically exit You can change the length of time before the menu exits automatically see OSD Timer in the Time Menu Signal Information Allows you to view signal frequency signal quality an...

Page 20: ...ction settings Wi Fi Auto Search Automatically searches for available wireless networks Select the desired Wi Fi network and then enter the network password if network is password protected Once the password is accepted you will not be asked for it again Network Info Allows you to view Information about network settings Network Test Allows you to test the network connection Wifi Status Allows you t...

Page 21: ...n day Sleep Timer Lets you set the sleep timer so the television automatically switches off after a set amount of time Off 10min 20min 30min 60min 90min 120min 180min 240min OSD Timer Lets you adjust the amount of time the On Screen Menu stays on the screen before disappearing Off 5secs 15secs 30secs 60secs Auto standby Set Auto Standby to OFF 3 hours 4 hours or 5 hours Time Zone Change your curre...

Page 22: ...to enter a 4 digit password Use the button to quit the password input or use the button to clear Default password is 0000 Set Password Allows you to set the password Channel Lock Allows you to lock certain channels manually Parental Guidance Allows you to set the rating to block certain content based on age information Key Lock Allows you to lock the TV buttons located on the side underside of the...

Page 23: ... a USB memory stick Software and instructions are available on our website Software Update NET Allows you to update your TV with the newest software via your internet connection Reset TV This resets the menus to factory settings and clears all the TV channels from the television HDMI CEC Consumer Electronic Control Allows HDMI devices to control each other and allows the user to operate multiple d...

Page 24: ...ty of apps and multimedia which the TV acesses via the internet To enter Aquos Net you will be prompted to enter a language and acccept terms and conditons once the relevant information has been entered you will be able to use a range of features such as MUZU TV Viewster and Dailymotion Content is updated and managed from a central source so look out for new features and updates To access this men...

Page 25: ...include Screen Mirroring as standard Apple devices do not currently allow it however it is possible to mirror from your Apple smart phone or IPad etc when used with an Apple TV box available separately MEDIA MENU CH Scroll page up CH Scroll page down Red Button Show hide browser menu bar Yellow Button Zoom in Blue Button Zoom out Applications BBC iPlayer Catch up on your favourite BBC TV programme...

Page 26: ...u screen will appear The content will be divided into Photo Music Movie and All Tip If you experience a playback issue please ensure the files being used are the correct format example the picture plays but no sound See technical specification page for compatible file types Note USB extension cables are not recommended as they can cause a reduction in picture audio quality and stoppages during play b...

Page 27: ...ew the next day by pressing BLUE 3 Press EXIT to exit the 7 day TV Guide 7 Day TV Guide and Channel List Channel List To view the channel list please ensure that the TV is set to either the analogue or digital source and no menus or TV notifications are displayed 1 Press OK on the remote control and the channel list menu will appear 2 Press LEFT RIGHT arrow to filter desired channel types Digital TV...

Page 28: ...ing Live TV is very simple Press the play pause button and the television will pause and the live content will be recorded To resume watching press play pause again Press fast forward to go forward in a recording i e to skip adverts Press fast rewind to go back in a recording i e if you fast forwarded too far Tip This television contains one TV tuner therefore it can only record the channel you ar...

Page 29: ...ect channel 1 to store the Sky box channel if you still have and use analogue channels 1 5 you may for example decide that channel 6 is the best option for you 3 Press the corresponding number on the remote control to select the desired analogue channel chosen as per point 2 above 4 On the TV remote control press Menu Now navigate through the menus to select Manual Tuning or Analogue Manual tuning...

Page 30: ...addition to connecting via SCART you should connect the aerial cable from the wall socket to your VCR DVD Recorder and another aerial cable from the VCR DVD Recorder to the TV Game Consoles I have connected my Playstation Xbox to the TV via HDMI but I am not receiving any pictures or sound on my TV 1 Ensure the TVs source is set to HDMI 2 Check your settings on your Playstation Xbox are as per the...

Page 31: ...ur local network and there is suitable signal strength Check the server devices you are trying to connect with are also on the Network and are set to share content Smart I cannot access content through the Wireless Connection settings Ensure the device you are trying to mirror onto the TV is correctly paired with the TV Check the settings on the device move your device closer to the TV set check t...

Page 32: ... no function is active Product fiche Additional technical information RF 75 ohm Antenna Analog DVB DVB S2 Inputs 3 x HDMI 2 x USB 1 x Mini SCART 1 x Mini Component YPbPr 1 x Mini AV IN Composite Video CVBS and L R Audio shared for Composite Video and Component YPbPr 1 x RJ45 LAN Ethernet Sound Outputs 1 x Digital Optical Audio output 1 x 3 5mm Headphone Speaker Amplifier Watts RMS 2 x 10 2 x 8 Vol...

Page 33: ...ional technical information RF 75 ohm Antenna Analog DVB DVB S2 Inputs 3 x HDMI 2 x USB 1 x Mini SCART 1 x Mini Component YPbPr 1 x Mini AV IN Composite Video CVBS and L R Audio shared for Composite Video and Component YPbPr 1 x RJ45 LAN Ethernet Sound Outputs 1 x Digital Optical Audio output 1 x 3 5mm Headphone Speaker Amplifier Watts RMS 2 x 10 2 x 8 Voltage and power consumption AC 220V 240V 50...

Page 34: ...C3 32KHz 44 1KHz 48KHz 32Kbps 640Mbps ec3 3gpp 3gp mp4 mov m4a ts trp tp DAT VOB MPG MPEG HEAAC 8KHz 48KHz aac avi mkv 3gpp 3gp mp4 mov m4a ts Internal Subtitle File Extension Container Subtitle Codec mp4 MP4 DVD Subtitle UTF 8 Plain Text mkv MKV ASS SSA UTF 8 Plain Text VobSub DVD Subtitle avi AVI 1 0 2 0 XSUB XSUB External Subtitle File Extension Subtitle Parser Remark srt SubRip ssa ass SubStat...

Page 35: ...nd sp z o o Ostaszewo 57B 87 148 Łysomice Poland Assembled in Europe Sharp User Guide SHA MAN 0269 SmartTV 5141K models indd Sec1 40 Sharp User Guide SHA MAN 0269 SmartTV 5141K models indd Sec1 40 25 08 2017 10 43 43 25 08 2017 10 43 43 ...

Reviews: