background image

15

14

13

19

18

17

16

21

20

22

23

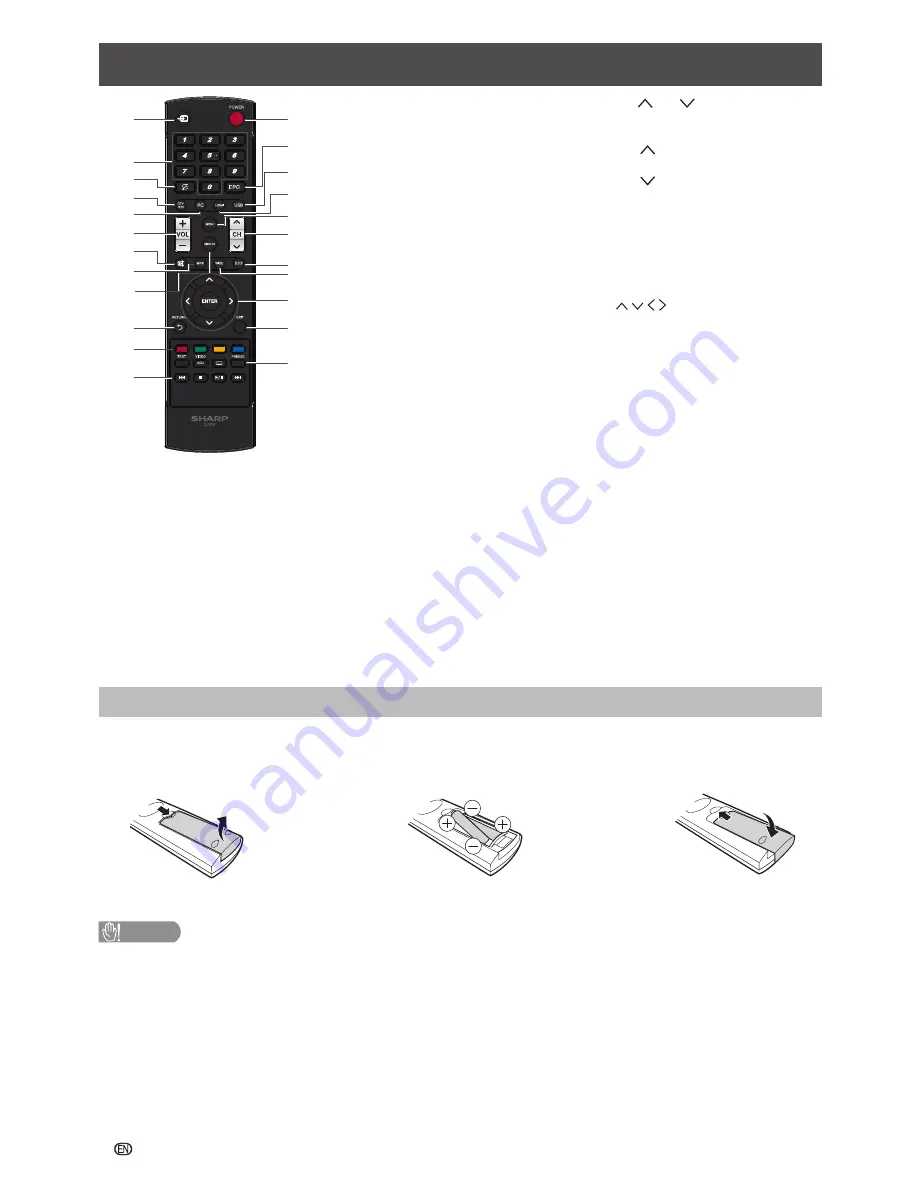
1

10

3

6

8

9

4

7

5

2

11

12

1. 


INPUT 

Select an input source.

2. 

0 – 9 

Set the channel.

3. 

A

 (Flashback) 

Press 

A

 to return to the 

previous selected channel or 

external input mode.

4. 

DTV/ATV 

Press to switch between DTV 

and ATV.

5. 

PC 

Directly select the PC input.

6. 

VOL

k

/VOL

l


(VOL

k

) Increase the volume. 

(VOL

l

) Decrease the volume.

7. 


e

(Mute)


Press 

e


s

 Mutes sound. 

Press 

e

 again 

s

 Restores 

sound.

8. 

MPX 

Select the sound multiplex 

mode.

9. 

DISPLAY 

Display the channel or input 

information.

10. 

RETURN 

Return to the previous menu 

page or exit from the previous 

function.

11. 

Colour (Red/Green/Yellow/

Blue) 

Follow the on screen instructions 

to use the colour button.

12. 


KH   I

/

F   L


Used for the USB Media Player.

13. 

POWER (On/Off) 

To switch the power on and off. 

(See page 8.)

14. 

EPG 

Press to display electronic 

programme guide when 

watching digital channels.

15. 

USB 

Directly select the USB input.

16. 

HDMI 

Directly select the HDMI1/

HDMI2 input.

17. 

MENU 

Display the menu screen.

Remote control unit

18. 

CH /CH


TV input mode: Select the 

channel. 

(CH ) Increase the channel 

number. 

(CH ) Decrease the channel 

number.

19. 

SLEEP 

Set the Sleep Timer. (See page 

11.)

20. 

WIDE 

Change the 

Zoom

 setting. (See 

page 11.)

21. 

       (Cursor) 

Select a desired item on the 

setting screen. 

ENTER 

Execute a command.

22. 

EXIT 

Return to the default screen or 

close the OSD menu screen.

23. 

TEXT 

Press to start MHEG5 

application when watching 

available digital channels. 

VIDEO ADJ 

Select the video mode. 

[

 (SUBTITLE) 

To switch the subtitle on and off. 

FREEZE 

Freeze a motion picture on the 

screen. (Do not support PC and 

USB source.)

Inserting the batteries

Before using the TV for the first time, insert two “AAA” size alkaline batteries (supplied). When the batteries become 

depleted and the remote control fails to operate, replace the batteries with new “AAA” size alkaline batteries.

1


Open the battery cover.

2


Insert the two supplied “AAA” size alkaline batteries.

3


Close the battery cover.


Place batteries with their terminals corresponding to the (

e

and (

f

) indications in the battery compartment.

CAUTION 


Batteries (battery pack or batteries installed) shall not be exposed to excessive heat such as sunshine, fire or the like.


If the remote control will not be used for a long time, remove the batteries.


Do not subject the remote control unit to shock. In addition, do not soak the remote control unit with liquids or place it in an 

area with high humidity.


Do not install or place the remote control unit under direct sunlight. The heat may cause deformation of the unit.


Do not mix batteries of different types. Different types of batteries have different characteristics.


Do not mix old and new batteries. Mixing old and new batteries can shorten the life of new batteries or cause chemical 

leakage in old batteries.


Remove batteries as soon as they have worn out. Chemicals that leak from batteries can cause a rash. If you find any 

chemical leakage, wipe thoroughly with a cloth.


The batteries supplied with this product may have a shorter life expectancy due to storage conditions.

Summary of Contents for LC-23LE160H

Page 1: ...LC 23LE160H LC 32LE160H LC 32LE165H 使用說明書 OPERATION MANUAL 液晶彩色電視機 LCD COLOUR TELEVISION LC 23LE160H LC 32LE160H LC 32LE165H 香港電器安全規格 國際電工委員會規格適合 中文 ENGLISH ...

Page 2: ...Connecting a VCR game console or camcorder 4 Connecting a PC 5 Connecting audio out 5 Remote control unit 6 Inserting the batteries 6 Part names 7 TV Front 7 TV Rear 7 Turning the TV on off 8 Initial auto installation 8 Select input source 8 Selecting preset mode 8 Menu operation 9 Picture menu 9 Audio menu 9 TV menu 10 Setting menu 11 Lock menu 11 Text 12 PC compatibility 12 USB Media Player 12 C...

Page 3: ...f the LCD panel is broken be careful not to be injured by broken glass Heat sources Keep the product away from heat sources such as radiators heaters stoves and other heat generating products including amplifiers To prevent fire never place any type of candle or naked flames on the top or near the TV set To prevent fire or shock hazard do not place the AC power cord under the TV set or other heavy...

Page 4: ...e the stand 3 Insert and tighten the 4 screws into the 4 holes on the bottom of the stand base 2 NOTE To detach the stand perform the steps in reverse order The illustrations used throughout this manual are based on LC 23LE160H Setting the TV Connecting the antenna cable To enjoy a clearer picture use an outdoor antenna COMPONENT AV IN DTV ATV VGA PC VGA PC Y VIDEO Pb Pr L AUDIO R COAXIAL AUDIO IN...

Page 5: ...r terminals when connecting to a DVD player Digital TV STB Set Top Box and other audiovisual equipment COMPONENT AV IN DTV ATV VGA PC VGA PC Y VIDEO Pb Pr L AUDIO R COAXIAL AUDIO IN DIGITAL AUDIO OUT HEADPHONE L R PB CB PR CR Y DVD player Digital TV STB Set Top Box DVD player Digital TV STB Set Top Box When using HDMI certified cable commercially available When using component cable commercially a...

Page 6: ...UT HEADPHONE PC OUT AUDIO L R PC VGA PC VGA PC Connecting audio out You can use the HEADPHONE terminal or DIGITAL AUDIO OUT terminal to connect your headphone or your external speakers COMPONENT AV IN DTV ATV VGA PC VGA PC Y VIDEO Pb Pr L AUDIO R COAXIAL AUDIO IN DIGITAL AUDIO OUT HEADPHONE HEADPHONE External Audio Device DIGITAL AUDIO IN COAXIAL DIGITAL AUDIO OUT or ...

Page 7: ...l channels VIDEO ADJ Select the video mode SUBTITLE To switch the subtitle on and off FREEZE Freeze a motion picture on the screen Do not support PC and USB source Inserting the batteries Before using the TV for the first time insert two AAA size alkaline batteries supplied When the batteries become depleted and the remote control fails to operate replace the batteries with new AAA size alkaline b...

Page 8: ...UME up e down f buttons NOTE USB terminal use for USB Media Player See page 12 COMPONENT AV IN DTV ATV VGA PC VGA PC Y VIDEO Pb Pr L AUDIO R COAXIAL AUDIO IN DIGITAL AUDIO OUT HEADPHONE COMPONENT AV IN DTV ATV VGA PC VGA PC Y VIDEO Pb Pr L AUDIO R COAXIAL AUDIO IN DIGITAL AUDIO OUT HEADPHONE 1 4 3 5 2 8 7 6 9 LC 32LE160H CAUTION TO PREVENT ELECTRIC SHOCK DO NOT REMOVE COVER NO USER SERVICEABLE PAR...

Page 9: ...t you still can search channel in TV menu Select input source You can select signal source directly or from the Input Source menu 1 Press direct button on the remote control USB 2 Press button ATV Input Source YPbPr PC HDMI1 HDMI2 AV DTV USB 3 Press to select press ENTER to confirm Selecting preset mode Picture mode The Picture Mode provides several options to choose from to match with the viewing...

Page 10: ...p the contrast of the TV set to vary in accordance with the brightness and darkness of the TV set when it is set to on Low High Off DCC Dynamic Colour Control Using DCC image on the LCD display become more vivid and superior colour saturation On Off Gamma Adjustment Change the tones between bright parts and dark parts Dark Middle Bright PC Setting The PC adjustment is only available when the input...

Page 11: ...ontrol to swap interchange the channels so that you can arrange tuned channels as per your requirements Delete Channel Press Blue key on remote control to delete the selected channel from the channel list 3 Select a channel and press ENTER button to enter its sub menu TV Move Select Exit Return Channel Number Channel Name Frequency Fine Tune Skip Save 1 55 25 Colour System NTSC Off Sound System DK...

Page 12: ...od after which the TV will be turned off and enter standby mode HDMI CEC This function enables you to control the HDMI CEC compliant device connected via the HDMI connector Software Version Displays the Software information Software Update USB Update the Software by USB Reset Default Restore the factory default video and sound settings The TV and Lock settings remain the same Lock menu Lock menu c...

Page 13: ... USB device Connect a USB device to the TV as shown below COMPONENT AV IN DTV ATV VGA PC VGA PC Y VIDEO Pb Pr L AUDIO R COAXIAL AUDIO IN DIGITAL AUDIO OUT HEADPHONE Depending on the USB device the TV may not be able to recognise the contained data File names with many characters may vary depending on character set may not be displayed Do not disconnect a USB device from the TV while transferring f...

Page 14: ...r viewing next photo 4 Sec 6 Sec 8 Sec Transition Select the method for viewing next photo Random None Fade to Black Vertical Wipe Horizontal Wipe Playing Music files MP3 Music Back 00 00 05 00 03 35 1 Thumbnail of the available music files will be displayed on the screen If no files are displayed select the folder containing music files 2 To play particular music file select the required file and...

Page 15: ...48 kHz Video file format File Type Ext Name Video Type Audio Type MP4 mp4 m4v MPEG 4 SP ASP XviD MPEG 4 AVC H 264 LPCM PCM MPEG AUDIO AVI avi MPEG 1 MPEG 2 Motion JPEG MPEG 4 SP ASP XviD MPEG 4 AVC H 264 LPCM MPEG AUDIO MKV mkv MPEG 1 MPEG 2 MPEG 4 SP ASP XviD MPEG 4 AVC H 264 LPCM MPEG AUDIO HE AAC LC AAC RM RMVB rm rmvb RV8 RV9 COOK RA Lossless DAT MPG MPEG dat mpg mpeg MPEG 1 MPEG 2 LPCM MPEG A...

Page 16: ...See page 9 Is the room too bright The picture may look dark in a room that is too bright Power is suddenly turned off The unit s internal temperature has increased Remove any objects blocking the vent or clean Is the sleep timer set See page 11 No picture Is the connection to external equipment correct See page 4 Is the input source selection correct See page 8 Is the antenna connected properly Se...

Page 17: ...0p 50Hz 720p 60Hz 1080i 50Hz 1080i 60Hz 1080p 50Hz 1080p 60Hz 1080p 24Hz COMPONENT IN AV IN Audio input COMPONENT input 480i 576i 480p 576p 720p 50Hz 720p 60Hz 1080i 50Hz 1080i 60Hz PC IN 15 pin D sub AUDIO IN Audio input from PC Ø3 5 mm mini jack USB USB 2 0 DIGITAL AUDIO OUT Coaxial digital audio output AUDIO OUTPUT HEADPHONE Ø 3 5mm jack OSD Language English Traditional Chinese Power Requiremen...

Page 18: ...ve Area 42 8 Unit mm 75 75 COMPONENT AV IN DTV ATV VGA PC VGA PC Y VIDEO Pb Pr L AUDIO R COAXIAL AUDIO IN DIGITAL AUDIO OUT HEADPHONE CAUTION The Kensington Lock is an anti theft slot to protect the set from being stolen Please do not put any object like clip or coin into this slot ...

Page 19: ...E PERSONNEL COMPONENT AV IN DTV ATV VGA PC VGA PC Y VIDEO Pb Pr L AUDIO R COAXIAL AUDIO IN DIGITAL AUDIO OUT HEADPHONE 482 2 453 392 3 732 6 697 7 317 5 165 66 Active Area 53 Unit mm 100 100 CAUTION The Kensington Lock is an anti theft slot to protect the set from being stolen Please do not put any object like clip or coin into this slot ...

Page 20: ... 436 7 396 4 726 5 702 8 318 7 165 76 8 Active Area 53 2 Unit mm 100 100 CAUTION The Kensington Lock is an anti theft slot to protect the set from being stolen Please do not put any object like clip or coin into this slot ...

Page 21: ...ESA 75 x 75 mm 4 holes M4 9mm LC 32LE160H LC 32LE165H VESA 100 x 100 mm 4 holes M6 16mm 3 Locate the ideal TV position on the wall 4 Fix the wall bracket firmly on the wall 5 Secure the TV to the bracket using the 4 mount screws attached to the mount holes on the back and center of the TV COMPONENT AV IN DTV ATV VGA PC VGA PC Y VIDEO Pb Pr L AUDIO R COAXIAL AUDIO IN DIGITAL AUDIO OUT HEADPHONE CAU...

Page 22: ...PIN SHARP CORPORATION ...

Reviews: