Sharp HT-CN300H Quick Manual Download Page 3

– 3 –

4

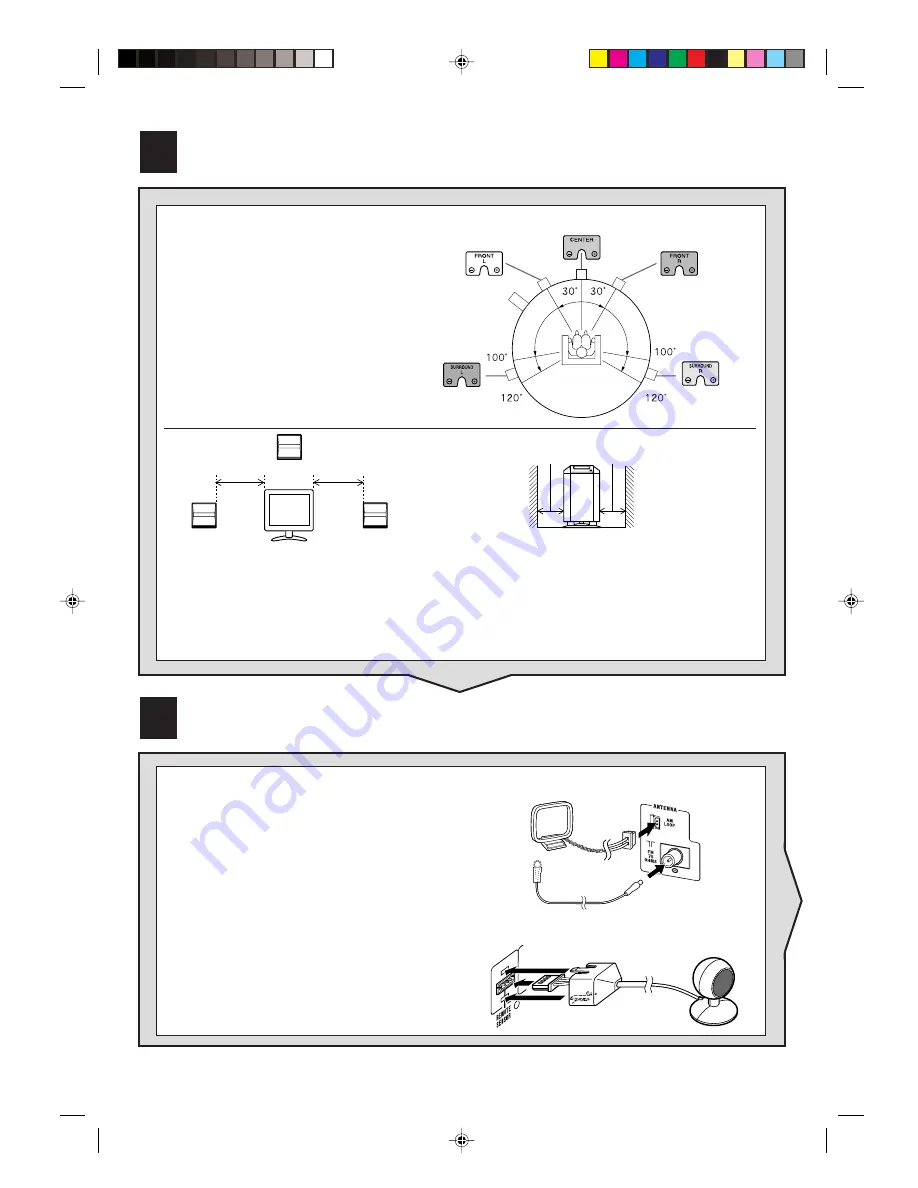
Aerial and Remote control sensor connection

Supplied FM aerial:
Connect the FM aerial wire to the FM 75 OHMS
socket and position the FM aerial wire in the direc-
tion where the strongest signal can be received.

Supplied AM loop aerial:
Connect the AM loop aerial to the AM LOOP socket.
Position the AM loop aerial for optimum reception.
Place the AM loop aerial on a shelf, etc., or attach it
to a stand or a wall with screws (not supplied).

Connect the plug of the remote control sensor
and push the plug cover until it clicks.

Remote control sensor

3

Speaker layout

The best surround effect will be
achieved by placing each speaker at
the same distance from the listening
position.

Notes:

Place the TV halfway between the front speakers.

It is recommended that the centre speaker be placed near the television.

Keep the free space of at least 10 cm (4") along the side of the unit (subwoofer).

Place the surround speakers at a position just above the height of your ears.

Front
speaker (left)

Centre speaker

Front speaker
(right)

Main unit
(subwoofer)

Surround
speaker (left)

Surround
speaker (right)

Same distance

Centre speaker

Same distance

Front speaker

(right)

Front speaker

(left)

10 cm (4")

10 cm (4")

Main unit (subwoofer)

Summary of Contents for HT-CN300H

Page 1: ...aptor for remote control 1 Labels for remote control 1 Video cable 1 Speaker cushion 20 Speaker connection lead 5 White Front left 5 m 15 Green Centre 5 m 15 Red Front right 5 m 15 Blue Surround left 15 m 45 Grey Surround right 15 m 45 I N O U T If you require any advice or assistance regarding your Sharp product please visit our web site www sharp co uk support Customers without Internet access m...

Page 2: ...ts of matching colours Front speaker right Centre speaker Front speaker left Black Red Red Black Red Green Black Red White Black Red Blue Black Red Grey Red Green White Blue Grey Main unit with subwoofer Black Red Surround speaker right Surround speaker left ...

Page 3: ...ug cover until it clicks Remote control sensor 3 Speaker layout The best surround effect will be achieved by placing each speaker at the same distance from the listening position Notes Place the TV halfway between the front speakers It is recommended that the centre speaker be placed near the television Keep the free space of at least 10 cm 4 along the side of the unit subwoofer Place the surround...

Page 4: ...oaxial digital audio cable Optical digital audio cable S video cable To S video output socket DVD player Connecting the VCR VIDEO 1 Video cable Audio cable Yellow White Left Red Right Yellow White Left Red Right L AUDIO VIDEO R IN TV Video cable supplied To video input socket SCART adaptor IN To SCART socket Video cable Audio cable Video cable Audio cable VCR To audio output sockets To video outpu...

Page 5: ...croll 1 Press the X BASS button to cancel the demonstration mode 2 Press the ON STAND BY button on the main unit or the ON STAND BY button on the remote control to turn the power on Power indicator Wall socket AC 230 V 50 Hz Connection example using a SCART adaptor To SCART socket SCART adaptor OUT To audio output sockets To video output socket Audio cable Video cable To SCART socket SCART adaptor...

Page 6: ...VD TV and VCR Memory 2 buttons No functions are stored at the factory setting Memorise the remote control signals learn function of your equipment before use Listening to the radio 1 Press the TUNER BAND button repeatedly to select the desired frequency band FM ST FM or AM 2 Press the or button to tune in to the desired station When the or button is pressed for more than 0 5 sec onds scanning will...

Page 7: ...n indicator will flash the red indicator remains lit 4 Within 10 seconds press down for more than 2 seconds the desired button on the remote control supplied with other equipment to send the signal to the marking When the signal is sent to the remote control of the unit the green indicator will go off When memorisation is completed it will light up If the signal is not memorised correctly the red ...

Page 8: ...tely after approx 15 seconds you can go on to the next step 2 Press the ON STAND BY and CLEAR buttons simultaneously for more than 3 seconds Initialisation is completed when the red and green learn indicators light up alternately and then the red learn indicator lights up 3 Move the LEARN TRANSMIT selector switch to TRANSMIT Caution This operation will reset all data stored in memory to the initia...

Reviews: