


1 – 4
UX-B700U
FO-B1600U
[4] Installation
1. Site selection
Take the following points into consideration when selecting a site for this
model.
ENVIRONMENT
•
The machine must be installed on a level surface.
•
Keep the machine away from air conditioners, heaters, direct sun-
light, and dust.
•
Provide easy access to the front, back, and sides of the machine. In
particular, keep the area in front of the machine clear, or the original
document may jam as it comes out after scanning.
•
The temperature should be between 41 - 95
°
F(5 - 35
°
C).
•
The humidity should be between 25% and 85% (without conden-
sation).
ELECTRICITY
AC 120V, 60Hz, grounded(3-prong) AC outlet is required.
Caution!
•
Connection to a power source other than that specified will cause
damage to the equipment and is not covered under the warranty.
•
If your area experiences a high incidence of lightning or power surges,
we recommend that you install a surge protector for the power and
telephone lines. Surge protectors can be purchased at most telephone
speciality stores.
If the machine is moved from a cold to a warm place...
Condensation may form on the reading glass if machine is moved from
a cold to a warm place, this will prevent proper scanning of documents
for transmission. Turn on the power and wait approximately 2 hours be-
fore using machine.
TELEPHONE JACK
A standard RJ11C single-line wall telephone jack must be located near
the machine. This is the telephone jack commonly used in most homes
and offices.
•
Plugging the fax machine into a jack which is not RJ11C single-line
wall telephone jack may result in damage to the machine or your
telephone system. If you do not know what kind of jack you have, or
need to have one installed, contact the telephone company.
2. Assembly and connections
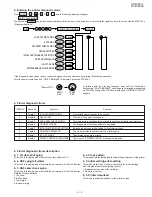
1
Connect the handset as shown and place it on the handset rest.
The ends of the handset cord are identical, so they will go into
either jack.
Make sure the handset cord
goes into the jack marked
with a handset symbol on the
side of the machine!
Use the handset to make ordinary phone calls,
or to transmit and receive faxes manually.
2
Attach the paper tray and paper trays.
Attach the paper tray.
Pull the paper plate
toward you and attach
the paper tray cover.
Paper plate
Attach the document tray.
Pull out the received
document tray.
Attach the document exit support.
1
2
Summary of Contents for FO-B1600
Page 51: ...UX B700U FO B1600U 3 13 M E M O ...
Page 81: ...UX B700U FO B1600U Control PWB parts layout Top side 6 8 DRSNS BROWN ORGSNS ORANGE FRSNS RED ...
Page 82: ...UX B700U FO B1600U Control PWB parts layout Bottom side 6 9 FU101 FU100 ...
Page 91: ...UX B700U FO B1600U P IN YELLOW FU1 GREEN 3 3V Printer PWB parts layout Top side 6 18 ...
Page 92: ...UX B700U FO B1600U Printer PWB parts layout Bottom side 6 19 ...


