background image

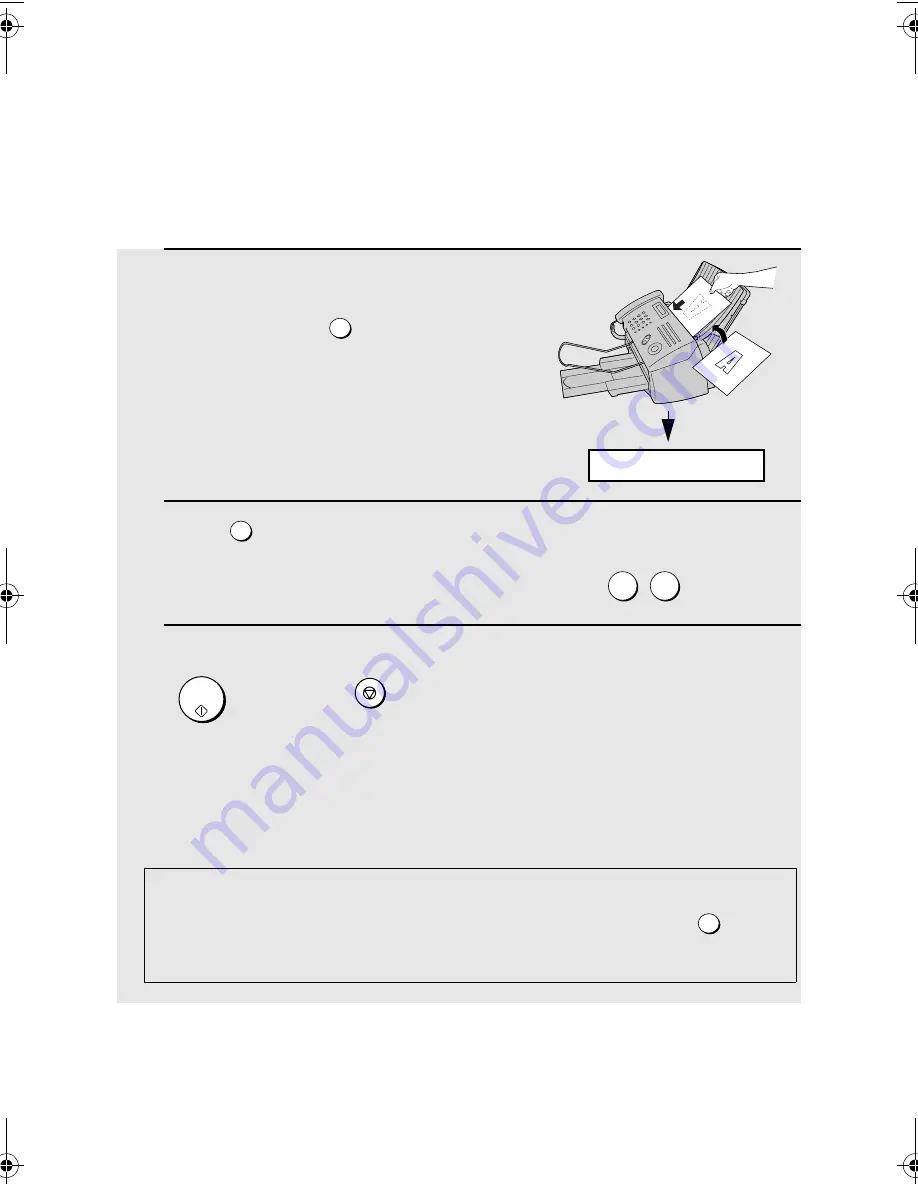
Sending a Fax by Automatic dialling

44

Speed dialling

Speed dialling can be used to dial any number that has been stored as a 
Speed Dial number.

1

Load the document(s).

If desired, press 

 to set 

the resolution and/or contrast.

2

Press 

 and then enter the 2-digit Speed Dial number.

For example, to enter Speed Dial number 19, press 


.

3

Check the display. If the name or number shown is correct, press 

. (If not, press 

 and repeat Step 2.)

If the transmission is completed successfully, the machine will beep once.

If an error occurs, the machine will beep three times and print a Transaction 
Report to inform you of the problem (see page 87).

Using a Speed Dial number for a voice call


To use a Speed Dial number for a voice call, lift the handset, press 

and enter the Speed Dial number.

RESOLUTION/         

RECEPTION MODE

SPEED DIAL

1

9

START/

MEMORY

STOP

SPEED DIAL

READY TO SEND

all.book

Page 44

Thursday, March 6, 2003

3:57 PM

Summary of Contents for FO-B1600

Page 1: ...DEL FO B1600 OPERATION MANUAL FACSIMILE 1 Installation 2 Sending Faxes 3 Receiving Faxes 4 Making Copies 5 Answering Machine Connection 6 Special Functions 7 Printing Lists 8 Maintenance 9 Troubleshooting ...

Page 2: ...illage vermin infestation software use of consumables other than those approved by Sharp or any alterations made to the product which are not authorised by Sharp Please retain your sales documentation as this should be produced to validate a warranty claim This warranty is in addition to and in no way limits varies or excludes any express and implied rights and remedies under any relevant legislat...

Page 3: ...mory size 1 8 MB approx 100 average pages Modem speed 14 400 bps with auto fallback to lower speeds Transmission time Approx 6 seconds only when ECM is on Scanning Resolution Horizontal 8 lines mm Vertical Standard 3 85 lines mm Fine Halftone 7 7 lines mm Super fine 15 4 lines mm Print resolution 600 600 dpi Automatic document feeder 20 pages max A4 size 80 g m2 paper Recording system Thermal inkj...

Page 4: ...ent size Automatic feeding Width 148 to 210 mm Length 140 to 297 mm Manual feeding Width 148 to 210 mm Length 140 to 600 mm Effective scanning width 210 mm max Effective printing width 203 mm max Contrast control Automatic Dark selectable Reception modes TEL FAX A M TEL FAX Copy function Single Multi Sort 99 copies page Telephone function Yes cannot be used if power fails Applicable telephone line...

Page 5: ...owing situations occur Liquid has been spilled into the machine or the machine has been exposed to rain or water The machine produces odors smoke or unusual noises The power cord is frayed or damaged The machine has been dropped or the housing damaged Do not allow anything to rest on the power cord and do not install the machine where people may walk on the power cord This machine must only be con...

Page 6: ...n between the equipment and the receiver Connect the equipment to an outlet on a different circuit to that which the receiver is connected Consult the dealer or an experienced radio TV technician for help For Australia The Ringer Equivalence Number REN for this equipment is written on the back of the machine The sum of all Ringer Equivalence Numbers REN s on your telephone line should not exceed 3...

Page 7: ...ng the Date and Time 26 Setting the Reception Mode 28 Volume Adjustment 29 2 Sending Faxes 31 Transmittable Documents 31 Loading the Document 32 Adjusting the Resolution and Contrast 34 Sending a Fax by Normal dialling 37 Sending a Fax by Automatic dialling 38 Batch Page Numbering 49 Sending a Fax From Memory 50 3 Receiving Faxes 55 Using TEL FAX Mode 55 Using FAX Mode 57 Using TEL Mode 58 Optiona...

Page 8: ...ID Requires Subscription to Service 72 Distinctive Ring Requires Subscription to Service 77 Blocking Reception of Unwanted Faxes 79 Polling Requesting a Fax Transmission 80 7 Printing Lists 85 8 Maintenance 90 Cleaning the Machine 90 Improving Print Quality 93 9 Troubleshooting 98 Problems and Solutions 98 Messages and Signals 103 Clearing Paper Jams 106 Quick Reference Guide 109 Index 110 ...

Page 9: ...ial Keys Press one of these keys to dial a fax number automatically Number keys Use these keys to dial numbers and enter numbers and letters when storing auto dial numbers SPEED DIAL key Press this key to dial a fax or voice number using an abbreviated 2 digit Speed Dial number A Look at the Operation Panel 1 2 3 4 5 6 DEF A M 1 2 3 4 5 6 7 8 9 0 TEL FAX MNO WXYZ ABC JKL TUV GHI 01 02 03 04 05 06 ...

Page 10: ... key again to resume conversation PANEL RELEASE Grasp here and pull up to open the operation panel COPY HELP key When a document is in the feeder press this key to make a copy of a document At any other time press this key to print out the Help List a quick reference guide to the operation of your fax machine STOP key Press this key to cancel an operation before it is completed START MEMORY key Pr...

Page 11: ...contact your dealer or retailer Before setting up make sure you have all of the following items Operation manual Handset Handset cord Telephone line cord Rapid Key labels Print cartridge Paper tray Paper tray cover Document tray Document exit support Adaptor for Australia ...

Page 12: ...ndensation If the machine is moved from a cold to a warm place it is possible that condensation may form on the scanning glass preventing proper scanning of documents for transmission To remove the condensation turn on the power and wait approximately two hours before using the machine Removing the packing tape 1 Open the print compartment cover Press as shown and pull the cover toward you 2 Remov...

Page 13: ...ndset rest The ends of the handset cord are identical so they will go into either socket Make sure the handset cord goes into the socket marked with a handset symbol on the side of the machine Use the handset to make ordinary phone calls or to transmit and receive faxes manually 3 Close the printer cover ...

Page 14: ...Attachments 12 Attaching the paper trays Attach the paper tray Pull the paper plate toward you and attach the paper tray cover Paper plate 1 2 Attach the document tray ...

Page 15: ...Attachments 13 1 Installation Attach the document exit support Pull out the received document tray ...

Page 16: ...e stack with the new paper 3 Pull the paper plate toward you and replace the paper tray cover Loading Printing Paper You can load up to 200 sheets of A4 size 60 80 g m2 paper in the paper tray at room temperature maximum stack height should not be higher than the line on the tray The stack should not be higher than this line Be sure to load the paper so that printing takes place on the print side ...

Page 17: ...e power cord see page 10 Plugging in the power cord without doing so may damage the machine Note If your area experiences a high incidence of lightning or power surges we recommend that you install surge protectors for the power and telephone lines Surge protectors can be purchased at most telephone specialty stores CHECK CARTRIDGE normally appears in the display the first time you plug in the mac...

Page 18: ...per is loaded before installing or replacing the print cartridge 1 Open the operation panel The initial starter print cartridge included with your fax can print about 300 A4 size pages When replacing the print cartridge use a SHARP FO C60B cartridge One cartridge can print about 600 A4 size pages If PRINTER ERROR or PRINTER ERROR CHECK PAPER appears In the event that the display shows either of th...

Page 19: ...he label and then pull the green lever and open the cartridge holder cover If you are replacing the cartridge remove the old cartridge If you are going to use the old cartridge again place it in an air tight container CAUTION DO NOT touch the contact area inside the carriage carrier Note If the print compartment cover is left open for approximately 30 minutes with a cartridge installed the cartrid...

Page 20: ...ur index finger on the tab as shown and close the cartridge holder cover with your thumb Make sure the cover clicks into place 7 Close the print compartment cover 8 Close the operation panel pressing down firmly on both front corners to make sure it clicks into place Display 1 NEW 2 OLD CHANGE CARTRIDGE ...

Page 21: ...he old cartridge align the cartridge as explained on page 93 If you selected NEW the display will show the alternating messages at right Continue with the following steps to align the print cartridge 11 Press to print an alignment page To enter an alignment value without printing an alignment page press 1 2 START MEMORY 1 2 1 PRINT 2 SET ALIGN CARTRIDGE Display when NEW is selected OK PRESS START ...

Page 22: ...ake press and then repeat the entry 14 Press 1 5 STOP START MEMORY In this example 15 comes closest to forming a straight line ENTER 0 30 15 After the alignment page is printed the display shows Note If at any time the display shows the alternating messages at right check the printing paper If the tray is empty add paper If there is paper in the tray take it out and then reinsert it When you are f...

Page 23: ...f you prefer a higher quality image turn off ink save mode Ink save mode is initially turned off 1 Press once and twice 2 Press once and twice 3 Press once 4 Press to turn on ink save mode or to turn it off 5 Press to return to the date and time display FUNCTION 1 2 STOP ALIGN CART The display briefly shows your selection then INK SAVE MODE 1 YES 2 NO Display PRINT SET UP ...

Page 24: ...line you must set the fax machine for pulse dialling Press the panel keys as follows 1 Press once and 3 times 2 Press once and 4 times 3 Press once 4 Select the dial mode TONE PULSE 5 Press to exit FUNCTION 1 2 STOP Display The display briefly shows your selection then OPTION SETTING DIAL MODE PSEUDO RING 1 TONE 2 PULSE TEL LINE L SET For Australia Note To use the machine in New Zealand please pur...

Page 25: ...isconnecting the power lead When reconnecting it is necessary to connect the power lead before connecting the telephone line cord Extension phone optional If desired you can connect an extension phone to the TEL SET socket on the fax machine To connect an answering machine to the fax machine see page 66 TEL LINE TEL SET TEL SET TEL LINE Note In New Zealand not all standard telephones and answering...

Page 26: ...ax page you send Before you can begin sending faxes you must enter your name and fax telephone number You also need to set the date and time FUNCTION START MEMORY 1 Press once and twice 2 Press once 3 Press once FUNCTION Display ENTER FAX ENTRY MODE OWN NUMBER SET 1 2 3 4 5 6 7 8 9 0 01 02 03 04 05 06 07 08 09 10 11 12 13 14 15 16 POLL 17 G1 18 G2 STOP ...

Page 27: ...s can be entered Example SHARP 7777 44 2 777 7 To enter two letters in succession that require the same key press after entering the first letter To clear a mistake press To enter a lower case letter continue pressing the key for the letter until the lower case letter appears To enter one of the following symbols press or repeatedly _ 7 Press 8 Press to return to the date and time display SPEAKER ...

Page 28: ...cursor back to the mistake and then enter the correct number FUNCTION 0 5 Display The currently set date appears example ENTRY MODE DATE TIME SET DATE 15 08 2003 DATE 05 08 2003 FUNCTION START MEMORY 1 2 3 4 5 6 7 8 9 0 01 02 03 04 05 06 07 08 09 10 11 12 13 14 15 16 POLL 17 G1 18 G2 STOP The date and time appear in the display and are printed at the top of every page you fax Set the date and time...

Page 29: ... 6 Enter the year four digits Example 2003 7 Enter a two digit number for the hour 00 to 23 and a two digit number for the minute 00 to 59 Example 9 25 8 Press to start the clock 9 Press to return to the date and time display 0 1 2 0 0 3 0 9 2 5 START MEMORY STOP The currently set time appears example TIME 12 19 05 JAN 09 25 ANTI JUNK DATE 05 01 2003 ...

Page 30: ... make a special ringing sound to alert you to answer If it is an automatically dialled fax reception will begin automatically A M mode Use this mode only if you have connected an answering machine to the fax see Chapter 5 Select this mode when you go out to receive voice messages in your answering machine and faxes on your fax machine Setting the reception mode Make sure a document is not loaded i...

Page 31: ...r using the up and down arrow keys 1 Press 2 Press or to select the desired volume level Press again to turn off the speaker SPEAKER UP DOWN SPEAKER Speaker UP DOWN 1 2 3 4 5 6 7 8 9 0 01 02 03 04 05 06 07 08 09 10 11 12 13 14 15 16 POLL 17 G1 18 G2 SPEAKER Display SPEAKER HIGH SPEAKER MIDDLE SPEAKER LOW ...

Page 32: ... sure has not been pressed and a document is not loaded in the feeder The ringer will ring once at the selected level 2 If you selected RINGER OFF OK to turn off the ringer press UP DOWN SPEAKER START MEMORY Ringer Display RINGER HIGH RINGER MIDDLE RINGER LOW RINGER OFF OK ...

Page 33: ...tters or graphics within 4mm of the top and bottom edges of a document will not be scanned 4 mm 4 mm Other restrictions The scanner cannot recognise yellow greenish yellow or light blue ink Ink glue and correcting fluid on documents must be dry before they pass through the document feeder All clips staples and pins must be removed from documents before loading in the feeder If these are not remove...

Page 34: ...ay cause double feeding or jamming If your document consists of several large or thick pages which must be loaded one at a time insert each page into the feeder as the previous page is being scanned Insert gently to prevent double feeding 1 Adjust the document guides to the width of your document 2 Insert the document face down in the document feeder The top edge of the document should enter the f...

Page 35: ...on panel This may damage the feeder mechanism 1 Open the operation panel 2 Remove the document If the document does not come out easily follow the procedure on page 106 3 Close the operation panel pressing down firmly on both front corners to make sure it clicks into place If you need to remove a document from the feeder open the operation panel ...

Page 36: ...This setting gives you the fastest and most economical transmission FINE Use FINE for documents containing small letters or fine drawings SUPER FINE Use SUPER FINE for documents containing very small letters or very fine drawings HALF TONE Use HALF TONE for photographs and illustrations The original will be reproduced in 64 shades of gray AUTO Use AUTO for normal documents DARK Use DARK for faint ...

Page 37: ...before the resolution and contrast can be adjusted 2 Press one or more times until the desired resolution and contrast settings appear in the display The first time you move through the list of resolution settings the contrast setting AUTO will appear next to each resolution setting The second time you move through the list the contrast setting DARK will appear RESOLUTION RECEPTION MODE Display ST...

Page 38: ...ocuments to FINE Follow the steps below 1 Press once and 3 times 2 Press once 3 Press once 4 Press to set the default resolution to FINE or to set it to STANDARD 5 Press to return to the date and time display FUNCTION 1 2 STOP Display The display briefly shows your selection then OPTION SETTING FINE PRIORITY 1 YES 2 NO NUMBER OF RING ...

Page 39: ...m to press their Start key if you pressed pick up the handset to speak with them This causes the receiving machine to issue a fax tone RESOLUTION RECEPTION MODE SPEAKER SPEAKER or Sending a Fax by Normal dialling With Normal dialling you pick up the handset or press and dial by pressing the number keys If a person answers you can talk with them through the handset before sending the fax If you pre...

Page 40: ...ect a two digit Speed Dial number for it Ninety nine Speed Dial numbers are available SPEED DIAL 5 When you hear the fax tone press Replace the handset If the transmission is completed successfully the machine will beep once If an error occurs the machine will beep three times and print a Transaction Report to inform you of the problem see page 87 START MEMORY Speed Dial numbers 01 through 18 are ...

Page 41: ... required between any of the digits to access a special service or an outside line press The pause appears as a hyphen two seconds per pause Several pauses can be entered in a row FUNCTION 0 1 SPEAKER FUNCTION Display ENTER FAX NEW NUMBER Storing fax and phone numbers for automatic dialling Speed Dial numbers 01 to 18 can be used for Rapid Key dialling Speed Dial numbers 19 to 99 are only for Spee...

Page 42: ... pressing the key for the letter until the lower case letter appears To enter one of the following symbols press or repeatedly _ 6 Press If you selected a Speed Dial number in Step 2 the display will briefly show STORED and then NEW NUMBER Go to Step 7 If you did not select a Speed Dial number in Step 2 the display will show the next available Speed Dial number If that number is acceptable press a...

Page 43: ...ntil the number appears in the display 3 Press 4 Press for EDIT or for CLEAR If you selected CLEAR go to Step 8 5 If you selected EDIT make the desired changes to the number Press or to move the cursor to the digit or digits you wish to change and then enter the new digit The new digit will replace the old digit If you do not wish to change the number go directly to Step 6 FUNCTION 0 1 1 2 Display...

Page 44: ...hange and then press the appropriate number key repeatedly until the desired letter appears see Step 5 on page 40 The new letter will replace the old letter If you do not wish to change the name go directly to Step 8 8 Press 9 Return to Step 2 to edit or clear another number or press to return to the date and time display START MEMORY START MEMORY STOP ...

Page 45: ...onnection is established If the transmission is completed successfully the machine will beep once If an error occurs the machine will beep three times and print a Transaction Report to inform you of the problem see page 87 Using a Rapid Key for a voice call To use a Rapid Key for a voice call simply lift the handset and then press the Rapid Key RESOLUTION RECEPTION MODE STOP Example To dial Speed ...

Page 46: ...s 3 Check the display If the name or number shown is correct press If not press and repeat Step 2 If the transmission is completed successfully the machine will beep once If an error occurs the machine will beep three times and print a Transaction Report to inform you of the problem see page 87 Using a Speed Dial number for a voice call To use a Speed Dial number for a voice call lift the handset ...

Page 47: ...f the other party appears in the display if no name was stored the number will appear 3 If you are sending a fax press Dialling and transmission begins If the transmission is completed successfully the machine will beep once If an error occurs the machine will beep three times and print a Transaction Report to inform you of the problem see page 87 If you are making a phone call lift the handset Di...

Page 48: ...ion and or contrast 2 Enter the number of the receiving machine by pressing the number keys If a pause is required between any of the digits to access a special service or an outside line press The pause will appear as a hyphen two seconds per pause Several pauses can be entered in a row 3 Check the display If the number of the receiving machine shown is correct press If the number is not correct ...

Page 49: ...ax machine This procedure can be used to send a fax or make a phone call Automatic redialling If you use automatic dialling including Direct Keypad dialling to send a fax and the line is busy the fax machine will automatically redial the number The fax machine will make 2 redial attempts at intervals of 5 minutes During this time RECALLING will appear in the display followed by a two digit number ...

Page 50: ... The fax machine is set to automatically correct any distortions in a transmission due to noise on the telephone line before printing at the receiving end This function is called Error Correction Mode ECM ECM is effective for both transmissions and receptions and is only effective when the other fax machine has ECM as well When there is considerable noise on the line you may find that transmission...

Page 51: ...esolution and or contrast 2 Press once and once 3 Press once 4 Enter the total number of pages 01 to 99 by pressing the numeric keys Example 5 pages 5 Dial the receiving machine and send the fax If you need to cancel a batch number entry remove the document from the feeder or press If the number of pages actually transmitted does not coincide with the batch number entered the alarm will sound and ...

Page 52: ...a fax to multiple destinations This function allows you to send the same fax to as many as 20 different destinations in just one operation When sending to multiple destinations only auto dial numbers can be used to dial the numbers of the receiving machines 1 Load the document s If desired press to set the resolution and or contrast 2 Press 3 Select a destination using one of the following methods...

Page 53: ...he destinations are marked Busy or have a communication error code If so send the document to those destinations again START MEMORY Broadcasting using a Group Key If the fax machines to which you want to broadcast have all been programmed into one Group Key see Storing numbers in Group Keys which follows you can perform the broadcasting operation using the following simplified procedure 1 Load the...

Page 54: ...Group Key and a Rapid Key Up to 20 numbers can be stored in one Group Key Only Rapid Key and Speed Dial numbers can be stored in a Group Key Full numbers cannot be stored 1 Press once and twice 2 Press once and once 3 Press 4 Press to program a Group Key Press to clear a Group Key 5 Press the Group Key that you wish to program Rapid Key 17 G1 or 18 G2 If you are clearing a Group Key press the Grou...

Page 55: ...til the name of the destination appears in the display if no name was stored the number will appear 7 Press to store the destination 8 Repeat Steps 6 and 7 for each of the other destinations that you want to store in the Group Key maximum of 20 9 When you have finished storing the destinations press 10 Press to return to the date and time display SPEED DIAL START MEMORY STOP ...

Page 56: ... press Press repeatedly to select an auto dial number and then press Press once to select the last number dialled and then press START MEMORY START MEMORY START MEMORY SPEED DIAL START MEMORY START MEMORY REDIAL Z START MEMORY If the memory becomes full If the memory becomes full while the document is being scanned MEMORY IS FULL will appear in the display Press if you want to transmit the pages w...

Page 57: ... fax tone this means that the call is a voice call or manually dialled fax it will make a ringing sound called pseudo ringing for 15 seconds to alert you to answer If you don t answer within this time your fax will send a fax tone to the other machine to allow the calling party to send a fax manually if they desire Note Only the fax will alert you to voice calls or manually dialled faxes by pseudo...

Page 58: ... second and 120 second settings to be used 5 Press to return to the date and time display 15 SEC 15 seconds 30 SEC 30 seconds 60 SEC 60 seconds 120 SEC 120 seconds FUNCTION STOP Display OPTION SETTING PSEUDO RING 1 15 SECONDS The display briefly shows your selection then QUIET TIME 1 2 3 4 Pseudo Ring Duration for Tel Fax Mode If desired you can change the duration of pseudo ringing in Tel Fax mod...

Page 59: ...xplained in Using TEL Mode on page 58 2 rings Fax reception Using FAX Mode Changing the number of rings If desired you can change the number of rings on which the fax machine answers incoming calls in FAX mode Any number from 2 to 4 can be selected 1 Press once and 3 times FUNCTION Display OPTION SETTING To select FAX mode press with no document in the feeder until the arrow in the display points ...

Page 60: ...riefly shows your selection then To select TEL mode press with no document in the feeder until the arrow in the display points to TEL RESOLUTION RECEPTION MODE When the reception mode is set to TEL you must answer all calls even fax calls by picking up the fax machine s handset or an extension phone connected to the same line NUMBER OF RING FAX REMOTE ENTER 2 4 2 RESOLUTION RECEPTION MODE FAX TEL ...

Page 61: ...nd then wants to send a fax press after speaking Press before the sender presses their Start key When RECEIVING appears in the display hang up START MEMORY Answering on an extension phone connected to the same line Answering with the fax s handset Note If you have set the Fax Signal Receive setting to NO press to begin reception START MEMORY Beep 1 Answer the extension phone when it rings RECEIVIN...

Page 62: ...in its feeder In New Zealand not all standard telephones and answering machines will respond to incoming ringing when connected to the extension socket of the equipment 5 5 Phone goes dead Beep Optional Reception Settings Fax Signal Receive Your fax will automatically begin reception if you hear a soft fax tone after answering a call on your fax or an extension phone If you use a computer fax mode...

Page 63: ...te fax activation If desired you can use a number other than 5 to activate fax reception from an extension telephone You can select any number from 0 to 9 1 Press once and 3 times 2 Press once and twice 3 Press once 4 Enter the desired number any number from 0 to 9 Example 5 Press to return to the date and time display FUNCTION 3 STOP Display OPTION SETTING FAX REMOTE ENTER 0 9 5 The display brief...

Page 64: ... remainder will be printed on a second page In this case the cut off point may occur in the middle of a line Automatic reduction may not be possible if the received document is too large contains too many fine graphics or images or is sent at high resolution In this case the remainder of the document will be printed on a second page 1 Press once and twice 2 Press once 3 Press once 4 Press to selec...

Page 65: ...replace the print cartridge the stored documents will automatically print out If you received documents in memory because the fax ran out of paper be sure to add paper which is the same size as the paper previously used If not the document print out size may not match the size of the printing paper Caution When documents are stored in memory do not turn the power off This will erase all of the con...

Page 66: ...justment to match the size of the paper The default setting is 100 Example Press twice Number of copies per original Press the number keys to enter a number from 1 to 99 The default setting is 1 Example Press for two copies Sorted copies To sort the copies as shown below under Sorted first set the number of copies per original at least 2 copies must be set and then press RESOLUTION RECEPTION MODE ...

Page 67: ... of originals in the feeder the memory may become full before all pages can be scanned the display will show MEMORY IS FULL If this happens press to copy the pages that have been scanned and then repeat the copy procedure for the remaining pages including the page that was being scanned when the memory became full Copy Cut off When making a copy of a document that is longer than the printing paper...

Page 68: ... covering the TEL SET socket 2 Connect the answering machine s telephone line socket to the TEL SET socket If desired you can connect an extension phone to your answering machine s extension phone socket Note When FaxAbility or Fax Duet distinctive ring is used the answering machine may be connected to any extension of the same line TEL LINE TEL SET TEL SET TEL LINE To answering machine s telephon...

Page 69: ...ing of the message This will give your fax a chance to detect fax tones sent when automatic dialling is used Using the Answering Machine Connection When you go out activate the answering machine connection as follows 1 Set the reception mode to A M 2 Set your answering machine to auto answer Your answering machine must be set to answer on a maximum of two rings If not you may not be able to receiv...

Page 70: ...ges were received when only fax messages were received To prevent the fax from taking over the line and beginning reception if you call in from an external phone or answer on an extension phone press any three keys other than the code to activate fax reception 5 and on the dial pad of the phone This can only be performed from a phone capable of tone dialling When you return and turn off your answe...

Page 71: ... machine is interrupting callers before they can leave a message try a longer Quiet Detect Time setting If your outgoing message includes a period of silence make sure that the setting is longer than that period of silence or re record your outgoing message to shorten the silence Note Quiet Detect Time can be turned off by entering 00 for the time Note however that the fax machine will not be able...

Page 72: ...ive seconds at the factory You can change this setting by entering a 2 digit number equal to the desired number of seconds of the delay or turn the function off by enttering 00 As general guide the delay time should be slightly longer than the pause before the outgoing message 1 Press once and 3 times 2 Press once and 7 times 3 Press once 4 Enter a 2 digit number from 01 to 15 for the number of se...

Page 73: ...s been turned off at the factory If you want to turn it on follow the steps below Note When this function is turned on make sure that the answering machine is set to answer on 3 rings or less If it isn t the fax will always answer first preventing callers from leaving voice messages 1 Press once and 3 times 2 Press once and 8 times 3 Press once 4 Press to turn on the function or to turn it off 5 P...

Page 74: ...dentification service from your telephone company Your fax may not be compatible with some caller identification services 1 Press once and 3 times 2 Press once and 4 times 3 Press once 4 Press YES to turn on Caller ID To turn off Caller ID press and go to Step 6 5 Press if you are in Australia or if you are in New Zealand 6 Press to return to the date and time display FUNCTION 1 2 1 2 STOP Display...

Page 75: ...ar while the fax rings if caller information is not available NO SERVICE No caller information was received from your telephone company Make sure that the telephone company has activated your service CALLER ID ERROR Noise on the telephone line prevented reception of caller information UNAVAILABLE OUT OF AREA in New Zealand The call was made from an area which does not have a caller identification ...

Page 76: ...eading digits from the number shown on the display when dialling manually After you have received 30 calls each new call will delete the oldest call Follow the steps below to view the Caller ID List in the display If desired you can immediately dial a number when it appears 1 Press twice 2 Press or to scroll through the list 3 If you wish to dial one of the numbers in the list scroll through the l...

Page 77: ...eviously stored number press and go to Step 6 5 Enter the number by pressing the number keys max 20 digits 6 Press to store or clear the number 7 Press to return to the date and time display FUNCTION 1 2 START MEMORY STOP Priority Call If you have turned on Caller ID you can set the machine to make a special ringing sound when you receive a call from a designated phone number This lets you know im...

Page 78: ...a voice call or a fax comes in from the number you have specified as a Junk Number your fax will terminate the call as soon as it receives the calling phone number from the caller ID service The caller will hear a 3 second high pitch tone to signal the call s termination In Australia the call will not break off until the caller has hung up To use this function enter the number that you wish to blo...

Page 79: ...y and begin reception after the number of rings set with the Number of Rings setting the initial setting is 2 rings refer to Using Fax Mode in Chapter 3 When your voice number is dialled the fax machine will signal the call with the normal ringing sound to let you know that you must answer personally The initial setting for distinctive ring is NO If set to YES both Australian Fax Duet and New Zeal...

Page 80: ...ce 78 4 Press to turn on the function or to turn it off 5 Press to return to the date and time display 6 Set the reception mode to FAX 1 2 STOP RESOLUTION RECEPTION MODE FAX A M TEL TEL FAX The display briefly shows your selection then FAX SIGNAL RX ...

Page 81: ...keys max 20 digits 6 Press and then press to return to the date and time display FUNCTION 1 2 START MEMORY STOP Blocking Reception of Unwanted Faxes The Anti Junk Fax function allows you to block reception of faxes from a party that you specify This saves paper by not printing out unwanted junk faxes To use this function follow the steps below to enter the fax number from which you do not wish to ...

Page 82: ...es the transmission To use the polling function you must first set Rapid Key 16 POLL for use as a polling key When Rapid Key 16 POLL is set as a polling key it cannot be used for Rapid Key dialling 1 Press once and 3 times 2 Press once and 5 times 3 Press once 4 Press to use Rapid Key 16 POLL as a polling key To turn off the polling function press 5 Press to return to the date and time display FUN...

Page 83: ...Speed Dial number Enter the full number using the numeric keys 2 Press If you used the handset replace it when POLLING appears in the display Reception will begin SPEAKER SPEAKER SPEED DIAL 16 POLL Requesting transmission Being polled polling standby To let another fax machine poll your fax press to set the reception mode to FAX and load the document s Transmission will take place when the other f...

Page 84: ...PASSCODE MODE Polling security Polling Security allows you to prevent unauthorized polling of your machine When this function is turned on polling will only take place when the fax number of the polling fax machine has been entered in your machine s list of permitted fax numbers called passcode numbers The number of the polling fax must also be correctly programmed into itself for identification T...

Page 85: ...s in your machine s list of permitted numbers 1 Press once and twice 2 Press once and twice 3 Press 4 Press 5 Enter the fax number maximum of 20 digits 6 Press 7 Return to Step 4 to store another number or press to return to the date and time display FUNCTION START MEMORY STOP PASSCODE MODE Display ENTRY MODE NEW CODE ENTER FAX NEW CODE ...

Page 86: ...clear appears in the display 5 Press 6 Press for EDIT or for CLEAR If you selected CLEAR go to Step 8 7 If you selected EDIT make the desired changes to the number Press or to move the cursor to the digit or digits you wish to change and then enter the new digit The new digit will replace the old digit 8 Press 9 Return to Step 4 to edit or clear another number or press to return to the date and ti...

Page 87: ...rmation on your most recent 30 fax transactions The report is divided into two parts the TRANSMISSIONS ACTIVITY REPORT which shows information on fax transmissions and the RECEPTIONS ACTIVITY REPORT which shows information on fax receptions All information is erased after a report is printed out If information on 30 fax transactions accumulates the information on the oldest transaction will be del...

Page 88: ...y Setup List This list shows your current selections for the FUNCTION key settings The list also shows your name and fax telephone number as entered in the machine and a sample of the header printed at the top of every page you transmit HEADER PRINT Caller ID List This list shows information on your 30 most recently received calls and faxes This list is only available if you are using the Caller I...

Page 89: ...s transmitted received NOTE One of the following notes will appear under NOTE in the report to indicate whether the transaction was successful and if not the reason for the failure OK Transmission reception was successful P FAIL A power failure prevented the transaction JAM The printing paper or document jammed preventing the transaction BUSY The fax was not sent because the line was busy COM E X ...

Page 90: ...date and time display ALWAYS PRINT A report will be printed after each transmission reception or error ERROR MEMORY A report will be printed after an error or a memory operation SEND ONLY A report will be printed after each transmission ERROR ONLY A report will be printed only when an error occurs NEVER PRINT A report will never be printed FUNCTION 1 5 STOP Display The display briefly shows your s...

Page 91: ...has accumulated A report can still be printed on demand at any time Follow these steps 1 Press once and 3 times 2 Press once and 3 times 3 Press once 4 Press to turn on auto print out or to turn it off 5 Press to return to the date and time display FUNCTION 1 2 STOP OPTION SETTING ECM MODE 1 YES 2 NO The display briefly shows your selection then AUTO PRINT OUT Display ...

Page 92: ...y of transmitted images and copies 1 Open the operation panel 2 Flip up the green levers on each side of the white roller 3 Wipe the scanning glass under the white roller and rollers with a cotton swab Make sure that all dirt and stains such as correcting fluid are removed Dirt and stains will cause vertical lines on transmitted images and copies ...

Page 93: ... from the scanning glass you can try moistening the swab with isopropyl alcohol or denatured alcohol Take care that no alcohol gets on the rollers 4 Flip down the green levers on each side of the white roller 5 Close the operation panel pressing down firmly on both front corners to make sure it clicks into place ...

Page 94: ...dure when a document is loaded in the feeder This may cause the top part of the document to be cut off when the document is faxed or copied 1 Press once and 3 times 2 Press once and once 3 Press once 4 Press The white roller rotates half a turn When rotation is finished the machine will beep FUNCTION START MEMORY OPTION SETTING CLEAN ROLLER Display About the lithium battery The fax machine uses a ...

Page 95: ...ce 2 Press once and twice 3 Press once 4 Press to print an alignment page To enter an alignment value without printing an alignment page press 5 In the alignment page that the machine prints locate the line that comes closest to forming a completely straight line FUNCTION 1 2 ALIGN CART 1 PRINT 2 SET Display PRINT SET UP ENTER 0 30 15 After printing the alignment page the display shows In this exa...

Page 96: ...MEMORY STOP Cleaning the print cartridge nozzles If print quality is still not satisfactory after aligning the print cartridge follow these steps to clean the print cartridge nozzles 1 Press once and twice 2 Press once and once 3 Press once 4 Press The machine prints a test pattern similar to the one shown in the following step FUNCTION START MEMORY CLEAN NOZZLES Display PRINT SET UP PRESS START K...

Page 97: ...y is satisfactory after running the nozzle test three times the nozzles are clean If the print quality is still not satisfactory after running the test a third time continue with Step 7 7 Open the operation panel and then the print compartment cover and remove and reinstall the print cartridge see page 16 8 Repeat the nozzle test If the lines are still broken wipe the nozzles as explained in the f...

Page 98: ...mpen a clean cloth with water and gently wipe the nozzles and the gold colored area around the nozzles Wipe in one direction only To dissolve dried ink hold the damp cloth against the nozzles for about three seconds Gently blot and wipe dry When finished allow the gold colored area to dry 3 Dampen another section of clean cloth with water and gently wipe the contacts and the gold colored area arou...

Page 99: ...lder A dirty print cartridge holder may cause smudges on your printed pages To clean the print cartridge holder open the operation panel and then the print compartment cover and remove the print cartridge see page 16 Wipe on the holder with a damp cloth 1 ...

Page 100: ...problem on the phone line Try the transaction again If the error persists check the following Check the connection The cord from the TEL LINE socket to the wall socket should be no longer than two meters Make sure there are no modem devices sharing the same telephone line Check with the other party to make sure their fax machine is functioning properly Have your telephone line checked for line noi...

Page 101: ...d to both the TEL LINE socket and the wall socket see page 22 Make sure that the fax machine is set to the correct dialling mode for your telephone line See Dial mode on page 22 The power is on but no transmission takes place Make sure that the receiving machine has paper Make sure that the telephone line cord is plugged into the TEL LINE socket and not the TEL SET socket If the receiving machine ...

Page 102: ...e a copy or print a report to confirm the printing ability of your machine Print quality is poor The print cartridge may need alignment or cleaning See page 93 The received document is faint Ask the other party to send higher contrast documents If the contrast is still too low your fax machine may need service Make a copy or print a report to check your machine s printing ability The print cartrid...

Page 103: ...ct another electrical appliance to the outlet to see if it has power The machine does not respond when you press any of its keys If a beep sound is not made when you press the keys unplug the power cord and then plug it in again several seconds later Automatic document feeding does not work for transmission or copying Check the size and weight of the document see Transmittable Documents on page 31...

Page 104: ...Make sure your machine s TEL LINE socket is connected to the wall socket Make sure your machine s TEL SET socket is connected to your answering machine s telephone line socket not the answering machine s extension phone socket Make sure your answering machine s outgoing message is under 10 seconds Make sure that the Quiet Detect Time setting is set to three or four seconds see page 68 ...

Page 105: ...rectly COVER OPEN The print compartment cover is open Close it DOCUMENT JAMMED The original document is jammed See the following section Clearing Paper Jams Document jams will occur if you load more than 20 pages at once or load documents that are too thick see page 31 The document may also jam if the receiving machine doesn t respond properly when you attempt to send a fax FAX RX IN MEMORY A fax ...

Page 106: ...an auto dial number when none have been stored OFF HOOK This appears if you forgot to replace the handset after using it to dial and send a fax Replace the handset or press the STOP key to clear the message ON HOOK DIAL The SPEAKER key has been pressed and the fax machine is waiting for you to dial OUT OF INK The cartridge is out of ink and must be replaced Faxes will be received to memory PAPER J...

Page 107: ... the call See Automatic redialling on page earthed TOTAL PAGE S 01 Number of pages transmitted received or copied Audible signals Continuous tone 3 seconds Indicates the end of transmission reception or copying Intermittent tone 3 beeps 5 seconds 1 second on 1 second off Indicates incomplete transmission reception or copying Rapid intermittent tone 35 seconds 0 7 seconds on 0 3 seconds off Indicat...

Page 108: ...t try pressing If the document doesn t feed out remove it as explained below Important Do not try to remove a jammed document without releasing it as explained below This may damage the feeder mechanism START MEMORY 1 Slowly open the operation panel until it is half open 2 Flip up the green levers on each side of the white roller 3 Gently remove the document Be careful not to tear the document ...

Page 109: ... Trouble shooting 1 Open the operation panel Clearing jammed printing paper 4 Flip down the green levers on each side of the white roller 5 Close the operation panel pressing down on both sides to make sure it clicks into place ...

Page 110: ... cover toward you 3 Gently pull the jammed paper out of the machine making sure no torn pieces of paper remain in the print compartment or rollers 4 Close the print compartment cover 5 Close the operation panel pressing down firmly on both front corners to make sure it clicks into place ...

Page 111: ...lly answers and receives faxes TEL mode Answer all calls even faxes by picking up the handset To begin fax reception press TEL FAX mode The fax machine automatically answers and receives faxes Voice calls are signalled by a special ringing sound A M mode Select this mode when you want to use an answering machine that is connected to the fax Storing Auto Dial Numbers 1 Press once and once 2 Enter a...

Page 112: ...lling Direct Keypad 46 Normal 37 Rapid Key 43 Searching 45 Speed 44 Direct Keypad dialling 46 Display messages 73 103 Distinctive ring 77 Document feeder 32 Document guides 32 Document restrictions 31 Document sizes 31 Document maximum scanning size 31 E ECM Error Correction Mode 48 Extension telephone Connecting 23 Using 59 F Fax Ability distinctive ring 77 Fax Duet distinctive ring 77 FAX recept...

Page 113: ...Rapid Key dialling 43 Reception mode A M mode 28 67 FAX mode 28 57 TEL mode 28 58 TEL FAX mode 28 55 Reception Ratio setting 62 Redialling 47 Removing original document 33 Resolution 34 Ringer volume 30 Roller rotating for cleaning 92 S Scanning glass cleaning 90 Sender s name and number entering 24 25 Setup List 86 Speaker volume 29 Speed dialling 44 T TEL reception mode 28 58 TEL LINE socket 22 ...

Page 114: ...320XHTA SHARP CORPORATION OF AUSTRALIA PTY LTD A C N 003 039 405 1 Huntingwood Drive Huntingwood Blacktown N S W 2148 SHARP CORPORATION OF NEW ZEALAND LIMITED 59 Hugo Johnston Drive Penrose Auckland New Zealand SHARP CORPORATION ...

Reviews: