background image

2-8

Installation Manual

Installation Procedure

Basic Installation

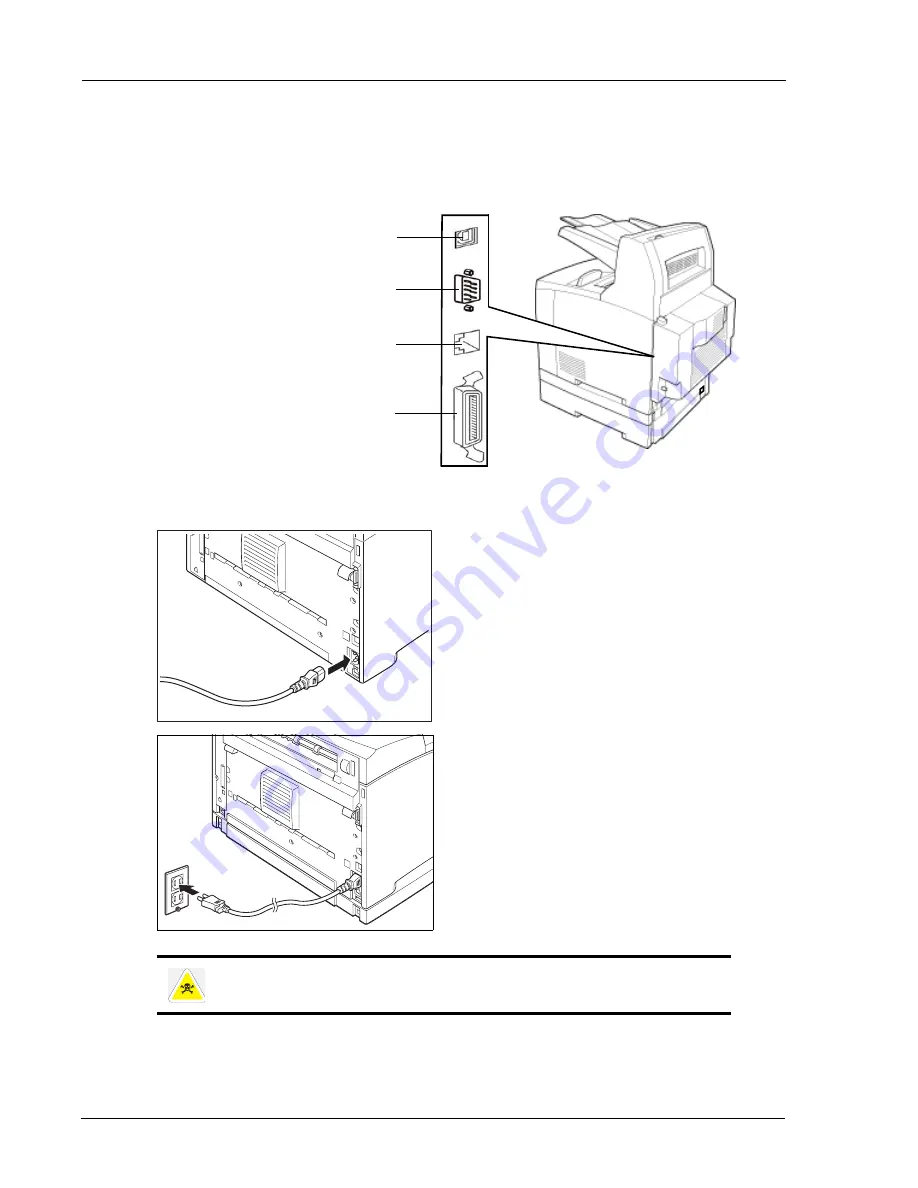
Connecting an Interface

The following four interfaces are available to directly connect the printer or to connect to a 
network.

Connecting the Power Cord

1.

Connect the power cord to the 

power cord connector at the back 

of the printer. 

2.

Make sure that the power switch 

has been firmly pushed to the 

<O> position and then insert the 

other end of the power cord to a 

correctly rated power outlet.

Connect the printer exclusively to an outlet with a suitable voltage rating and current rating 
for your printer’s model.

USB2 Port

Serial RS 232 Cable Connection

Parallel Cable Connection

Ethernet 10/100 Base-Tx Connection

Summary of Contents for DX-B350P

Page 1: ...LASER PRINTER Installation Manual MODEL DX B350P DX B450P ...

Page 2: ......

Page 3: ...nstallation 2 1 Checking Your Package 2 1 Preparing a Location for the Printer 2 1 Installation Precautions 2 1 Space Requirements 2 2 Installation Procedure 2 3 Removing the Tape 2 3 Installing the Toner Cartridge 2 3 Loading Paper 2 5 Connecting an Interface 2 8 Connecting the Power Cord 2 8 Turning the Printer On 2 9 Using the Operator Panel 2 9 Selecting a Display Language 2 10 Printing a Conf...

Page 4: ...TOC 2 Installation Manual ...

Page 5: ...Do not perform any operation or action in any way other than provided in this manual When in doubt contact your dealer or service company Keep in mind that hazard warnings in this manual or on the printer cannot cover every possible case as it is impossible to predict and evaluate all circumstances beforehand Be alert and use your common sense Safety Precautions This printer is available in the po...

Page 6: ...ient to cause any health hazard It is advisable to place the printer in a ventilated area since the small amount of ozone that is emitted may have an objectionable odor Laser Information for North America This Digital Equipment is rated Class 1 and complies with 21 CFR 1040 10 and 1040 11 of the CDRH standards This means that the equipment does not produce hazardous laser radiation For your safety...

Page 7: ...15 of the FCC Rules These limits are designed to provide reasonable protection against harmful interference in a residential installation This equipment generates uses and can radiate radio frequency energy and if not installed and used in accordance with the instructions may cause harmful interference to radio communications However there is no guarantee that interference will not occur in a part...

Page 8: ...lied directly to you the end user and no one is authorized to make any representations or warranties on behalf of Sharp Specifically SHARP DOES NOT EXTEND TO YOU THE END USER ANY EXPRESS WARRANTY OR ANY IMPLIED WARRANTY OF MERCHANTABILITY FITNESS FOR USE OR FITNESS FOR ANY PARTICULAR PURPOSE IN CONNECTION WITH THE HARDWARE SOFTWARE OR FIRMWARE EMBODIED IN OR USED IN CONJUNCTION WITH THIS PRODUCT S...

Page 9: ... superior efficiency DX B450P model requires the optional DX DUX2 duplex module to fully qualify for ENERGY STAR The EcoLogo Program guidelines are applied to only the products in Canada The products that meet the EcoLogo Program guidelines carry the logo shown to the left The products without the logo may not meet the EcoLogo Program guidelines ...

Page 10: ...g Toner Cartridges Store a new toner cartridge box horizontally Do not store it standing on end If stored standing on end the toner may not distribute well even after shaking the cartridge vigorously and will remain inside the cartridge without flowing out Supply of Spare Parts and Consumables The supply of spare parts for repair of the machine is guaranteed for at least 7 years following the term...

Page 11: ...erve the following precautions when locating the printer Place the printer on a horizontal sturdy and stable surface The printer may cause injury if it falls over Do not subject the printer to direct sunlight or a malfunction may result Printer Starter Toner Cartridge DX B450P is 10K page yield at 5 coverage on A4 Letter DX B350P is 6K page yield at 5 coverage on A4 Letter Power cord Paper tray A4...

Page 12: ...pace Requirements A certain amount of space is required for proper operation of the printer and also for performing printer maintenance and replacing consumables Use the following figures to plan for appropriate clearances when determining a location for your printer NOTE Be sure to leave ample space between the ventilation openings on the printer and the nearest wall or other surface otherwise ov...

Page 13: ...r should remain in the down position Installing the Toner Cartridge When installing the Toner Cartridge take note of the following points below Never throw a Toner Cartridge into an open flame It can cause an explosion and you can get burned Keep the toner cartridge in a location out of reach of children Do not forcibly open the toner cartridge Do not subject it to direct sunlight or strong light ...

Page 14: ... to immediately remove it with a vacuum cleaner which has a fine filter Avoid inhaling possibly escaped toner dust 1 Open the top cover NOTE Do not touch any parts inside the printer 2 Take the Toner Cartridge out of the box and shake it 7 to 8 times as shown in the diagram 3 Place the Toner Cartridge on a flat surface and pull the seal out horizontally NOTE When pulling out the seal pull it out h...

Page 15: ...ils on the type and size of paper that can be loaded in the paper tray 4 Hold the Toner Cartridge by the grip and insert it into the slot inside the printer NOTE Do not touch any parts inside the printer Ensure that the Toner Cartridge is firmly set 5 Close the top cover securely 1 Place the paper tray on a flat surface ...

Page 16: ...e Basic Installation 2 Remove the lid of the tray 3 If the base plate of the paper tray is raised push it down 4 Squeeze the length guide and slide it to the desired paper size 5 Squeeze the right width guide and slide it to the desired paper size ...

Page 17: ...o step 7 If not skip to step 8 7 Slide the right and left lock tabs in the paper tray outwards to unlock them Hold the grip of the paper tray and pull its extendable part to the front until it touches the desired paper size NOTE Do not load paper exceeding the maximum fill line or the maximum capacity allowed Align the right width guide with the paper width correctly If the right width guide is no...

Page 18: ... cord to the power cord connector at the back of the printer 2 Make sure that the power switch has been firmly pushed to the O position and then insert the other end of the power cord to a correctly rated power outlet Connect the printer exclusively to an outlet with a suitable voltage rating and current rating for your printer s model USB2 Port Serial RS 232 Cable Connection Parallel Cable Connec...

Page 19: ...od of time When you have finished using the printer for the day or you do not intend to use it for a long period of time switch off the power Using the Operator Panel To configure the printer press the MENU button and use the NEXT RETURN and PREVIOUS buttons to navigate through the Operator Panel options and the SELECT button to choose the option You can use the CANCEL button to exit any current s...

Page 20: ...in trays options installed and other relevant information about your printer To print a Configuration Summary press the INFO button on the Operator Panel Setting an IP Address Manually This action is only needed if you must set an IP address manually If you receive an IP address from a DHCP source then you do not need this action DHCP is On by default You must turn DHCP Off by navigating through t...

Page 21: ... is installed with a base printer configuration This means optional features such as a duplexer will be unavailable until the option is added to the driver s configuration The driver configuration can be performed automatically or manually Driver options are added as follows 1 From the Windows Control Panel select Printer and Faxes This control is named simply Printers on Windows Vista 2 Find your...

Page 22: ...2 12 Installation Manual Driver Installation Basic Installation ...

Page 23: ...297mm A5 148 x 210mm A6 105 x 148mm B5 182 x 257mm C5 162 x 229mm DL 110 x 220mm Custom W 76 2 mm 3 0 in 215 9 mm 8 5 in and L 127 0 mm 5 0 in 355 6 mm 14 0 in Paper that is smaller than W 98 4 mm 3 9 in x L 148 0 mm 5 8in must be placed in Tray 1 Paper that is smaller than W 88 9 mm 3 5 in x L 139 7 mm 5 5in cannot be duplexed or output to the Offset Catch tray Paper type Plain 64 105 gsm Transpa...

Page 24: ...r 2003 32 64 NT 4 Win 98 MacOS 10 2 10 5 PPDs Protocols TCP IPv4 UDP BOOTP DHCP ARP ICMP DNS WINS HTTP LPR HTTP Apple EtherTalk IPv6 ICMPv6 Bonjour Netware V5 V6 POP3 SMTP Operating Environment Operating Temperature 41 to 95 F 5 to 35 C Relative Humidity 15 to 85 non condensing Humidity should be 70 or below at 95 F and temperature should be 90 F or below at 85 humidity Acoustics Bystander Sound P...

Page 25: ...ned to protect the environment through superior efficiency DX B450P model requires the optional DX DUX2 duplex module to fully qualify for ENERGY STAR EcoLogo Canada The EcoLogo Program guidelines are applied to only the products in Canada The products that meet the EcoLogo Program guidelines carry the logo The products without the logo may not meet the EcoLogo Program guidelines Not applicable Sp...

Page 26: ...3 4 Installation Manual General Specification Specifications ...

Page 27: ...w Jersey 07495 1163 www sharpusa com SHARP ELECTRONICS OF CANADA LTD 335 Britannia Road East Mississauga Ontario L4Z 1W9 DX B350P DX B450P Installation Manual This manual has been printed using a vegetable based soy oil ink to help protect the environment ...

Page 28: ......

Reviews: