


The following steps should only be performed if there is a
power failure or if this unit is unplugged for more than 1 hour.
Turn on the TV and select the video channel on the TV.
Press
OPERATE
, then
VCR
.
Press
K
or
L
repeatedly to select your desired language.
Press
MENU
.
4
3
2
1
Turning on Your VCR/DVD
Press
VCR
, then
MENU
.
Press
K
or
L
to select INITIAL, then press
B
.
Press
K
or
L
to select LANGUAGE, then press
B
.
Press
K
or
L
repeatedly to select your desired language,
and
MENU
to confirm.
4
3
2
1
Changing the Language
– 12 –
EN
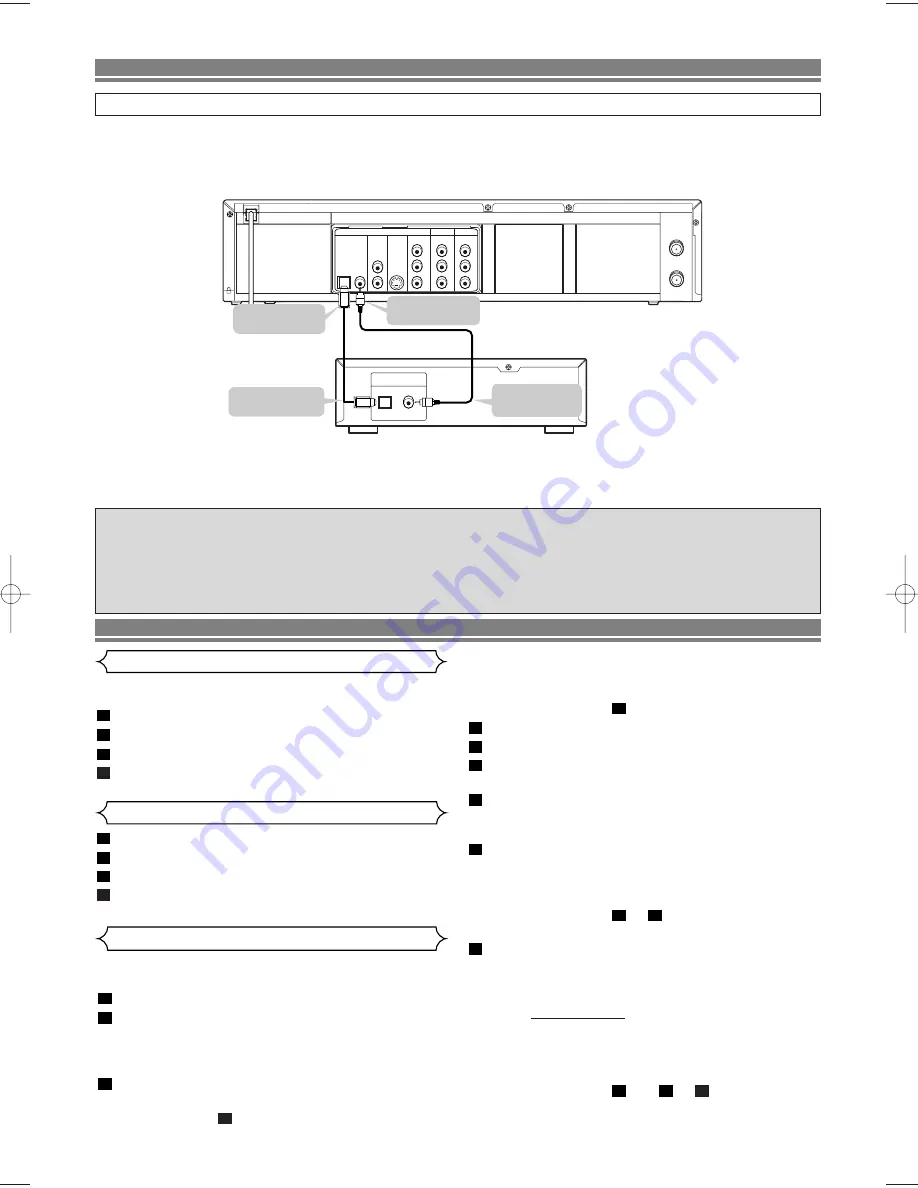
SETTING UP YOUR VCR/DVD COMBINATION
DIGITAL IN
COAXIAL
DVD
DVD/VCR
VCR
DIGITAL
AUDIO OUT
AUDIO
OUT
S-VIDEO
OUT
COMPONENT
VIDEO OUT
AUDIO OUT
VIDEO OUT
AUDIO IN
VIDEO IN
L
R
A E R I A L
R F O U T
Y
C
B
L
R
L
R
C
R
OPTICAL
COAXIAL
OPTICAL
To OPTICAL
DIGITAL input jack
To OPTICAL
DIGITAL OUT jack
Optical digital cable
(commercially available)
To COAXIAL
DIGITAL input jack
To COAXIAL
DIGITAL OUT jack
Coaxial digital cable
(commercially available)
Dolby Digital (5.1 ch)/DTS/
MPEG Audio processor or amplifier
VCR/DVD SET UP
Video Channel setting will be necessary, if your VCR/DVD is
connected to the TV via the round coaxial cable.
Press
VCR.
Insert a pre-recorded tape into the cassette compart-
ment.
Playback will start automatically.
If playback does not start, press
PLAY
.
Select and adjust your TV to channel 37.
• If the playback picture appears on the TV screen, con-
tinue with step
.
9
3
2
1
Video Channel Setting
• If channel 37 is set for broadcasting, or interference
lines appear on the picture, the RF converter must be
set to a different channel between CH28 and CH69.
Continue with step
Press
MENU
.
Press
K
or
L
repeatedly to select INITIAL, then press
B
.
Press
K
or
L
repeatedly to select RF OUT, then press
B
.
The RF OUT CH menu will appear.
Press
K
or
L
to select a channel which is not used for
broadcasted between channel 28 and channel 69 in your
area, and
B
to confirm.
Press
MENU
to exit.
Set the TV channel to the RF OUT CHANNEL which was
selected on the VCR/DVD. A picture from the VCR/DVD
will appear on the TV screen. If a picture does not
appear, repeat steps
to
using a different channel
which is not used for broadcasting.
Press
STOP
to stop the tape.
NOTES:
• You may also access the RF OUT CH menu by press-
ing and holding
MENU
on the remote control for 3 sec-
onds during power off until the RF OUT CH menu
appears.
• If this unit and your TV are connected using a SCART
cable, the RF converter may be switched off to avoid
any possibility of interference. To switch off the RF con-
verter,
follow
steps and to above
and
press
L
repeatedly until “--” appears next to RF OUT CH.
Press
B
, then press
MENU
to exit.
6
4
1
9
8
4
8
7
6
5
4
4
Optical cable (not supplied)
• Optical cable (not supplied) may be damaged when bent at sharp angles. Ensure cables are coiled in loops with a diame-
ter of 15 cm or more when storing them.
• Use a cable which is 3m or shorter.
• Insert cable plugs firmly into the connectors when making connections.
• If a plug has minor scratches or is dirty, clean it with a soft cloth before inserting it into a connector.
Playing Dolby Digital (5.1 channel), DTS or MPEG audio
Connecting an amplifier with a Dolby Digital/ DTS/ MPEG Audio digital surround processor to your VCR/DVD’s coaxial digital
jack provides richer and more powerful audio play.
C
C
Digital connection to a processor or amplifier with an optical/ coaxial digital input jack
You can make this connection using either a coaxial digital cable or an optical digital cable.
NOTES:
• This connection is not possible if the processor or amplifier to which you want to connect does not have an optical/
coaxial digital input jack.
• ANALOG AUDIO OUT and AV (TV) of the VCR/DVD are not available on the DTS audio.
H9745AD(EN)_v2.qx4 04.9.6 13:19 Page 12


