background image

– 8 –

EN

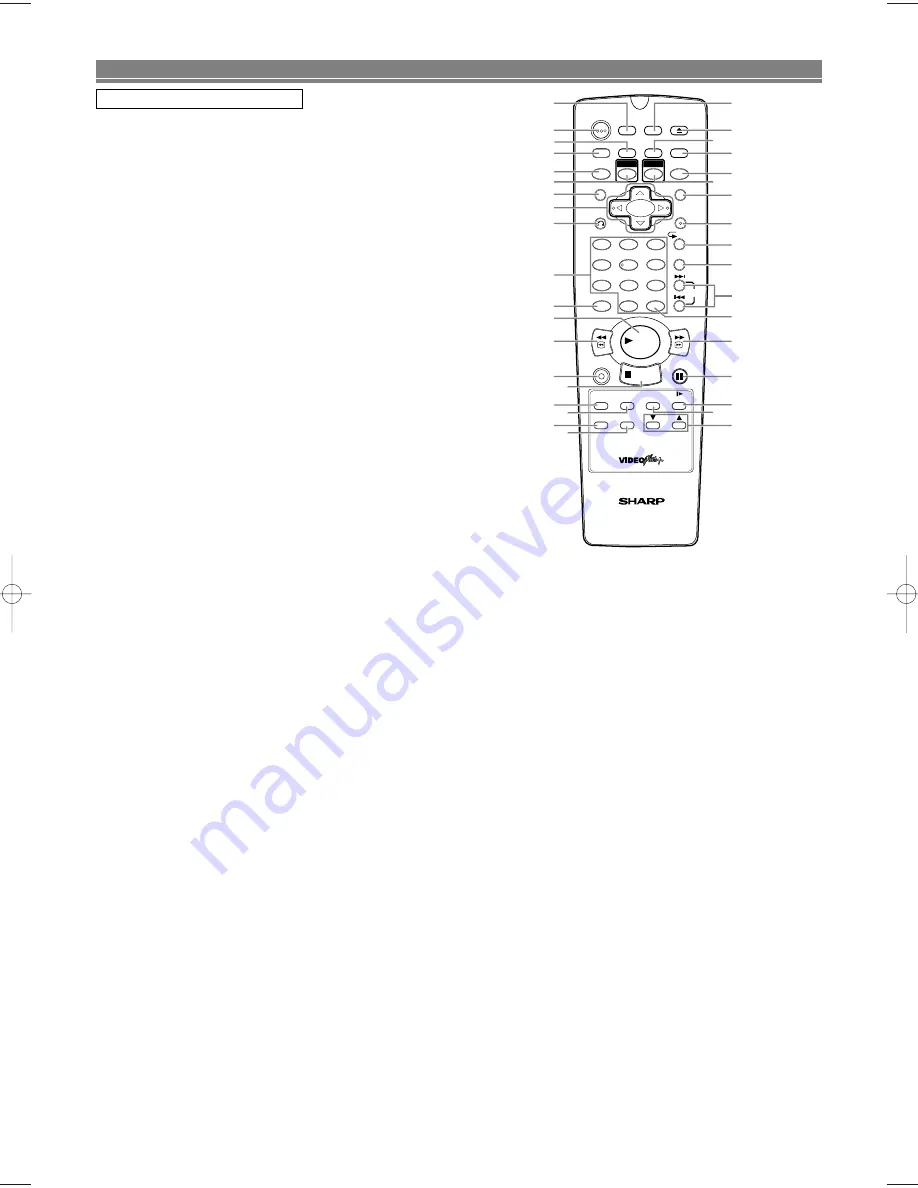
25. DAILY/WEEKLY Button

Press to select once, daily, everyday, or weekly when
you programme the automatic timer recording using the
VIDEO Plus+ system. (VCR)

26. SKIP (

H

) Buttons

Press to skip Chapters or Tracks. (DVD)

27. A-B REPEAT Button

Repeats playback of a selected section. (DVD)

28. REPEAT Button

Repeats playback of the current disc, title, chapter or
track. (DVD)

29. ENTER Button

Press to accept a setting. (DVD)

30. MENU Button

• 

Press to display the DVD menus and MP3 file lists.
(DVD)

• 

Press to display the VCR menu. (VCR)

31. DVD Button

Press to select DVD output mode and to use the remote
control in DVD mode

32. MODE Button

Activates programme playback or random playback
mode. (CD/ MP3/ JPEG)
Activates the 3D sound or Rapid Play. (DVD)

33. MARKER Button

Press to call back the Marker display. (DVD)

34. AUDIO Button

• 

Press to select a desired audio language or sound
mode. (DVD)

• 

Press to select a desired sound mode. (VCR)

35. OPEN/CLOSE/EJECT Button

• 

Press to insert discs into or remove them from the tray.
(DVD)

• 

Press to remove the tape from the VCR. (VCR)

36. SETUP Button

Press to enter the setup mode or to change setup items.
(DVD)

FUNCTIONAL OVERVIEW

REMOTE CONTROL

1. DISPLAY Button

• 

Press to display the current playback mode.(DVD)

Press to display the current time, tape counter and

channel number.(VCR)

2

.

OPERATE Button

Press to turn the power on and off.

3. ANGLE/VIDEO Plus+ Button

Press to change the camera angle to see the sequence
being played back from a different angle.(DVD) 
Press to programme timer recording with the VIDEO
Plus+ system. (VCR)

4. SUBTITLE Button

Press to select a desired subtitle language or to change
the Panel Display settings. (DVD)

5. ZOOM Button

Enlarges part of a DVD-reproduced image.

6. VCR Button

Press to select VCR output mode and to use the remote
control in VCR mode.

7. TITLE Button

Displays the title menu.

8. ARROW Buttons (

o p s B

)

(up/down/left/right) Press to select an item in the menu
and to move the cursor.

9. RETURN Button

Returns to the previous operation. (DVD)

10. Numerical Buttons
11. CLEAR/C-RESET Button

• 

Press to clear the markers or the incorrect input. (DVD)

• 

Press to reset the counter. (VCR)

12. PLAY Button

Press to begin playback.

13. REV Button

Fast reverse playback to a desired point.

14. REC/OTR Button

Press once to start recording or repeatedly to start One
Touch Recording. (VCR)

15. STOP Button

• 

Press to stop playback. (DVD)

• 

Press to stop playback or recording. (VCR)

16. DIRECT SKIP/QUICK-FIND Button

• 

Press to locate a desired point. (DVD)

• 

Press to skip to the beginning of the next programme.
(VCR)

17. TAPE SPEED Button

Press to select the VCR’s recording speed. (SP or LP)

18. GAMMA Button

Press to adjust the black parts of the picture brighter
(DVD)

19. SEARCH MODE Button

Press to call up the index or time search menu. (VCR)

20. CH (

o

/

p

) Button

Press to change TV channels or to adjust the tracking
manual on the VCR.

21. TIMER ON/OFF Button

Press to put the VCR into standby mode for a timer
recording.

22. SLOW Button

Press to view the video tape in slow motion.

23. STILL/PAUSE Button

• Press to pause playback or to advance playback one

frame at a time. (DVD)

• Press to pause playback or recording or to advance

playback one frame at a time. (VCR)

24. FWD Button

Fast forwards playback to a desired point.

1

2

3

6

5

4

7

0

+10

8

9

2

4

3

12

15

17

6

5

7
8
9

11

10

13

14

16

19

18

1

36

35

34

21

25

31

33

32

30

29

28

27

26

24

23

22

20

TAPE

SPEED

DIRECT SKIP

QUICK-FIND

TIMER

ON/OFF

CH

SLOW

SEARCH MODE

GAMMA

MENU

TITLE

STILL/PAUSE

REC/OTR

STOP

PLAY

FWD

REV

RETURN

SKIP

REPEAT

A-B REPEAT

CLEAR/C-RESET

DAILY/WEEKLY

ENTER

ZOOM

AUDIO

VCR

MARKER

DVD

MODE

SETUP

SUBTITLE

    OPEN/CLOSE

EJECT

ANGLE

VIDEO Plus+

DISPLAY

OPERATE

VCR/DVD COMBINATION

NA528BD

H9741BD(EN)_v2.qx4  04.9.6  13:49  Page 8

Summary of Contents for DV-NC100H

Page 1: ...se from Gemstar Development Corporation 2 PULL OPEN DV NC100 OPERATE OPEN CLOSE PLAY STOP DVD VCR TIMER REC PLAY REW STOP EJECT TRACKING OUTPUT The region number for this VCR DVD is 2 MODEL DV NC100H FF CH If you require any advice or assistance regarding your Sharp product please visit our web site www sharp co uk customersupport Customers without Internet access may telephone 08705 274277 during...

Page 2: ...cannot be used elsewhere CAUTION USE OF CONTROLS OR ADJUSTMENTS OR PERFORMANCE OF PROCEDURES OTHER THAN THOSE SPECIFIED HEREIN MAY RESULT IN HAZARDOUS RADIATION EXPOSURE AS THE LASER BEAM USED IN THIS VCR DVD IS HARMFUL TO THE EYES DO NOT ATTEMPT TO DISASSEMBLE THE CABINET REFER SERVIC ING TO QUALIFIED PERSONNEL ONLY WARNING TO REDUCE THE RISK OF FIRE OR ELECTRIC SHOCK DO NOT EXPOSE THIS EQUIPMENT...

Page 3: ...vision Corporation Reverse engineering or disassembly is prohibited Do not attempt to clean the pickup lens yourself ing playback the video heads in your VCR DVD may need to be cleaned 1 Please visit your local Audio Video store and purchase a good qual ity VHS Video Head Cleaner 2 If a Video Head Cleaner does not solve the problem Please call our help line mentioned on the front page to locate a ...

Page 4: ...io language and sound mode Parental lock Automatic detection of discs This VCR DVD automatically detects if a loaded disc is DVD audio CD video CD MP3 and JPEG on disc or Kodak Picture CD Playing an MP3 disc Displaying a JPEG picture Kodak Picture CDs can be played Still images stored in JPEG format on CD RW R can also be played Direct Search DTS Digital Theater System You can enjoy 5 1 channel su...

Page 5: ...tus Display 18 Video Cassette Tape 18 Two Different Tape Speeds 18 PLAYING A DISC 19 TV Colour System 19 Basic Playback 19 General Features 19 Pause 19 Disc Menus 19 Title Menu 20 Step by Step Playback 20 Rapid Play 20 Resume 20 Playing the disc recorded in VR mode Video Recording format 20 Fast Forward Reverse Search 21 Slow Forward Reverse 21 Zoom 21 Track Search 21 Title Chapter Search 21 Time ...

Page 6: ...deo mode can be played back Some DVD RW R DVD RW R or CD RW R discs made on personal computers or on DVD recorders may not be played back prop erly due to the factors such as scratches dirt or special properties of the disc Discs made on personal computers may not playback properly due to compatibility or settings in the recording software We recommend always to use the standard settings and corre...

Page 7: ...n your A V compatible TV or wide screen TV for a best quality picture 26 EURO AV2 DECODER terminal VCR Only Use the scart cable to connect this terminal to the 21 pin scart terminal on your decoder 27 RF OUT jack Use the supplied round coaxial cable to connect this jack to the ANTENNA IN jack on your TV 28 AERIAL jack Connect your antenna Cable Box or Direct Broadcast System FUNCTIONAL OVERVIEW PU...

Page 8: ... VCR output mode and to use the remote control in VCR mode 7 TITLE Button Displays the title menu 8 ARROW Buttons o p s B up down left right Press to select an item in the menu and to move the cursor 9 RETURN Button Returns to the previous operation DVD 10 Numerical Buttons 11 CLEAR C RESET Button Press to clear the markers or the incorrect input DVD Press to reset the counter VCR 12 PLAY Button P...

Page 9: ...d disc comes to a pause Displays the elapsed time of the title or track The number of a new title chapter or track is displayed when a chapter or track is switched No disc inserted or cannot read Tray open Tray closed Loading the Disc Lights up when the playback control is activated REC and mark will disappear when you set VCR DVD in DVD mode However the function indicated by each mark is still wo...

Page 10: ...D mode Connecting to a TV Equipped with S VIDEO Input Jack DVD only If your TV has no SCART input terminal but has an S VIDEO input jack Use a commercially available S VIDEO cable to con nect from the VCR DVD to the TV 10 EN CAUTION Be sure to turn off the VCR DVD and equipment to be connected before connecting Read through the operation manual for the equipment to be connected Be sure to keep the...

Page 11: ...and track numbers may be lost C C Digital Connection to Audio Equipment or MD Recorder without a Dolby Digital Decoder Audio CD Audio CDs can be transferred digitally to other equipment such as an MD recorder play the disc as you would normally with the audio mode set to L R and use the connection shown above Audio CDs recorded in the DTS format cannot be trans ferred digitally or via analogue DVD...

Page 12: ... are not available on the DTS audio DIGITAL IN COAXIAL To coaxial digital input jack Coaxial digital cable commercially available Dolby Digital 5 1 ch DTS MPEG Audio processor or amplifier DVD DIGITAL AUDIO OUT ANALOG AUDIO OUT S VIDEO OUT COAXIAL L R VCR AV2 DECODER AV1 TV DVD VCR AERIAL RF OUT To COAXIAL DIGITAL AUDIO OUT jack VCR DVD SET UP Video Channel setting will be necessary if your VCR DV...

Page 13: ...d to solid blue or the static screen by pressing the CLEAR C RESET Press the numerical buttons KorLto select your desired position number then press B You can select position number 01 99 If ON appears on the right side of SKIP press K or L to point to SKIP Then press B to select OFF If you want to remove scrambled signals press K or L repeatedly to point to DECODER Then press B to select ON Press...

Page 14: ...epeatedly to select the position number you want to change the channel then press B You cannot select a position number where 5 4 3 2 1 appears next to the number This is because SKIP is set to ON for this position number When a weak signal is received in Channel Reprogramming mode you can change the back ground to static blue by pressing CLEAR C RESET If you press the button again the background ...

Page 15: ...ndicator flashes because the VCR is still on standby for timer recordings Press TIMER ON OFF on the remote con trol or STOP EJECT on the VCR DVD to cancel timer standby then press VCR button to use the VCR again If there is a timer recording set after an OTR the VCR DVD switches to the DVD mode and TIMER indi cator lights up indicating that the VCR DVD is on timer standby Press TIMER ON OFF on the...

Page 16: ...press K or L repeatedly to select W MO Example every monday For once only recording only Press K or Lrepeatedly until your desired day appears Press K or L repeatedly until the relevant start hour appears Next enter the minute digit 6 5 4 3 10 4 9 3 2 1 Press K or L repeatedly until the relevant end hour appears Next enter the minute digit Press K or L repeatedly until the relevant channel num ber...

Page 17: ...k Find while in progress press STOP When the end of a tape is reached during the Quick Find the tape will automatically rewind to the beginning After rewinding finishes the VCR DVD will eject the tape 1 Quick Find PDC Programme Delivery Control If there are any remaining programmes including Daily Everyday and Weekly AUTO RETURN will not operate Press VCR then MENU Press K or L repeatedly to point...

Page 18: ...that bears the VHS mark For best results we recommend the use of high quality tapes Do not use poor quality or damaged tapes You can prevent accidental erasing of a recording by breaking off the erase prevention tab on the back edge of the cassette If you decide to record on the tape again cover the hole with plastic tape Tab Video Cassette Tape If a tape includes both programmes recorded in the P...

Page 19: ...e playlist was made and edited deleted titles repeated recording 5 4 3 2 1 VCD DVD RW MP3 CD DVD Press MENU The DVD main menu will appear If the feature is not available symbol may appear on the TV screen If disc menu is available on the disc audio language subtitle options chapters for the title and other options will appear for selection Press Arrow K L s B to select an item and ENTER to confirm...

Page 20: ... assigned to alter the order or content to be played If a PLAYLIST has been created you can choose the ORIGINAL or PLAYLIST option Press MENU in stop mode The current setting screen will appear Pressing MENU during playback is not valid Press s or B to select ORIGINAL or PLAYLIST PLAYLIST will not be displayed when it has not been made Resume playback will not be possible if you change the setting...

Page 21: ...s the screen To exit zoom mode press ZOOM to OFF NOTES Zooming function does not work while disc menu is shown x4 zoom is not available on some discs Only x2 zoom is available on Video CDs and JPEG You may not be able to move zoomed JPEG pictures 4 3 2 1 JPEG VCD DVD RW DVD Zoom During playback press DIRECT SKIP repeatedly until the Chapter Search or the Title Search screen appears Enter the desir...

Page 22: ...pped The PROGRAM screen will appear Press or to select a track then press ENTER Press CLEAR C RESET to erase the most recently entered programme Press PLAY to play the programmed tracks NOTES While the programme is being played back the STOP works as follows Press STOP once and then PLAY again playback will restart from the point where STOP was pressed Programme continued Press STOP twice and then...

Page 23: ... file is selected an image will be played back from the selected track and go to the next one in turn Press STOP to stop playback NOTES on JPEG and Kodak Picture CD playback A track is displayed for 5 seconds and then the next track is displayed 3 2 1 Picture 1 Picture 2 Picture 3 Picture 4 Current track number the number of total tracks Picture 5 Picture 6 1 32 Kodak Picture CD The VCR DVD can al...

Page 24: ...ayback Press AUDIO repeatedly to select your desired language NOTES The sound mode cannot be changed during playback of discs not recorded in double sound Audio language selection cannot be made during Rapid Play Refer to page 20 Pressing AUDIO may not work on some DVDs with mul tiple audio languages e g DVDs which allow audio lan guage setting on the disc menu NOTES for VR mode only Pressing AUDI...

Page 25: ...eat A indicates All disc repeat Press DISPLAY again to exit 3 2 1 JPEG MP3 3 2 1 VCD CD 4 3 2 1 DVD RW DVD Changing the On Screen Display 9 49 0 00 00 0 00 00 IIII ORG T VR mode without PBC function Some DVDs contain scenes which have been shot simulta neously from various angles You can change the camera angle when the icon appears on the screen If the ANGLE ICON setting is OFF in the Display set...

Page 26: ...ss MARKER during playback The display screen and Markers will appear on the TV screen Press s or B to select a Marker 1 10 and ensure that appears in the display When it reaches the desired point press ENTER Selected number will turn to and the point will be marked The Title or Track and elapsed playing time will appear in the TV screen To return to the Marker later press MARKER during playback an...

Page 27: ... TV ASPECT 4 3 LETTER BOX STILL MODE AUTO ANGLE ICON ON VIDEO OUT PAL ALL All parental lock is cancelled Level 8 DVD software of any grade adult general children can be played back Levels 7 to 2 Only DVD software intended for general use and children can be played back Level 1 Only DVD software intended for children can be played back with those intended for adult and general use pro hibited PAREN...

Page 28: ...rkmen 6657 Twi 6669 U Z Ukrainian 6757 Urdu 6764 Uzbek 6772 Vietnamese 6855 Volapuk 6861 Welsh 4971 Wolof 6961 Xhosa 7054 Yiddish 5655 Yoruba 7161 Zulu 7267 Language Code Language Code Language Code Language Code If you choose a Language that has a 3 letter language code the code will be displayed every time you change the Audio or Subtitle language setting on pages 24 and 25 If you choose any oth...

Page 29: ...t and the stop recording times are set correctly Make sure the tape has a erase prevention tab Make sure the clock is set This VCR DVD may not perform or continue a timer recording if the power fails for more than 1 hour The motor rotates even when tape To enable quick play mechanism the motor will rotate for about 5 playback is stopped minutes This is normal You cannot insert a tape Insert a tape...

Page 30: ...t cloth slightly moistened with a mild detergent solution Do not use a solution containing alcohol spirits ammonia or abrasives Cleaning Discs When a disc becomes dirty clean it with a cleaning cloth Wipe the disc from the centre out Do not wipe in a circular motion Do not use solvents such as benzine thinner commercially available cleaners detergent abrasive cleaning agents or antistatic spray in...

Page 31: ...ts appointed Service Facility within one year from the date this product was purchased Proof of purchase must be provided 4 The guarantee does not cover carriage costs 5 In the unlikely event of this product requiring repair please contact the supplier from whom it was purchased Where this is not possible please contact the Sharp Customer Information Centre on the telephone number given below 6 No...

Page 32: ...1VMN20164 H9741BD 9HS1VMN20164 SHARP CORPORATION SHARP ELECTRONICS U K LTD Sharp house Thorp Road Newton Heath Manchester M40 5BE ...

Reviews: