background image


E-5


2009 September 17 

DK-AP8P_A6_09 EN.fm


ENGLISH


DK-AP8P


Preparation f

or Use


System connections


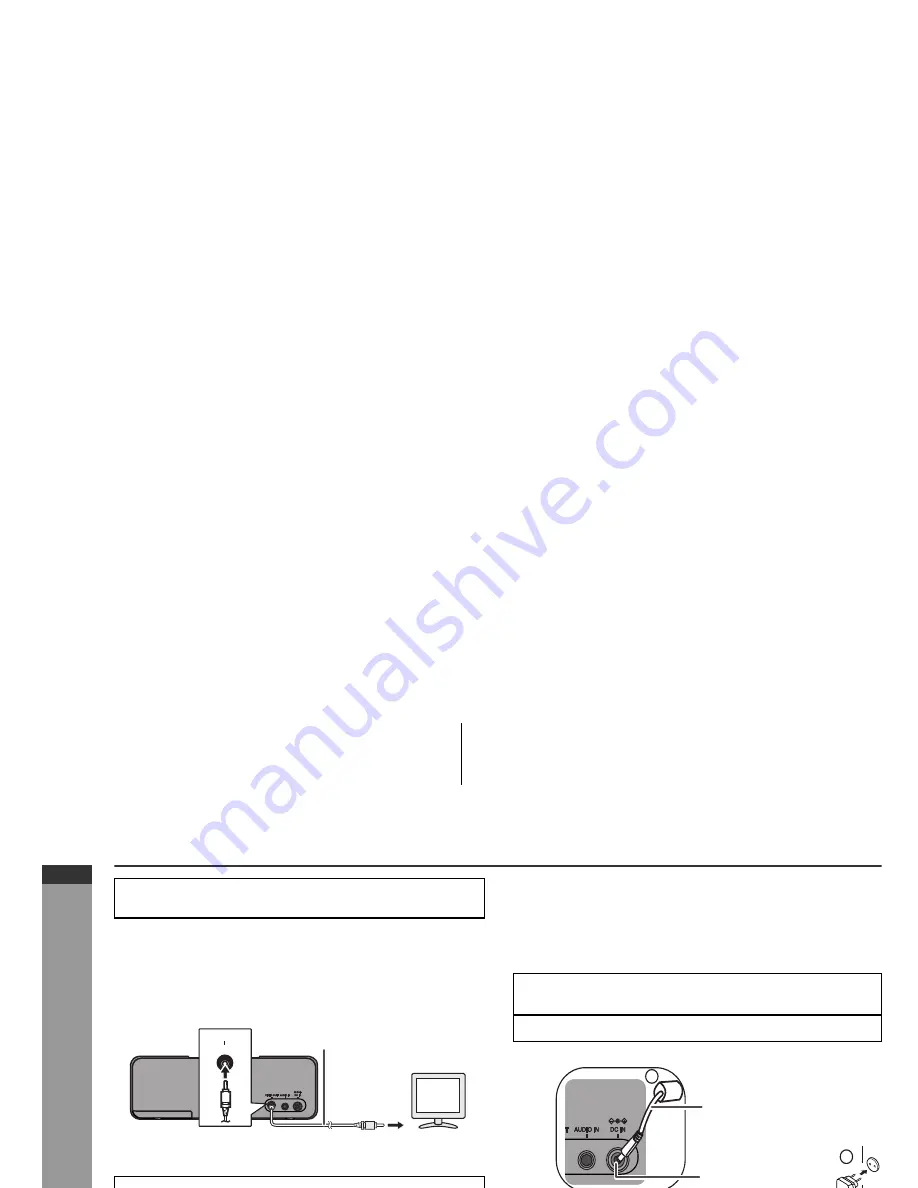
Connecting iPod or iPhone to TV


Photo and video files from iPod or iPhone can be viewed by
connecting the system to TV/monitor.
If the TV/monitor has a video input, connect it to the VIDEO OUT
socket at the back of the unit and set the TV Out on the iPod or
iPhone unit to “ON” position.


Watching videos on a TV connected to iPod or 
iPhone


Notes:


If the TV Out setting is already turned ON at video menu, the 
video is automatically displayed on the TV screen when iPod 
or iPhone starts playback.


To return to watching video on iPod or iPhone screen, repeat 
steps 1 to 3.


During iPod or iPhone video playback, touching the TV 
DISPLAY pad will not toggle video out display between iPod 
or iPhone and TV.


Please make sure to set iPod or iPhone unit to either NTSC 
or PAL to match your TV signal. Please visit Apple’s home 
page for further information.


Customer should also refer iPod or iPhone operation manual 
before making video out setting.


Using with the AC/DC adaptor


Notes:


Unplug the AC/DC adaptor from the wall socket if the unit will 
not be used for a prolonged period of time.


Connecting the AC/DC adaptor to the unit disconnects the 
batteries.


Use only the supplied AC/DC adaptor. Using other AC/DC 
adaptor may cause an electric shock or fire.


Make sure to unplug the AC/DC adaptor before making
any connections.


1


Enter the iPod or iPhone menu.
Touch the TV DISPLAY pad. The E


SOUND


 LED will blink

twice to display video on the TV screen.


2


Select the desired video to be played.


3


Press the 

 button on the iPod unit or touch the

ENTER pad on the remote control to start playback.

V

T

T

U

O


O

E

D

I

V

To video
input
socket

Video cable
(not supplied)


1


Plug the AC/DC adaptor cable into the DC IN socket on
the unit.


2


Plug the AC/DC adaptor into an wall socket.

2

1

DC IN socket 
(DC 6V)

AC/DC Adaptor Cable

Wall socket

(AC 100 - 240 V ~ 50/60 Hz)

Summary of Contents for DK-AP8P

Page 1: ...RA iPod y iPhone MUSIKANLÄGGNING FÖR iPod och iPhone IMPIANTO MUSICALE PER iPod e iPhone MUZIEKSYSTEEM VOOR iPod en iPhone SISTEMA DE MÚSICA PARA iPod e iPhone MUSIIKKIJÄRJESTELMÄ iPod ja iPhone MUSIC SYSTEM FOR iPod and iPhone MODELL MODÈLE MODELO MODELL MODELLO MODEL MODELO MALLI MODEL ...

Page 2: ... tasto ON STAND BY è impostato su STAND BY l unità può essere azionata con il telecomando Avvertenza L apparecchio non contiene parti riparabili dall utente Non togliere mai i coperchi a meno di non essere qualificati per farlo All interno dell apparecchio ci sono tensioni pericolose per cui si deve sempre staccare la spina del cavo d alimentazione dalla presa di corrente prima di qualsiasi interv...

Page 3: ...tore è presente un voltaggio che può essere pericoloso Rimuovere sempre la spina del cavo di alimentazione dalla presa di rete prima di eseguire qualsiasi operazione di assistenza tecnica o quando si prevede di non utilizzare l apparecchiatura per un lungo periodo di tempo Non utilizzare l adattatore CA CC fornito insieme a DK AP8P con altri apparecchi Non utilizzare un adattatore CA CC diverso da...

Page 4: ...et toestel niet bloot aan druipend of spattend water om brand en elektrische schokken te voorkomen Met vloeistoffen gevulde voorwerpen zoals vazen mogen niet op het toestel geplaatst worden Cuidado Para evitar incêndio ou choque elétrico não exponha este aparelho a gotejamento ou salpicamento de água Não coloque objetos com água Varoitus Älä vie laitetta sateeseen tai kosteisiin tiloihin Jos laite...

Page 5: ...ertifioinut laitteen niin että se vastaa Applen standardeja Works with iPhone means that an electronic accessory has been designed to connect specifically to iPhone and has been certified by the developer to meet Apple performance standards Entsorgungsinformationen Achtung Ihr Produkt trägt dieses Symbol Esbesagt dass Elektro und Elektronikgerät e nicht mit dem Haushaltsmüll entsorgt sondern einem...

Page 6: ...nne Si vous souhaitez mettre ce produit au rebut veuillez contacter votre administration locale qui vous renseignera Información sobre la eliminación Atención su producto está marcado con este símbolo Significa que los productos eléctricos y electrónicos usados no deberían mezclarse con los residuos domésticos generales Existe un sistema de recogida independiente para estos A Información sobre eli...

Page 7: ...to simbolo che segnala di non smaltire le apparecchiature elettriche ed elettroniche insieme ai normali rifiuti domestici Per tali prodotti è previsto un sistema di raccolta a parte A Informazioni sullo smaltimento per gli utenti privati 1 Nell Unione europea Attenzione Per smaltire il presente dispositivo non utilizzare il normale bidone della spazzatura Le apparecchiature elettriche ed elettroni...

Page 8: ...ontstaan door het verkeerd verwerken van het afval 2 In andere landen buiten de Europese Unie Als u dit product wilt weggooien neem dan contact op met de Informação sobre Eliminação de Produtos Atenção Oseu produto está identificado com este símbolo Significa que os produtos eléctricos e electrónicos não devem ser misturados com o lixo doméstico comum Existe um sistema de recolhas específicopara A...

Page 9: ...sjärjestelmä Information on Proper Disposal Attention Your product is marked with this symbol It means that used electrical and electronic products should not be mixed with general household waste There is a separate collection system for these products A Information on Disposal for Users private households 1 In the European Union Attention If you want to dispose of this equipment please do not us...

Page 10: ...re détaillant Pour les pays hors Union Européenne Veuillez contacter une autorité locale afin de connaître la bonne méthode à utiliser pour la collecte de vos piles accus usagées Information om batteriavyttring För EU Batteriet är märkt med den överkorsade soptunnan vilket betyder att det inte ska kastas i det vanliga hushållsavfallet Det finns ett separat insamlingssystem för batterier för att un...

Page 11: ...te as autoridades locais para mais detalhes nos esquemas de recolha e reciclagem Para a Suíça As baterias usadas deverão ser devolvidas ao Tietoja paristojen hävittämisestä EU maat Paristo akku on merkitty yliviivatun roskasäiliön symbolilla mikä tarkoittaa että sitä ei saa hävittää kotitalouden yleisjätteiden kanssa Paristoille akuille on olemassa erillinen keräysjärjestelmä joka helpottaa niiden...

Page 12: ...g your SHARP product Accessories Please confirm that only the following accessories are included Contents Page General Information Precautions 2 Controls and indicators 3 4 Preparation for Use System connections 5 6 Remote control 7 Basic Operation General control 8 iPod and iPhone Listening to the iPod or iPhone 9 11 Advanced Feature Enhancing your system 12 AC DC adaptor x 1 RADPAA068AWSA ENGLIS...

Page 13: ...ange of 5 C 35 C 41 F 95 F Warning Please ensure that the equipment is positioned in a well ventilated area and ensure that there is at least 10 cm 4 of free space along the sides top and back of the equipment Use the unit on a firm level surface free from vibration Keep the unit away from direct sunlight strong magnetic fields excessive dust humidity and electronic electrical equipment home compu...

Page 14: ...On Stand by Indicator 8 8 ESOUND Indicator 8 9 Subwoofer Port 8 Remote control with touch panel Reference page 1 Remote Control Transmitter 7 2 iPod and iPhone Menu Pad 11 3 iPod and iPhone Enter Pad 11 4 Remote Control Active Indicator 8 5 iPod and iPhone Skip Up and Down Pads 11 6 On Stand by Pad 8 ON STAND BY ESOUND 3 2 1 7 9 8 5 6 4 Main Unit ENTER MENU TV DISPLAY SKIP ON STAND BY PLAY MODE ES...

Page 15: ...ormation Main unit back view Reference page 1 Video Out Socket 5 2 Audio Input Socket 12 3 DC Input Socket 5 3 1 2 DK AP8P MODEL NO NO DE MODELO MUSIC SYSTEM SISTEMA MUSICAL DC IN 6V 2 A 6V UM 3 SUM 3 R6 AA x4 The spec label ...

Page 16: ...d to iPod or iPhone Please make sure to set iPod or iPhone unit to either NTSC or PAL to match your TV signal Please visit Apple s home page for further information Customer should also refer iPod or iPhone operation manual before making video out setting Using with the AC DC adaptor Make sure to unplug the AC DC adaptor before making any connections V T T U O O E D I V To video input socket Video...

Page 17: ... all old batteries with new ones at the same time Do not mix old and new batteries Batteries battery pack or batteries installed shall not be exposed to excessive heat such as sunshine fire or the like Changing power source Turn off the unit before changing the power source If the 6V DC power supply is directly plugged in during power on the unit may automatically enter to stand by mode Press the ...

Page 18: ...on of the unit if this occurs Keep the remote control away from moisture heat shock vibrations and any conductive materials to avoid malfunction Test of the remote control Point the remote control directly at the remote sensor on the unit The remote control can be used within the range shown below 1 Whilst pushing the locking tab towards the centre of the remote control slide out the battery holde...

Page 19: ... are now in the ESOUND mode where low bass and high frequency are automatically adjusted according to the volume input To turn off ESOUND press the ESOUND button on the main unit or touch the ESOUND pad on the remote control The ESOUND indicator will go off Auto Power Off function If no iPod or iPhone is docked and there is no audio cable connected to AUDIO IN terminal the unit will enter the powe...

Page 20: ...ve iPhone software 2 2 1 above iPhone 3G software 2 2 1 above Caution Please update your iPod and iPhone unit to the latest software version before using it Please visit Apple s homepage to download the latest version for your iPod and iPhone Notes iPod and iPhone adaptor connection Choose the adaptor that fits your iPod or iPhone Your iPod or iPhone will fit snuggly into the correct adaptor If yo...

Page 21: ... hole as shown and lift upward to remove iPod or iPhone playback ON STAND BY ESOUND ON STAND BY ESOUND iPhone Dock connector iPhone bottom 1 Press the ON STAND BY button on the main unit or touch the ON STAND BY pad on the remote control to turn the power on 2 Insert iPod or iPhone unit in the dock of main unit 3 Press the button on the iPod unit or touch the pad on the remote control to start pla...

Page 22: ...low depend on the generation iPod 1 Touch the MENU pad to view the menu on iPod or iPhone unit Touch it again to go back to previous menu 2 Use the CURSOR or pad to select an item on the menu and then touch ENTER pad iPod and iPhone Function Remote control Operation Pause Touch in the playback mode Skip up down Touch in the playback or pause mode If you touch the pad in the pause mode touch the pa...

Page 23: ... AUDIO IN To the line output socket Computer Portableaudio player 1 Use Audio cable to connect the portable audio player computer etc to the AUDIO IN socket When using video equipment connect the audio output to this unit and the video output to a television 2 Press the ON STAND BY button on the main unit or touch the ON STAND BY pad on the remote control to turn the power on 3 Play the connected ...

Page 24: ... is pressed the unit does not respond Set the unit to the power stand by mode and then turn it back on No sound is heard Is the volume level set to minimum Symptom Possible cause The remote control does not operate properly Is the battery polarity correct Is the battery dead Is the distance or angle incorrect Are there any obstructions in front of the main unit Symptom Possible cause iPod or iPhon...

Page 25: ...roduct improvement without prior notice The performance specification figures indicated are nominal values of production units There may be some deviations from these values in individual units General Speaker 2 1 way type speaker system Front speaker 3 0 cm 1 1 8 Subwoofer 4 6 cm 1 3 4 Speaker maximum input power Front speaker 2 0 W Channel Subwoofer 4 W Speaker rated input power Front speaker 1 ...

Page 26: ......

Reviews: