background image

CVP09LX

3 – 4

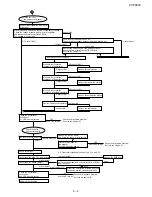
7. Freeze preventive

When the indoor pipe temperature falls below 32.0

°

F during cool oper-

ation or dry operation, the compressor is turned off. And if the indoor
pipe temperature rises exceeds 39.2

°

F after 3 minutes, the compres-

sor will restart.

8. Timer

8.1. OFF TIMER

Set the OFF-TIMER.

The unit will turn off automatically according to your setting. Timer
duration can be set by 0.5 hours to maximum 12 hours. Up to 9.5
hours, you can set by 0.5hours increments and from 10 to 12 hours, by
1 hour increment.

8.2. ON TIMER

Set the ON-TIMER.

The unit will turn on automatically according to your setting. Timer
duration can be set by 0.5 hours to maximum 12 hours. Up to 9.5
hours, you can set by 0.5hours increments and from 10 to 12 hours, by
1 hour increment.

8.3. ONE-HOUR TIMER

When ONE-HOUR timer is set, the unit turns off automatically after
one hour. The one hour timer operation has priority over other time
operation, such as the TIMER ON and TIMER OFF. If the ONE-HOUR
TIMER button is pressed again during operation, the unit will operate
additionally for another one hour.

9. POWER Button

9.1. Test Run

If the "POWER" button on the unit is pressed for 5 seconds or more
during operation, cool test operation starts. The operation LED (red)
flickers during test run. Continuous compressor on operation is per-
formed.

During Test-Run mode, pump is always ON.

9.2. Aux Operation

If the "POWER" button on the unit is pressed during operation OFF,
cooling operation starts.

Then setting Temperature will be is automatically set.

During Aux mode, pump will be ON for 1 minute since start.

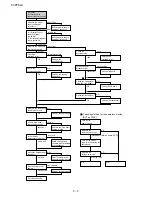
10. Test mode

Keep pushing the "POWER." buttons and supply the power, the sys-
tem will go to the test mode. In this mode, the output of operation is
switched by pushing the "POWER." button in the unit or the "OI" button
in the remote controller. Normal outputs are shown in "Self Check
Mode Table"

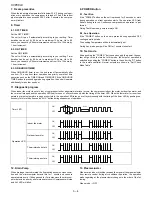
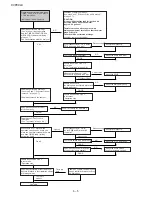
11. Diagnostic program

When indoor fan motor is out of order or compressor lock or abnormal water level occurs, the compressor, indoor fan motor, outdoor fan motor, and
louver are all stopped and the operation LED(red) turns on or off synchronously with the timing of the timer LED. When the thermistor for room tem-
perature or pipe temperature is open or short state, the operation LED turns on or off synchronously with the timing of the timer LED by pushing con-
tinuously for more than 5 seconds "AUX." button during suspension of operation.

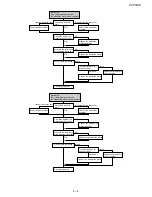
12. Drain Pump

When drainage is accumulated the float switch becomes close condi-
tion and the microcomputer detects this for 1 minute and cause to
operate drain pump. If it has passed for 3 minutes since the microcom-
puter detects an error by photo interrupter circuit, Compressor will stop
and ALL LED will blink.

13. Plasmacluster

Whenever an indoor machine receives the signal of the plasma cluster
from remote control during air conditioner operation, the operation
mode regarding at the plasmacluster changes in the order of the fol-
lowing.

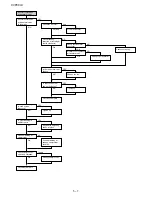
Clean mode 

 OFF

Timer LED

Operation LED

Indoor fan motor

Outdoor fan motor

Thermistor short state

Thermistor open state

ON

OFF

1sec

1sec

4sec

ON

OFF

ON

OFF

ON

OFF

ON

OFF

Summary of Contents for CV-P09LX

Page 1: ...NENT TEST 4 3 CHAPTER 5 TROUBLESHOOTING GUIDE 1 TROUBLESHOOTING 5 1 REPLACEMENT PARTS LIST SERVICE MANUAL CVP09LX S1651CVP09LX T CONTENTS Parts marked with are important for maintaining the safety of the set Be sure to replace these parts with specified ones for maintaining the safety and performance of the set This document has been published to be used for after sales service only The contents a...

Page 2: ...tory Charge 12 5 NET DIMENSIONS Width Height Depth Inch mm 18 5 470 x 32 3 820 x 15 1 383 Net Weight Lbs 84 GROSS DIMENSIONS Width Height Depth Inch mm 22 1 561 x 35 8 910 x 18 3 465 Gross Weight Lbs 95 FAN SYSTEM Indoor side Evaporator Centrifugal fan Outdoor side Condenser Centrifugal fan Air Flow rate Indoor side CFM High 240 Med 190 Low 140 OTHERS Safety devices Compressor Overload relay Fan m...

Page 3: ...CVP09LX 1 2 3 WIRING DIAGRAM 4 EXTERNAL DIMENSION M M TH2 TH1 TH3 18 5 15 1 16 1 32 3 0 95 Max 59 ...

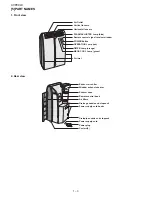
Page 4: ...mote control signal receiver window POWER Button OPERATION Lamp red TIMER Lamp orange MEGA COOL Lamp green Air inlet Exhaust air outlet Window exhaust adapter Exhaust hose Remote control hook Air filters Drainage nozzle and stopcock Power supply cord hooks Drainpipe nozzle and stopcock Power supply cord Power plug Casters 4 ...

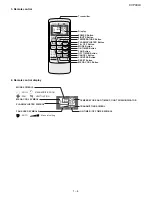
Page 5: ...hr OFF Button MODE Button ON TIMER Button FAN Button OFF TIMER Button CANCEL Button LOUVERS Button RESET Button MEGA COOL Button COOL DEHUMIDIFICATION FAN VENTILATION AUTO Manual setting MODE SYMBOLS MEGA COOL SYMBOL PLASMACLUSTER SYMBOL FAN SPEED SYMBOLS TEMPERATURE AND TIMER COUNT DOWN INDICATOR TRANSMITTING SYMBOL ON TIMER OFF TIMER SYMBOL ...

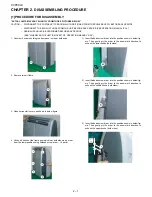
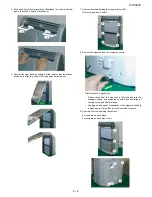
Page 6: ...ds 2 Remove two air filters 3 Open horizontal louvers as shown in below figure 4 Unhook 6 hooks of the front panel which is at both sides in an order from the lower position using flathead screw driver 6 parts 1 Insert flathead screw driver into the position shown in below fig ure Then gently pry the driver to the arrow mark direction to unhook the lower hooks both sides 2 Insert flathead screw dr...

Page 7: ...e panel L and R Remove side panel L and R 8 Remove the stopcock from the drainpipe nozzle Drain stopcock replacement Please check that the stopcock is fully inserted into the drainage nozzle and drainpipe nozzle when operating at cooling mode and after drainage Applying small amount of soapsuds to the stopcock will help it make easier if it is difficult to fully insert the stopcock 9 Unscrew 12 sc...

Page 8: ...ISCHARGE THE FAN MOTOR CAPACITOR AND RUN NING CAPACITOR BEFORE TOUCHING THESE CAPAC ITORS OR OTHER COMPONENTS OR WIRING 13 Unscrew 2 screws holding the float switch ass y Then move the float switch a little from bulkhead L 14 Unscrew 6 screws holding the bulkhead L Remove the wire from wire holder 2 parts Then remove the bulkhead L by pulling it toward the arrow mark in below figure and next lift ...

Page 9: ...Y WHEN RE ASSEMBLYING White connector Upper louver motor Black connector Lower louver motor 18 Unscrew 2 screws holding the cluster holder Remove the cluster holder 19 Remove the plasmacluster unit and cluster cover Disconnect the connector of plasmacluster unit 20 Unscrew 5 screws holding the top duct Remove the top duct 21 Cut the fixing band holding the wire and tape Then remove the tape CAUTIO...

Page 10: ...CH ASS Y 4P 23 Cut the fixing band holding the wires 1 part 24 Cut the fixing band holding the wire and tape Then remove the tape CAUTION KEEP THE TAPE IN CASE OF RE ASSEMBLYING Then cut the fixing band holding the wires 25 Disconnect the micro switch connector Lower micro switch only 26 Unscrew 3 screws holding the wire holders 27 Remove wiring connectors of the compressor cord by using long nose...

Page 11: ... the band to the direction as shown in below figure CAUTION RETURN THE BAND TO THE ORIGINAL DIRECTION WHEN RE ASSEMBLYING 31 Move the band to the direction shown in below figure approx 11 16 Then removed the drain hose B 32 Unscrew the screw holding the lead wire 33 Turn the band as shown in below figure CAUTION RETURN THE BAND TO THE ORIGINAL DIRECTION WHEN RE ASSEBLYING Move the band to the dire...

Page 12: ...asing from the unit 36 Unscrew 6 screws holding the stay angle R Remove the stay angle R from the unit 37 Unscrew 3 screws holding the drain pump ass y Remove the drain pump ass y from the unit 38 Unfasten and remove the nut holding the terminal cover at the top of compressor Then remove the wiring connector of the compressor cord 39 Unscrew the screw holding the centrifugal fan Remove the centrif...

Page 13: ...g the motor cover and wire holder Remove the motor cover Then remove the fan motor 41 Unscrew the screw holding the centrifugal fan 42 Unscrew 5 screws holding the motor cover and wire holder Remove the motor cover Then remove the fan motor ...

Page 14: ... TOUCHING THESE CAPACITORS OR OTHER COMPONENTS OR WIRING 1 Cut fixing bands holding the wires 2 parts 2 Remove 2 P W B 3 Cut fixing bands holding the wires 2 parts Disconnect 6 connectors 4 Unscrew 5 screws holding fan motor capacitor transformer and lead wire earth 5 Remove the control board by unhooking 3 spacers ...

Page 15: ...2 C14 0 033μ 275V 100 1W 22K 22K 16V 0 01μ 2 1 20K Q1 SSR3 SSR4 16V 0 01μ 0 01μ 16V 16V 0 01μ C5 C6 C7 C8 C9 C21 JP1 C26 C27 C28 C29 C35 C36 C37 470 RY1 1 8K 470 470 470 SSR1 R3 R6 R7 R8 R9 R32 R33 R34 R35 R36 C34 16V 0 01μ C33 0 01μ 16V OSC1 8MHz 8 JP11 1 2W 1W 1W 1 2W SSR4 SSR2 SSR3 10μ 16V 16V 10μ 10μ 16V C38 100μ 10V C42 C39 C40 R51 R53 4 431kW 25ºC 6 5 4 3 1 2 CN14 CN5 CN6 JP12 JP13 JP14 JP15...

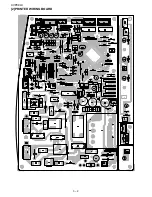
Page 16: ...CVP09LX 3 2 2 PRINTED WIRING BOARD ...

Page 17: ...fan speed 5 Indoor Fan Speed Fan speeds are given by the indoor fan motor DL AH which are available in the following operation mode In the COOL or DRY mode indoor fan speed is different by con denser temperature 6 Overheating protection system If the condenser temperature goes over 136 4 F during the cooling or dry operation outdoor fan speed will rise to prevent the overloading of the compressor ...

Page 18: ...on starts Then setting Temperature will be is automatically set During Aux mode pump will be ON for 1 minute since start 10 Test mode Keep pushing the POWER buttons and supply the power the sys tem will go to the test mode In this mode the output of operation is switched by pushing the POWER button in the unit or the OI button in the remote controller Normal outputs are shown in Self Check Mode Ta...

Page 19: ... X P45 L X P46 L X 2 E2PROM Wireless Cond Fan RPM Input O X O X X X Speed 1 X O X O X O X O OK O P40 H O OK O NG X P40 L X NG X 3 Photo Interrupter Float SW L Eva Fan RPM Input X O O O X CL Speed 2 OPEN X X X X P64 H X P63 H O OK O P64 L O P63 L X NG X 4 Photo Interrupter Float SW L Sweat Auto Restart Select X X X X CM Speed 3 OPEN OPEN P64 H X P63 H O P41 H O P34 H O P64 L O P63 L X P41 L X P34 L...

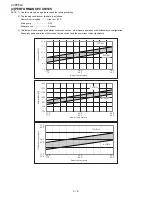
Page 20: ...s such as a drain pump operation or an exhaust hose configuration Especially pump operation will decrease the line current and the power input value significantly 7 0 8 0 9 0 10 0 11 0 12 0 25ºC 77ºF 30ºC 86ºF 35ºC 95ºF Room temperature Line current A 750 850 950 1050 1150 1250 1350 Room temperature Power input W 10ºC 50ºF 20ºC 68ºF 30ºC 86ºF Room temperature Outlet air temperature 40 RH 70 RH 40 ...

Page 21: ... between the closely mated surfaces rather than forming large fil lets This films make the strongest joints capillary attraction also work best with close tolerance The best clearance is between 0 01 to 0 03 the amount of lap will be approximately 3 8 depending on the swaging tool used 4 Cleaning tubing To make a sound leak tight joint the brazing alloy when raised to brazing temperature must wet ...

Page 22: ...ing point of any water in the system will be lowered to a point where it will vaporize and be expelled from the system in the form of vapor 7 1 Type of evacuation methods 1 Piston Type Compressor No good System parts must be above 110 F 2 Rotary Vacuum Pump Disavantages Low CFMC 4 oil gets dirty 3 Single State Vacuum Pump will not clean oil Oil must be changed often 4 Two Stage Vacuum Pump will re...

Page 23: ... system After the diagnosis has been made they must be removed so that the system will be restored to a hermeticly sealed condition 2 ELECTRICAL COMPONENT TEST RUNNING CAPACITOR AND FAN CAPACITOR NOTE DISCHARGE THE RUNNING CAPACITOR AND FAN CAPACITOR BEFORE TOUCHING CAPACITOR OR WIRING 1 Discharge capacitor by shorting terminals 2 Take the wires off the capacitor terminals 3 Set the selector switc...

Page 24: ...nge the proper part or equipment The plug was connected by improper insertion Insert the plug properly Check the operation of the product Any LED does not turn on Check the Limit SW for drain water Neither fan nor louver works Check the display detector unit Check the operation of the product Any LED does not turn on Checking for LCDI Pull the LCDI out from the wall socket And remove the LCDI from...

Page 25: ...ulation resistance of compressor Measure the insulation resistance of indoor fan motor Can the Compressor operate Change the compressor Change the indoor fan motor NG under 10M OK over 10M Measure the insulation resistance of outdoor fan motor Change the outdoor fan motor Change the compressor The fuse was open short YES Check the diagnostic program Refer to the page 4 4 Some LED turn on EX Transf...

Page 26: ... the current in compressor circuit Is it sufficient current capacity of power equipment Is it small wiring for power supply equipment Measure the power supply voltage at receptacle Check the overload relay Check the overload relay Is the connector disconnecting Check the compressor relay RY1 on PWB Check the thermistor Measure the resistance of its coil Turn on the power supplty as operating the c...

Page 27: ... fan motor Change fan or another parts or adjust Repair with over solder Connect the connector properly No cooling The compressor operate but the outdoor fan motor doesn t operate Check CN5 on PWB ass y OK OK OK NG NG crack at the solder part disconnecting the connector locked no touch touch Check the outdoor fan motor capacitor 8μF Measure the resistance of outdoor fan motor coil Is the outdoor f...

Page 28: ...e PWB Should be checked the drain pump ass y drain motor and pump body etc NG Change the drain pump ass y GOOD Should be performed drainage See step 6 and 7 Whenever the unit is moved of page 2 7 Should be removed the cabinet Should be checked movement of the float ass y NG Repair or change the float ass y GOOD Should be canceled Step 3 in test mode Operation stop Should be set it as Step 3 in tes...

Page 29: ...rily Adjust properly Another object obstructing exhaust outlet Compressor runs discontinuously Remove obstruction Thermister attached incorrectly Error light is on Refer to the manual 3 Funtion 11 Diagnostic program Attach correctly Room temperature out of operation range Remove heat source and ventilate room Power supply voltage too low Unplug other appliances Variation in temperature of discharg...

Page 30: ...ce of fan motor coil Change the fan motor Connect properly Change the fan Tighten up Check rotating direction of centrifugal fan to clockwise Is the fan deformed or broken Is loosened screw and nut fixing fan Checking complete Tighten up Repair with adjusting shape of pipes Repair mounting or change compressor cushion Change compressor Is each screws loosened Is pipe touching to another parts Chec...

Page 31: ...furnish the following information 1 MODEL NUMBER 2 REF No 3 PART NO 4 DESCRIPTION MARK SPARE PARTS DELIVERY SECTION For U S A only Contact your nearest SHARP Parts Distributor to order For location of SHARP Parts Distributor Please call Toll Free 1 800 BE SHARP PORTABLE AIR CONDITIONER MODELS CV P09LX CV P10LC 1 CV P09LX Outside parts 2 CV P09LX Inside parts 3 CV P09LX Control box parts 4 CV P09LX...

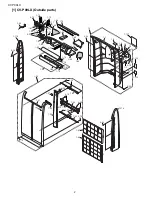
Page 32: ...0 6 24 1 68 1 66 1 65 6 24 6 24 1 137 6 24 6 24 6 24 6 24 1 59 1 75 1 69 1 83 1 84 1 134 1 132 1 5 1 2 1 1 6 19 6 19 6 19 6 19 6 19 6 19 1 3 1 6 1 8 6 19 1 4 1 3 6 19 1 7 1 67 1 62 1 70 1 60 1 63 6 16 1 57 1 58 1 79 1 79 1 56 1 42 1 43 1 38 1 37 1 39 1 41 1 36 1 40 1 43 1 42 1 81 1 55 1 116 6 24 6 19 ...

Page 33: ...A027JBFA AM Stopper 1 63 MLOV A411JBFA AF Horizontal louver A 1 64 PCOV B108JBFA AZ Cluster cover 1 65 PFPFPC769JBFZ AF Insulator A 1 66 PFPFPC770JBFZ AF Insulator B 1 67 PFPFPC771JBEZ AF Insulator C 1 68 PFPFPC772JBEZ AF Insulator D 1 69 PFPFPC773JBEZ AF Insulator E 1 70 PFPFPC774JBEZ AF Insulator F 1 71 PFPFPC775JBEZ AF Insulator G 1 72 PFPFPC830JBEZ AC Cl cover insulator B 1 73 PFPFPC831JBEZ AC...

Page 34: ...2 1 122 1 29 1 11 1 13 6 19 1 122 1 12 1 97 6 20 1 99 1 91 1 122 1 98 1 90 1 123 6 19 6 20 6 19 6 19 6 19 1 88 1 89 6 2 1 14 1 16 1 15 1 10 1 10 1 15 6 3 6 23 6 3 6 23 6 3 6 23 6 3 6 23 6 19 6 5 6 24 6 24 6 24 6 5 6 24 6 5 6 19 6 19 1 92 1 8 1 9 1 114 1 112 1 107 1 113 1 108 1 111 1 114 1 101 1 106 1 103 1 102 1 91 1 104 1 117 1 100 1 19 1 20 1 19 1 29 1 21 2 19 6 17 6 17 6 19 1 22 6 19 2 21 6 24 ...

Page 35: ... Bulkhead R ass y 1 86 DPLT A075JBKZ AX Bulkhead L ass y 1 87 DPLT A076JBKZ AZ Half plate ass y 1 88 CMOT A439JBKZ BL Fan motor sub ass y 1 89 NFANSA045JBFZ AX Centrifugal fan OUT 1 90 LANG A617JBWZ AL Motor cover 1 91 LHLDW0364JBE0 AA Wire holder 1 92 LHLDW0370JBE0 AA Wire holder 1 97 PKESSA092JBFA AX Out casing A 1 98 PKESSA093JBFA AX Out casing B 1 99 PKESSA094JBFA AX Out casing C 1 100 CMOT A4...

Page 36: ... 2 15 RC HZA509JBZZ AP Fan motor capacitor 2 16 RC HZA529JBZZ AR Fan motor capacitor 2 17 RH HXA047JBZZ AV Thermistor 2 20 TLABCC034JBRZ AD Wiring diagram 6 9 XHTS740P08000 AC Tap tight screw for earth leads Control box 6 42 XJTS740P08000 AC Tap tight screw for the transformer 6 43 XJTS740P10000 AC Tap tight screw for Running capacitor Wire holder 6 44 XJTS740P12000 AC Tap tight screw for Fan moto...

Page 37: ...range nut 3 5 MSPR A114JBE0 AF Protector spring 3 6 PCOV A371JBE0 AF Terminal cover 3 7 PSEL B160JBE0 AH Terminal gasket 3 9 RHOG A233JBEZ AU Overload relay 3 10 PCMPRA468JBEZ CA Compressor 3 12 LBND A046JBE0 AE Wire fixing band 3 13 PCON A569JBEZ BT Condenser 3 14 PEVA A586JBEZ BQ Evaporator 3 15 PFPFPC834JBEZ AD Insulator A 3 16 PFPFPC835JBEZ AD Insulator B 3 17 PGUM A113JBE0 AH Damper rubber 3 ...

Page 38: ...001JBKZ AZ Connecter ass y 4 11 CRMC A663JBEZ AY Remote controller 4 12 DX BZA049JBKZ AS Screw kit 4 13 SSAKAA018YDE0 AB Bag 4 14 XMPS740P25000 AC Wood screw 4 15 LANG A616JBTA AK Panel angle 4 16 LBNDKA136JBEZ AF Band 5 8 4 17 LHLD A740JBFA AQ Holder 4 18 PCOV B115JBFA AG Cover 4 19 PGUMMA347JBEZ AE Drain joint 4 20 PSEL A931JBE0 AH Window insulator 4 21 PSEL C848JBEZ AD Panel insulator 4 22 PSEL...

Page 39: ...AE Battery pack 4 27 TLAB C979JBRZ AF Caution label 4 28 TLAB C989JBRZ AF Caution label FR 4 29 DFZK B641JBKZ BL Accessory sub kit 6 CV P09LX Packing parts 5 1 CPADBA114JBKZ AF Bottom pad ass y 5 2 CPADBA111JBKZ AR Top pad ass y 5 3 DPAKCA005JBKZ AZ Packing case ass y 5 4 SPADBA321JBEZ AD Pad 5 5 SSAKHA018JBEZ AF Bag 5 7 TLABKE115JBRZ AF Number card 5 CV P09LX Accessory parts 5 1 5 4 5 2 5 7 5 2 5...

Page 40: ...0 6 24 1 68 1 66 1 65 6 24 6 24 1 137 6 24 6 24 6 24 6 24 1 59 1 75 1 69 1 83 1 84 1 134 1 132 1 5 1 2 1 1 6 19 6 19 6 19 6 19 6 19 6 19 1 3 1 6 1 8 6 19 1 4 1 3 6 19 1 7 1 67 1 62 1 70 1 60 1 63 6 16 1 57 1 58 1 79 1 79 1 56 1 42 1 43 1 38 1 37 1 39 1 41 1 36 1 40 1 43 1 42 1 81 1 55 1 116 6 24 6 19 ...

Page 41: ... A027JBFA AM Stopper 1 63 MLOV A411JBFB AN Horizontal louver A 1 64 PCOV B108JBFA AZ Cluster cover 1 65 PFPFPC769JBFZ AF Insulator A 1 66 PFPFPC770JBFZ AF Insulator B 1 67 PFPFPC771JBEZ AF Insulator C 1 68 PFPFPC772JBEZ AF Insulator D 1 69 PFPFPC773JBEZ AF Insulator E 1 70 PFPFPC774JBEZ AF Insulator F 1 71 PFPFPC775JBEZ AF Insulator G 1 72 PFPFPC830JBEZ AC Cl cover insulator B 1 73 PFPFPC831JBEZ A...

Page 42: ...2 1 122 1 29 1 11 1 13 6 19 1 122 1 12 1 97 6 20 1 99 1 91 1 122 1 98 1 90 1 123 6 19 6 20 6 19 6 19 6 19 1 88 1 89 6 2 1 14 1 16 1 15 1 10 1 10 1 15 6 3 6 23 6 3 6 23 6 3 6 23 6 3 6 23 6 19 6 5 6 24 6 24 6 24 6 5 6 24 6 5 6 19 6 19 1 92 1 8 1 9 1 114 1 112 1 107 1 113 1 108 1 111 1 114 1 101 1 106 1 103 1 102 1 91 1 104 1 117 1 100 1 19 1 20 1 19 1 29 1 21 2 19 6 17 6 17 6 19 1 22 6 19 2 21 6 24 ...

Page 43: ...V Bulkhead R ass y 1 86 DPLT A075JBKZ AX Bulkhead L ass y 1 87 DPLT A076JBKZ AZ Half plate ass y 1 88 CMOT A439JBKZ BL Fan motor sub ass y 1 89 NFANSA045JBFZ AX Centrifugal fan OUT 1 90 LANG A617JBWZ AL Motor cover 1 91 LHLDW0364JBE0 AA Wire holder 1 92 LHLDW0370JBE0 AA Wire holder 1 97 PKESSA092JBFA AX Out casing A 1 98 PKESSA093JBFA AX Out casing B 1 99 PKESSA094JBFA AX Out casing C 1 100 CMOT A...

Page 44: ...r 2 15 RC HZA509JBZZ AP Fan motor capacitor 2 16 RC HZA529JBZZ AR Fan motor capacitor 2 17 RH HXA047JBZZ AV Thermistor 2 20 TLABCC034JBRZ AD Wiring diagram 6 9 XHTS740P08000 AC Tap tight screw for earth leads Control box 6 42 XJTS740P08000 AC Tap tight screw for the transformer 6 43 XJTS740P10000 AC Tap tight screw for Running capacitor Wire holder 6 44 XJTS740P12000 AC Tap tight screw for Fan mot...

Page 45: ... Frange nut 3 5 MSPR A114JBE0 AF Protector spring 3 6 PCOV A371JBE0 AF Terminal cover 3 7 PSEL B160JBE0 AH Terminal gasket 3 9 RHOG A233JBEZ AU Overload relay 3 10 PCMPRA468JBEZ CA Compressor 3 12 LBND A046JBE0 AE Wire fixing band 3 13 PCON A569JBEZ BT Condenser 3 14 PEVA A586JBEZ BQ Evaporator 3 15 PFPFPC834JBEZ AD Insulator A 3 16 PFPFPC835JBEZ AD Insulator B 3 17 PGUM A113JBE0 AH Damper rubber ...

Page 46: ...NT A003JBKZ AZ Connecter ass y 4 11 CRMC A705JBEZ BC Remote controller 4 12 DX BZA049JBKZ AS Screw kit 4 13 SSAKAA018YDE0 AB Bag 4 14 XMPS740P25000 AC Wood screw 4 15 LANG A616JBTA AK Panel angle 4 16 LBNDKA136JBEZ AF Band 5 8 4 17 LHLD A740JBFA AQ Holder 4 18 PCOV B115JBFA AG Cover 4 19 PGUMMA347JBEZ AE Drain joint 4 20 PSEL A931JBE0 AH Window insulator 4 21 PSEL C848JBEZ AD Panel insulator 4 22 ...

Page 47: ... 4 26 UBATUA027JBE0 AE Battery pack 4 27 TLAB C979JBRZ AF Caution label 4 29 DFZK B643JBKZ BL Accessory sub kit 12 CV P10LC Packing parts 5 1 CPADBA114JBKZ AF Bottom pad ass y 5 2 CPADBA111JBKZ AR Top pad ass y 5 3 DPAKCA007JBKZ AZ Packing case ass y 5 4 SPADBA321JBEZ AD Pad 5 5 SSAKHA018JBEZ AF Bag 5 7 TLABKE117JBRZ AF Number card 11 CV P10LC Accessory parts 5 1 5 4 5 2 5 7 5 2 5 3 5 5 ...

Page 48: ... 2 BG GLEG A103JBE0 4 3 3 AG 10 3 3 AG GWAKPA173JBFA 1 1 59 BC 7 1 59 BC H HBDG A002KKEA 1 1 37 AE 7 1 37 AE HDEC B192JBFA 1 1 38 AF 7 1 38 AF HPNL A726JBFA 1 1 39 AW HPNL A726JBFC 7 1 39 AR HPNL A727JBFA 1 1 40 AZ 7 1 40 AZ HPNL A728JBFA 1 1 115 AW HPNL A728JBFC 7 1 115 AU HPNL A729JBFA 1 1 116 AW HPNL A729JBFC 7 1 116 AU HPNL A815JBRA 1 1 41 BC HPNL A815JBRB 7 1 41 BC L LANG A606JBFZ 2 1 102 AM ...

Page 49: ... PFPFPC828JBEZ 2 1 24 AC PARTS CODE No PRICE RANK NEW MARK PART RANK 8 1 24 AC PFPFPC829JBEZ 2 1 25 AC 8 1 25 AC PFPFPC830JBEZ 1 1 72 AC 7 1 72 AC PFPFPC831JBEZ 1 1 73 AC 7 1 73 AC PFPFPC832JBEZ 1 1 74 AC 7 1 74 AC PFPFPC834JBEZ 4 3 15 AD 10 3 15 AD PFPFPC835JBEZ 4 3 16 AD 10 3 16 AD PFPFPC862JBEZ 1 1 75 AC 7 1 75 AC PGID A124JBFA 1 1 42 AF PGID A124JBFC 7 1 42 AK PGID A125JBFA 1 1 43 AF PGID A125...

Page 50: ...5JBRZ 1 1 7 AF 7 1 7 AF TLAB C976JBRZ 1 1 8 AF 7 1 8 AF TLAB C977JBRZ 1 1 132 AF 7 1 132 AF TLAB C979JBRZ 5 4 27 AF 11 4 27 AF TLAB C989JBRZ 5 4 28 AF TLAB C990JBRZ 1 1 4 AF 1 1 137 AF 7 1 4 AF 7 1 137 AF TLABCC034JBRZ 3 2 20 AD 9 2 20 AD TLABKE115JBRZ 6 5 7 AF TLABKE117JBRZ 12 5 7 AF TSPC F428JBRZ 1 1 134 AK TSPC F430JBRZ 7 1 134 AK U UBATUA027JBE0 5 4 26 AE 11 4 26 AE X XCTS740P10000 2 6 8 AC 8 ...

Page 51: ...MEMO ...

Page 52: ...T 2006 BY SHARP CORPORATION ALL RIGHTS RESERVED No part of this publication may be reproduced stored in retrieval systems or transmitted in any form or by any means electronic mechanical pho tocopying recording or otherwise without prior written permission of the publisher CVP09LX ...

Reviews: