background image

YO

<P=001>

(Continued)

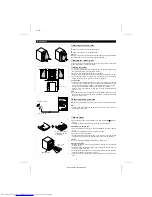
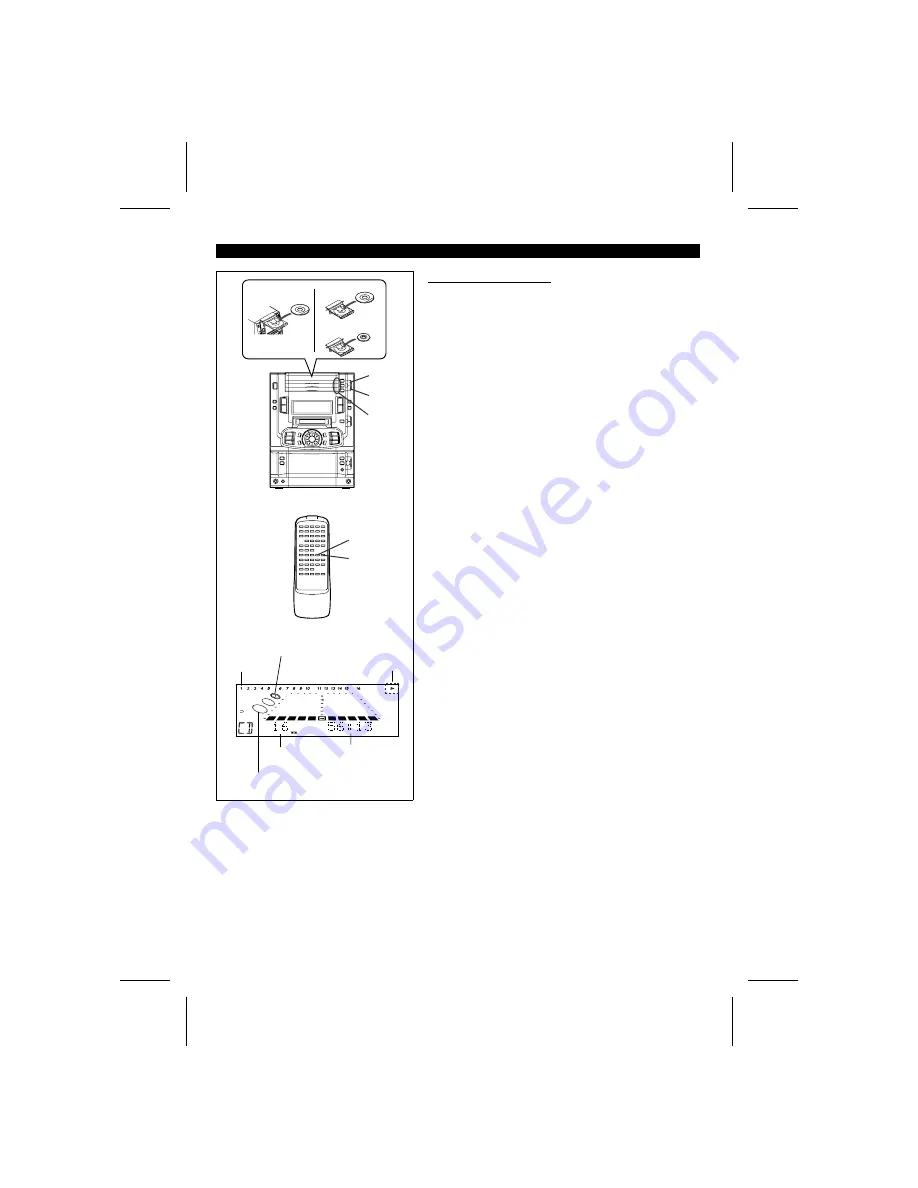
Loading and playing CDs

1

Press the CD 

 button.

The power will be turned on automatically, and the unit will enter the CD mode.

2

Press the CD 

7

 button to open a disc tray.

Press one of the CD 1 

0

 - CD 3 

0

 buttons depending on which disc tray you

want to load.

You cannot open more than one disc tray at the same time.

3

Place the CD(s) on the disc tray, label side up.

Be sure to place 8 cm (3") disc in the middle of the disc holder.

5

1

2,4

3

5

1

Caution:
Do not place more than one CD in any tray position.
This can damage the player and the CDs.

4

Press the CD 

7

 button of the disc tray that is open.

Repeat steps 2 - 3 to load one disc each into the second and third disc trays.

The total number of tracks and the total playing time on the selected disc will
be displayed. At this time, the blue frame that corresponds to the selected disc
tray will light up.

The music schedule will be displayed only for the number of tracks on the disc.

If the CD contains more than 21 tracks, "

C

" will appear.

5

Press the CD 

0 6

 button.

Playback will begin from track 1 on the disc you have selected to play.

After the disc finishes playing, the next disc will automatically play.

When there is no CD in one of the disc 1 - 3 trays, that tray will be skipped
and the next CD will be played.

When the CD 

0 6

 button is pressed after a track is selected (whilst the blue

frame mark of Disc 1 is lit), the track will be played.
If you press the CD 

0 6

 button and then the CD 2 

0

 button, discs 2 and 3

will be played.
If the CD 3 

0

 button is pressed, only disc 3 will be played.

When the last track on the third disc has finished playing, the unit will stop
automatically.

To interrupt playback:

Press the CD 

0 6

 button.

Press the CD 

0 6

 button to resume playback from the same point.

To stop playback:

Press the CD 

 button.

To remove the CDs:

Whilst in the stop mode, press the 

7

 button.

When playing back a CD, it is possible to remove or change the other two discs.

After use:

Press the ON/STAND-BY button to enter the stand-by mode.

12 cm (5")

8 cm (3")

Music schedule

The blue frame that corre-
sponds to the selected CD
tray will light up.

More tracks indicator

The tray with a CD will be displayed.

Total number of
tracks

Total playing time

MD-X60H(SUK) TINSE0227AWZZ

10

Summary of Contents for CP-X60H

Page 1: ...E CLOCK 8 SOUND CONTROL 9 DISPLAY SECTION 9 COMPACT DISC OPERATION 9 11 MINIDISC OPERATION 11 RADIO OPERATION 12 13 RDS Radio Data System OPERATION 14 19 Page CASSETTE OPERATION 20 CONVENIENT CD AND MD OPERATIONS 21 24 RECORDING 25 33 EDITING 34 40 HOW TO USE THE BUILT IN TIMER 41 43 USING EXTERNAL UNITS 44 48 WHAT IS A MINIDISC 49 MINIDISC SYSTEM LIMITATIONS 50 TROUBLESHOOTING 50 53 MAINTENANCE 5...

Page 2: ...ructions below IMPORTANT The wires in the mains lead are coloured in accordance with the following code Blue Neutral Brown Live As the colours of the wires in the mains lead of this product may not correspond with the coloured markings identifying the terminals in your plug proceed as follows The wire which is coloured blue must be connected to the plug terminal which is marked N or coloured black...

Page 3: ...olume control setting up high or whilst continually listening at high volumes Condensation Sudden temperature changes storage or operation in an extremely humid environment may cause condensation inside the cabinet CD pickup MD pickup tape heads etc or on the transmitter LED on the remote control Condensation can cause the unit to malfunction If this happens leave the power on with no disc or cass...

Page 4: ...n DISPLAY 24 MD Record Mode Button REC MODE 25 MD Pole Position Button POLE POSITION 26 CD 0 TAPE Edit Button CD 0 TAPE 27 MD 0 TAPE Edit Button MD 0 TAPE 28 MD Name TOC Edit Button NAME TOC EDIT 29 TUNER Tuning Down Button 3 3 CD Track Down Review Button 3 3 MD Track Down Review Cursor Button 3 30 Jog Dial 31 TUNER Tuning Up Button 2 3 CD Track Up Cue Button 2 3 MD Track Up Cue Cursor Button 2 32...

Page 5: ...Indicator REC 15 MD Sound Synchro Indicator S SYNC 16 MD Auto Mark Indicator AUTO MARK 17 MD Recording Mode Indicator MONO LP 18 Timer Play Timer Record Indicator 19 CD MD Programme Indicator PROGRAM 20 CD MD Random Play Indicator RANDOM 21 CD MD Repeat Indicator R 22 RDS Indicator RDS 23 Traffic Announcement Indicator TA 24 Traffic Programme Indicator TP 25 EON Indicator EON 26 Programme Type Ind...

Page 6: ...cord Button SOUND SYNCHRO 16 Auto Mark Button A MARK 17 Record Mode Button REC MODE CD control section 18 Track Up Cue Down Review Buttons 5 4 19 Play Pause Button 0 6 20 Stop Button 21 Play Buttons 1 0 2 0 3 0 22 Auxiliary Input Digital Analogue Select Button AUX 23 Display Button DISPLAY 24 Time Display Select Button TIME Tape control section 25 Fast Wind Buttons 3 2 26 Stop Button 27 Play Butto...

Page 7: ...the FM 75 OHMS terminal and position the FM aerial wire in the direction where the strongest signal can be received Supplied AM loop aerial Connect the AM loop aerial wire to the AM LOOP socket Position the AM loop aerial for optimum reception Place the AM loop aerial on a shelf etc or attach it to a stand or a wall with screws not supplied Notes Do not place the aerial on the main unit as it may ...

Page 8: ...hen the power is turned on the cooling fan will run When the volume is increased the cooling fan will run at high speed Connecting the AC power lead After connecting the speakers plug the AC power lead into a convenient AC socket Note Unplug the AC power lead from the AC socket if the unit will not be in use for a prolonged period of time Remote control When inserting or removing the batteries pus...

Page 9: ... set the hour 13Adjust the minute using the jog dial 14Press the ENTER button to set the minute The clock starts operating from 0 seconds Seconds are not displayed ON STAND BY TIMER DELETE ENTER 2 14 12 13 3 4 5 6 7 8 9 10 11 Notes In the event of a power failure or when the AC power lead is disconnected the clock setting will be lost Reset the time Whilst recording an MD you cannot set the date a...

Page 10: ...y the unit whilst CDs are in the trays or a MiniDisc is loaded The discs may come loose inside the unit and they may be damaged or cause damage to the unit This may also cause malfunctions Do not place two CDs in one disc position Do not push the disc tray whilst it is moving Do not attempt to push the disc tray by hand This may cause malfunctions If the power fails whilst the tray is open wait un...

Page 11: ... 0 6 button Playback will begin from track 1 on the disc you have selected to play After the disc finishes playing the next disc will automatically play When there is no CD in one of the disc 1 3 trays that tray will be skipped and the next CD will be played When the CD 0 6 button is pressed after a track is selected whilst the blue frame mark of Disc 1 is lit the track will be played If you press...

Page 12: ...he MD 0 6 button If the MD has a name the name will appear and scroll across the display Then the elapsed playing time will appear If the MD has no disc or track names the elapsed playing time will appear When the last track has been played back this unit will stop automatically To interrupt playback Press the MD 0 6 button Press the MD 0 6 button to resume playback from the same point To stop pla...

Page 13: ...the station will be skipped To stop the auto tuning press the TUNING 3or 2 button again 4 To receive an FM stereo transmission press the ST MODE button on the remote control so that the STEREO indicator on the display lights up ST will appear when an FM broadcast is in stereo 5 If the FM reception is weak press the ST MODE button on the remote control so that the STEREO indicator goes out Although...

Page 14: ...m step 2 5 Repeat steps 1 4 to set other preset stations or to change a preset station When a new station is stored in the selected station preset number memory the contents previously memorised will be erased To recall a memorised station 1 Press the TUNER BAND button 2 Press the DIRECT KEY on the remote control or turn the jog dial on the main unit to recall the preset channel number The frequen...

Page 15: ...ch time you press the DISPLAY button the display will change to show the following information PS Programme Service Station names commonly known will be displayed NO PS appears if no signal is being sent PTY Programme Type Programme type will be displayed NO PTY appears if no signal is being sent Frequency Channel number and tuning frequency Descriptions of the PTY Programme Type codes TP Traffic ...

Page 16: ...ory If the same station is broadcasting on different frequencies the transmission with the strongest broadcast frequency will be stored in memory Any station which has the same frequency as one which has been already stored in memory will not be stored again If a 40th station is stored in memory during a scan the scanning will stop at that station The number of stations and MEMORY END will each be...

Page 17: ...ily lit and the jog dial is turned nothing will happen In this case start again from step 4 Each time a station of the selected type is encountered the search will stop and you can listen to the broadcast The station name will flash for 7 seconds and then remain lit If you want to listen to another station of that programme type press the ENTER button whilst the channel number or station name is f...

Page 18: ...he DISPLAY button is pressed whilst a preset FM RDS station is tuned in the display will switch as follows Station name PS Programme type PTY Frequency Notes for RDS operation If any of the following events occur it does not mean that the unit is faulty When the station name flashes the unit does not operate properly If a particular station is not broadcasting properly or a station is conducting t...

Page 19: ...cannot enter the EON stand by mode Checking the stand by mode setting When in the EON stand by mode press the EON button Programme type WAITING To cancel the EON stand by mode When in the EON stand by mode press the EON button Within 4 seconds press it again The EON stand by mode will be cancelled PTY will go out Notes In the following cases the EON stand by mode will be cancelled When the unit is...

Page 20: ...TP nor TA appear then even if EON appears the unit cannot enter the EON TI stand by mode In this condition even if the EON button is pressed NO TI will flash for 4 seconds Notes During the same programme as the specified PTY or TA is being broadcast on the station you are receiving the unit will not switch to other network station If there are more than two other network stations you want to liste...

Page 21: ...side A 1 will not be played after side B 2 finishes To stop playback Press the TAPE button To fast wind the tape onto the left reel Press the 3 button when the tape is stopped To fast wind the tape onto the right reel Press the 2 button when the tape is stopped Listening to the reverse side during playback Press the 1 or 0 button during playback Direct play If a tape is already loaded when you pre...

Page 22: ...thin 5 seconds press the Y 10 button Within 5 seconds press the 1 button Within 5 seconds press the 2 button Within 5 seconds press the 8 button The beginning of the selected track will be found and play will begin automatically Notes A track number higher than the number of tracks on the disc cannot be selected During APMS play or random play track number selection play is not possible APSS Auto ...

Page 23: ... programme source CD or MD by pressing the CD or MD button 2 Press the P MODE button on the remote control Each time this button is pressed the mode will change in the following order Repeat play Random play Normal play Repeat play 3 Press the CD 0 6 or MD 0 6 button to start playback To specify a disc from disc trays 1 3 press one of the CD 1 0 3 0 buttons only for CDs Repeat play After the last ...

Page 24: ...ack of the programmed selections After all of the programmed tracks have finished playback the unit will automat ically stop To clear the programmed selections Press the CLEAR button whilst the PROGRAM indicator is flashing Each time the button is pressed one track will be cleared beginning with the last track programmed To cancel the APMS Whilst the unit is stopped in the APMS mode press the CLEA...

Page 25: ... the CD or MD jacket as the time between the tracks is not included Changing the display during MD playback Each time the DISPLAY button is pressed during playback or when in the pause mode the display will change as described below When the MD has a track name 1 The track name will be displayed 2 The total number of tracks and the remaining recording time will be displayed 3 The date and time rec...

Page 26: ...ut source you eject the MiniDisc you turn the power off Do NOT unplug the power lead whilst the TOC is being recorded TOC is flashing and do NOT impart shock to the unit Otherwise TOC will not be correctly recorded and consequently proper playback may not be possible About track numbers When recording from a CD New track numbers will be created automatically according to the original tracks Synchr...

Page 27: ...been completely recorded the CD and the MD will stop automatically DISPLAY DISPLAY MD MD 4 2 1 2 3 3 1 3 4 If recording does not begin When a disc is loaded in each of DISC 1 DISC 3 if all of the tracks on the discs cannot be recorded the number of tracks that cannot be recorded will be displayed Next the number of tracks that can be recorded will appear The unit will then enter the recording stan...

Page 28: ...istening to a CD Hypertrack Editing 1 Press the CD button 2 Load a compact disc and a recordable MiniDisc 3 Check the recording mode by pressing the REC MODE button 4 Press the CD 0 6 button 5 Press the TRACK EDIT button whilst playing a track you want to record Repeat this operation whilst continuing to listen to the CD If the number of programmed tracks exceeds 32 or if the total rec ording time...

Page 29: ... Be aware that when you do this all of the tracks and track names that follow the newly recorded track will be erased 1 During playback press the MD 0 6 button at the point where you want to begin re recording The unit will pause 2 Press the MD REC button R ERASE OK will be displayed 3 Press the ENTER button This unit will be in the recording pause mode To cancel the operation press the MD button ...

Page 30: ... turn on the G indicator 5 Check the recording mode by pressing the REC MODE button 6 Check the recordable time by pressing the DISPLAY button 7 Press the MD REC button The unit will enter the recording stand by mode 8 Press the TAPE 0 button Recording will begin To stop recording Press the TAPE button after pressing the MD button To interrupt recording Press the MD 0 6 button whilst recording Pre...

Page 31: ...utton is pressed If you cannot record all of the tracks you have selected from a CD the number of tracks and the amount of time that can be included on the recording and the number of tracks and the amount of time that cannot be included will both be displayed The unit will then enter the recording stand by mode To record from a cassette tape 1 Perform steps 1 to 6 on page 29 One Touch Editing 2 P...

Page 32: ...ecording from a CD or an MD to a cassette tape Synchronised Recording System When a CD or an MD is played recording will start automatically 1 Load a blank cassette into the cassette compartment Wind past the tape leader which cannot be recorded on 2 Press the REVERSE MODE button To record on only one side To record on both sides 3 Select the Dolby NR mode by pressing the DOLBY NR button When reco...

Page 33: ...E button Recording only your favorite tracks on a tape whilst listen ing to a CD or an MD Hypertrack Editing If you programme your favorite tracks whilst listening to a CD or an MD you can record the programmed tracks all together onto a tape after listening to the disc 1 Load a blank cassette into the cassette compartment 2 Press the REVERSE MODE button To record on only one side To record on bot...

Page 34: ...e compartment Wind past the tape leader which cannot be recorded on 3 Press the REVERSE MODE button To record on only one side To record on both sides 4 Select the Dolby NR mode by pressing the DOLBY NR button When recording with the Dolby NR system turn on the Gindicator When not recording with the Dolby NR system turn off the Gindicator 5 Press the TAPE 6 button will flash 6 Press the 0 button t...

Page 35: ... unnecessary sections Talk CM Cut using the erase function Cut using the erase function STEP 4 Rearranging tracks in your preferred order The tracks are rear ranged using the pro gramme move function The track is moved using the move function STEP 5 Finish by putting names on the disc and tracks Disc name Track name Recording the editing results Whilst editing the TOC indicator is displayed This m...

Page 36: ... 2 3 4 1 2 3 4 E 5 MOVE The order of the recorded tracks can be changed This feature is different from programme play A new track order can be recorded directly on the disc When the unit is in the stand by mode the revised order will not be changed Page 39 C A B D 1 2 3 4 1 2 3 4 A B C D Programmed move This function allows the track numbers to be automatically rear ranged in the order specified f...

Page 37: ...ning to will be played repeatedly 3 Press the DISPLAY button to select the type of characters 4 Select the character you want using the jog dial 5 Press the ENTER button to enter the character Repeat steps 3 to 5 above to enter the characters in the name When the next character s type is the same as the previous character step 3 can be skipped 6 After entering all of the characters in the name pre...

Page 38: ...the ENTER button The unit will enter the character input mode To cancel the operation press the MD button 4 Press the 3 2button to make the character you want to erase begin flashing 5 Press the TIMER DELETE button 6 Press the NAME TOC EDIT button To add a character After performing steps 1 to 3 above do the following Example To change BET to BEST 4 Press the 3 2 button to make the character at th...

Page 39: ... want to combine and then press the MD 0 6 button The unit will enter the pause mode 2 Press the NAME TOC EDIT button and within 10 seconds select COMBINE using the jog dial 3 Within 10 seconds press the ENTER button To cancel the operation press the MD button 4 Press the ENTER button again The two tracks are combined and the unit is stopped at the beginning of the combined track The numbers assig...

Page 40: ...come the new fourth track and the old fourth track will become the new fifth track This function cannot be used whilst a programme is being entered PROGRAM is lit Page 23 or whilst in the random play mode RANDOM is lit Page 22 First cancel the programme or random play mode before trying to use this function Programmed move 1 Select the tracks you want to move and enter them into a programme Page 2...

Page 41: ...ically decreased by one When a track is erased the track name will be erased at the same time This function cannot be used whilst a programme is being entered PROGRAM is lit Page 23 or whilst in the random play mode RANDOM is lit Page 22 First cancel the programme or random play mode before trying to use this function To erase all of the tracks at once 1 Press the MD button The total number of tra...

Page 42: ... dial to set the hour at which to stop and then press the ENTER button 9 Turn the jog dial to set the minute at which to stop and then press the ENTER button 10Turn the jog dial to select the function If TUNER is selected press the ENTER button then select the preset number using the jog dial When no stations have been programmed NO PRESET will be displayed and the programme operation will end In ...

Page 43: ...lected press the ENTER button then select the preset number using the jog dial When no stations have been programmed NO PRESET will be displayed and the programme operation will end In this case programme some stations and then reprogramme from the beginning 11Select MD REC or TAPE REC by using the jog dial and then press the ENTER button 12Adjust the sound level using the jog dial and then press ...

Page 44: ...reset sleep time has elapsed At this time you cannot change the volume To confirm the sleep timer setting Press the TIMER DELETE button Turn the jog dial so that the SLEEP display appears To cancel the sleep operation If the unit enters the stand by mode the sleep operation will be can celled The sleep operation can also be cancelled as follows if you cannot set the unit to the stand by mode durin...

Page 45: ...ally adjusted Connecting to stereos or MD CD players equipment which can output analogue signals The other MD CD player Commercially available lead with 3 5 mm 1 8 stereo mini plug and RCA plugs To the output headphone socket RCA lead LEFT RIGHT RIGHT LEFT Analogue output sockets Analogue input sockets LEFT RIGHT RIGHT LEFT Red plug To RIGHT White plug To LEFT RCA lead Notes When audio input and o...

Page 46: ...M5AC available separately To the output headphone socket The other MD CD player A 3 5 mm 1 8 stereo mini plug cable To the output headphone socket Headphones Before plugging in or unplugging the headphones make sure the volume level is reduced Be sure your headphones have a 3 5 mm diameter plug and are between 16 ohms and 50 ohms impedance The recom mended impedance is 32 ohms When headphones are ...

Page 47: ...auto mark function will work automatically during synchro recording 1 Press the AUX button Select AUX 1 AUX 2 or AUX OPT Select the input that corresponds to the terminals where the external unit you will record from is connected 2 Start the recording on the external unit and adjust the recording level using the INPUT LEVEL control This is only necessary when recording from anal ogue inputs In the...

Page 48: ...from is connected Each time the button is pressed the display will change as follows 3 Press the MD REC or TAPE 6 button 4 Start playback on the external unit To record analogue signals perform steps 5 6 To record digital signals perform step 6 5 Adjust the recording level using the INPUT LEVEL control The maximum level should not exceed 0 dB 6 Press the MD 0 6 or TAPE 0 button To stop recording P...

Page 49: ...ly manufactured MD music disc PLAY BACK MD will be displayed The sound will be recorded however the disc name and track names will not be recorded If the length of a track is very short it may be impossible to record the complete track name A maximum of 100 characters can be recorded in the MD 0 MD Edit func tion including both the disc name and all of the track names The volume sound quality and ...

Page 50: ...ssemble MiniDiscs Adaptive TRansform Acoustic Coding ATRAC The ATRAC Adaptive TRansform Acoustic Coding is a new technol ogy that is designed to eliminate the information in sounds which you can not hear and to compress the remaining sound data so that the recording uses about 1 5 of the original sound information Sound data is analysed and filtered to take advantage of psycho acous tic masking Th...

Page 51: ...n discs those sections will be automatically avoided no recording will be placed in those sections Therefore the recording time will be reduced An MD which has been recorded or edited repeatedly may skip during fast reverse or fast forward TROUBLESHOOTING If a problem occurs If this unit functions abnormally during operation first check the following items If the unit continues to function abnorma...

Page 52: ...ape is damaged The capstan and pinch roller are very dirty Replace the tape Clean the capsten and pinch roller The cassette cannot be ejected Did a power failure occur Wait until the power is supplied Radio reception SYMPTOM POSSIBLE CAUSE REMEDY Radios make unusual noise consecutively The unit is placed near the TV or computer The aerial direction is not placed properly When the unit receives a r...

Page 53: ...o strong external interference mechanical shock excessive static electricity abnormal supply voltage due to light ning etc or if it is operated incorrectly it may malfunction or the display may not function correctly If such a problem occurs do the following Connect the AC power lead to the AC socket and press the RESET button once on the rear of the main unit When the RESET button is pressed all ...

Page 54: ... and press the 7 but ton NAME FULL The number of characters for the disc name or track name exceeds 100 Shorten the disc or track name NO DISC A disc has not been loaded The disc data cannot be read Load a disc Reload the disc NOT AUDIO The data recorded on this disc is not audio data Select another track Replace the disc PLAYBACK MD You tried to record on a playback only disc Replace it with anot...

Page 55: ...nd flutter Unmeasurable less than 0 001 W peak Signal noise ratio 95 dB 1 kHz Dynamic range 90 dB 1 kHz Compact disc player section Type 3 disc multi play compact disc player Signal readout Non contact 3 beam semiconductor laser pickup Rotation speed 200 500 rpm CLV Approx Error correction CIRC Cross Interleave Reed Solomon Code Quantization 16 bit linear D A converter 1 bit D A converter Filter 8...

Page 56: ...ny fault which occurs must be notified to Sharp or its appointed Service Facility within one year from the date this product was purchased Proof of purchase must be provided 4 The guarantee does not cover carriage costs jewelled styli audio tapes compact discs or batteries 5 In the unlikely event of this product requiring repair please contact the supplier from whom it was purchased Where this is ...

Reviews: