background image


7


XL-UH25H


2008/June/24

XL-UH25H_UK&AUS


General Information


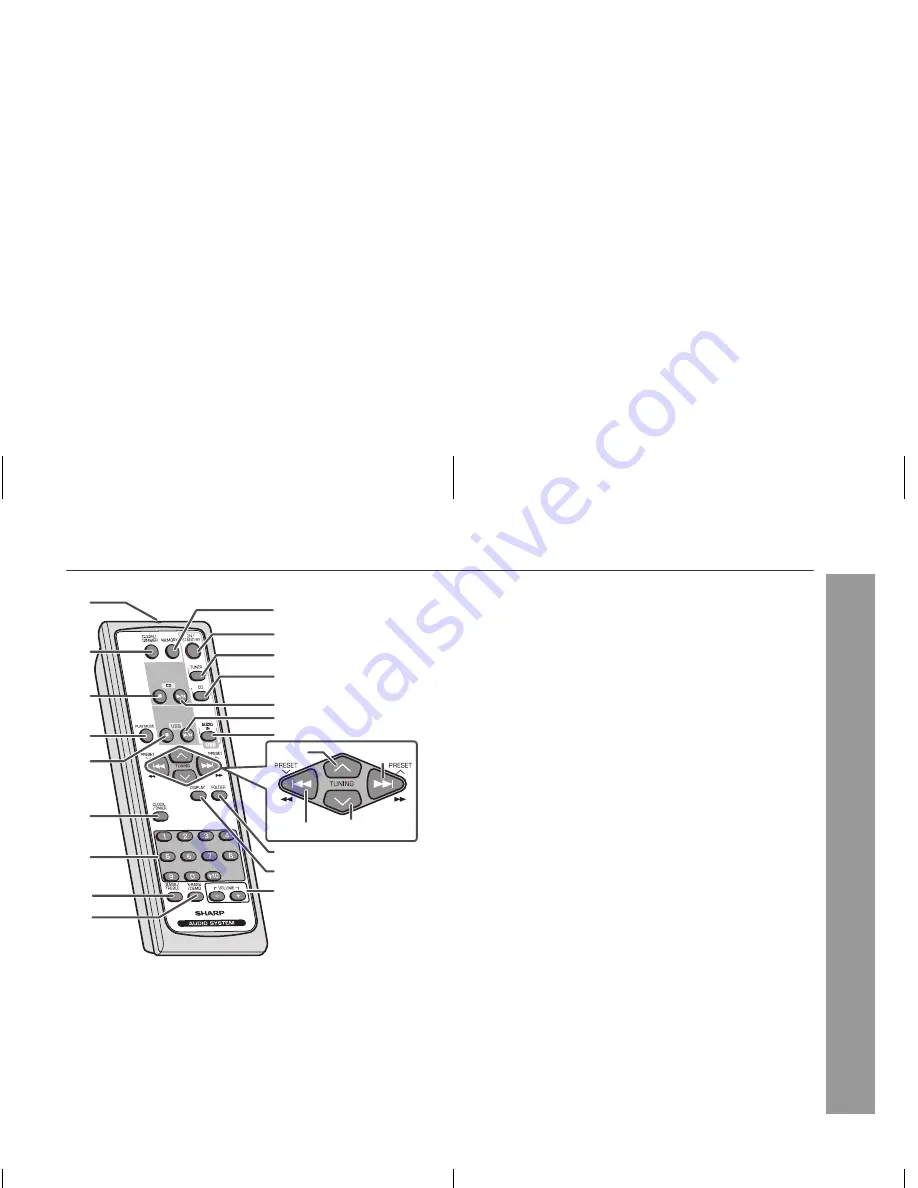
Remote control


Reference page

1. Remote Control Transmitter  . . . . . . . . . . . . . . . . . . . . . . . .  11
2. Clear/Dimmer Button  . . . . . . . . . . . . . . . . . . . . . . . . . . . . . .  18
3. Disc Stop Button  . . . . . . . . . . . . . . . . . . . . . . . . . . . . . . . . .  16
4. Play Mode Button . . . . . . . . . . . . . . . . . . . . . . . . . . . . . . . . .  17
5. USB Stop Button. . . . . . . . . . . . . . . . . . . . . . . . . . . . . . . . . .  21
6. Clock/Timer Button  . . . . . . . . . . . . . . . . . . . . . . . . . . . .  13, 26
7. Direct Search Buttons  . . . . . . . . . . . . . . . . . . . . . . . . . . . . .  17 
8. Bass/Treble Button   . . . . . . . . . . . . . . . . . . . . . . . . . . . . . . .  12
9. Extra Bass/Demo Button . . . . . . . . . . . . . . . . . . . . . . . .  10, 12

10. Memory Button . . . . . . . . . . . . . . . . . . . . . . .  13, 18, 24, 25, 26
11. On/Stand-by Button  . . . . . . . . . . . . . . . . . . . . . . . . . . . . . . .  12
12. Tuner Button   . . . . . . . . . . . . . . . . . . . . . . . . . . . . . . . . . . . .  24
13. CD Button  . . . . . . . . . . . . . . . . . . . . . . . . . . . . . . . . . . . . . . .  15
14. Disc Play and Pause Button  . . . . . . . . . . . . . . . . . . . . .  15, 16
15. USB Play and Pause Button  . . . . . . . . . . . . . . . . . . . . . . . .  21
16. Audio In/USB Button  . . . . . . . . . . . . . . . . . . . . . . . . . . .  21, 30
17. Tuning Up, Folder Up Button   . . . . . . . . . . . . . . . . . . . .  20, 24
18. Track Up or Fast Forward, Tuner Preset Up, 

Time Up Button   . . . . . . . . . . . . . . . . . . . . . .  13, 16, 21, 25, 26

19. Track Down or Fast Reverse, Tuner Preset Down, 

Time Down Button  . . . . . . . . . . . . . . . . . . . .  13, 16, 21, 25, 26

20. Tuning Down, Folder Down Button   . . . . . . . . . . . . . . .  20, 24
21. MP3/WMA Folder Button  . . . . . . . . . . . . . . . . . . . . . . . .  19, 22
22. MP3/WMA Display Button  . . . . . . . . . . . . . . . . . . . . . . . . . .  21
23. Volume Up and Down Buttons  . . . . . . . . . . . . . . . . . . . . . .  12

1

2

3

4

5

6

7

8
9

12
13 

14 
15 

11

10

16 

22 
23 

21 

17

18

20

19

Summary of Contents for CP-UH25H

Page 1: ... read this manual carefully It will guide you in operating your SHARP product XL UH25H Micro Component System consisting of XL UH25H main unit and CP UH25H speaker system MICRO COMPONENT SYSTEM MODEL XL UH25H OPERATION MANUAL Note This product is not compatible with MTP and AAC file systems AUDIO IN ...

Page 2: ...rial may require consent which SHARP is unable to give Please refer particularly to the provisions of the Copyright Act 1956 the Dramatic and Musical Performers Protection Acts 1958 the Performers Protection Acts 1963 and 1972 and to any subsequent statutory enactments and orders Note for users in Australia Copyright may exist in material you wish to record Copying or broadcasting such material wi...

Page 3: ...fer IIS and Thomson Accessories Please confirm that only the following accessories are included Contents Page General Information Precautions 4 Controls and indicators 5 7 Preparation for Use System connections 8 10 Remote control 11 Basic Operation General control 12 Setting the clock Remote Control only 13 CD or MP3 WMA disc Playback Listening to a CD or MP3 WMA disc 14 16 Advanced CD or MP3 WMA...

Page 4: ...ld responsible for any damage resulting from use of this unit with a voltage other than that which is specified Volume control The sound level at a given volume setting depends on speaker efficiency location and various other factors It is advisable to avoid exposure to high volume levels Do not turn the volume on to full at switch on and listen to music at moderate levels Excessive sound pressure...

Page 5: ...nce page 1 Disc Compartment 15 2 Timer Indicator 27 3 ON STAND BY Button 12 4 Function Button 12 5 Volume Control 12 6 Remote Sensor 11 7 Stop Button 15 16 21 8 Play Pause Button 15 16 21 9 Headphone Socket 30 10 Audio In Socket 30 11 USB Terminal 21 2 3 4 5 6 7 8 9 10 11 1 ...

Page 6: ...r 15 21 14 Extra Bass Indicator 12 15 Disc or USB Play Indicator 15 21 16 Disc or USB Pause Indicator 16 17 FM Stereo Mode Indicator 24 18 FM Stereo Receiving Indicator 24 19 Tuner Receiving Frequency Indicator 24 Rear panel Reference page 1 FM 75 Ohms Aerial Socket 9 2 AC Power Lead 10 3 Speaker Terminals 9 Speaker system 15 17 18 1 2 3 4 5 10 11 12 13 14 6 7 8 9 16 19 1 2 3 XL UH25H MODEL NO SER...

Page 7: ...tand by Button 12 12 Tuner Button 24 13 CD Button 15 14 Disc Play and Pause Button 15 16 15 USB Play and Pause Button 21 16 Audio In USB Button 21 30 17 Tuning Up Folder Up Button 20 24 18 Track Up or Fast Forward Tuner Preset Up Time Up Button 13 16 21 25 26 19 Track Down or Fast Reverse Tuner Preset Down Time Down Button 13 16 21 25 26 20 Tuning Down Folder Down Button 20 24 21 MP3 WMA Folder Bu...

Page 8: ... System connections Right speaker FM aerial To a wall socket Left speaker AC power connection see page 10 Aerial connection see page 9 Speaker connection see page 9 Make sure to unplug the AC power lead before making any connections ...

Page 9: ...l the speakers either vertically or horizontally Affix the cushions supplied to the bottom of the speakers to prevent them from sliding or falling due to vibration A sheet of speaker cushions 8 pcs is supplied with this product Use 4 cushions per speaker Red Black Use speakers with an impedance of 8 ohms or more as lower impedance speakers can damage the unit Do not mistake the right and the left ...

Page 10: ...r dealer Note When an external FM aerial is used disconnect the supplied FM aerial wire Wall socket AC 220 240 V 50 Hz The first time the unit is plugged in the unit will enter the demonstration mode You will see words scroll To cancel the demonstration mode When the unit is in the power stand by mode demonstration mode press the X BASS DEMO button on the remote control The unit will enter the low...

Page 11: ...he operation becomes erratic Purchase 2 AA size batteries UM SUM 3 R6 HP 7 or similar Periodically clean the transmitter on the remote control and the sensor on the unit with a soft cloth Exposing the sensor on the unit to strong light may interfere with operation Change the lighting or the direction of the unit if this occurs Keep the remote control away from moisture heat shock and vibrations Te...

Page 12: ... power is first turned on the unit will enter the extra bass mode which emphasises the bass frequencies and X BASS will appear To cancel the extra bass mode press the X BASS DEMO button on the remote control Bass control 1 Press the BASS TREBLE button to select BASS 2 Within 5 seconds press the VOLUME or button to adjust the bass Treble control 1 Press the BASS TREBLE button to select TREBLE 2 Wit...

Page 13: ...r display will be skipped To change the 24 hour or 12 hour display 1 Press the ON STAND BY button to turn the power on 2 Press the CLOCK TIMER button 3 Press the or button to select TIME ADJ and press the MEMORY button 4 Press the or button to select 24 hour or 12 hour display and then press the MEMORY button 0 00 The 24 hour display will appear 0 00 23 59 AM 12 00 The 12 hour display will appear ...

Page 14: ...A WMA files are Advanced System Format files that include audio files which are compressed with Windows Media Audio codec WMA is developed by Microsoft as an audio format file for Windows Media Player MP3 and WMA indicator will light up after the unit reads information on an MP3 or WMA disc Bitrate which is supported by WMA is 64 160 kbps Auto power on function When you press any of the following ...

Page 15: ... occurs during CD operation move the unit away from the TV or radio 1 Press the ON STAND BY button to turn the power on 2 Open the disc compartment 3 Place the disc on the spindle label side up Be sure to place 8 cm 3 disc in the middle of the spindle 4 Close the disc compartment Press the CD button on the remote control or FUNCTION button repeatedly on the main unit to select CD function Due to t...

Page 16: ...isplayed for several seconds depending on the number of files in the disc If this indication is displayed for an indefinite period of time due to unspecified file being played or external noise etc switch off the main AC power supply and then switch it on again Function Main unit Remote control Operation Play Press in the stop mode Stop Press in the playback mode Pause Press in the playback mode P...

Page 17: ...ct and play tracks automatically You cannot select the order of the tracks After all track on the disc is played the unit will stop automatically Caution After performing repeat play be sure to press the CD button Otherwise the disc will play continuously Use the direct search buttons on the remote control to select the desired track whilst playing the selected disc Selected track number The direc...

Page 18: ...ned the programmed sequence will be cancelled If you press the ON STAND BY button to enter the stand by mode or change the function from CD to another the programmed selections will be cleared During the programme operation random play is not possible 1 Whilst in the stop mode press the MEMORY button on the remote control to enter the programming save mode 2 Press the direct search buttons on the ...

Page 19: ...not according to our expected playback order For CD MP3 WMA 512 numbers of folders and files inclusives of the folders with non playable files can be read Folder mode on off can be operated by the FOLDER button on the remote control Files that are played when folder mode is set to the on position may differ from those played back when folder mode is turned off Folder Mode Off case All the files st...

Page 20: ... be played back by pressing the or button TOTAL Indicator WMA Indicator MP3 Indicator CD indicator Total number of files FOLDER Indicator Total files in Folder 3 FOLDER Number 4 Press the CD button Playback will start and file number selected will be displayed Title Artist Album name are displayed if they are recorded on the disc Display content can be changed by pressing the DISPLAY button In cas...

Page 21: ...lect desired file to be played back by pressing the or button TOTAL Indicator WMA Indicator MP3 Indicator USB Indicator Total number of files 3 Press the USB button Playback will start and the file number selected will be displayed Title Artist Album name are displayed if they are recorded in the USB memory device Display content can be changed by pressing the DISPLAY button Only appears when cloc...

Page 22: ... unit and then turn it on again This product relates to USB memory devices and MP3 players It may however face some irregularities due to various unforeseen reasons from some devices Should this happen turn off the unit and then turn it on again The USB terminal is intended for direct connection to a USB memory device without any cable 2 Press the FOLDER button and press the TUNING or button to se...

Page 23: ...k order for MP3 files may differ sometimes depending on the writing software used during file download Bitrate which is supported by MP3 is 32 320 kbps WMA is 64 160 kbps For MP3 WMA files please put MP3 WMA extension Files cannot be played back if there is no MP3 WMA extension Playlists are not supported on this unit This unit can display Folder Name or File Name up to 32 characters Maximum total...

Page 24: ...R button to select stereo mode and ST indicator will be displayed will appear when an FM broadcast is in stereo If the FM reception is weak press the TUNER button to extinguish the ST indicator The reception changes to monaural and the sound becomes clearer 1 Press the ON STAND BY button to turn the power on 2 Press the TUNER button on the remote control or FUNCTION button repeatedly on the main u...

Page 25: ... memory in order starting with preset channel 1 4 Within 30 seconds press the MEMORY button to store that station in memory If the MEMORY and preset number indicators disappear before the station is memorised repeat the operation from step 2 5 Repeat steps 1 4 to set other stations or to change a preset station When a new station is stored in memory the station previously memorised for that preset...

Page 26: ...CE TIMER and DAILY TIMER Once timer Once timer play works for one time only at a preset time Daily timer Daily timer play works at the same preset time every day For example set the timer as a wake up call every morning 1 Set the daily timer pages 26 28 2 Set the once timer pages 26 28 Start Daily timer Once timer 1 minute or more Stop Start Stop 1 Check that the clock is set to the correct time r...

Page 27: ...teps 5 and 6 above 8 Switch input with the or button and then press the MEMORY button To select the timer playback source CD or TUNER or USB or AUDIO IN When you select the tuner select a station by pressing the or button and then press the MEMORY button If a station has not been programmed NO P SET will be displayed and timer setting will be cancelled 9 Adjust the volume using the VOLUME control ...

Page 28: ...minal or AUDIO IN sockets select USB or AUDIO IN in step 8 This unit will turn on or enter the power stand by mode automatically However the connected unit to AUDIO IN sockets will not turn on or off To stop the blinking follow step Cancelling the timer setting in the timer stand by mode on the right hand side of this page 1 Press the CLOCK TIMER button 2 Within 10 seconds press the or button to s...

Page 29: ...s 1 minute 1 minute intervals 5 Press the MEMORY button SLEEP will appear 6 The unit will enter the power stand by mode automatically after the preset time has elapsed The volume will be turned down 1 minute before the sleep operation finishes 1 Whilst SLEEP is indicated press the CLOCK TIMER button 2 Within 10 seconds press the or button to select SLP X XX X XX is sleep remaining time The remaini...

Page 30: ...and headphones can cause hearing loss Before plugging in or unplugging the headphones reduce the volume Be sure your headphones have a 3 5 mm 1 8 diameter plug and impedance between 16 and 50 ohms The recommended impedance is 32 ohms Plugging in the headphones disconnects the speakers automatically Adjust the volume using the VOLUME control Portable audio player etc Audio cable not supplied 1 Use ...

Page 31: ...rds Is the disc distorted or scratched Playback sounds are skipped or stopped in the middle of a track Is the unit located near excessive vibrations Is the disc very dirty Has condensation formed inside the unit Symptom Possible cause The remote control does not operate Is the AC power lead of the unit plugged in Are the batteries polarity correct Are the batteries dead Is the distance or angle in...

Page 32: ...clearing all memory 1 Press the ON STAND BY button to enter the power stand by mode 2 Whilst pressing down the button press the ON STAND BY button until CLR ALL appears 3 Can be operate on the main unit only Caution This operation will erase all data stored in memory including clock timer settings tuner preset and CD programme Before transporting the unit Remove the USB memory device and the disc ...

Page 33: ...arefully followed Specifications As part of our policy of continuous improvement SHARP reserves the right to make design and specification changes for product improvement without prior notice The performance specification figures indicated are nominal values of production units There may be some deviations from these values in individual units General Amplifier Power source AC 220 240 V 50 Hz Powe...

Page 34: ...160 kbps Other Maximum total number of MP3 WMA files is 65 280 Maximum total number of folders is 255 INCLUSIVE of root directory The ID3TAG information supported are TITLE ARTIST and ALBUM only Support ID3TAG version 1 and version 2 File system support Support USB devices with Microsoft Windows DOS FAT 12 FAT16 FAT 32 2 kbyte block length for sector Frequency range FM 87 5 108 MHz Other Maximum s...

Page 35: ...MEMO ...

Page 36: ...TINSEA257AWZZ 08F R AS 1 ...

Reviews: