background image

20

XL-UH220H

CD or MP3/WMA disc Playback

MP3/WMA folder mode (only for MP3/WMA files)  

To playback MP3/WMA (Windows Media Audio) file

There are many music sites on the internet that you can download
MP3/WMA (Windows Media Audio) music files. Follow the
instructions from the website on how to download the music files.
You can then playback these downloaded music files by burning
them to a CD-R/RW disc or by connecting a USB Memory Player
device.

Your downloaded song/files are for personal use only. Any other
usage of the song without owner’s permission, is against the law.

About folder playback order

If MP3/WMA files are recorded in several folders, a folder number will
be set to each folder automatically.

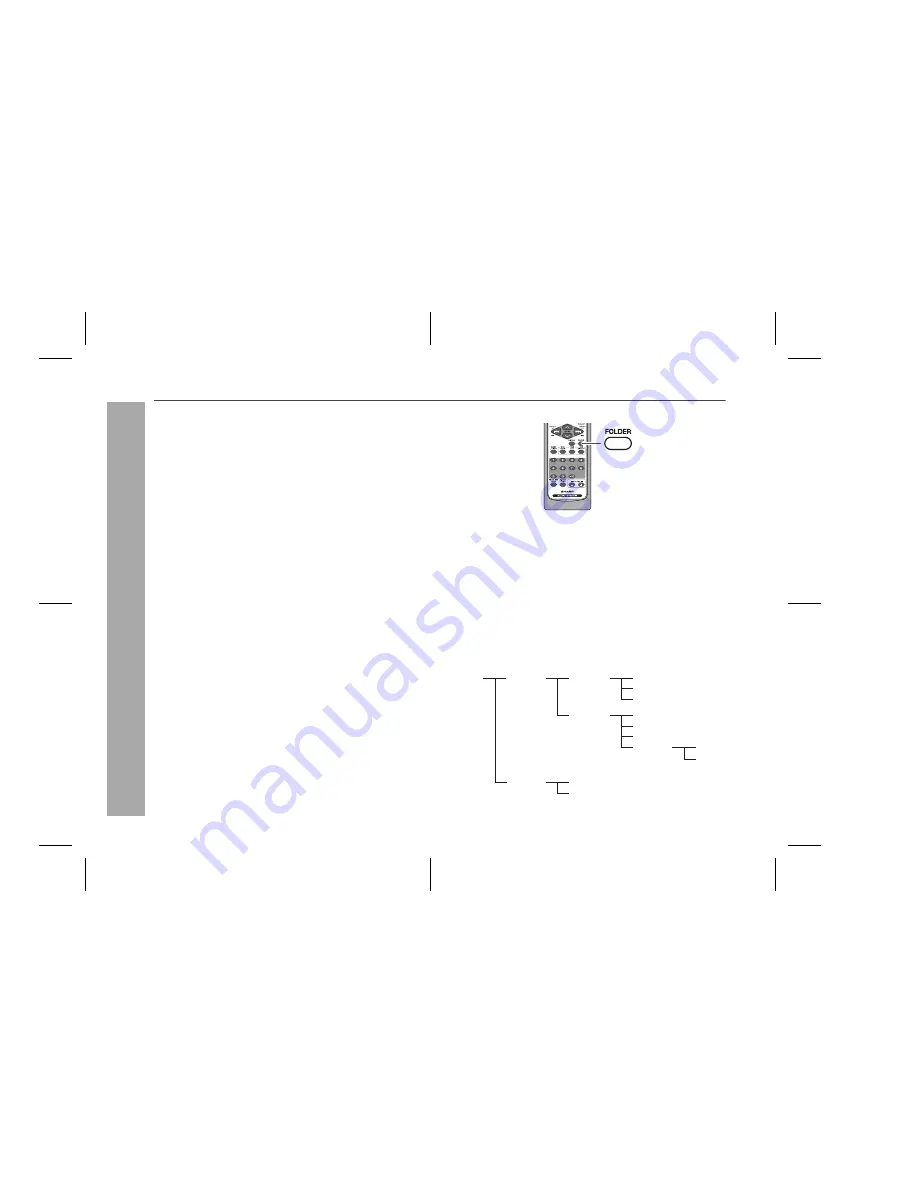
These folders can be selected by the FOLDER button on the remote
control. If there is no supported file formats inside the selected folder,
the folder is skipped and the next folder will be selected.
Example: How to set folder number if MP3/WMA format files are
recorded as below figure.

* The folder and file order information which is recorded on the disc
depends on the writing software. There maybe possibilities that this
unit will playback the files not according to our expected playback
order.

Folder mode on/off can be operated by the FOLDER button on the
remote control. Files that are played when folder mode is set to the
on position, may differ from those played back when folder mode is
turned off.


Folder Mode Off case:


All the files starting from the selected folder or file will be played back.
If file 3 inside Folder C is  selected, all the files starting from file 3 will
be played back.


Folder Mode On case:


All the files inside the selected folder will be played back. 
In case Folder D is selected, file 4, 5 and 6 will be played back. File
7 and 8 in Folder E will not be played back.

1. ROOT folder is set as folder 1.
2. As for folders inside ROOT folder (Folder A and Folder B), the 

folder which is recorded earlier on the disc will be set as folder 2.

3. As for folder inside Folder A (Folder C and Folder D), the folder 

which is recorded earlier on the disc will be set as folder 3.

4. Because there is no folder in Folder C, Folder D will be set as 

folder 4.

5. Folder E that is inside Folder D will be set as folder 5.
6. Folder B inside ROOT folder will be set as folder 6.

ROOT
(FOLDER 1) 

FOLDER A
(FOLDER 2)

FOLDER B
(FOLDER 6)

FILE 7
FILE 8

FILE 1
FILE 2
FILE 3

FILE 4
FILE 5
FILE 6
FOLDER E
(FOLDER 5)

FOLDER C
(FOLDER 3)

FOLDER D
(FOLDER 4)

FILE 9
FILE 10

Summary of Contents for CP-UH220H

Page 1: ...is product please read this manual carefully It will guide you in operating your SHARP product MICRO COMPONENT SYSTEM XL UH220H Micro Component System consisting of XL UH220H main unit and CP UH220H speaker system MODEL OPERATION MANUAL XL UH220H Note This product is not compatible with MTP and AAC file systems ...

Page 2: ...r broadcasting of copyright materials and nothing in this OPERATION MANUAL should be implied as giv ing that authority For other countries Audio visual material may consist of copyrighted works which must not be recorded without the authority of the owner of the copyright Please refer to the relevant laws in your country CAUTION This product is classified as a CLASS 1 LASER product Use of controls...

Page 3: ...hofer IIS and Thomson Accessories Please confirm that the following accessories are included Note Only the above accessories are included Contents Page General Information Precautions 4 Controls and indicators 5 7 Preparation for Use System connections 8 10 Remote control 11 Basic Operation General control 12 Setting the clock Remote Control only 13 CD or MP3 WMA disc Playback Listening to a CD or...

Page 4: ...not be held responsible for any dam age resulting from use of this unit with a voltage other than that which is specified Volume control The sound level at a given volume setting depends on speaker effi ciency location and various other factors It is advisable to avoid ex posure to high volume levels Do not turn the volume on to full at switch on and listen to music at moderate levels Use the unit...

Page 5: ...33 3 Remote Sensor 11 4 Disc or USB Stop Button 16 5 Disc or USB Play or Repeat Button 14 18 6 ON STAND BY Button 12 7 CD Button 14 8 Tuner Band Button 25 27 9 Video Auxiliary USB Button 22 10 USB Terminal 22 11 Headphone Socket 36 12 Volume Control 12 13 Disc Number Select Buttons 14 14 Disc Tray Open Close Button 14 ...

Page 6: ...2 18 Disc or USB Repeat Play Indicator 18 24 19 Disc or USB Pause Indicator 16 20 Disc or USB Play Indicator 15 23 Rear panel Reference page 1 Speaker Terminals 9 2 AC Power Lead 10 3 FM 75 Ohms Aerial Socket 9 4 AM Aerial Earth Terminal 9 5 AM Loop Aerial Terminal 9 6 Video Auxiliary Audio Signal Input Sockets 36 7 Cooling Fan 10 8 Subwoofer Pre output Socket 37 Speaker system RATED SPEAKER IMPED...

Page 7: ...lume Up and Down Buttons 12 14 Clear Dimmer Button 19 15 Disc Random Button 18 16 Disc Stop Button 16 17 USB Stop Button 22 18 Memory Button 13 19 19 Disc USB Pause Button 16 20 Disc Play and Repeat Button 14 21 USB Play and Repeat Button 22 22 Tuning Up Button 22 25 23 Disc Track Up or Fast Forward Tuner Preset Up Time Up Button 13 16 22 25 26 27 24 Disc Track Down or Fast Reverse Tuner Preset Do...

Page 8: ...LEFT VIDEO AUX IN SPEAKERS LEFT ANTENNA FM 75 OHMS AM GND SUBWOOFER PRE OUT Left speaker Right speaker Wall socket AC 230 240V 50 Hz Speaker connection see page 9 AM loop aerial FM aerial Make sure to unplug the AC power lead before any connections Aerial connection see page 9 AC power connection see page 10 ...

Page 9: ...ng Attaching to the wall Wall Screws not supplied RATED SPEAKER IMPEDANCE 6 OHMS MIN AC INPUT RIGHT RIGHT LEFT VIDEO AUX IN SPEAKERS LEFT ANTENNA FM 75 OHMS AM GND SUBWOOFER PRE OUT ANTENNA FM AM GND 75 OHMS Use speakers with an impedance of 6 ohms or more as lower impedance speakers can damage the unit Do not mistake the right and the left channels The right speaker is the one on the right side w...

Page 10: ...acles as this will block proper ventilation RATED SPEAKER IMPEDANCE 6 OHMS MIN AC INPUT RIGHT RIGHT LEFT VIDEO AUX IN SPEAKERS LEFT ANTENNA FM 75 OHMS AM GND SUBWOOFER PRE OUT Wall socket AC 230 240V 50 Hz RATED SPEAKER IMPEDANCE 6 OHMS MIN AC INPUT RIGHT RIGHT LEFT VIDEO AUX IN SPEAKERS LEFT ANTENNA FM 75 OHMS AM GND SUBWOOFER PRE OUT The first time the unit is plugged in the unit will enter the ...

Page 11: ...smitter on the remote control and the sensor on the unit with a soft cloth Exposing the sensor on the unit to strong light may interfere with operation Change the lighting or the direction of the unit if this occurs Keep the remote control away from moisture heat shock and vibrations Test of the remote control Check the remote control after checking all the connections see pages 8 10 Point the rem...

Page 12: ...ti clockwise the volume will decrease Remote control operation Press the VOLUME or button to increase or decrease the volume Bass control When the power is first turned on the unit will enter the extra bass mode which emphasises the bass frequencies and X BASS will appear To cancel the extra bass mode press the X BASS DEMO button on the remote control Equaliser When the EQUALIZER MODE button on th...

Page 13: ...splay will be skipped To change the 24 hour or 12 hour display 1 Press the ON STAND BY button to turn the power on 2 Press the CLOCK TIMER button 3 Within 10 seconds press the or button to select CLOCK and press the MEMORY button 4 Press the or button to select 24 hour or 12 hour display and then press the MEMORY button 0 00 The 24 hour display will appear 0 00 23 59 AM 12 00 The 12 hour display w...

Page 14: ...itrate which is supported by MP3 is 32 320 kbps WMA WMA files are Advanced System Format files that include audio files which are compressed with Windows Media Audio codec WMA is developed by Microsoft as an audio format file for Windows Media Player MP3 and WMA indicator will light up after the unit reads information on an MP3 or WMA disc Bitrate which is supported by WMA is 64 160 kbps Auto powe...

Page 15: ...y is stopped with force ER CD20 will appear on the display for 3 seconds and the unit will not function If this occurs press the ON STAND BY button to enter the power stand by mode and then turn the power on again If TV or radio interference occurs during CD operation move the unit away from the TV or radio If a disc is damaged dirty or loaded upside down the disc will be skipped 1 Press the ON ST...

Page 16: ...on in the stop mode press the button to start the desired track Fast for ward Fast reverse Press and hold down in the playback mode Release the button to resume playback Track up track down is possible only within individual discs Fast forward fast reverse is possible only within individual discs When the end of the last track is reached during fast forward END will appear on the display and CD op...

Page 17: ...t possible To stop playback Press the CD button Use the direct search buttons on the remote control to select the desired track whilst playing the selected disc Selected track number The direct search buttons allow you to select up to number 9 When selecting number 10 or higher use the 10 button A For example to choose 13 1 Press the 10 button once 2 Press the 1 button 3 Press the 3 button B For e...

Page 18: ...eration On the other hand the button does not allow you to move to the previous track The beginning of the track being played will be located In random play the unit will select and play tracks automatically You cannot select the order of the tracks Caution After performing repeat or random play be sure to press the CD button Otherwise the disc s will play continuously To repeat one disc Press the...

Page 19: ...r the stand by mode or change the function from CD to another the programmed selections will not be cleared During the programme operation random play is not possible 1 Whilst in the stop mode press the MEMORY button on the remote control to enter the programming save mode 2 Press one of the 1 5 buttons to select the desired disc Selected disc number 3 Press the direct search buttons on the remote...

Page 20: ... unit will playback the files not according to our expected playback order Folder mode on off can be operated by the FOLDER button on the remote control Files that are played when folder mode is set to the on position may differ from those played back when folder mode is turned off Folder Mode Off case All the files starting from the selected folder or file will be played back If file 3 inside Fol...

Page 21: ...ceed to step 5 Total number of files TOTAL indicator MP3 indicator Disc Name WMA indicator Disc 1 Blinking Total files in Folder 3 FOLDER indicator FOLDER number 4 Select desired file to be played back by pressing the or button Folder mode off 5 Press the CD button Playback will start and file name will be displayed Title Artist Album name is displayed if it is recorded on the disc Display content...

Page 22: ...n will be displayed In case folder is selected proceed to step 2 In case file is selected proceed to step 4 2 Press the FOLDER button and press the TUNING or button to select desired playback folder Folder mode on To start playback with folder mode on go to step 5 To change the playback folder press the TUNING or button to select another folder 3 Select desired file to be played back by pressing t...

Page 23: ...ack file is selected The USB terminal in this unit is not intended for a PC connection but is used for music streaming with a USB memory device In case the data inside the USB memory is large it may take a longer time for data to be read 4 Select desired file to be played back by pressing the or button Folder mode off 5 Press the USB button Playback will start and the file name will be displayed T...

Page 24: ... are not supported Programme playback for USB memory is not available Playback order for MP3 files may differ sometimes depending on the writing software used during file download Bitrate which is supported by MP3 is 32 320 kbps WMA is 64 160 kbps For MP3 WMA files please put MP3 WMA extension Files cannot be played back if there is no MP3 WMA extension Playlists are not supported on this unit Thi...

Page 25: ... indicator will light up Finally the station name will appear Full auto tuning can be achieved for RDS stations ASPM see page 28 To receive an FM stereo transmission Press the TUNER BAND button to display the ST indicator will appear when an FM broadcast is in stereo If the FM reception is weak press the TUNER BAND button to extinguish the ST indicator The reception changes to monaural and the sou...

Page 26: ... in order starting with preset channel 1 4 Within 30 seconds press the MEMORY button to store that station in memory If the MEMORY and preset number indicators disappear before the station is memorised repeat the operation from step 2 5 Repeat steps 1 4 to set other stations or to change a preset station When a new station is stored in memory the station previously memorised for that preset channe...

Page 27: ... the received broadcast carries traffic information and TA Traffic Announcement will appear whilst a traffic information is on air PTYI Dynamic PTY Indicator will appear whilst the Dynamic PTY station is received You can control the RDS by using the buttons on the remote control only Information provided by RDS Each time the RDS DISPLAY button is pressed the display will switch as follows When you...

Page 28: ...ion name again if the wrong name was stored in memory It may be impossible to store station names in memory using the ASPM function if there is lots of noise or if the signal is too weak In this case perform as follows 1 Press the TUNER BAND button to select the FM band 2 Press and hold down the RDS ASPM button on the remote control for at least 3 seconds 1 After ASPM has flashed for about 4 secon...

Page 29: ...you tune in to an RDS station which is not broadcasting any radio text NO RT will be displayed when you switch to the radio text position Whilst radio text data is received or when the text contents change RT will be displayed To recall stations in memory To specify programmed types and select stations PTY search You can search a station by specifying the programme type news sports traffic program...

Page 30: ... Press the PRESET or button on the remote control to select a desired station 3 The station name will be displayed for 6 seconds Then the display will change NEWS Short accounts of facts events and publicly expressed views reportage and actuality AFFAIRS Topical programme expanding or enlarging upon the news generally in different presentation style or concept including debate or analysis INFO Pro...

Page 31: ... and opportunities Not for use for announcements about problems delays or roadworks affecting immediate travel where TP TA should be used LEISURE Programmes concerned with recreational activities in which the listener might participate Examples include Gardening Fishing Antique collecting Cooking Food Wine etc JAZZ Polyphonic syncopated music characterised by improvisation COUNTRY Songs which orig...

Page 32: ... of timer ONCE TIMER and DAILY TIMER Once timer Once timer play works for one time only at a preset time Daily timer Daily timer play works at the same preset time every day For example set the timer as a wake up call every morning 1 Set the daily timer pages 32 34 2 Set the once timer pages 32 34 Start Daily timer Once timer 1 minute or more Stop Start Stop 1 Check that the clock is set to the co...

Page 33: ...to finish as in steps 5 and 6 above 8 Switch input with the or button and then press the MEMORY button To select the timer playback source CD or TUNER When you select the tuner select a station by pressing the or button and then press the MEMORY button If a station has not been programmed NO PRESET will be displayed and timer setting will be cancelled 9 Adjust the volume using the VOLUME control a...

Page 34: ... sockets select USB or AUX in step 8 This unit will turn on or enter the power stand by mode automatically however the connected unit to AUX IN sockets will not turn on or off 1 Press the CLOCK TIMER button 2 Within 10 seconds press the or button to select ONCE or DAILY and press the MEMORY button 3 Within 10 seconds press the or button to select ONCE CALL or DAILY CALL and press the MEMORY button...

Page 35: ... 1 minute 1 minute intervals 5 Press the MEMORY button SLEEP will appear 6 The unit will enter the power stand by mode automatically after the preset time has elapsed The volume will be turned down 1 minute before the sleep op eration finishes 1 Whilst SLEEP is indicated press the CLOCK TIMER button 2 Within 10 seconds press the or button to select SLEEP X XX X XX is sleep remaining time The remai...

Page 36: ...adphones Before plugging in or unplugging the headphones reduce the volume Be sure your headphones have a 3 5 mm 1 8 diameter plug and impedance between 16 and 50 ohms The recommended impedance is 32 ohms Plugging in the headphones disconnects the speakers automatically Adjust the volume using the VOLUME control RATED SPEAKER IMPEDANCE 6 OHMS MIN AC INPUT RIGHT RIGHT LEFT VIDEO AUX IN SPEAKERS LEF...

Page 37: ...FM 75 OHMS AM GND SUBWOOFER PRE OUT Subwoofer with a built in amplifier SUBWOOFER PRE OUT Symptom Possible cause The clock is not set to the correct time Did a power failure occur Reset the clock When a button is pressed the unit does not respond Set the unit to the power stand by mode and then turn it back on If the unit still malfunctions reset it No sound is heard Is the volume level set to 0 A...

Page 38: ...rn the power on again 2 If the unit is not restored in the previous operation unplug and plug in the unit and then turn the power on Note If neither operation above restores the unit clear all the memory by resetting it Clearing all the memory reset 1 Press the ON STAND BY button to enter the power stand by mode 2 Whilst pressing down the 1 button and the 5 button press the ON STAND BY button unti...

Page 39: ...sc particularly the non label side from which signals are read Do not mark this surface Keep your discs away from direct sunlight heat and excessive moisture Always hold the CDs by the edges Fingerprints dirt or water on the CDs can cause noise or mistracking If a CD is dirty or does not play properly clean it with a soft dry cloth wiping straight out from the centre along the radius Maintenance C...

Page 40: ... W 91 W 10 T H D RMS 100 W 50 W 50 W 10 T H D RMS 76 W 38 W 38 W 0 9 T H D Output terminals Speakers 6 ohms Headphones 16 50 ohms recommended 32 ohms Subwoofer pre out audio signal 200 mV 10 k ohms at 70 Hz Input terminals Video Auxiliary audio signal 500 mV 47 k ohms Class Mass storage class Support File MP3 WMA do not support DRM file Format support FAT 16 or FAT 32 Bitrate support MP3 32 320 kb...

Page 41: ...MEMO MEMO 11 16 05 4 41 PM 1 ...

Page 42: ...MEMO MEMO 11 16 05 4 41 PM 3 ...

Page 43: ...USTRALIA PTY LTD LOCAL CALL COST APPLY WITHIN AUSTRALIA FOR LOCATION ENQUIRIES WITHIN NEW ZEALAND REGARDING YOUR LOCAL SHARP CORPORATION OF NEW ZEALAND LIMITED VISIT OUR WEBSITE AT SHARP CUSTOMER SERVICES TELEPHONE 09 573 0111 FACSIMILE 09 573 0113 SHARP APPROVED SERVICE CENTRE www sharp net nz CONTACT YOUR SELLING DEALER RETAILER OR CALL SPform019 JUNE 2004 XL UH220HA Back 1 4 06 7 43 PM 1 ...

Page 44: ... in no way limits varies or excludes any express and implied rights and remedies under any relevant legislation in the country of sale For your reference please enter the particulars of your purchase below and retain with your purchase documentation Model No Serial No Date of Purchase Retailer IMPORTANT NOTICE This warranty applies only to products sold in Australia New Zealand SHARP CORPORATION O...

Reviews: