CD-SW440N
–2
CHAPTER 1
.
GENERAL DESCRIPTION
All check must be repeated with the AC line cord plug
connection reversed.
Any reading of 0.3 volt RMS (this corresponds to 0.2
milliamp. AC.) Or more is excessive and indicates a
potential shock hazard which must be corrected before
returning the audio product to the owner.
[2]
Important Service Notes (for
U.S.A only)
BEFORE RETURNING THE AUDIO PRODUCT
(Fire & Shock Hazard)
[1] Important Service Safety Precaution
CAUTION : “These servicing instructions are for use by qualified service personnel only. To reduce
the risk of electric shock do not perform any servicing other than that contained in the operating
instructions unless you are qualified to do so”.
WARNING
1. For continued safety, no modification of any circuit should be attempted.
2. Disconnect AC power before servicing.
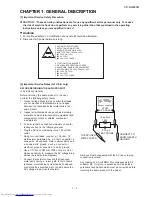
TO EXPOSED
METAL PARTS
CONNECT TO
KNOWN EARTH
GROUND
0.15 µ F
TEST PROBE
1.5k ohms
10W
VTVM
AC SCALE
CAUTION: FOR CONTINUED
PROTECTION AGAINST FIRE
HAZARD, REPLACE ONLY WITH
SAME TYPE F801, F802 6A, 125V/
F803, F804 2A, 125V/
F805 5A, 125V/
F808 1.6A, 125V FUSES.
ATTENTION: POUR ASSURER
UNE LONGUE PROTECTION CONTRE
UN INCENDIE, REMPLACER SEULEMENT
PAR UN FUSIBLE DE F801, F802 6A, 125V/
F803, F804 2A, 125V/
F805 5A, 125V/
F808 1.6A, 125V FUSES.
Before returning the audio product to the user,
perform the following safety checks.
1. Inspect all lead dress to make certain that leads
are not pinched or that hardware is not lodged
between
the chassis and other metal parts in the
audio
product.
2. Inspect all protective devices such as insulating
materials, cabinet, terminal board, adjustment and
compartment covers or shields, mechanical
insulators
etc.
3. To be sure that no shock hazard exists, check for
leakage current in the following manner.
* Plug the AC line cord directly into a 120 volt AC
outlet.
* Using two clip leads, connect a 1.5k ohm, 10
watt resistor paralleled by a 0.15µF capacitor in
series with all exposed metal cabinet parts and
a known earth ground, such as conduit or
electrical ground connected to earth ground.
* Use a VTVM or VOM with 1000 ohm per volt, or
higher, sensitivity to measure the AC voltage drop
across the resistor (See diagram).
* Connect the resistor connection to all exposed
metal parts having a return path to the chassis
(antenna, metal cabinet, screw heads, knobs and
control shafts, escutcheon, etc.) and measure the
AC voltage drop across the resistor.
1 – 1
Summary of Contents for CD-SW440N
Page 19: ...CD SW440N 6 3 Figure 6 2 MAIN SCHEMATIC DIAGRAM 2 6 7 8 9 10 11 12 ...
Page 22: ...CD SW440N 6 6 Figure 6 5 MAIN SCHEMATIC DIAGRAM 5 6 TO SERVO PWB 7 8 9 10 11 12 ...
Page 23: ...CD SW440N 6 7 Figure 6 6 MAIN SCHEMATIC DIAGRAM 6 6 L CH R CH 13 14 15 16 17 18 ...
Page 27: ...CD SW440N 6 11 Figure 6 10 DISPLAY TAPE SCHEMATIC DIAGRAM 2 2 7 8 9 10 11 12 ...
Page 29: ...CD SW440N 6 13 Figure 6 12 DISPLAY TAPE SCHEMATIC DIAGRAM 2 2 7 8 9 10 11 12 ...
Page 37: ...CD SW440N 6 21 Figure 6 20 iPod SCHEMATIC DIAGRAM 2 2 7 8 9 10 11 12 ...
Page 43: ...CD SW440N 6 27 Figure 6 26 WIRING SIDE OF MAIN PWB BOTTOM VIEW 2 2 JP24 7 8 9 10 11 12 ...
Page 45: ...CD SW440N 6 29 MEMO ...
Page 49: ...CD SW440N 6 33 Figure 6 31 WIRING SIDE OF DISPLAY TAPE PWB BOTTOM VIEW 2 2 7 8 9 10 11 12 ...


