background image

 14

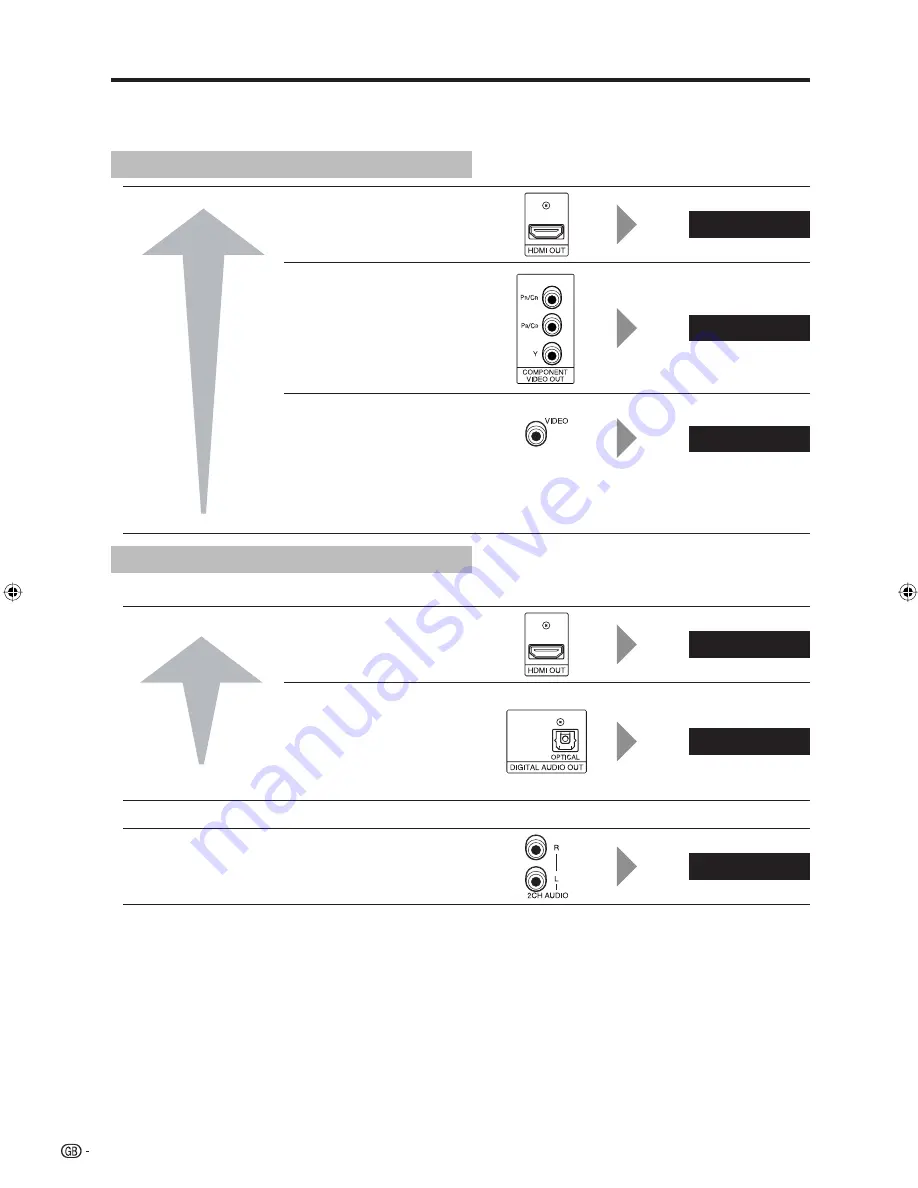
Introduction to Connections

This Player is equipped with the terminals/jacks listed below. Find the corresponding terminal/jack on your video 
equipment. Using the supplied cable or commercially available cables, connect the video first. Then connect the 
audio.

Video terminals/jacks on this Player

Higher Quality

Standard Quality 

HDMI OUT terminal

1

Page 15

COMPONENT VIDEO OUT 
jacks

2

Page 16

VIDEO output jack

3

Page 17

Audio terminals/jacks on this Player

Digital audio connection

Higher Quality

Standard Quality

HDMI OUT terminal

1

Page 15

DIGITAL AUDIO OUT OPTICAL 
terminal

2

Page 18

Analogue audio connection

Standard Quality

2CH AUDIO output jacks

Page 19

Connection

BD-HP21X_en.indd   14

BD-HP21X_en.indd   14

2008/09/17   13:04:58

2008/09/17   13:04:58

Summary of Contents for BD-HP21X

Page 1: ...BLU RAY DISC PLAYER OPERATION MANUAL MODEL BD HP21X ...

Page 2: ......

Page 3: ...tinued safety do not remove any cover or attempt to gain access to the inside of the product Refer all servicing to qualified personnel Note This Player can be used only where the power supply is AC 100 240V 50 60Hz It cannot be used elsewhere CAUTION USE OF CONTROLS OR ADJUSTMENTS OR PERFORMANCE OF PROCEDURES OTHER THAN THOSE SPECIFIED HEREIN MAY RESULT IN HAZARDOUS RADIATION EXPOSURE AS THE LASE...

Page 4: ... 24 BD DVD Video Playback 24 BD DVD Menus 24 BONUSVIEW Use of Picture in Picture function secondary audio video playback 25 Virtual Package 25 DVD R RW Playback 26 Audio CD Playback 27 n o p Playback Functions 28 30 Fast Forward Reverse Search 28 Skipping to the Next or the Start of the Current Chapter Track 28 Pause Frame Advance Playback 28 Slow Playback 28 Repeat Playback of a Title or Chapter ...

Page 5: ...ct it to the TV using HDMI and no other cable will be needed to enjoy movies If your TV is compatible with AQUOS LINK you can control both the TV and this Player with simple operations Introduction to Connections p 14 Video Connections p 15 n o p q r Introduction pp 1 13 Explains the important operation information n Connection pp 14 19 Shows the connecting options provided by this Player o Disc P...

Page 6: ...er source indicated on the marking label If you are not sure of the type of power supply to your home consult your product dealer or local power company For products intended to operate from battery power or other sources refer to the operating instructions Overloading Do not overload wall outlets extension cords or integral convenience receptacles as this can result in a risk of fire or electric ...

Page 7: ...n the life of the product Do not place the product on a bed sofa rug or other similar surface since they can block ventilation openings This product is not designed for built in installation do not place the product in an enclosed place such as a bookcase or rack unless proper ventilation is provided or the manufacturer s instructions are followed Heat The product should be situated away from heat...

Page 8: ...place the AC cord under the product or other heavy items Turn off the main power and unplug the AC cord from the wall outlet before handling To clean the outer cabinet periodically wipe it with a soft cloth Do not use chemicals for cleaning It may damage the cabinet finish ...

Page 9: ...gs If a menu screen or operating instructions are displayed during playback of a disc follow the operating procedure displayed The audio component of a DVD video recorded at 96 kHz Linear PCM will be output as 48 kHz audio during playback NOTE Playback for some of the discs in the left side column tables may not be possible depending on the disc Finalise refers to a recorder processing a recorded ...

Page 10: ...olders number of files and volume of data involved EXIF information will not be displayed EXIF stands for Exchangeable Image File Format and is a standard for storing interchange information in image files especially those using JPEG compression Refer to http exif org for more information When using the unit to play a CD RW R disc with still images stored recorded With CD RW R discs on which still...

Page 11: ... front from the left side from the right side etc 5 Region code This indicates the region code playable region code The Icons Used in This Operation Manual BD VIDEO Indicates the functions that can be performed for BD Video discs BD RE Indicates the functions that can be performed for BD RE discs BD R Indicates the functions that can be performed for BD R discs DVD VIDEO Indicates the functions th...

Page 12: ... 5 974 380 5 978 762 6 487 535 other U S and worldwide patents issued pending DTS is a registered trademark and the DTS logos Symbol DTS HD and DTS HD Advanced Digital Out are trademarks of DTS Inc 1996 2007 DTS Inc All Rights Reserved is a trademark is a trademark of DVD Format Logo Licensing Corporation HDMI the HDMI logo and High Definition Multimedia Interface are trademarks or registered trad...

Page 13: ...t to connect Connection varies with the equipment used Refer to Connection Pages 14 19 Turn off the devices before connecting Step 3 Playing back discs Play back a Blu ray disc after connecting the Player to your favourite equipment Refer to Disc Playback Pages 20 33 Step 4 Adjust settings Adjust settings to enjoy various features and other functions for playing discs Refer to Settings Pages 34 38...

Page 14: ...IDEO OUT jacks p 16 VIDEO output jack p 17 2CH AUDIO output jacks p 19 HDMI OUT terminal p 15 BD STORAGE SERVICE terminal BD STORAGE pp 25 38 SERVICE for software p 37 DIGITAL AUDIO OUT OPTICAL terminal p 18 Cooling fan The cooling fan operates while the power to the Player is on AC IN terminal p 20 1 2 3 4 5 6 7 8 Main Unit Rear Main Unit Front Major Components 5 8 6 2 1 4 3 7 7 8 1 2 3 6 4 5 ...

Page 15: ...S REV p 28 H STOP p 24 POP UP MENU p 25 n RETURN p 28 HDMI p 15 SETUP pp 22 34 Keylock function You can set the keylock to prevent accidental operations This function allows TVs compatible with AQUOS LINK to also perform a Key Lock on the player Press and hold Lock for more than 5 seconds Each time you perform this operation the function is activated or deactivated If you try to operate the Player...

Page 16: ... Then connect the audio Video terminals jacks on this Player Higher Quality Standard Quality HDMI OUT terminal 1 Page 15 COMPONENT VIDEO OUT jacks 2 Page 16 VIDEO output jack 3 Page 17 Audio terminals jacks on this Player Digital audio connection Higher Quality Standard Quality HDMI OUT terminal 1 Page 15 DIGITAL AUDIO OUT OPTICAL terminal 2 Page 18 Analogue audio connection Standard Quality 2CH A...

Page 17: ...onnect the player to a TV with an HDMI cable HDMI VIDEO OUT is set to AUTO If you don t get a stable image select the desired resolution When you set HDMI VIDEO OUT to a setting other than AUTO you can only select resolutions that are compatible with the connected TV Refer to HDMI VIDEO OUT on page 35 regarding the resolutions of the HDMI video output CAUTION Even when there is no cable connected ...

Page 18: ... to LCD TV directly CAUTION You need to switch the output to Component video by pressing HDMI button to enjoy images via the Component video output See page 15 CAUTION HDMI output and Component Video output can not be used at the same time STEPS Be sure to turn off this Player and the equipment before making any connections Firmly connect a component video cable commercially available to the compo...

Page 19: ...is function However this is not a malfunction When you watch the programme where copyright is protected we recommend that the Blu ray disc player be connected to LCD TV directly STEPS Be sure to turn off this Player and the equipment before making any connections Firmly connect an AV cable supplied to the video jacks 1 and 2 1 2 AV cable supplied 1 2 Yellow Yellow TV Projector AV receiver VCR Blu ...

Page 20: ...s To OPTICAL terminal Optical digital cable commercially available 1 To optical input terminal 2 Amplifier When using OPTICAL output 5 1 ch Digital Output is available 7 1 ch Digital Output is not available STEPS Be sure to turn off this Player and the equipment before making any connections Firmly connect an optical digital cable commercially available to the optical digital audio terminals 1 and...

Page 21: ...udio equipment with audio jacks STEPS Be sure to turn off this Player and the equipment before making any connections Firmly connect the AV cable supplied to the audio jacks 1 and 2 1 2 To 2CH AUDIO output jacks To audio input jacks White AV cable supplied Amplifier 1 Red White Red TV 2 After connecting Load a disc and start playback Pages 24 27 ...

Page 22: ...urst Read the battery warnings and use the batteries properly Do not mix old and new batteries or mix different brands Remove the batteries if you will not use the remote control unit for an extended period of time 1 2 3 Connecting the Power Cord Plug the supplied AC cord into the AC IN terminal on the rear of the Player Then plug into AC outlet NOTE Place the Player close to the AC outlet and kee...

Page 23: ...the Player and remote control to one of the signals RC 1 RC 2 or RC 3 will let you operate only with this Player Make sure to set the Player and remote control to the same remote code You can not operate the Player if they are not set to the same code Setting the Remote Control Code of the Remote Example Setting the code to RC 3 Press and hold 3 first and then POWER on the remote control together ...

Page 24: ...ed on Standby BD DVD CD mode indicator Off No disc Blue on Playing back White on Disc stopped White blinks Loading a disc When you turn on the POWER the MENU screen automatically displays for a while Press EXIT to erase the display Language Setting Changing the on screen display language Press SETUP to display the SETUP MENU screen Press a b c d to select ON SCREEN LANGUAGE then press ENTER DISPLA...

Page 25: ...you can perform the function listed below See page 15 for connecting to the HDMI terminal Playback function turns on the LCD TV immediately When you start to playback of this player Power of LCD TV will be turned on and the playback image will appear on the screen Automatic input select function When you start playback of this player the input selector of the LCD TV will automatically switch to th...

Page 26: ...ending on the type of disc In this case open the disc tray or enter standby NOTE Resume playback may not function depending on the disc 1 2 3 4 1 2 BD DVD Menus This section explains how to play back a BD DVD video disc with a top menu disc menu or pop up menu The titles listed in the top menu and a disc guide for options like subtitles and audio languages are given in the disc menu Start playback...

Page 27: ... be removed depending on the content Also playable areas may be restricted Virtual Package BD VIDEO Some BD Video discs are compatible with a function where data is copied to local storage USB memory device etc and played back along with the primary video as secondary video secondary audio subtitles etc This function is called Virtual Package Virtual Package data is automatically copied to the loc...

Page 28: ... Press a b to select the title then press ENTER Playback of the selected title will begin You can playback by pressing d PLAY instead of pressing ENTER Press H STOP to stop playback NOTE Finalise refers to a recorder processing a recorded disc so that it will play in other DVD players recorders as well as this player Only finalised DVD discs will play back in this player This player does not have ...

Page 29: ...NEW FROM OLD TITLES The displayed titles are rearranged by selected sorting type 1 2 3 4 5 1 2 Playing back the title you stopped while being played Press D Blue while the TITLE LIST screen is displayed PLAYBACK FROM BEGINNING FROM CONTINUED 21 5 FRI 9 30 AM 110 MIN PROGRAM 1 Press c d to select the type of Playback then press ENTER Playback of the title will begin NOTE Finalise refers to a record...

Page 30: ...discs are not compatible with Pause Frame Advance Playback NOTE Frame Advance Reverse Playback can be performed for DVD discs by pressing L SKIP l or K SKIP k during Pause Slow Playback Slow Playback functions when T SKIP k or U SKIP l is pressed more than 2 seconds during pause Press d PLAY to return to normal playback NOTE This doesn t work for audio CDs Reverse Slow Playback cannot be performed...

Page 31: ... For Partial Repeat Playback set the start and end points within the same title Repeat Playback may be forbidden depending on the disc Partial Repeat Playback may not work in multi angle scenes If you press DISPLAY you can confirm the Repeat Playback status 1 2 3 4 Switching Audio You can change the audio output channel using AUDIO Each time AUDIO is pressed the audio channels 2 channels or multi ...

Page 32: ...unction Control Screen Page 32 The operations of subtitles angle and audio differ according to each disc You may need to refer to the operation manual of the disc The following operations will not work when playing back an audio CD Slow Playback Frame Advance Display of functions The display for subtitles angle or audio automatically disappears after 5 seconds Switching between functions You can s...

Page 33: ...T 1 2 1 2 3 JPEG File Playback Press T SKIP k or U SKIP l to replace one image with another The same operation can be performed by pressing c d or S REV V FWD Press n RETURN if you wish to return to the folder selection screen To stop the still image play at any time press H STOP Playing back Slide Show In Step 2 of the left side Playing back still images in a selected folder press d PLAY SLIDE SH...

Page 34: ...tion procedure Press FUNCTION during playback The Function Control screen is displayed on the TV BD VIDEO 2 ENGLISH 1 OFF 00 20 30 1 1 3 5 1ch RETURN SELECT ENTER 5 5 2 ENTER Press a b to select the desired setting then press ENTER For a description of each setting see Functions which can be set Page 33 BD VIDEO 2 ENGLISH 1 OFF 00 20 30 1 1 3 5 1ch RETURN SELECT ENTER 5 5 2 ENTER Press a b c d to ...

Page 35: ...ct the Hour Minute or Second then press a b or the Number buttons to set the time Press ENTER to start playback at the set time Shows the currently selected subtitle language If subtitles are provided in other languages you can switch to your preferred language Shows the currently selected angle number If the video is recorded with multiple angles you can switch the angle Shows the currently selec...

Page 36: ...TUP or EXIT to exit Basic Operation for PLAYBACK SETTING Example Setting PARENTAL CONTROL under PLAYBACK SETTING Press SETUP to display the SETUP MENU screen Press a b c d to select SETTINGS then press ENTER Press a b to select PLAYBACK SETTING then press ENTER When setting the PIN code for the first time Press c d to select YES to enter the PIN code setting menu then press ENTER Enter the 4 digit...

Page 37: ... output from the COMPONENT VIDEO OUT jacks and VIDEO output jack YES NO SECONDARY AUDIO This toggles the clicking sound on the menu and audio with secondary video in picture in picture mode for BD Video Select OFF when enjoying the high quality sounds of BD Video ON OFF HDMI AUTO DETECTION This function enables the video output to switch to HDMI automatically when the player detects a TV connected...

Page 38: ...n below The 4 digit PIN code number needs to be entered before the Parental Control Levels and the Country Code are set The Parental Control Levels and the Country Code cannot be set if a PIN code has not been created or the PIN code is not entered 8 and OFF All DVD video can be played 1 7 Prohibits play of DVD video with corresponding ratings recorded on them NO LIMIT All BD video can be played 0...

Page 39: ... Kannada KO Korean KS Kashmiri KU Kurdish KY Kirghiz LA Latin LN Lingala LO Laothian LT Lithuanian LV Latvian Lettish MG Malagasy MI Maori MK Macedonian ML Malayalam MN Mongolian MO Moldavian MR Marathi MS Malay MT Maltese MY Burmese NA Nauru NE Nepali NL Dutch NO Norwegian OC Occitan OM Afan Oromo OR Oriya PA Panjabi PL Polish PS Pashto Pushto PT Portuguese QU Quechua RM Rhaeto Romance RN Kirundi...

Page 40: ... b to select USB MEMORY MANAGEMENT then press ENTER AUDIO VIDEO SETTINGS QUICK START AUTO POWER OFF AQUOS LINK PLAYBACK SETTING FRONT DISPLAY LED VERSION USB MEMORY MANAGEMENT SOFTWARE UPDATE SYSTEM RESET NO USB MEMORY appears when no USB memory is inserted Press a b select ERASE or FORMAT then press ENTER ERASE Deletes only BD VIDEO data contents FORMAT Deletes all contents ERASE ERASES BD VIDEO ...

Page 41: ...layed back properly The audio may not be output or the images may not be played back properly for some discs in which copyright protected contents are recorded The following problems do not always suggest a defect or malfunction of this Player Refer to the problems and lists of possible solutions below before calling for service Screen freezes and operation buttons do not work Press H STOP then re...

Page 42: ...n again At this point it may take a few moments for the system processing to finish before the Player is ready for use During the system processing the BD DVD CD mode indicator on the front panel display of the Player will blink Once the system processing has finished the indicators will finish blinking and then light up normally You can operate the Player when the BD DVD CD mode indicator is lit ...

Page 43: ...ccurate sound field positioning and realistic acoustics By connecting a DTS Digital Surround decoder you can also listen to DTS Digital Surround sound DTS HD High Resolution Audio DTS HD High Resolution Audio is a new technology developed for the next generation high definition optical disc format DTS HD Master Audio DTS HD Master Audio is a lossless audio compression technology developed for the ...

Page 44: ...red to the Interlace format that alternately shows every other line of an image field to create one frame the Progressive format shows the entire image at once as a single frame This means that while the Interlace format can show 30 frames 60 fields in one second the Progressive format can show 60 frames in one second The overall picture quality increases and still images text and horizontal lines...

Page 45: ...Layer BDMV format BD R Dual Layer BDMV format DVD Video DVD RW R RW R Dual Layer Video VR format Audio CD CD DA CD RW R CD DA JPEG file format Input Output HDMI HDMI 19 pin standard connector 1080p 24Hz output HDMI V 1 3 with x v Colour Dolby TrueHD DTS HD Advanced Digital Out Component video output Output level Y 1 Vp p 75 ohms PB CB PR CR 0 7 Vp p 75 ohms Jacks RCA jack Video output Output level...

Page 46: ...44 Memo ...

Page 47: ......

Page 48: ...Printed in Malaysia TINSEA151WJQZ 08P09 MA NG ...

Reviews: