background image

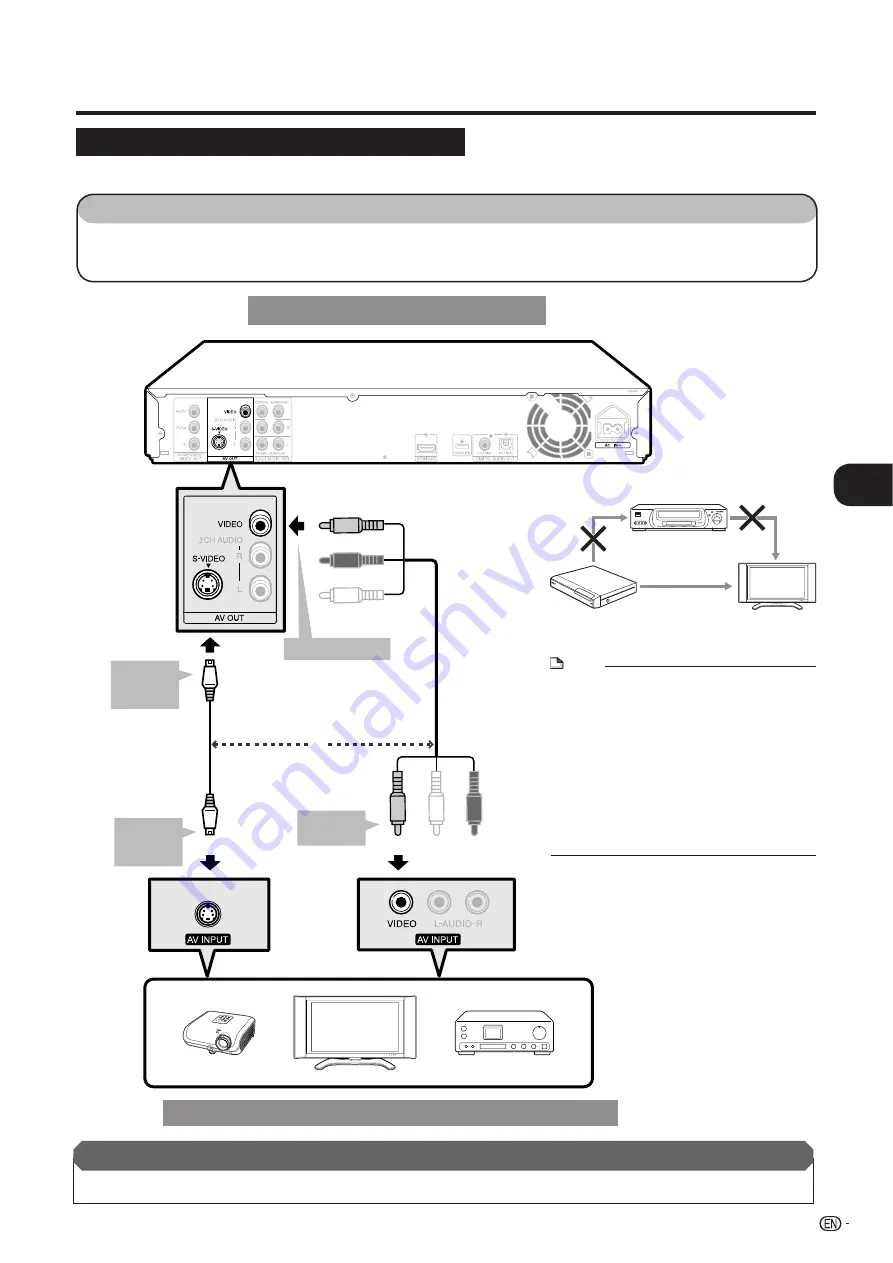
Connecting to the S-video or Video Jack

You will enjoy the images through the S-video or video jack.

S-VIDEO

STEPS

1: Be sure to turn off this Player and the equipment before making any connections.
2: Firmly connect an S-video cable (commercially available) or AV cable (supplied) to the S-video or video 

jacks (

1

 and 

2

, or 

3

 and 

4

).

To VIDEO jack

AV cable (supplied)

To 
S-VIDEO 
jack

To 
S-video 
input jack

S-video cable 
(commercially available)

or

TV

Projector

AV receiver

Video equipment with an S-video or video jack

This Player

1

3

2

4

After connecting

• Connect audio equipment or the audio terminals of the TV. (Pages 18-20)

(Yellow)

To video 
input jack

(Yellow)

VCR

Blu-ray Disc 

Player 

LCD TV

Connect directly

NOTE

•  Connect the Blu-ray disc player to LCD TV 

directly. If you playback the image via VCR, the 
image may deteriorate due to the copy guard 
function.

•  When you record the programme where 

copyright is protected, the copy guard function is 
activated automatically; the programme can not 
be recorded correctly. Also, the playback image 
via VCR may deteriorate due to this function. 
However, this is not a malfunction. When you 
watch the programme where copyright is 
protected, we recommend that the Blu-ray disc 
player be connected to LCD TV directly. 

 17

Connection

o

Video Connections

Summary of Contents for BD-HP20H

Page 1: ...alaysia TINSEA124WJQZ 07P09 MA NG MODEL BLU RAY DISC PLAYER If you require any advice or assistance regarding your Sharp product please visit our web site www sharp co uk customersupport Customers without Internet access may telephone 0845 880 0421 during office hours or 01 6760648 if telephoning from Ireland OPERATION MANUAL ...

Page 2: ... or its appointed Service Facility within one year from the date this product was purchased Proof of purchase must be provided 4 The guarantee does not cover carriage costs 5 In the unlikely event of this product requiring repair please contact the supplier from whom it was purchased Where this is not possible please contact the Sharp Customer Information Centre on the telephone number given below...

Page 3: ...RIC SHOCK AND ANNOYING INTERFERENCE USE THE RECOMMENDED ACCESSORIES ONLY Power Cord Protection To avoid any malfunctions of the Player and to protect against electric shock fire or personal injury please observe the following Hold the plug firmly when connecting or disconnecting the AC power cord Keep the AC power cord away from heating appliances Never put any heavy object on the AC power cord Do n...

Page 4: ... 28 Loading a Disc 25 BD DVD Video Playback 25 BD DVD Menus 26 BD R RE DVD R RW Playback 27 28 Audio CD Playback 28 Playback Functions 29 31 Fast Forward Reverse Search 29 Skipping to the Next or the Start of the Current Chapter Track 29 Slow Playback 29 Pause Frame Advance Playback 29 Skip Search 29 Replay 29 Repeat Playback of a Title or Chapter Repeat Playback 29 Enlarge the playback image Zoom...

Page 5: ...D DVD CD Playback p 25 Enjoying different kinds of discs and contents Use this Player to enjoy certain types of discs like DVDs and CDs and to enjoy many kind of multimedia contents About Discs pp 7 8 BD DVD CD Playback p 25 Simple connection and operation through HDMI This Player is equipped with an HDMI terminal You can connect it to the TV using HDMI and no other cable will be needed to enjoy m...

Page 6: ... operated only from the type of power source indicated on the marking label If you are not sure of the type of power supply to your home consult your product dealer or local power company For products intended to operate from battery power or other sources refer to the operating instructions 16 Overloading Do not overload wall outlets extension cords or integral convenience receptacles as this can...

Page 7: ...ace the product on a bed sofa rug or other similar surface since they can block ventilation openings This product is not designed for built in installation do not place the product in an enclosed place such as a bookcase or rack unless proper ventilation is provided or the manufacturer s instructions are followed Heat The product should be situated away from heat sources such as radiators heat reg...

Page 8: ... on the environment and human health which could otherwise arise due to inappropriate waste handling 2 In other Countries outside the EU If you wish to discard this product please contact your local authorities and ask for the correct method of disposal For Switzerland Used electrical or electronic equipment can be returned free of charge to the dealer even if you don t purchase a new product Furt...

Page 9: ... Back CDG Video CD Photo CD CD ROM CD TEXT SVCD SACD PD CDV CVD DVD RAM DVD Audio BD RE Ver 1 0 BD RE DL CD MP3 CD WMA DIVX Disc Type Recording Format Contents Disc Size BD video Region code B ALL Audio Video Movie 12 cm 5 BD RE BD R Finalised disc only DVD Video Region code 2 ALL Video VR mode Audio Video Movie 12 cm 5 8 cm 3 DVD RW DVD R DVD R DL DVD RW DVD R Video mode finalised disc only Audio ...

Page 10: ...t displaying 2 or ALL for the region code discs sold outside the authorized marketing area 3 Discs produced illegally Discs recorded for commercial use 3 The region code for this product is 2 The following BD RE R DVD RW R and DVD RW R discs cannot be played Discs on which data has not been recorded cannot be played back The following Audio CD discs cannot be played Discs containing a signal for t...

Page 11: ...By connecting a DTS Digital Surround decoder you can also listen to DTS Digital Surround sound Linear PCM Linear PCM is a signal recording format used for Audio CDs and on some DVD and Blu ray discs The sound on Audio CDs is recorded at 44 1 kHz with 16 bits Sound is recorded between 48 kHz with 16 bits and 96 kHz with 24 bits on DVD video discs and between 48 kHz with 16 bits and 192 kHz with 24 ...

Page 12: ...pick up lens or disc in the following conditions Immediately after a heater has been turned on In a steamy or very humid room When the Player is suddenly moved from a cold environment to a warm one When condensation forms It becomes difficult for the Player to read the signals on the disc and prevents the Player from operating properly To remove condensation Take out the disc and leave the Player w...

Page 13: ...nnecting Step 3 Playing back discs Play back a Blu ray disc after connecting the Player to your favourite equipment Refer to Disc Playback Pages 21 33 Step 4 Adjust settings Adjust settings to enjoy various features and other functions for playing discs Refer to Settings Pages 34 46 Remote control unit AAA size battery g2 AC cord AV cable 11 Introduction n BD HP20H_en_a indd 11 BD HP20H_en_a indd ...

Page 14: ... 7 11 2 3 9 10 1 COMPONENT VIDEO OUT jacks p 16 2 S VIDEO output jack p 17 3 VIDEO output jack p 17 4 2CH AUDIO output jacks p 20 5 5 1CH AUDIO OUT jacks p 18 6 HDMI OUT terminal p 15 7 DIGITAL AUDIO OUT COAXIAL jack p 19 8 DIGITAL AUDIO OUT OPTICAL terminal p 19 9 Cooling fan The cooling fan operates while the power to the Player is on 10 AC IN terminal p 21 11 SERVICE terminal for software p 46 ...

Page 15: ...p 34 30 Number buttons p 33 31 ENTER p 33 This button is the same operation as 5 ENTER 32 CLEAR p 33 To clear the input number 33 Non functional buttons These buttons on the remote control are non functional They have no operation at all 31 32 33 30 Buttons under the cover Keylock function You can set the keylock to prevent accidental operations This function allows TVs compatible with AQUOS LINK ...

Page 16: ...connect the audio Video terminals jacks on this Player VIDEO output jack 4 S VIDEO output jack 3 COMPONENT VIDEO OUT jacks 2 HDMI OUT terminal 1 Higher Quality Audio terminals jacks on this Player 2CH AUDIO output jacks 2 DIGITAL AUDIO OUT terminal or jack 2 HDMI OUT terminal 1 Higher Quality Page 15 Page 20 Page 19 Standard Quality Standard Quality Higher Quality Standard Quality 5 1CH AUDIO OUT ...

Page 17: ...t automatically The following setting is unnecessary When you connect to the TV with an HDMI cable only HDMI video output is set to AUTO If you don t get the normal image select the desired resolution When you are setting HDMI video output besides AUTO you can only select the resolution that corresponds to the connected TV Caution HDMI output and Component Video output can not be used at the same ...

Page 18: ...disc player to LCD TV directly If you playback the image via VCR the image may deteriorate due to the copy guard function When you record the programme where copyright is protected the copy guard function is activated automatically the programme can not be recorded correctly Also the playback image via VCR may deteriorate due to this function However this is not a malfunction When you watch the pr...

Page 19: ...connecting Connect audio equipment or the audio terminals of the TV Pages 18 20 Yellow To video input jack Yellow VCR Blu ray Disc Player LCD TV Connect directly NOTE Connect the Blu ray disc player to LCD TV directly If you playback the image via VCR the image may deteriorate due to the copy guard function When you record the programme where copyright is protected the copy guard function is activ...

Page 20: ...o SUBWOOFER jack To SURROUND L R jack This Player After connecting Set the size distance and level of each speaker Pages 39 41 Load a disc and start playback Pages 25 28 NOTE You can also connect 2 ch stereo speakers through an amplifier In this case set the jacks without any speakers connected to NONE Pages 39 41 To CENTER jack To FRONT L R jack Audio cables commercially available Amplifier 18 Audi...

Page 21: ...commercially available to the coaxial digital audio jacks 1 and 2 or 3 and 4 This Player To COAXIAL jack To OPTICAL terminal or Optical digital cable commercially available Coaxial digital cable commercially available To coaxial input jack To optical input terminal Amplifier Audio equipment with a digital audio input terminal or jack 3 1 4 2 After connecting Load a disc and start playback Pages 25 ...

Page 22: ...and the equipment before making any connections 2 Firmly connect the AV cable supplied to the audio jacks 1 and 2 This Player White AV cable supplied Amplifier Audio equipment with audio jacks 1 To 2CH AUDIO output jacks Red White Red After connecting Load a disc and start playback Pages 25 28 TV 2 To audio input jacks 20 Audio Connections ...

Page 23: ...ngs and use the batteries properly Do not mix old and new batteries or mix different brands Remove the batteries if you will not use the remote control unit for an extended period of time Remote control sensor Remote control unit Approximate operating range of remote control 30º 30º 7 m Connecting the Power Cord Plug the supplied AC cord into the AC IN terminal on the rear of the Player Then plug ...

Page 24: ...gether for more than 5 seconds Press B to turn off the player 1 2 Setting the Remote Control Code of the Player Point the remote control at the player then press and hold the DISPLAY button 3 TV function control TV Power B TV Channel up down P r s TV Volume up down i e f TV AV Selector b Operating the TV of SHARP Using the Remote Control The Universal Remote Control may operate the basic functions...

Page 25: ...NO Before Starting Playback a STANDBY indicator Red blinks Preparing for standby Red on Standby BD and DVD CD mode indicators Off No disc Blue on Playing back White on Disc stopped White blinks Loading a disc Indicators on the Player I ON indicator If you press B again immediately after entering standby the Player may not turn on If this happens wait for 10 seconds or more and then turn on the pow...

Page 26: ...ng an HDMI cable you can perform the function listed below See page 15 for connecting to the HDMI terminal Playback function turns on the LCD TV immediately When you start to playback of this player Power of LCD TV will be turned on and the playback image will appear on the screen Automatic input select function When you start playback of this player the input selector of the LCD TV will automatic...

Page 27: ...e the disc tray 3 4 OPEN CLOSE B POWER Load a disc Playback may begin automatically depending on the disc Press dPLAY Playback begins from the first title The menu may be displayed first depending on the disc Perform playback operation by following the directions on the screen To stop playback Press H STOP Resume playback function If you press dPLAY next playback will resume from the point where the...

Page 28: ...ng the disc menu Example Select SUBTITLE LANGUAGE Press POP UP MENU The disc menu screen is displayed Press a b to select SUBTITLE LANGUAGE then press ENTER The screen for selecting the subtitle language is displayed 1 2 MENU 1 AUDIO LANGUAGE 3 AUDIO 2 SUBTITLE LANGUAGE SUBTITLE LANGUAGE 1 English 2 Español 3 Français Press a b c d to select the title then press ENTER The selected title is played ...

Page 29: ...TLE LIST DVD ORIGINAL SORTING B PLAYLIST C FUNCTIONS 21 5 FROM OLD FRI 9 30 AM 1 PROGRAM 1 21 5 FRI 110 MIN 2 PROGRAM 2 15 8 FRI 110 MIN 3 PROGRAM 3 3 7 MON 56 MIN 4 PROGRAM 4 18 9 THU 40 MIN 110 MIN PROGRAM 1 D Information of selected title Title Name Recording Date Recording Duration Caption for Colour Button Press a b to select the title then press ENTER Playback of the selected title will begi...

Page 30: ...110 MIN PROGRAM 1 D Sorting the titles Press B Green then press ENTER while The TITLE LIST screen is displayed Select the type of sorting by pressing a b then press ENTER 1 2 MENU TITLE LIST DVD ORIGINAL SORTING B PLAYLIST C FUNCTIONS 21 5 FRI 9 30 AM 110 MIN PROGRAM 1 FROM NEW FROM OLD TITLES D Playing back the title you stopped while being played Press D Blue while the TITLE LIST screen is displ...

Page 31: ...LAY is pressed during playback Repeat Playback of a Title or Chapter Repeat Playback Play back the title or chapter you want to repeat Press REPEAT Press c d to select the type of Repeat Playback PLAY BACK TITLE Repeats the title currently being played back PLAY BACK CHAP Repeats the chapter currently being played back SCENE SELECTION Repeats the specified scene of title or chapter 1 2 3 BD VIDEO B...

Page 32: ... digital output jack you cannot select the audio channel Set AUDIO OUT to PCM page 36 or if you want to change the audio channel listen via the analogue output jacks SET START POINT displays Press ENTER at the scene where you want SET END POINT displays Press ENTER at the scene where you want to set the end point You can press V FWD to fast forward to the scene where you want to set the end point ...

Page 33: ...dio CD Slow Playback Frame Advance Display of functions The display for subtitles angle or audio automatically disappears after 5 seconds Switching between functions You can switch the subtitles angle and audio at the Function Control screen Page 32 The operation for each function varies depending on the disc See the manual for the disc Fast Forward Reverse You cannot perform Fast Forward Fast Rev...

Page 34: ... 30 5 1ch 1 1 3 SELECT ENTER 5 5 2 ENTER 1 2 3 Press a b to select the desired setting then press ENTER For a description of each setting see Functions which can be set Page 33 2 BD VIDEO 2 ENGLISH 1 OFF 00 20 30 1 1 3 5 1ch RETURN SELECT ENTER 5 5 2 ENTER Press a b c d to set then press ENTER Operations vary depending on the setting Follow the operation instructions on the screen Press n RETURN o...

Page 35: ...to select the Hour Minute or Second then press a b or the Number buttons to set the time Press ENTER to start playback at the set time Playback Elapsed Time Direct Time Skip Shows the currently selected subtitle language If subtitles are provided in other languages you can switch to your preferred language Subtitle Language Shows the currently selected angle number If the video is recorded with mu...

Page 36: ...ART AUTO POWER OFF AQUOS LINK PLAYBACK SETTING FRONT DISPLAY LED VERSION SOFTWARE UPDATE SYSTEM RESET MENU AUDIO VIDEO SETTINGS Some TV are not fully compatible with the Blu ray disc player which may cause the image distortion In this case press COMPONENT RESET on the remote control for five seconds Component video out will be reset to 576 480i factory preset value Caution HDMI output and Component...

Page 37: ...connecting to SURROUND equipment 1 This sets the audio output connected to SURROUND equipment 5 1 ch AUDIO OUTPUT OPTICAL COAXIAL DIGITAL OUTPUT HDMI OUTPUT 2ch AUDIO OUTPUT TV ASPECT RATIO TV TYPE HDMI VIDEO OUT HDMI AUTO DETECTION COMPONENT VIDEO OUT AUDIO OUT DYNAMIC RANGE CONTROL MENU AUDIO VIDEO SETTINGS AUDIO OUT Selected item Description HDMI OUTPUT Select this when you connect using HDMI O...

Page 38: ...utput mode such as DOLBY DIGITAL DTS AUTO PCM SURROUND 2 This sets the audio output mode for DIGITAL AUDIO OUT COAXIAL jack OPTICAL terminal when selecting OPTICAL COAXIAL DIGITAL OUTPUT or 2ch AUDIO OUTPUT BITSTREM PCM STEREO BITSTREM DOLBY DIGITAL DTS PCM STEREO CONFIRM TVASPECT RATIO TVTYPE COMPONENTVIDEO OUT HDMIVIDEO OUT HDMIAUTO DETECTION AUDIO OUT DYNAMIC RANGE CONTROL MENU AUDIO VIDEO SETT...

Page 39: ...fore setting If you do not do so the speakers may emit a loud sound or excessive output may be applied to the speakers NORMAL SHIFT NORMAL SHIFT TV ASPECT RATIO TV TYPE COMPONENT VIDEO OUT HDMI VIDEO OUT HDMI AUTO DETECTION AUDIO OUT DYNAMIC RANGE CONTROL MENU AUDIO VIDEO SETTINGS DYNAMIC RANGE CONTROL SETTINGS NORMAL The same audio as the recorded audio is output so that the volume sounds the sam...

Page 40: ...ress ENTER Press c d to select the desired item then press ENTER 4 5 WIDE 16 9 4 3 NORMAL TV ASPECT RATIO TV TYPE HDMI VIDEO OUT HDMI AUTO DETECTION COMPONENT VIDEO OUT AUDIO OUT DYNAMIC RANGE CONTROL MENU AUDIO VIDEO SETTINGS TV ASPECT RATIO SETTINGS Press a b to select AUDIO VIDEO SETTINGS then press ENTER 3 Press c d to select the desired format then press ENTER 6 LETTER BOX PAN SCAN TVASPECT R...

Page 41: ...er for details of speaker setup Speaker setting cannot be performed with the disc in the disc tray Take out the disc from the player before setup Basic Operation for SPEAKER SETTINGS Press SETUP to display the SETUP MENU screen Press a b c d to select SETTINGS then press ENTER 1 2 DISPLAYS THE TITLE LIST SETTINGS ON SCREEN LANGUAGE Press a b to select SPEAKER SETTINGS then press ENTER 3 AUDIO VIDE...

Page 42: ...stance and level are set 7 NOTE The speakers L and R LS and RS move relative to one another The speakers L and R are automatically set to LARGE when the subwoofer SW is set to NO even after speakers L and or R are set to SMALL The images of speakers set to NONE disappear or are greyed out on the screen As for a subwoofer there are no settings for distance Press a b c d to select the speaker then p...

Page 43: ... the setup When the sound volume of each speaker is uneven reset the settings separately As for a subwoofer you can adjust LEVEL only Press ENTER while the TEST sound is present from the speaker that you want to reset the setting 10 Press c d to select the LEVEL then press a b to select the preferred setting then press ENTER 11 Repeat steps 9 and 10 until each speaker is reset 9 13 Press SETUP or ...

Page 44: ...y shut off if playback is stopped for about 10 minutes AUDIO VIDEO SETTINGS SPEAKER SETTINGS QUICK START AUTO POWER OFF AQUOS LINK PLAYBACK SETTING FRONT DISPLAY LED VERSION SOFTWARE UPDATE SYSTEM RESET MENU AUTO POWER OFF YES NO AQUOS LINK This lets you set the Player to receive the control signal from the AQUOS LINK remote control via the HDMI cable AUDIO VIDEO SETTINGS SPEAKER SETTINGS QUICK ST...

Page 45: ...ATE SYSTEM RESET MENU PLAYBACK SETTING SUBTITLE AUDIO MENU Refer to the Language Code List Page 44 ANGLE MARK DISPLAY This lets you turn the Angle Mark Display on or off when DVD video recorded with multiple angles is played back The Angle Mark is displayed in the lower right screen AUDIO VIDEO SETTINGS SPEAKER SETTINGS QUICK START AUTO POWER OFF AQUOS LINK PLAYBACK SETTING FRONT DISPLAY LED VERSI...

Page 46: ...n GN Guarani LO Laothian RU Russian TR Turkish BH Bihari GU Gujarati LT Lithuanian RW Kinyarwanda TS Tsonga BI Bislama HA Hausa LV Latvian Lettish SA Sanskrit TT Tatar BN Bengali Bangla HI Hindi MG Malagasy SD Sindhi TW Twi BO Tibetan HR Croatian MI Maori SG Sangho UK Ukrainian BR Breton HU Hungarian MK Macedonian SH Serbo Croatian UR Urdu CA Catalan HY Armenian ML Malayalam SI Singhalese UZ Uzbek...

Page 47: ...EN LANGUAGE When setting the password for the first time 1 Press c d to select YES to enter the password setting menu then press ENTER 2 Enter the 4 digit number 3 Press ENTER to move to the next setting screen Press a b to select PARENTAL CONTROL then press ENTER Enter your password You cannot move to the next setting screen until you can input the correct password 4 5 Press c d to select parental...

Page 48: ...ED ON OFF RESET NOT RESET MENU SYSTEM RESET Example Setting FRONT DISPLAY LED Press SETUP to display the SETUP MENU screen Press a b c d to select SETTINGS then press ENTER 1 2 AUDIO VIDEO SETTINGS SPEAKER SETTINGS QUICK START AUTO POWER OFF AQUOS LINK PLAYBACK SETTING FRONT DISPLAY LED VERSION SOFTWARE UPDATE SYSTEM RESET MENU FRONT DISPLAY LED Press c d to select the desired item then press ENTE...

Page 49: ...ll be automatically turned off after 10 continuous minutes of inactivity no playback The following problems do not always suggest a defect or malfunction of this Player Refer to the problems and lists of possible solutions below before calling for service Screen freezes and operation buttons do not work Press H STOP then restart playback Turn off the power and turn on the power again If the power ...

Page 50: ...e power is on the Player will turn off Turn the power on again At this point it may take a few moments for the system processing to finish before the Player is ready for use During the system processing the BD and DVD CD mode indicators on the front panel display of the Player will blink Once the system processing has finished the indicators will finish blinking and then light up normally You can ope...

Page 51: ...ayer Check the disc and load it correctly INCOMPATIBLE DISC If you load a disc which cannot be played with this Player i e a scratched disc or if you load a disc upside down this message will appear and the disc tray will automatically pop out Occurs if the loaded disc cannot be played because it is a non standard disc or scratched etc Occurs if the loaded disc cannot be played because it is a non...

Page 52: ...r bit DTS This is a digital sound system developed by DTS Inc for use in cinemas This system uses 6 audio channels and provides accurate sound field positioning and realistic acoustics By connecting a DTS Digital Surround decoder you can also listen to DTS Digital Surround sound DVD video pages 7 25 A disc format that contains up to eight hours of moving pictures on a disc the same diameter as a CD...

Page 53: ...ressive format Compared to the Interlace format that alternately shows every other line of an image field to create one frame the Progressive format shows the entire image at once as a single frame This means that while the Interlace format can show 30 frames 60 fields in one second the Progressive format can show 60 frames in one second The overall picture quality increases and still images text an...

Page 54: ...DVD RW R DVD RW R Audio CD CD DA CD RW R CD DA DVD R DL Playback HDMI HDMI 19 pin standard connector Component video output Output level Y 1 Vp p 75 ohms PB CB PR CR 0 7 Vp p 75 ohms Jacks RCA jack S Video output Y Output level 1 Vp p 75 ohms C Output level 0 3 Vp p 75 ohms Jack 4 pin mini DIN Video output Output level 1 Vp p 75 ohms Jack RCA pin jack 5 1 ch Audio output Output level 2 V rms Outpu...

Page 55: ... or its appointed Service Facility within one year from the date this product was purchased Proof of purchase must be provided 4 The guarantee does not cover carriage costs 5 In the unlikely event of this product requiring repair please contact the supplier from whom it was purchased Where this is not possible please contact the Sharp Customer Information Centre on the telephone number given below...

Page 56: ...alaysia TINSEA124WJQZ 07P09 MA NG MODEL BLU RAY DISC PLAYER If you require any advice or assistance regarding your Sharp product please visit our web site www sharp co uk customersupport Customers without Internet access may telephone 0845 880 0421 during office hours or 01 6760648 if telephoning from Ireland OPERATION MANUAL ...

Reviews: