background image

5

USING THE SADDLE STITCH FINISHER FUNCTIONS

Using the saddle stitch finisher functions in copy mode

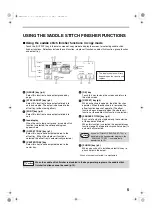
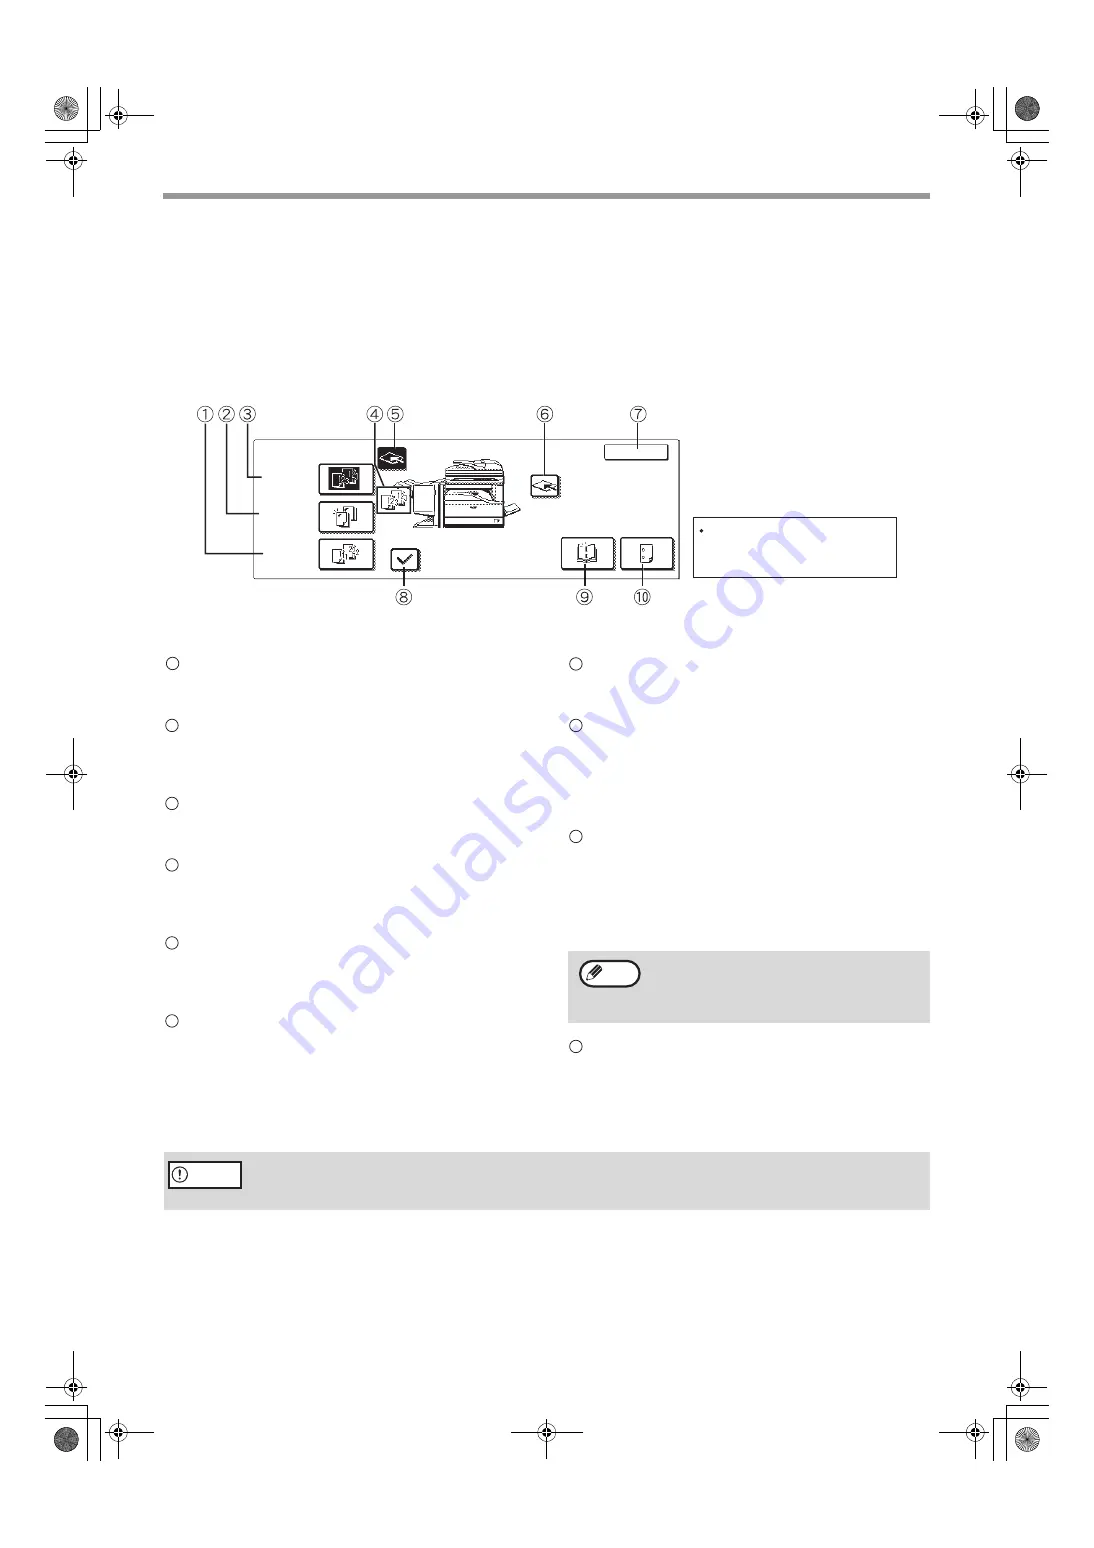
Touch the [OUTPUT] key in the main screen of copy mode to display the screen for selecting saddle stitch 
finisher functions. Selections include the sort function, staple sort function, saddle stitch function, group function, 
and output tray.

[GROUP] key (p.3)

Select this function to have output grouped by 
page.

[STAPLE SORT] key (p.3)

Select this function to have output collated into 
sets and stapled. The output is delivered to the 
offset tray (without being offset).

[SORT] key (p.3)

Select this function to have output collated into 
sets.

Icon display

When the sort, staple sort, group, or saddle stitch 
function is selected, the corresponding icon 
appears here.

[OFFSET TRAY] key (p.1)

Select this key to have output delivered to the 
offset tray. (When the staple sort function is 
selected, the offset tray is automatically selected.)

[CENTER TRAY] key

Select this key to have output delivered to the 
center tray.

[OK] key

Touch this key to close the screen and return to 
the main screen.

[OFFSET] key (p.3)

When a checkmark appears, the offset function 
operates. When the checkmark is removed, the 
offset function does not operate. (The offset 
function does not operate when the staple sort 
function or the saddle stitch function is selected.)

[SADDLE STITCH] key (p.3)

Each set of output is stapled along the centerline 
of the paper and folded.
When this function is selected, the pamphlet copy 
function (page 45 of operation manual for copier) is 
automatically selected.

[PUNCH] key (p.4)

When a punch unit is installed, select this key to 
punch holes in the output.

* When a function is selected, it is highlighted.

OK

STAPLE

SORT

OUTPUT

OFFSET

OFFSET

TRAY

CENTER
TRAY

SADDLE
STITCH

PUNCH

GROUP

SORT


The displayed menu will vary 
depending on the country and 
regions.

1

2

3

4

5

6

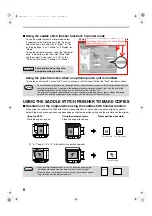
When "AUTOMATIC SADDLE STITCH" is 
disabled in the key operator programs, the 
"PAMPHLET COPY"  is automatically 
deselected (p.15).

7

8

9

Note

10

When the saddle stitch finisher is disabled in the key operator programs, the saddle stitch 
finisher functions cannot be used (p.15).

Caution

AR-F14.book  5 

ページ


2004年1月15日 木曜日 午後6時10分

Summary of Contents for AR-F14

Page 1: ...NS OF THE SADDLE STITCH FINISHER USING THE SADDLE STITCH FINISHER FUNCTIONS USING THE SADDLE STITCH FINISHER TO MAKE COPIES REPLACING THE STAPLE CARTRIDGE AND REMOVING STAPLE JAMS REMOVING PAPER MISFEEDS TROUBLESHOOTING USING THE KEY OPERATOR PROGRAMS 1 1 2 3 5 6 8 11 14 15 Page APAN DSC1 5QSZZ AR F14 book 1 ページ 2004年1月15日 木曜日 午後6時10分 ...
Page 2: ...nce at his own expense This device complies with Part 15 of the FCC rules Operation is subject to the following two conditions 1 This device may not cause harmful interference and 2 this device must accept any interference received including interference that may cause undesired operation WARNING For users in the USA This equipment complies with the requirements of Directive 89 336 EEC as amended ...

Page 3: ...modifications made for improvement This operation manual is described based on the American spelling standard Staple section Open the front cover and pull out this section to replace the staple cartridge or remove a staple jam Stapler compiler Paper to be stapled is temporarily stacked here Offset tray This tray is used for the offset function and the staple function Saddle stitch tray Saddle stit...

Page 4: ... Upper tray plain paper heavy paper letterhead paper recycled paper color paper Lower tray saddle stitch plain paper letterhead paper recycled paper color paper Paper full detection Upper tray lower tray saddle stitch Yes Offset function Upper tray only Allowed paper sizes for stapling Upper tray 11 x 17 8 1 2 x 14 8 1 2 x 13 8 1 2 x 11 8 1 2 x 11 R A3 B4 A4 A4R B5 B5R Lower tray saddle stitch 11 ...

Page 5: ... the upper offset tray Three stapling positions are available top left staple two left staples or lower left staple Saddle stitch Pamphlet stapling function Each set of output is stapled in two places along the centerline of the paper folded with the side facing up inside and delivered to the lower saddle stitch tray In the factory default settings the saddle stitch finisher is set to staple and f...

Page 6: ...stapled Transparency film heavy paper label sheets envelopes postcards thin paper The following types of paper cannot be punched Transparency film label sheets envelopes postcards thin paper Be sure to select the same paper size for the output Stapling and punching are not possible when different sizes are mixed together Note however that if the widths are the same the mix size original feeding mo...

Page 7: ...the center tray OK key Touch this key to close the screen and return to the main screen OFFSET key p 3 When a checkmark appears the offset function operates When the checkmark is removed the offset function does not operate The offset function does not operate when the staple sort function or the saddle stitch function is selected SADDLE STITCH key p 3 Each set of output is stapled along the cente...

Page 8: ...ion of the original Some printers do not have the pamphlet printing function Caution To use the above printer function the peripheral device installation settings must be correctly configured in the printer driver properties To configure the peripheral device installation settings right click the icon of the installed printer driver select Properties and then select the Options tab The paper selec...

Page 9: ...ocument glass Place the next page on the document glass and press the START key Repeat until all pages have been scanned and then touch the READ END key on the panel If the memory becomes full while the pages are being scanned MEMORY IS FULL PRESS START TO BEGIN COPYING OR CA TO CANCEL will appear in the display To copy only the pages that have been scanned to that point press the START key To can...

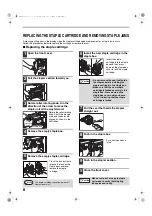
Page 10: ...the staple cartridge 6 Install the new staple cartridge in the staple box Insert the staple cartridge into the staple box and then press down on the staple box cover to lock the staple cartridge 7 Pull the seal that holds the staples straight out 8 Push in the staple box Push until you hear a click 9 Push in the stapler section 10 Close the front cover The staple cartridge cannot be removed if sta...

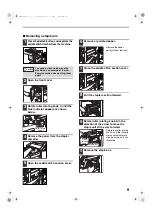
Page 11: ... tearing it 7 Close the saddle stitch section cover 8 Pull the stapler section forward 9 Rotate roller rotating knob A in the direction of the arrow to move the staple unit all the way forward Rotate the roller rotating knob A until the triangle mark and indicator are aligned as shown in the illustration 10 Remove the staple box The saddle stitch finisher and the machine are connected at the rear ...

Page 12: ...unit is installed 1 Press the detach button and separate the saddle stitch finisher from the machine 2 Gently pull the punch waste receptacle forward and discard the punch waste Empty the punch waste receptacle into a garbage bag or other container taking care not to let punch waste scatter 3 Replace the punch waste receptacle 4 Push the saddle stitch finisher back onto the machine Print a test jo...

Page 13: ... remove the misfeed Misfeed in the relay path 1 Grasp the hand hold on the center cover and open the cover 2 Remove the misfed paper from the conveyor unit Remove the paper slowly taking care not to tear it 3 Close the center cover When a misfeed occurs you can touch the INFORMATION key to display brief instructions for removing the misfeed A MISFEED HAS OCCURRED INFORMATION Note AR F14 book 11 ペー...

Page 14: ...B releases the caught paper 4 Open the top cover 5 Remove the misfed paper Remove the paper gently taking care not to tear it 6 Close the top cover 7 Remove any misfed paper from the stapler compiler Remove the paper gently taking care not to tear it 8 Open the cover of the saddle stitch section 9 Remove the misfed paper Remove the paper gently taking care not to tear it The saddle stitch finisher...

Page 15: ...emove any misfed paper from the saddle stitch tray Remove the paper gently taking care not to tear it 13 Close the cover of the saddle stitch section 14 Close the front cover 15 Push the saddle stitch finisher back onto the machine Roller rotating knob D AR F14 book 13 ページ 2004年1月15日 木曜日 午後6時10分 ...
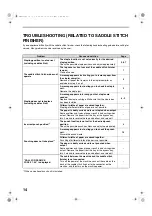
Page 16: ...d 8 9 Different widths of paper are mixed together Stapling of different widths of paper is not possible The paper is badly curled and is not stapled when output Some qualities and types of paper result in bad curling when output Remove the paper from the tray or the bypass tray turn it around to reverse the top and bottom and reload it Incorrect punch position 1 The punch function is not set for ...

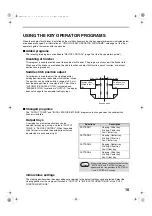
Page 17: ...e pamphlet setting screen Changed programs The OUTPUT TRAYS and INITIAL STATUS SETTINGS programs are changed when the saddle stitch finisher is installed Output trays A combination of output destinations can be selected for copying printing and fax in OUTPUT TRAYS in DEVICE CONTROL When the saddle stitch finisher is installed the combinations that can be selected are as shown at right Initial stat...

Page 18: ...PRINTED IN JAPAN 2004C DSC1 TINSEXXXXQSZZ Printed on 100 post consumer recycled paper AR F14 SHARP CORPORATION Cover4 fm 2 ページ 2004年1月15日 木曜日 午後6時39分 ...

Reviews: