Sharp AR-C262M Key Operation Manual Download Page 72

PART NAMES AND FUNCTIONS (The Reversing Automatic Document Feeder)

4-4

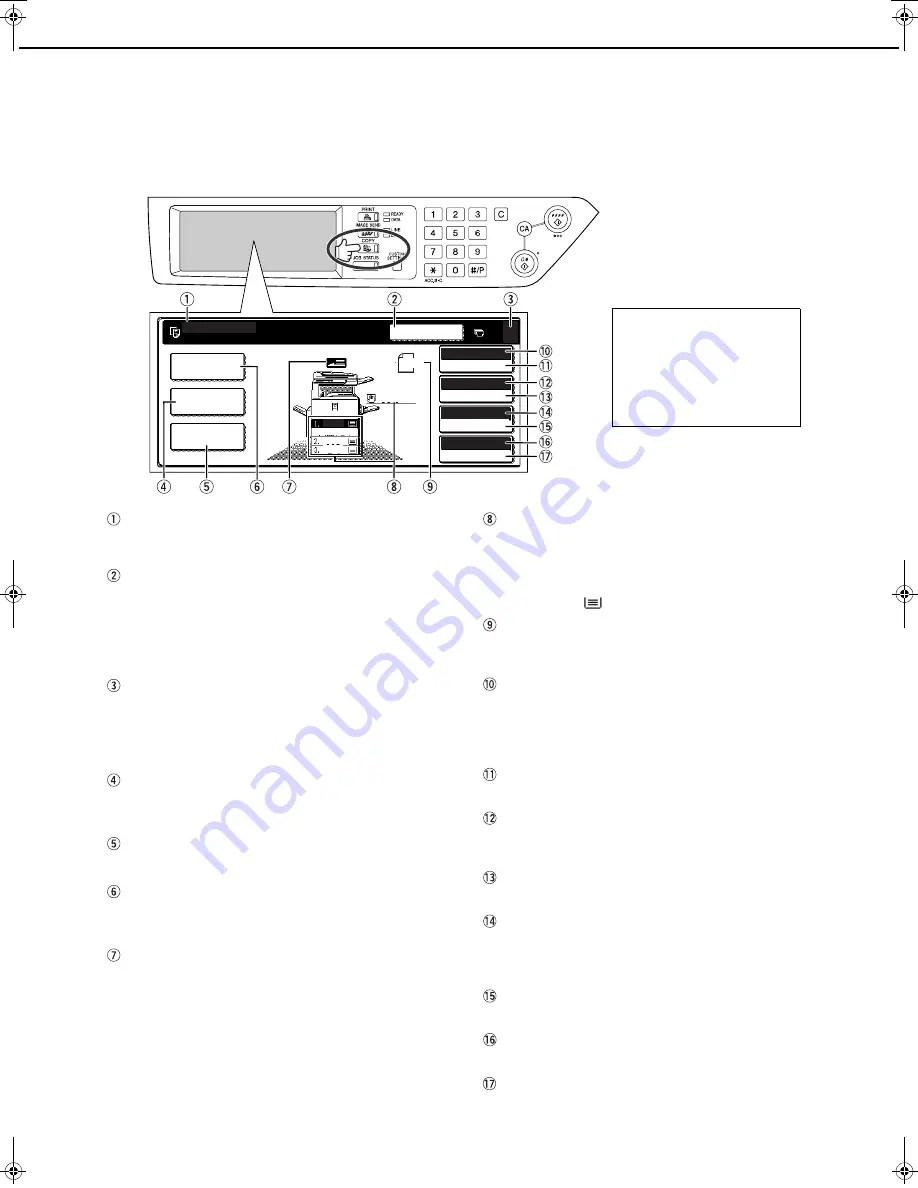
Touch Panel (main screen of copy mode)

The main screen of copy mode shows messages and keys necessary for copying and settings that can be selected.
Touch a key to make a selection. The main screen of the copy mode will be displayed when the [COPY] key is
pressed.*

Message display

Basic status messages are displayed here.

[INTERRUPT] key display area

When interrupt copy is available, the
[INTERRUPT] key will be displayed here. When an
interrupt copy job is being run, a [CANCEL] key will
be displayed here to be used for cancelling the
interrupt copy job.

Copy quantity display

Displays the selected number of copies before the
[START] key is pressed or the number of remaining
copies after the [START] key is pressed. A single
copy can be made when "0" displayed.

[2-SIDED COPY] key (page 5-6, 5-9)

Touch to display the duplex copy mode setting
screen.

[OUTPUT] key (page 5-3, 5-8)

Touch to select sort, group, and staple sort.

[SPECIAL MODES] key (page 6-2)

Touch to display the special modes selection
screen.

Original feed display

This lights steadily when an original is placed on
the original table of the reversing automatic
document feeder. When "Stream feeding mode" in
the key operator programs is turned on, the display
blinks during the waiting period (about 5 seconds)
for placement of the next original. (See page 12 of
the key operator's guide.)

Paper size display

The display shows the location of the paper trays,
the size of the paper in the trays and the
approximate amount of paper loaded in each tray.
The approximate amount of paper in a tray is
indicated by 

.

Original size display

Displays the original size only when an original is
placed for copying.

Original display

"AUTO" appears when the automatic original size
detection function is operating, and the original
size appears when the original size has been
entered manually.

[ORIGINAL] key

Use this key to manually enter the original size.

Exposure display

Displays the icon of the selected resolution and the
exposure scale.

[EXPOSURE] key (page 5-10)

Use this key to adjust the copy exposure.

Paper select display

Displays the selected paper size. When the auto
paper select mode has been selected, "AUTO" will
be displayed.

[PAPER SELECT] key (page 5-2, 5-7)

Use this key to select the paper size.

Copy ratio display

Displays the selected copy ratio.

[COPY RATIO] key (page 5-13)

Use this key to select the copy ratio.

SPECIAL MODES

2-SIDED COPY

OUTPUT

READY TO COPY.

A3

PLAIN

INTERRUPT

ORIGINAL

B5

0

A4

A4

DUPLEX

A4

AUTO

EXPOSURE

AUTO

ORIGINAL

AUTO    A4  

PAPER SELECT

100

%

COPY RATIO

* Except when the custom

settings screen is displayed.

The screen at left shows the
machine with the duplex
module/2 x 500 sheet paper
drawer and the duplex bypass/
inverter unit installed.
The image will vary depending
on the equipment installed.

WhaleII_general-copy_EX.book  4 

ページ


2004年9月22日 水曜日 午後7時50分

Summary of Contents for AR-C262M Key

Page 1: ... COLOUR MULTIFUNCTIONAL SYSTEM Option Duplex bypass inverter unit and Stand 3 x 500 sheet paper drawer Be sure to become thoroughly familiar with this manual to gain the maximum benefit from the product Before installing this product be sure to read the installation requirements and cautions sections Be sure to keep all operation manuals handy for reference including this manual the Operation manu...

Page 2: ...type Should the fuse need to be replaced a BSI or ASTA approved fuse to BS1362 marked or and of the same rating as the one removed from the plug must be used Always refit the fuse cover after replacing the fuse on the moulded plug Never use the plug without the fuse cover fitted In the unlikely event of the socket outlet in your home not being compatible with the plug supplied either cut off the m...

Page 3: ...Part 1 General Information ...

Page 4: ......

Page 5: ...machine as a network scanner when connected to a computer To use the network scanner function the network scanner expansion kit and a 256MB optional memory must be installed The Operation manual for printer and the Operation manual for network scanner are provided as PDF files on the supplied CD ROM These manuals are not provided as printed manuals NOTES Considerable care has been taken in prepari...

Page 6: ...very dusty exposed to direct sunlight poorly ventilated subject to extreme temperature or humidity changes e g near an air conditioner or heater 4 Be sure to allow the required space around the machine for servicing and proper ventilation A small amount of ozone is produced within the copier during operation The emission level is insufficient to cause any health hazard NOTE The present recommended...

Page 7: ...event it from toppling For locking and unlocking the casters and the adjusters see page 0 4 Left side Right side Bypass tray Exit tray Handles Handles Caution Two people are required to lift and carry this machine If the machine is to be left unused for a long time If the machine is to be left unused for a month or longer follow the procedure on pages 2 6 and 2 7 to release the pressure on the fus...

Page 8: ...it be moved by more than one person to prevent injury 7 When connecting this machine to a computer be sure to first turn both the computer and the machine off 8 Do not make copies of anything which is prohibited from copying by law The following items are normally prohibited from printing by national law Other items may be prohibited by local law Money Stamps Bonds Stocks Bank drafts Checks Passpo...

Page 9: ...aded2 11 Setting the paper type and paper size in the bypass tray 2 12 CUSTOM SETTINGS 2 13 Operation procedure common to all custom settings 2 13 About the settings 2 14 REPLACING THE TONER CARTRIDGES 2 15 STORAGE OF SUPPLIES 2 17 MISFEED REMOVAL 2 18 Misfeed removal guidance 2 18 Misfeed in the paper feed area 2 19 Misfeed in the transport area fusing area and exit area 2 20 Misfeed in the stand...

Page 10: ...CIAL MODES 6 2 Common operation procedure for using the special functions 6 3 Margin shift 6 4 Erase 6 5 Dual page copy 6 6 Centring 6 7 Transparency film with insert sheets 6 8 Covers 6 9 B W reverse 6 10 COLOUR ADJUSTMENTS MENU 6 11 RGB adjust 6 12 Sharpness 6 13 Suppress background 6 13 Colour balance 6 14 Brightness 6 15 Intensity 6 15 IMAGE EDIT MENU 6 16 Single colour 6 17 Mirror image 6 17 ...

Page 11: ... be read before using the product Page INTRODUCTION 1 2 MAIN FEATURES 1 2 PART NAMES AND FUNCTIONS 1 4 Exterior 1 4 Interior 1 5 Part names and functions of peripheral devices 1 6 Operation panel 1 8 Touch panel 1 9 AUDITING MODE 1 11 Using the machine when the auditing mode is enabled 1 11 ...

Page 12: ...portrait the landscape orientation size indication will contain an R These are indicated as A4R B5R 8 1 2 x 11 R 5 1 2 x 8 1 2 R etc Sizes that can be placed only in the landscape orientation A3 B4 11 x 17 8 1 2 x 14 8 1 2 x 13 do not contain the R in their size indication Size indication with R Landscape orientation Size indication without R Portrait orientation MAIN FEATURES 1 Full colour copies...

Page 13: ...llowing two power reducing modes to help conserve natural resources and reduce environmental pollution Preheat mode Preheat mode automatically reduces the temperature of the fusing unit after the time set in the key operator programs elapses when the machine is on standby This allows the machine to use less power while on standby The machine automatically returns to normal operation when a key is ...

Page 14: ...Operation panel Centre tray See page 5 5 Finished sheets are deposited here Bypass tray Special papers including transparency film and copy paper can be fed from the bypass tray Stand 1 x 500 sheet paper drawer See page 2 7 Stand 3 x 500 sheet paper drawer See page 2 7 Duplex module 2 x 500 sheet paper drawer See page 2 8 Paper tray Each tray can hold approximately 500 sheets of the recommended pa...

Page 15: ...r cartridge must be replaced when indicated on the operation panel See page 2 15 Right side cover Open when a misfeed has occurred in the paper feed area Right cover of paper drawer Open this cover to remove paper misfed in the paper drawer CAUTION The fusing unit is hot Take care in removing misfed paper ...

Page 16: ... or approximately 500 sheets of SHARP standard paper 80 g m2 or 21 lbs To perform two sided printing a duplex bypass inverter unit AR RB1 is required Stand 3 x 500 sheet paper drawer AR D18N This stand has three paper trays Each tray can hold approximately 500 sheets of the recommended paper for colour 80 g m2 or 21 lbs or approximately 500 sheets of SHARP standard paper 80 g m2 or 21 lbs Saddle s...

Page 17: ...ptional memory AR SM5 This adds memory that is used for the copy function printer function and scanner function Face up and face down output After printing the paper is delivered to the exit tray This product has two exit trays centre tray and left tray The paper specifications page 8 3 and output conditions differ for each tray however if the paper and output conditions are such that the paper ca...

Page 18: ... Press to select the copy mode JOB STATUS key Press to display the current job status See page 1 10 CUSTOM SETTINGS key Use to adjust the contrast of the touch panel or to set key operator programs See page 2 13 Numeric keys Use to enter number values for various settings key ACC C key This is used when the copy network scan 1 and fax 2 functions are used P key This is used as a program key when u...

Page 19: ...ady selected and will be registered to function if the OK key is touched Example 2 When the machine is used in the copy mode the functions shown in the table below can only be set or cancelled on the special feature screen by alternate touches of the function keys on the panel Example 3 When the machine is used in the copy mode and a special feature is selected a corresponding icon representing th...

Page 20: ...atus screen of fax mode The key is used to switch the job list display between JOB QUEUE and COMPLETE JOB QUEUE Shows stored jobs and the job in progress COMPLETE Shows finished jobs PRINT JOB key Use to display the print job list for printer copy and fax mode SCANNER JOB key This displays a list of jobs that only used the network scanner function Only when the network scanner function is added FA...

Page 21: ...y modes or only for colour copy mode Account counter enabled for both the colour copy and the black and white copy modes The account counter is enabled only for the colour copy mode When the key ACC C key or the COLOUR COPY START key is pressed the message at left appears In this case enter your 5 digit account number as explained on the next page to gain access to the copier functions NOTES When ...

Page 22: ... to the following message 2 Follow the appropriate steps to perform the copy job When copying is begun the following message will appear In the case of interrupt copying page 6 27 the following message will appear 3 When the copy job is finished press the key ACC C key NOTE If Account number security is turned on in the key operator programs the following message will appear in the event that an i...

Page 23: ...ex module 2 x 500 sheet paper drawer 2 8 Specifications of paper trays 2 9 Setting the paper type except the bypass tray 2 11 Setting the paper size when an extra size is loaded 2 11 Setting the paper type and paper size in the bypass tray 2 12 CUSTOM SETTINGS 2 13 Operation procedure common to all custom settings 2 13 About the settings 2 14 REPLACING THE TONER CARTRIDGES 2 15 STORAGE OF SUPPLIES...

Page 24: ...ft to indicate the paper size being loaded If a special size paper is loaded in the paper tray set the size slide to EXTRA to inform the machine that a special size paper has been loaded When INCH based size paper is loaded move the size slide to EXTRA Note that setting the size slide to EXTRA only informs the machine that a special size of paper has been loaded it does not inform the machine of t...

Page 25: ...ou loaded a different type of paper from the previous paper be sure to set the new paper type as explained in Setting the paper type page 2 11 7 Changing paper size in paper tray 1 is now complete NOTE If the size slide position step 2 of page 2 2 is not set correctly after changing the paper size or if the paper type page 2 11 is not set correctly incorrect paper selection or paper misfeeding may...

Page 26: ...er in Place the copy paper face up If the bypass tray guides are set wider than the copy paper the inside of the machine may become soiled resulting in smudges on succeeding copies Special purpose papers other than SHARP recommended transparency film must be fed individually Multiple sheets of SHARP recommended transparency film can be loaded in the bypass tray 4 Set the type and size of the paper...

Page 27: ...r When adding paper remove any paper remaining in the tray combine it with the paper to be added and reload as a single stack Do not use paper that has already been printed on by a plain paper fax machine or a laser printer This may cause printed images to become dirty When printing on transparency film be sure to remove each sheet as it exits the machine Allowing sheets to stack in the output tra...

Page 28: ...uaranteed in the area 10 mm or 13 32 from the edges of the envelope Print quality is not guaranteed on parts of envelopes where there is a large step like change of thickness such as on three layer or four layer envelopes Print quality is not guaranteed on envelopes having peel off flaps for sealing the envelopes Fusing unit pressure adjusting levers In some cases damage to the envelopes colour de...

Page 29: ...x 500 sheet paper drawer Specifications are subject to change for improvement without notice A B B Front side of fusing unit Normal position Lower pressure position A Rear side of fusing unit NOTE If the size of paper being loaded is different from the previous size or is an extra size or if the paper type is different from the previous type you must change the paper tray settings in the custom se...

Page 30: ...revious type you must change the paper tray settings in the custom settings Change the settings as explained in Setting the paper type and Setting the paper size when an extra size is loaded on page 2 11 Name Duplex module 2 x 500 sheet paper drawer AR D19N Paper size weight A3 B4 A4 A4R B5 B5R A5 Extra 11 x 17 8 1 2 x 14 8 1 2 x 13 8 1 2 x 11 8 1 2 x 11 R 7 1 4 x 10 1 2 R 5 1 2 x 8 1 2 64 to 105 ...

Page 31: ...an also be used in the bypass tray Special paper Refer to the next page for applicable special papers Heavy paper Heavy paper 1 A6R A3W 5 1 2 x8 1 2 12 x18 Special paper weight 106 to 200 g m2 28 to 54 lbs Postcard See More information on special media that can be used on the next page Heavy paper 2 A6R A3W 5 1 2 x8 1 2 12 x18 Special paper weight 201 to 300 g m2 54 to 80 lbs Transparency film Tra...

Page 32: ...R A3W 5 1 2 x8 1 2 12 x18 Plain paper SHARP standard paper 80g m2 21 lbs Restrictions on paper other than SHARP standard paper 64 to 105g m2 or 17 to 28 lbs Recycled coloured pre punched pre printed and letterhead papers must conform to the same conditions as above Type Remarks Special paper Heavy paper heavy paper 1 For paper sizes from A6R to A3W 5 1 2 x 8 1 2 to 12 x 18 paper weights from 106 t...

Page 33: ...f you loaded an irregular size of paper you can enter the dimensions of the paper To set the paper size when an extra size of paper is loaded in the bypass tray see page 2 12 1 Perform steps 1 through 4 of Setting the paper type at left 2 Touch the key to display the paper size setting screen 3 When the loaded paper size appears in the display if you loaded an INCH based size such as 8 1 2 x 11 to...

Page 34: ...rinting QUALITY MODE is for a high quality image 5 Touch the type of envelope and go to step 7 6 If you inserted a non standard size of paper in the bypass tray remove the checkmark from ENABLE AUTO SIZE DETECTION and then touch the EXTRA SIZE tab When the screen opens the X key will be highlighted Use the and touch keys to enter the X dimension If you inserted a standard size of paper in the bypa...

Page 35: ...ment of the letter keys in the display keyboard used for storing and editing destinations in the English character entry screen Key operator program These are programs that are used by the key operator administrator of the machine to configure machine settings A key appears for these settings in the custom settings menu screen For information on these settings see the key operator s guide These se...

Page 36: ...ARKER key to make the screen darker List print Used to print a list of the settings configured in the fax printer and network scanner function Clock adjust Use this to set the date and time in the machine s built in clock This clock is used by functions that require date and time information The format of the printed date can also be changed Tray settings The paper type paper size enabled modes an...

Page 37: ... toner will eventually run out the machine will stop and the following message will appear This indicates the colour of toner that is low Yellow toner Magenta toner Cyan toner Black toner Y M C Bk NOTES There may be cases that copy images become light or uneven before the message is displayed depending on the way the machine is used If this occurs take out the toner cartridge by following the same...

Page 38: ...fter the toner cartridge is replaced the machine automatically enters resolution adjustment mode In some cases this may take about 1 to 5 minutes NOTE A toner cartridge of a different colour cannot be installed For instance a yellow cartridge cannot be installed in the cyan position NOTE Do not push the white area shown in the illustration The lock lever may come down CAUTION Do not throw the tone...

Page 39: ...fter shaking the cartridge vigorously and will remain inside the cartridge without flowing out For best copying results be sure to use only Sharp Genuine Supplies which are designed engineered and tested to maximize the life and performance of Sharp products Look for the Genuine Supplies label on the toner package GENUINE SUPPLIES Supply and Consumables The supply of spare parts for a repair of th...

Page 40: ... not to tear the misfed paper during removal If paper is accidentally torn during removal be sure to remove all pieces Take care not to damage or leave fingerprints on the transfer belt when removing the misfed paper Misfeed in the fusing area and exit area page 2 20 Misfeed in the duplex bypass inverter unit page 2 22 Misfeed in the saddle stitch finisher page 3 10 Misfeed in the reversing automa...

Page 41: ...ar the misfed paper during removal 2 After removing the misfed paper open and close the duplex bypass inverter unit to reset Grasp the finger hold and gently open the unit After closing confirm that the misfeed message has been cleared and the normal display appears If the duplex bypass inverter unit is not installed close the side cover in the same way NOTE Paper misfed from a paper tray may be e...

Page 42: ...er unit If paper is misfed on the transfer belt remove it gently without touching the transfer belt Do not pull out the transfer unit 4 Gently close the duplex bypass inverter unit After closing confirm that the misfeed message has been cleared and the normal display appears If the duplex bypass inverter unit is not installed close the side cover in the same way NOTE If paper is loaded in the bypa...

Page 43: ...as been cleared and the normal display appears Misfeed in the stand 3 x 500 sheet paper drawer To remove a misfeed in the upper middle or lower tray follow steps 1 through 5 above of Misfeed in the stand 1 x 500 sheet paper drawer NOTE Paper misfed from a paper tray may be extending out of the tray into the right side cover area In this case if the tray is drawn out of the machine the paper may be...

Page 44: ... the illustration Be careful not to tear the misfed paper during removal 7 Close the cover of the duplex bypass inverter unit and return the exit tray to its original position 8 Remove a misfeed from the bottom of the duplex bypass inverter unit Gently remove the misfed paper from the bottom of the duplex bypass inverter unit as shown in the illustration taking care not to tear the paper Make sure...

Page 45: ... removal 11Gently close the duplex module Push the tray firmly all the way into the machine 12Gently close the duplex bypass inverter unit Misfeed in the upper or lower tray To remove misfed paper from the upper tray or lower tray follow steps 1 through 5 of Misfeed in the stand 1 x 500 sheet paper drawer on page 2 21 ...

Page 46: ...ge appears saying that the power must be turned off and then turned on Turn off the power switch wait about 10 seconds and then turn on the switch again If the same message appears after turning the power switch off and on several times it is possible that the machine needs service In this event contact your dealer Copying printing is not possible A message appears saying that this type of paper c...

Page 47: ...alled Paper misfeeds frequently Is paper other than SHARP recommended paper being used Use SHARP recommended paper Paper curled or damp Do not use curled or crimped paper If you do not use paper for a long time store paper in the wrapper in a dry location Is the paper curled and does it frequently misfeed in the duplex module 2 x 500 sheet paper drawer or saddle stitch finisher Paper may be curled...

Page 48: ......

Page 49: ...4 Using the saddle stitch finisher 3 6 Staple cartridge replacement and staple jam removal 3 7 Misfeed in the saddle stitch finisher 3 10 Troubleshooting saddle stitch finisher problems 3 12 Stapling position quick reference guide for duplex output 3 13 Relation between print image and saddle stitch 3 14 LARGE CAPACITY TRAY 3 15 Part name 3 15 Specifications 3 15 Loading paper in the large capacit...

Page 50: ...wer tray 64 to 105 g m2 or 17 to 28 lbs Paper types Upper tray Same as paper specifications of the machine Lower tray Plain paper only Number of trays 2 offset tray saddle stitch tray Tray capacity Upper paper tray Non stapling 1000 sheets of paper A4 A4R B5 B5R 8 1 2 x 11 8 1 2 x 11 R 80 g m2 or 21 lbs 500 sheets of paper Sizes other than A4 A4R B5 B5R 8 1 2 x 11 or 8 1 2 x 11 R up to 10 envelope...

Page 51: ... or 17 to 28 lbs Power supply Supplied from machine Stand paper drawer Dimensions 633 mm W x 603 mm D x 771 mm H 24 59 64 W x 23 3 4 D x 30 23 64 H Weight Approximately 36 kg 79 4 lbs Overall dimensions when attached to machine 1432 mm W x 676 mm D 56 25 64 W x 26 5 8 D when tray is extended Remarks Paper output Upper tray Supports both face up and face down output Lower tray Face down output only...

Page 52: ...r size for stapling and stapling capacity are shown below Printouts Original Printouts Original Offset mode Non offset mode Stapling positions Top left corner of printouts Lower left corner of printouts Portrait orientation Landscape orientation Available paper sizes A4 B5 and 8 1 2 x 11 Stapling capacity For each size up to 30 sheets can be stapled Same as above Available paper sizes A3 B4 A4R 11...

Page 53: ...hing and hole punching cannot be selected at the same time The automatic image rotation will not function when the hole punching function is used For the allowed paper sizes for punching see the specifications on page 3 3 When using the punch function in copy mode place the original with the top toward the inside of the machine If the original is not placed in this orientation punching will not ta...

Page 54: ... Yes is selected and doesn t operate when No is selected The offset checkmark is automatically cleared when the staple sort function is turned on CENTRE TRAY key If the centre tray is selected output paper will be delivered to the exit tray located above the main unit OK key Touch to close the OUTPUT screen and to return to the main screen SADDLE STITCH key See page 3 5 When saddle stitching is se...

Page 55: ...nd remove the staple cartridge 6 Insert a new staple cartridge into the staple box After inserting the staple cartridge press down on the staple box cover to lock the cartridge in place 7 Remove the tape from the staple cartridge by pulling it straight 8 Insert the staple box Push the staple box in until it clicks into place 9 Push the stapler section back into the finisher 10Close the front cover...

Page 56: ...If saddle stitching was selected open the saddle stitch section cover 6 Remove the misfed paper Be careful not to tear the misfed paper during removal 7 Close the saddle stitch section cover 8 Pull out the stapler section 9 Turn roller rotating knob A in the direction of the arrow to move the staple unit to the front Turn the roller rotating knob until the triangle mark is aligned with the index 1...

Page 57: ...e stitch finisher back against the main unit Disposal of hole punch scrap when the punch unit is installed 1 Unlatch the saddle stitch finisher and slide it away from the main unit 2 Pull out the punch scrap collecting container and empty it Discard the punch scraps in a plastic bag or other container taking care not to let the scraps scatter 3 Return the punch scrap collecting container to its or...

Page 58: ...er in step 2 pull roller rotating knob B on the punch unit towards you and rotate it Only when an optional punch unit is installed Rotating roller rotating knob B releases the caught paper 4 Open the top cover 5 Remove the misfed paper Remove the paper gently taking care not to tear it 6 Close the top cover 7 Remove the misfed paper from the stapler compiler Be careful not to tear the misfed paper...

Page 59: ...ting knob in the direction of the arrow 12Remove any misfed paper from the saddle stitch tray Be careful not to tear the misfed paper during removal 13Close the saddle stitch section cover 14Close the front cover 15Push the saddle stitch finisher back against the main unit ...

Page 60: ...e cartridge See page 3 7 Check that a staple cartridge has been installed See page 3 7 Different size paper included Stapling cannot be performed onto different size paper Is the paper badly curled preventing stapling Differences in paper quality and type may result in bad curling of output paper Take the paper out of the tray or bypass tray turn it around and reload it so that the top and bottom ...

Page 61: ...ing One position stapling Two position stapling Two position stapling One position stapling One position stapling One position stapling Left binding with two position stapling is not possible Right binding with two position stapling is not possible Top binding with two position stapling is not possible Two position stapling along the shorter edge is not possible Two position stapling along the sho...

Page 62: ...ed The table below shows these relationships Same as above Orientation of original or original data Output result Page 1 Page 3 Page 2 Page 4 Page 1 Page 2 Duplexed Page 3 Page 4 Duplexed Right binding Left binding Portrait orientation printing Left binding Right binding Landscape orientation printing Page 1 Page 3 Page 2 Page 4 Same as above Page 1 Page 2 Duplexed Page 3 Page 4 Duplexed ...

Page 63: ...n the tray To install the large capacity tray the optional duplex module 2 x 500 sheet paper drawer or the stand 3 x 500 sheet paper drawer must also be installed Name LARGE CAPACITY TRAY AR LC8 Paper size A4 8 1 2 x 11 Paper weight 64 to 105 g m2 17 to 28 lbs Number of trays 1 tray Paper capacity 3 500 sheets 80 g m2 or 21 lbs Power supply Supplied from machine Dimensions 376 mm W x 545 mm D x 59...

Page 64: ...er in the centre of the paper table The paper stack must not be higher than the indicator line up to 3 500 sheets of SHARP standard paper 80 g m2 21 lbs If the paper type was changed be sure to change the appropriate settings as explained in Setting the paper type except the bypass tray See page 2 11 3 Push the tray firmly all the way into the machine The paper table will automatically rise to the...

Page 65: ...r See Misfeed in the transport area fusing area and exit area on page 2 20 3 Open the top cover 4 Remove the misfed paper Be sure not to tear the misfed paper during removal After removing the misfed paper close the top cover 5 Push the large capacity tray towards the main unit and latch it into place Gently push the large capacity tray back in until it stops 6 If misfed paper is not found in step...

Page 66: ......

Page 67: ...Part 2 Copier Operation ...

Page 68: ......

Page 69: ...his chapter before making copies Page PART NAMES AND FUNCTIONS The Reversing Automatic Document Feeder 4 2 Exterior 4 2 Operation Panel 4 3 Touch Panel main screen of copy mode 4 4 REVERSING AUTOMATIC DOCUMENT FEEDER 4 5 Acceptable originals 4 5 SETTING ORIGINALS 4 6 SELECTING THE ORIGINAL SIZE 4 8 STORING DELETING AND USING ORIGINAL SIZES 4 9 ...

Page 70: ...his area Original guides page 4 6 Adjust to the size of the originals Document feeder tray page 4 6 Set the originals here for automatic feeding RADF exit area cover page 7 2 Open to remove misfed originals RADF exit area Finished originals are output here Document cover Document glass All originals which cannot be copied from the document feeder tray must be copied here RADF is an acronym for Rev...

Page 71: ... count will be displayed Numeric keys Use to select the number of copies and to make numerical entries for setting operations C key clear key Press to clear a copy quantity entry If this key is pressed while the reversing automatic document feeder is being used any originals in progress will be automatically output CA key clear all key This returns all copy mode settings to the default settings Ho...

Page 72: ... 5 seconds for placement of the next original See page 12 of the key operator s guide Paper size display The display shows the location of the paper trays the size of the paper in the trays and the approximate amount of paper loaded in each tray The approximate amount of paper in a tray is indicated by Original size display Displays the original size only when an original is placed for copying Ori...

Page 73: ...ut of the specified range may cause an original misfeed Before loading originals into the document feeder tray be sure to remove any staples or paper clips If originals have damp spots from correction fluid ink or glue from pasteups be sure they are dried before they are fed If not the interior of the document feeder or the document glass may be soiled To prevent incorrect original size detection ...

Page 74: ...l on the centring scale NOTE Do not place any objects under the original size detector because they may damage it or the original size may not be detected properly Original size detector R R B4 or 8 x14 A3 or 11x17 A4 or 8 x11 A4 or 8 x11 A5 or 5 x8 Original scale Centring scale Original scale Centring scale NOTE Original size detection function One of the four groups of standard original sizes sh...

Page 75: ...lected that is not suitable for rotation such as enlarging the copy to greater than A4 8 1 2 x 11 size or staple sorting with the saddle stitch finisher rotation will not be possible Example This function operates in both the auto paper select or auto image mode Rotation copying can be disabled with a key operator program See page 15 of the key operator s guide Document feeder tray Document glass ...

Page 76: ...To return to the AB palette touch the AB INCH key once again If the original size is a non standard size touch the SIZE INPUT tab and then enter the X width and Y length dimensions of the original with the or key The X dimension width is initially selected Touch the Y key and enter the Y dimension length The range of original sizes that can be entered is as follows 3 Touch the OK key You will retu...

Page 77: ... the original with the keys X width is initially selected Enter X and then touch the key to enter Y A width of 64 to 432 mm can be entered in X and a length of 64 to 297 mm can be entered in Y 6 Touch the OK key The original size entered in step 5 is stored in the key selected in step 4 To exit touch the ORIGINAL key 7 When you touch a key that shows an original size in step 4 a message screen app...

Page 78: ......

Page 79: ...L COPYING 5 2 Copying from the reversing automatic document feeder 5 2 Automatic two sided copying from the reversing automatic document feeder 5 6 Copying from the document glass 5 7 Automatic two sided copying from the document glass 5 9 EXPOSURE ADJUSTMENTS 5 10 REDUCTION ENLARGEMENT ZOOM 5 12 Automatic selection auto image 5 12 Manual selection 5 13 XY ZOOM 5 15 SPECIAL PAPERS 5 17 ...

Page 80: ...ER will appear If the message appears load paper in a paper tray with paper of the required size Even if the message above is displayed copying can be performed onto the currently selected paper Note The following requirements must be satisfied Originals of a standard size A3 B4 A4 A4R B5 B5R or A5 11 x 17 8 1 2 x 14 8 1 2 x 11 8 1 2 x 11 R or 5 1 2 x 8 1 2 are set and the auto paper select functi...

Page 81: ...e the C clear key to cancel an entry if a mistake has been made 9 Press the COLOUR COPY START or BLACK COPY START key If the C key is pressed while originals are being scanned scanning will stop If copying had already started copying and scanning will stop after the original in progress is output to the original exit area In these cases the copy quantity will be reset to 0 NOTE The 1 sided to 1 si...

Page 82: ...tput mode original paper size Sort Group Sort Group One sided copying Colour copying Up to A3 11 x 17 A3W 12 x 18 Black and white copying Up to A3 11 x 17 A3W 12 x 18 Automatic two sided copying Colour copying Up to A4 8 1 2 x 11 B4 A3 8 1 2 x 14 11 x 17 A3W 12 x 18 Black and white copying Up to A3 11 x 17 A3W 12 x 18 Output mode Original type Original size No added memory Added memory 128 MB 256 ...

Page 83: ...BLACK COPY START key Press the COLOUR COPY START key Set the number of copies 5 Touch the OUTPUT key Touch the SORT key Five sets of copies Sort is automatically selected when the original is placed on the document feeder tray of the reversing automatic document feeder SPECIAL MODES 2 SIDED COPY OUTPUT OUTPUT SORT GROUP Original Press the BLACK COPY START key Press the COLOUR COPY START key Set th...

Page 84: ...display when a reversing automatic document feeder a duplex module 2 x 500 sheet paper drawer and a duplex bypass inverter unit are installed The display will vary depending on the equipment installed If a copy key is touched for a mode that cannot be selected a double beep will be sounded The image to be copied onto the second side of 2 sided copies can be inverted so that the resultant 2 sided c...

Page 85: ...d paper Note The following requirements must be satisfied Originals of a standard size A3 B4 A4 A4R B5 B5R or A5 11 x 17 8 1 2 x 14 8 1 2 x 11 8 1 2 x 11 R or 5 1 2 x 8 1 2 are set and the auto paper select function is enabled If originals of a size other than the sizes above are to be copied manually select the desired paper size by touching the PAPER SELECT key and then touching the desired pape...

Page 86: ... the C clear key to cancel an entry if a mistake has been made 6 Press the COLOUR COPY START or BLACK COPY START key Replace the original with the next original and press the START key Repeat this operation until all originals have been scanned 7 Touch the READ END key If you selected Sort for the output in step 4 it is necessary to touch the READ END key NOTE If the SORT or GROUP key is touched i...

Page 87: ...aking automatic two sided copies of a one sided A3 11 x 17 or B4 8 1 2 x 14 size portrait original or when the front and back side of a two sided original are copied backwards touch the BINDING CHANGE key 4 Touch the OK key Make selections and proceed as in steps 3 to 7 on pages 5 7 and 5 8 NOTE Certain restrictions exist depending on the amount of memory installed and the copy settings See Copy m...

Page 88: ... for COPY OF COPY to select the mode Three resolution settings are available when this mode is selected TEXT PRINTED PHOTO TEXT and PRINTED PHOTO For brighter colours in colour copies touch the COLOUR TONE ENHANCEMENT checkbox The following restrictions apply when colour tone enhancement is selected Colour tone enhancement cannot be selected at the same time as COPY OF COPY mode above Brightness a...

Page 89: ... such as newspaper 3 Normal density originals 4 to 5 Originals written with pencils or light colour characters Colour adjustment menu As special functions for colour copying the following colour image adjustments can be made Page 6 11 RGB ADJUST SHARPNESS SUPPRESS BACKGROUND COLOUR BALANCE BRIGHTNESS INTENSITY MANUAL PRIN PHOT TEXT 1 3 5 To return to the automatic exposure mode touch the EXPOSURE ...

Page 90: ... the output to Sort you must touch the READ END key after all pages of the original have been scanned Step 7 on page 5 8 NOTE Automatic ratio adjustment can only be used for the following original and paper sizes It cannot be used for other sizes However in the case of non standard original and paper sizes the sizes can be entered to make automatic ratio adjustment possible for those sizes pages 4...

Page 91: ...ncrements Touch the key to increase the ratio or the key to decrease the ratio If you continue to touch either key for 3 seconds the ratio begins to change quickly 5 Touch the OK key AUTO A4 PAPER SELECT 100 COPY RATIO N READY TO COPY 100 ZOOM 70 115 86 141 81 122 XY ZOOM MENU AUTO IMAGE 2 1 0 OK 100 EXPOSURE ORIGINAL PAPER SELECT COPY RATIO AUTO AUTO AUTO A4 B4 A3 B5 B4 B5 B4 B4 A3 A4 A3 B5 A4 A5...

Page 92: ...ou placed the original on the document glass set the output to Sort you must touch the READ END key after all pages of the original have been scanned Step 7 on page 5 8 NOTE If the auto paper select display does not appear no appropriate paper size for the selected ratio is available Use the C clear key to cancel an entry if a mistake has been made To return the ratio to 100 To return the ratio se...

Page 93: ...touched The zoom keys can be used to change the ratio from 45 to 400 in increments of 1 Touch the key to increase the ratio or the key to decrease the ratio If you continue to touch either key for 3 seconds the ratio begins to change quickly 6 Touch the Y key Original Copy AUTO A4 PAPER SELECT 100 COPY RATIO PLAIN A4 READY TO COPY 100 ZOOM 70 115 86 141 81 122 XY ZOOM MENU AUTO IMAGE 2 1 0 OK 100 ...

Page 94: ...d 8 Touch the OK key 9 Touch the PAPER SELECT key and select the paper tray with the desired paper size If the AUTO PAPER SELECT mode is on the appropriate copy paper size will have been automatically selected based on the original size and selected copy ratios 10Make all other desired settings such as exposure paper size and number of copies and then press the COLOUR COPY START or BLACK COPY STAR...

Page 95: ...e or the number of copies and press the COLOUR COPY START or BLACK COPY START key If you placed the original on the document glass set the output to Sort you must touch the READ END key after all pages of the original have been scanned Step 7 on page 5 8 AUTO EXPOSURE UTO ORIGINAL AUTO A4 PAPER SELECT 100 OPY RATIO AIN AL A4 A4 NOTES Output location for copies on heavy paper 2 transparencies and e...

Page 96: ......

Page 97: ...6 6 Centring 6 7 Transparency film with insert sheets 6 8 Covers 6 9 B W reverse 6 10 COLOUR ADJUSTMENTS MENU 6 11 RGB adjust 6 12 Sharpness 6 13 Suppress background 6 13 Colour balance 6 14 Brightness 6 15 Intensity 6 15 IMAGE EDIT MENU 6 16 Single colour 6 17 Mirror image 6 17 Photo Repeat 6 18 Multi shot 6 19 A3 11 x 17 Full bleed 6 21 Multi page enlargement 6 22 Pamphlet copy 6 24 JOB PROGRAM ...

Page 98: ...een the special modes menu screens The special modes menu consists of two screens Touch the key to switch to the screen below The special modes below can be selected in the second screen 2 2 COLOUR ADJUSTMENTS key page 6 11 Touch this key to display the colour adjustments menu screen This allows you to select the special functions shown below for colour adjustment when making colour copies IMAGE E...

Page 99: ...he menu keys for colour adjustment or image editing you will go to the menu screen for selection of the corresponding functions Setting procedures for modes requiring setting screens start on the next page The dual page copy centring transparency film with insert sheets B W reverse mirror image and A3 11 x 17 full bleed functions do not require setting screens SPECIAL MODES 2 SIDED COPY MARGIN SHI...

Page 100: ...plex module 2 x 500 sheet paper drawer and duplex bypass inverter unit are not installed the margin shift setting for back side copies will not be displayed 4 Touch the OK key on the SPECIAL MODES screen Return to the main screen of copy mode The shift direction can be selected from right or left shift as shown in the illustration One sided copying Original Image shifted to the right Margin Two si...

Page 101: ...DES screen The erase setting screen will appear The erase icon will also appear in the upper left of the screen to indicate that the function is turned on 2 Select the desired erase mode Select one of the three erase modes The selected key will be highlighted 3 Adjust the amount of erase and touch the OK key Use the and keys to adjust the erase width and then touch the OK key 4 Touch the OK key on...

Page 102: ...is not selected touch the PAPER SELECT key to select A4 8 1 2 x 11 size paper The dual page copy function can be used with reduction copying but cannot be used with enlargement copying The dual page copy function can be done only from the document glass The reversing automatic document feeder cannot be used with this function Only A4 8 1 2 x 11 paper can be used Book original Dual page copy TRANSP...

Page 103: ...en of copy mode Example Original Copy This function can be used to reduce a larger sized original image and centre it on a copy of smaller paper size as well as centre a smaller original onto a larger sized copy This function will not work when non standard size originals or copy paper are used This function cannot be selected when enlargement copying has been selected About the steps that follow ...

Page 104: ...dy in the bypass tray before loading the transparency film To load paper in the bypass tray see pages 2 4 and 2 5 4 Touch the PAPER SELECT key and select the transparency film loaded in the bypass tray Touch the TRANSPARENCY key 5 Touch the SPEED MODE key or the QUALITY MODE key for the transparency film SPEED MODE is for fast printing QUALITY MODE is for a high quality image After touching either...

Page 105: ... side SHARP 1 2 3 4 5 One sided originals Two sided copies copying onto a cover Two sided originals 2 3 4 1 Cover original SHARP Two sided copies from one sided or two sided originals One sided copies from one sided or two sided originals 1 2 3 4 SHARP Cover original 2 3 4 1 SHARP Back cover no copying Front cover can copy onto front side Back side of cover is blank Selections for front cover back...

Page 106: ...in the upper left hand corner of the screen 3 Touch the OK key on the SPECIAL MODES screen Return to the main screen of copy mode OK CANCEL PRINT ON FRONT COVER YES NO About the steps that follow See pages 5 2 through 5 6 NOTE Be sure to place the originals in the document feeder tray of the reversing automatic document feeder The document glass cannot be used for this function NOTES During cover ...

Page 107: ...the colour tone and density of colour copies BRIGHTNESS page 6 15 This copier allows the level of brightness to be adjusted If brightness is selected colour tone can be darkened or lightened INTENSITY page 6 15 This copier allows the level of intensity to be adjusted If intensity is selected colour saturation can be made to be more vivid or more dull SPECIAL MODES MARGIN SHIFT ERASE COVERS TRANSPA...

Page 108: ...GB ADJUST setting screen Return to the COLOUR ADJUSTMENTS menu screen 5 Touch the OK key on the COLOUR ADJUSTMENTS menu screen Return to the SPECIAL MODES screen 6 Touch the OK key on the SPECIAL MODES screen Return to the main screen of copy mode OLOR ADJUSTMENTS RGB ADJUST SH COLOUR BALANCE BR RGB ADJUST OK ONLY ONE COLOUR CAN BE ADJUSTED R RED G GREEN B BLUE OK CANCEL 2 1 0 1 2 COLOUR ADJUSTMEN...

Page 109: ...ound areas will be erased The level can be adjusted in three steps The default setting is level 3 3 Touch the OK key inside OK key on the SUPPRESS BACKGROUND setting screen Return to the COLOUR ADJUSTMENTS menu screen 4 Touch the OK key on the COLOUR ADJUSTMENTS menu screen Return to the SPECIAL MODES screen 5 Touch the OK key on the SPECIAL MODES screen Return to the main screen of copy mode T SH...

Page 110: ...he density of the corresponding level or the key to decrease the density D Use this key to return the densities of all eight levels to the initial settings The initial colour balance settings are the values set with key operator program Initial colour balance setting See page 15 of the key operator s guide For this reason the initial settings may not necessarily be 0 the middle indicator position ...

Page 111: ...ts menu icon will appear at the upper left of the screen to indicate that the function is turned on 3 Touch the OK key inside OK key on the INTENSITY setting screen Return to the COLOUR ADJUSTMENTS menu screen 4 Touch the OK key on the COLOUR ADJUSTMENTS menu screen Return to the SPECIAL MODES screen 5 Touch the OK key on the SPECIAL MODES screen Return to the main screen of copy mode T SHARPNESS ...

Page 112: ... larger than A3 11 x 17 and prints divided images onto multiple sheets of copy paper for assembly into large composite copy PAMPHLET COPY page 6 24 The pamphlet copy function is used to arrange copies in proper order for eventual centre stapling and folding into a booklet Two original pages are copied onto each side of copy paper Four pages are therefore copied onto one sheet A duplex module 2 x 5...

Page 113: ...nu screen The MIRROR IMAGE key will be highlighted to indicate that the function is turned on and the mirror image icon will appear in the upper left of the screen 2 Touch the OK key on the IMAGE EDIT menu screen Return to the SPECIAL MODES screen 3 Touch the OK key on the SPECIAL MODES screen Return to the main screen of copy mode IMAGE EDIT SINGLE COLOUR A3 FULL BLEED M I MULT ENLA IMAGE EDIT 1 ...

Page 114: ...2 x 11 or A3 11 x 17 paper Original size to 130 x 90 mm 3 x 5 Four copies are made on a sheet of A4 8 1 2 x 11 size paper Eight copies are made on a sheet of A3 11 x 17 size paper Two copies are made on a sheet of A4 8 1 2 x 11 size paper Four copies are made on a sheet of A3 11 x 17 size paper Eight copies are made on a sheet of A4 8 1 2 x 11 size paper 16 copies are made on a sheet of A3 11 x 17...

Page 115: ...function place the originals select the desired paper size and select the copying mode before selecting the multi shot function on the special modes screen When using the multi shot function the appropriate copy ratio will be automatically set based on the original size paper size and the number of originals to be copied onto one sheet The minimum possible reduction ratio is 25 Depending on the or...

Page 116: ...r or not to add borderlines When the BORDER LINE checkbox is selected borderlines are added around the borders of the images 5 Touch the OK key inside OK key on the MULTI SHOT setting screen Return to the IMAGE EDIT menu screen 6 Touch the OK key on the IMAGE EDIT menu screen Return to the SPECIAL MODES screen 7 Touch the OK key on the SPECIAL MODES screen Return to the main screen of copy mode OK...

Page 117: ...he SPECIAL MODES screen 3 Touch the OK key on the SPECIAL MODES screen Return to the main screen of copy mode 4 Load A3W 12 x 18 copy paper into the bypass tray Adjust the bypass guide to A3W width before loading the paper Remove any paper remaining in the tray Pull out the tray extension and wire extension See page 2 4 5 Touch the PAPER SELECT key on the touch panel and then select the paper type...

Page 118: ...1 2 x 11 size Copy enlarged image on 8 sheets of A3 11 x 17 paper Example OR PHOT EED MIRROR IMAGE MULTI PAGE ENLARGEMENT PAMP IMAGE EDIT A0 A0x2 A1 A2 A5 A3 A4 CANCEL OK OK MULTI PAGE ENLARGEMENT ENLARGEMENT SIZE A SIZE ORIGINAL SIZE ORIENTATION 1 3 IMAGE EDIT OK B1 B0 B2 B4 ORIGINAL SIZE ORIENTATION B5 CANCEL OK OK MULTI PAGE ENLARGEMENT ENLARGEMENT SIZE B SIZE B3 2 3 IMAGE EDIT IMAGE EDIT OK 34...

Page 119: ...of copy mode NOTES The paper size number of sheets required for the enlarged image and the ratio are automatically selected based on the selected original size and enlargement size The paper size and ratio cannot be selected by the operator The relations between the original size and enlargement size selected by the operator and the automatically selected paper size number of sheets and ratio are ...

Page 120: ...eft binding or right binding and touch the OK key inside OK key on the PAMPHLET COPY setting screen Return to the IMAGE EDIT menu screen 4 Touch the OK key on the IMAGE EDIT menu screen Return to the SPECIAL MODES screen 5 Touch the OK key on the SPECIAL MODES screen Return to the main screen of copy mode 6 Place the original in the document feeder tray or on the document glass pages 4 6 to 4 9 7 ...

Page 121: ...reen Highlighted storage register numbers are registers which already have programs stored 4 Make all copier selections to be stored The number of copies cannot be stored 5 Touch the OK key The selected settings will be stored under the register number selected in step 3 If a number key is selected in step 3 that has already been programmed A setting confirmation screen will appear To replace the ...

Page 122: ...tep 4 on the previous page for storing a job program 4 Touch the DELETE key When the DELETE key is touched the screen in step 3 will return and the program will be deleted If the CANCEL key is touched the screen in step 3 will return but the program will not be deleted If no other programs are to be deleted touch the EXIT key on the screen displayed in step 3 to exit the job program mode JOB PROGR...

Page 123: ...ey to turn off the interrupt copy state 5 Resume the interrupted copy job If a colour copy job was interrupted replace the originals that have not yet been copied and resume copying If a black and white copy job was interrupted replace the originals that have not yet been copied and press the BLACK COPY START key to resume copying NOTES If you touch the INTERRUPT key when the account counter funct...

Page 124: ......

Page 125: ...ures for removing misfeeds in a reversing automatic document feeder cleaning the machine and troubleshooting Page REMOVING AN ORIGINAL MISFEED 7 2 Removing a misfed original from the reversing automatic document feeder 7 2 USER MAINTENANCE For copying 7 3 TROUBLESHOOTING 7 4 ...

Page 126: ...er cover and remove the misfed original If the original is difficult to remove open the document feeder cover and then remove the original 2 Open and close the document feeder cover Opening and closing the cover clears the misfeed display Copying cannot be resumed until this step is performed However this step is not necessary after a misfeed is removed from location C A message may appear indicat...

Page 127: ...ss and the transport belt of the reversing automatic document feeder with a soft clean cloth CAUTION Do not use flammable spray to clean the machine If gas from the spray comes in contact with hot electrical components or the fusing unit inside the machine fire or electrical shock may result NOTE When cleaning do not use thinner benzene or similar volatile cleaning agents These may degrade or disc...

Page 128: ...setting for the original has not been selected Change the resolution setting to TEXT Moiré appears on a copy of a magazine catalogue or other printed material An appropriate resolution setting for the original has not been selected Change the resolution setting to PRINTED PHOTO Text overlaying a photo is not clear on a copy of a map magazine or other printed material An appropriate resolution sett...

Page 129: ...e you attempting colour copying in sort mode When colour copying is performed in sort mode for an interrupt copy job only one set of copies can be made If more than one set is needed replace the original and repeat the copy procedure for each set needed Not all pages are copied When making copies the memory became full during scanning of the originals and a message appears asking you whether you w...

Page 130: ......

Page 131: ... SPECIFICATIONS This chapter contains useful information about the machine Page SPECIFICATIONS 8 2 Copier and Main unit 8 2 Reversing automatic document feeder 8 4 Duplex bypass inverter unit optional 8 4 INDEX 8 5 ...

Page 132: ...alent of 256 levels in printer mode Originals Sheets bound documents Maximum size A3 or 11 x 17 Copy paper Plain paper and special papers Copy sizes Max A3wide or 12 x 18 min A6R or 5 1 2 x 8 1 2 Image loss 4 mm 2 mm at edges Warm up time 99 seconds or less First copy time Full colour single colour copying 8 0 seconds or less Black white copying 7 0 seconds or less Copy ratio Variable 45 to 400 in...

Page 133: ...rencies fast speed setting A4 8 1 2 x 11 26 copies min 26 copies min Transparencies high resolution setting A4 8 1 2 x 11 13 copies min 13 copies min Heavy paper 1 2 A4 8 1 2 x 11 13 copies min 13 copies min Output method Centre tray Face down output Left tray Face up output Maximum number of sheets A4 8 1 2 x 11 size recommended paper for colour Centre tray 500 sheets Left tray 250 sheets Paper t...

Page 134: ...13 16 H Weight Approx 12 kg Approx 26 5 lbs Number of sheets 1 sheet non stack method Paper size Face up output Same as paper feed specifications of machine Face down output A3W A3 B4 A4 A4R B5 B5R A5 12 x18 11 x17 8 1 2 x14 8 1 2 x13 8 1 2 x11 8 1 2 x11 R 7 1 4 x10 1 2 R 8 1 2 x5 1 2 Page weight Face up output 64 to 300 g m2 17 to 80 lbs Face down output 64 to 200 g m2 17 to 54 lbs Transport refe...

Page 135: ...e 4 4 Copy mode output restrictions 5 4 Copy output 5 5 Copy ratio 5 12 Copy ratio display 4 4 Copy ratio selection 5 13 Copying from the bypass tray 5 17 Covers 6 2 6 9 Custom settings 1 8 2 13 Cyan toner 2 15 D Deleting a stored job program 6 27 Detail 1 10 Display contrast 2 14 Display switching 1 10 Disposal of hole punch scrap 3 9 Document feeder tray 4 2 4 6 Document feeding area cover 4 2 7...

Page 136: ...per drawer 2 21 Stand 3 x 500 sheet paper drawer 2 21 Transport area 2 20 Mode select 1 8 4 3 to 4 4 More information on plain paper 2 10 More information on special media 2 10 Moving this machine 0 3 Multi shot 6 16 6 19 Multi page enlargement 6 16 6 22 N Network scanner expansion kit 1 7 Non standard size 2 9 to 2 11 6 24 Number of copy sheets used by each account 1 11 Number of scannable origin...

Page 137: ...nt feeder 8 4 Saddle stitch finisher 3 2 Stand 1 x 500 sheet paper drawer 2 7 Stand 3 x 500 sheet paper drawer 2 7 Specifications of paper trays 2 9 Speed mode 2 12 Stand 1 x 500 sheet paper drawer 1 6 2 7 2 21 Stand 3 x 500 sheet paper drawer 1 6 2 7 2 21 Stand paper drawer 0 3 Standard sizes 1 2 2 9 to 2 10 Standard sizes in both the AB and inch systems 1 2 Standard supplies 2 17 Staple cartridg...

Page 138: ......

Page 139: ...89 336 EEG en 73 23 EEG gewijzigd door 93 68 EEG Dette udstyr overholder kravene i direktiv nr 89 336 EEC og 73 23 EEC med tillæg nr 93 68 EEC Quest apparecchio è conforme ai requisiti delle direttive 89 336 EEC e 73 23 EEC come emendata dalla direttiva 93 68 EEC Este equipamento obedece às exigências das directivas 89 336 CEE e 73 23 CEE na sua versão corrigida pela directiva 93 68 CEE Este apara...

Page 140: ...mation and copier operation This manual has been printed using a vegetable based soy oil ink to help protect the environment Printed on 100 post consumer recycled paper PRINTED IN CHINA 2004L KS2 TINSE2939FCZZ SHARP CORPORATION ...

Reviews: