background image

11

BEFORE USING THE MACHINE

1

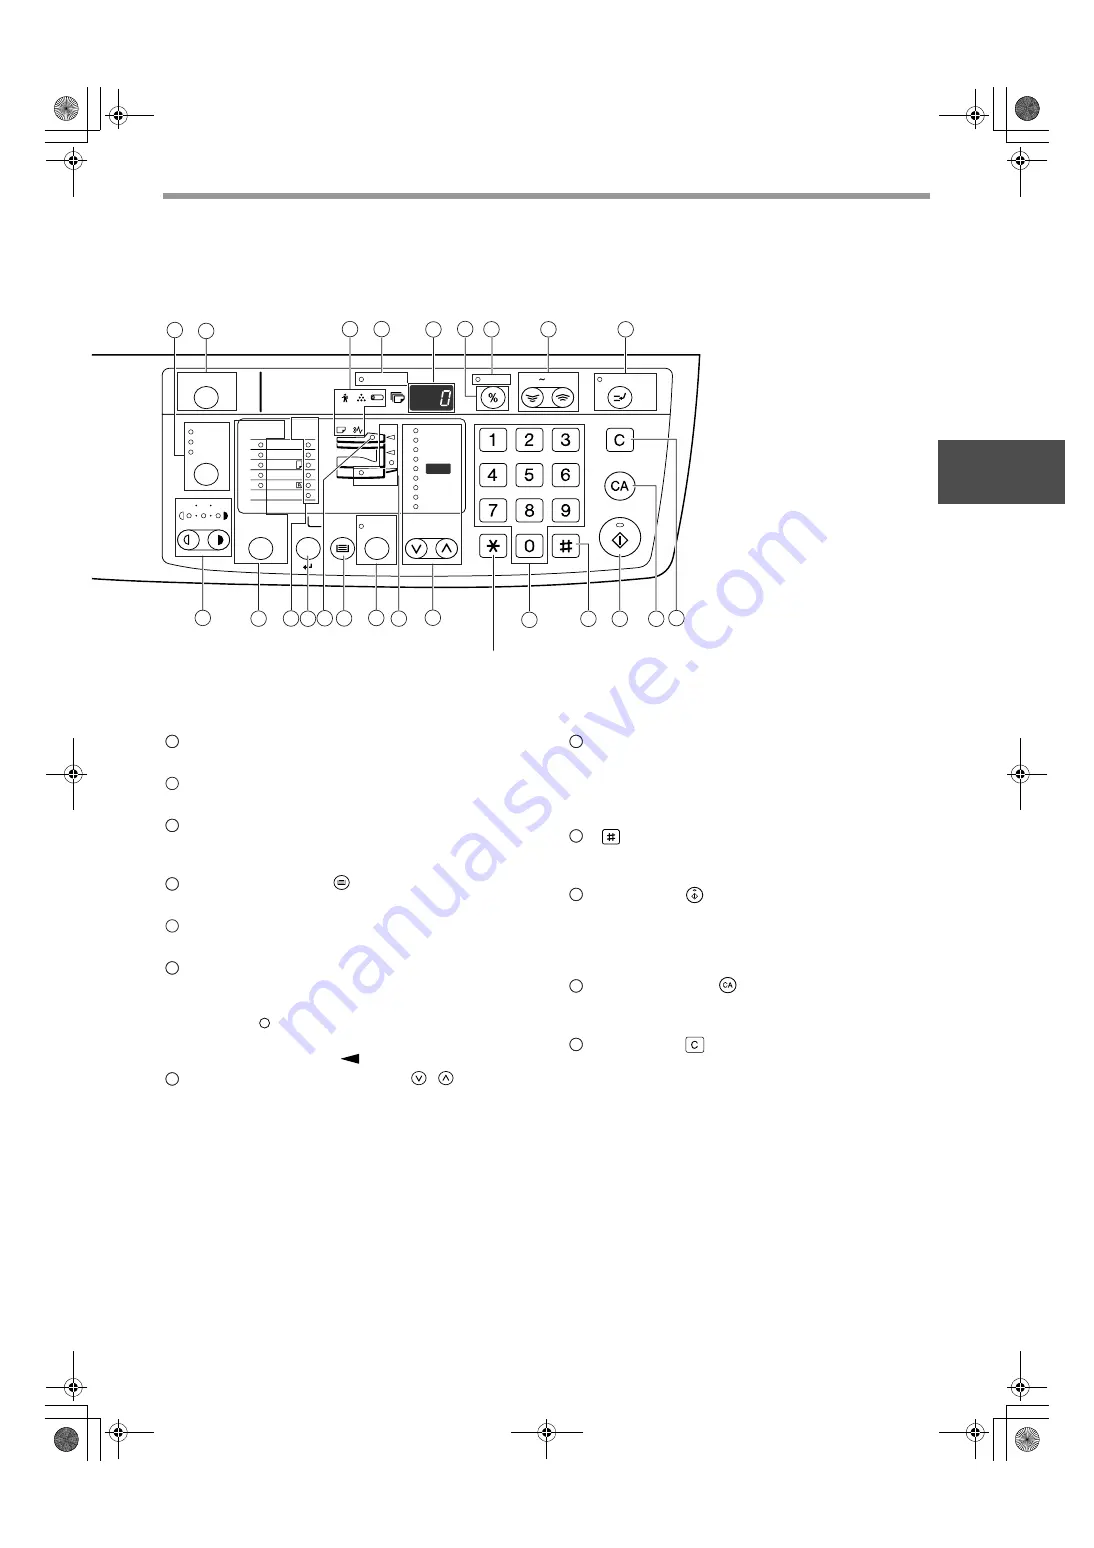
PAPER SIZE indicators

Light up to show the selected copy paper size. (p.16)

PAPER SIZE ENTER key 

Use to set the paper size in the paper tray. (p.16)

SPF indicator (when the SPF is installed)

Lights up when originals are set in the document 
feeder tray. (p.19)

TRAY SELECT key (

)

Use to manually select a paper tray. (p.21)

AUTO IMAGE key / indicator

Press for automatic copy ratio selection. (p.22)

Paper feed location / misfeed location 
indicators

The selected paper feed location is shown by a lit 
indicator (

). (p.18)

The general location of misfed paper is shown by a 
blinking red indicator (

). (p.47)

PRESET RATIO selector keys (

)

/ indicators

Use to select preset reduction/enlargement copy 
ratios. (p.23)

Numeric keys

Use to select the desired copy quantity or to make 
user program entries. (p.22)
To display the total number of pages output by the 
machine, hold the [0] key down. (p.56)

[

]  key

Use to check the total number of copies made. 
(p.56)

START key (

) /indicator

Press to make a copy (p.18). Also press to exit 
"Auto power shut-off" mode and to set a user 
program. Copying is possible when the indicator is 
on.

CLEAR ALL key (

)

Clears all selected settings and returns the 
machine to the initial settings. (p.12)

CLEAR key (

)

Clears the copy quantity display or terminates a 
copy run.

16

15

16

18

17

19

18

19

21

20

22

21

23

22

24

23

25

24

26

25

27

26

AUDIT CLEAR

POWER SAVE

INTERRUPT

CLEAR

CLEAR ALL

START

ZOOM

PRESET RATIO

AUTO

IMAGE

TRAY

SELECT

ORIGINAL SIZE

ENTER

AUTO

ORIGINAL
SIZE

PAPER

SIZE

TEXT
PHOTO

1 3 5

11

X

17

200%

100%

50%

141

95

77
64

129

121

X

14

X

11

X

11

X

EXTRA

25   400%

Not used for this machine.

4

5

6

7

8

9

10

11

13

14

15 16 17 18

19 20

21

22

23

24

25 26

12

AR-5316-5320-EX.book  11 

ページ


2005年4月8日 金曜日 午前9時35分

Summary of Contents for AR-5320

Page 1: ...TION MANUAL BEFORE USING THE MACHINE COPY FUNCTIONS PRINTER FUNCTIONS USER SETTINGS TROUBLESHOOTING ROUTINE MAINTENANCE PERIPHERAL DEVICES AND SUPPLIES APPENDIX 8 18 29 31 40 56 60 62 Page HINA KS2 QSZZ AR 5316 5320 EX book 1 ページ 2005年4月8日 金曜日 午前9時35分 ...

Page 2: ...chase Place of Purchase Authorized Sharp Copier Service Department Number Do not make copies of anything which is prohibited from copying by law The following items are normally prohibited from copying by national law Other items may be prohibited by local law Checks Passports Driver s licenses Money Stamps Bonds Stocks Bank drafts AR 5316 5320 EX book 1 ページ 2005年4月8日 金曜日 午前9時35分 ...

Page 3: ...LECTING THE VERTICAL AND HORIZONTAL COPY RATIOS SEPARATELY 24 TWO SIDED COPYING USING THE BYPASS TRAY 26 DUAL PAGE COPYING 27 INTERRUPTING A COPY RUN 28 3 PRINTER FUNCTIONS USING THE PRINTER MODE 29 BASIC PROCEDURE FOR PRINTING 29 OPERATION IN COPY AND PRINTER MODES 30 4 USER SETTINGS ADJUSTING THE AUTOMATIC EXPOSURE LEVEL 31 TONER SAVE MODE AND HIGH IMAGE QUALITY MODE 32 CUSTOMIZING SETTINGS 33 U...

Page 4: ...ASS AND SPF DOCUMENT COVER 58 CLEANING THE ORIGINAL SCANNING GLASS ONLY WHEN A SPF IS INSTALLED 58 CLEANING THE BYPASS TRAY PAPER FEED ROLLER 59 CLEANING THE TRANSFER CHARGER 59 7 PERIPHERAL DEVICES AND SUPPLIES PERIPHERAL DEVICES 60 SINGLE PASS FEEDER 60 STORAGE OF SUPPLIES 61 SUPPLY PART NUMBERS 61 PROPER STORAGE 61 8 APPENDIX SPECIFICATIONS 62 SOFTWARE LICENSE 64 MATERIAL SAFETY DATA SHEET 66 I...

Page 5: ...r cloth or plastic film while the power is on Doing so may prevent heat dissipation damaging the machine Use of controls or adjustments or performance of procedures other than those specified herein may result in hazardous laser radiation exposure The socket outlet should be installed near the machine and should be easily accessible IMPORTANT POINTS WHEN SELECTING AN INSTALLATION SITE Improper ins...

Page 6: ...trademarks of International Business Machines Corporation Acrobat Reader Copyright 1987 2002 Adobe Systems Incorporated All rights reserved Adobe the Adobe logo Acrobat and the Acrobat logo are trademarks of Adobe Systems Incorporated All other trademarks and copyrights are the property of their respective owners Connect the machine to a power outlet which is not used for other electric appliances...

Page 7: ...nstructions for installing the software that allows the machine to be used with your computer and procedures for establishing initial printer settings THE MEANING OF R IN ORIGINAL AND PAPER SIZE INDICATIONS An R appearing at the end of an original or paper size 5 1 2 x 8 1 2 R 8 1 2 x 11 R etc indicates that the original or paper is oriented horizontally as shown below Sizes that can be placed onl...

Page 8: ... not properly followed Cautions the user that damage to the machine or one of its components may result if the contents of the caution are not properly followed Notes provide information relevant to the machine regarding specifications functions performance operation and such that may be useful to the user Warning Caution Note AR 5316 5320 EX book 6 ページ 2005年4月8日 金曜日 午前9時35分 ...

Page 9: ...s When the SPF is being used the zoom copy ratio range is 50 to 200 Continuous copying of up to 999 copies is possible Can be changed to a maximum of 99 copies in the user programs The user programs allow customized machine settings and management Access to the machine can be controlled by enabling audit mode Scan once Print many The machine is equipped with a memory buffer allowing the machine to...

Page 10: ... tray Front cover Open to remove paper misfeeds and perform machine maintenance p 50 p 54 Paper tray Paper tray holds 250 sheets of paper p 14 Side cover Open to remove paper misfeeds and perform machine maintenance p 48 p 59 Side cover handle Pull to open the side cover p 48 Bypass tray guides Adjust to the width of the paper p 15 Bypass tray Paper including special paper such as transparency fil...

Page 11: ...ge strap Lift to remove the TD cartridge p 53 TD cartridge lock release lever To replace the TD cartridge pull out the TD cartridge while pulling up on this lever p 53 Roller rotating knob Turn to remove misfed paper p 49 p 50 Fusing unit release levers To remove a paper misfeed from the fusing unit push down on these levers and remove the paper p 50 Drum cartridge Copy images are formed on the ph...

Page 12: ...e replacement required indicator p 46 Paper required indicator p 46 Misfeed indicator p 46 POWER SAVE indicator Lights up when the machine is in a power save mode p 12 Display Shows the set number of copies as well as the copy ratio user program function or setting code or an error code when an error occurs Copy ratio display key Hold down when the machine is not in use to display the copy ratio i...

Page 13: ...ntity or to make user program entries p 22 To display the total number of pages output by the machine hold the 0 key down p 56 key Use to check the total number of copies made p 56 START key indicator Press to make a copy p 18 Also press to exit Auto power shut off mode and to set a user program Copying is possible when the indicator is on CLEAR ALL key Clears all selected settings and returns the...

Page 14: ...ut the machine being used when the power is on All lights except the POWER SAVE indicator and ON LINE indicator go off To resume normal operation press the START key Normal operation also resumes automatically when a print job is received While in auto power shut off mode no keys except the START key can be used The machine reverts to the initial settings when it is first turned on when the CLEAR ...

Page 15: ...e at a time using the bypass tray do not attempt continuous copying or printing There are many varieties of special paper available on the market and some cannot be used with this machine Before using special paper contact a SHARP service center Before using other than SHARP recommended paper make a test copy to see if the paper is suitable Paper tray type Paper type Size Weight Capacity Paper tra...

Page 16: ...feeds or misfeeds may occur 4 Load paper into the tray 5 Gently push the paper tray into the machine 15 Do not load paper higher than the line on the tray up to 250 sheets Make sure that the paper fits under the tabs on the right side of the tray Make sure the stack of paper is straight before loading it When adding paper take the remaining paper out and combine it into a single stack with the new...

Page 17: ...t and do not have loosely glued construction flaps not the closure flap Special papers except SHARP recommended transparency film labels and envelopes must be fed one sheet at a time through the bypass tray When adding paper first remove any paper remaining in the tray combine it with the paper to be added and then reload as a single stack The paper to be added must be the same size and type as th...

Page 18: ...IGINAL SIZE ENTER key to select the paper size The indicator of the selected paper size lights up 3 Squeeze the lock lever of the front guide and slide the front guide to match the width of the paper and move the left guide to the appropriate slot as marked on the tray The front guide is a slide type guide Grasp the locking knob on the guide and slide the guide to the indicator line of the paper t...

Page 19: ... tray s paper size setting is the same as the tray s paper size setting in the printer driver For example if the tray s paper size setting is 8 1 2 x 11R set Setting Paper Size to Letter R For more information see CONFIGURING THE PRINTER DRIVER in the Software Setup Guide Affix the paper size label for the paper size selected in step 3 to the label position on the right end of the tray START Note ...

Page 20: ...with the TRAY SELECT key and copy from the bypass tray The bypass tray must be manually selected To copy on paper of a different size than the original select the paper with the TRAY SELECT key If the ORIGINAL SIZE indicator is blinking rotate the original so that it is in the same orientation as the blinking ORIGINAL SIZE indicator 4 Set the number of copies 5 Press the START key to begin copying...

Page 21: ...SELECT key and copy from the bypass tray The bypass tray must be manually selected To copy on paper of a different size than the original select the paper with the TRAY SELECT key 4 Set the number of copies 5 Press the START key to begin copying The copy is delivered to the paper output tray Do not place originals of different sizes together in the document feeder tray This may cause misfeeds Note...

Page 22: ...laced at once Originals that cannot be used in the SPF The following originals cannot be used These may cause misfeeds or smudging and unclear images Transparencies tracing paper other transparent or translucent paper and photographs Carbon paper thermal paper Originals that are creased folded or torn Glued originals cut out originals Originals with binder holes Originals printed using an ink ribb...

Page 23: ...st the exposure of a text original manually press until the TEXT indicator lights To copy a photo press until the PHOTO indicator lights 2 Press the Light key or Dark key to adjust the exposure For a darker image press the Dark key For a lighter image press the Light key If exposure level 2 or 4 is selected the two indicators will light simultaneously SELECTING THE TRAY If you wish to use a tray o...

Page 24: ...ith the AUTO IMAGE key AUTOMATIC RATIO SELECTION below Reduction and enlargement ratios can be selected manually with the PRESET RATIO selector keys and or the ZOOM keys MANUAL RATIO SELECTION p 23 Separate settings can be selected for the vertical and horizontal ratios SELECTING THE VERTICAL AND HORIZONTAL COPY RATIOS SEPARATELY p 24 Ratios that can be selected will vary depending on whether the ...

Page 25: ...rease or decrease the ratio To decrease or increase the zoom ratio rapidly hold down the Zoom keys or When a Zoom key or is pressed the ZOOM indicator will light up and the zoom ratio will appear in the display for about two seconds 4 Set the number of copies and other copy settings and then press the START key The copy will be delivered to the paper output tray If the ORIGINAL SIZE indicator blin...

Page 26: ... appear in the display 4 Use the PRESET RATIO selector keys and Zoom keys to change the copy ratio in the vertical direction Press the PRESET RATIO selector keys to select a ratio close to the desired ratio and then press the Zoom keys to adjust the ratio in increments of 1 The ratio appears in the display 5 Press the Copy ratio display key The selected ratio for the vertical direction will be ent...

Page 27: ...ll change to the number of copies display 8 Set the number of copies and other copy settings and then press the START key The copy will be delivered to the paper output tray To verify the copy ratios press and hold down the Copy ratio display key The vertical and horizontal ratios will be alternately displayed If you need to change the ratios press the PRESET RATIO selector keys and the Zoom keys ...

Page 28: ...py of original A over and without changing the position of the edge closest to you insert it in the bypass tray Insert the paper all the way in 4 Select the bypass tray with the TRAY SELECT key and then press the START key The copy is delivered to the paper output tray 1 2 1 Original A Original B Copy 1 1 Original A Copied original A 1 1 Original A Copied original A 2 Original B 2 Original B Copie...

Page 29: ...nd press the START key The copy will be delivered to the paper output tray Original Copy 8 1 2 x 11 paper is used for dual page copying When used in combination with XY ZOOM copying enlargement is not possible Dual page copying cannot be used in combination with the enlargement copying Automatic ratio selection cannot be used when dual page copying is used Dual page copying cannot be selected when...

Page 30: ... copy job is finished press the INTERRUPT key and remove the original s The INTERRUPT indicator will go off indicating that the interrupt function is no longer operating The copy settings will automatically revert to the settings selected for the copy run before the run was interrupted 5 Replace the previous original s and press the START key The interrupted copy run will resume Interrupt copying ...

Page 31: ...gs in the printer driver For information on the settings in the printer driver see the Online Manual the Software Setup Guide or the printer driver help file 5 Click the Print button or the OK button to begin printing The print job will be delivered to the paper output tray Important points when setting the paper size Make sure that the tray s paper size setting is the same as the tray s paper siz...

Page 32: ...n Use close paper size is enabled Printing will take place using a size of paper that is close to the size of the print image OPERATION IN COPY AND PRINTER MODES Some operations cannot be performed simultaneously when the machine is being used in printer mode or copy mode 1Can be used after pressing the INTERRUPT key 2Printing will begin when the CLEAR ALL key is pressed after the copy job is fini...

Page 33: ...re level in the SPF place the original in the SPF p 19 Make sure that the SPF indicator is lit 2 Press the AUTO TEXT PHOTO key to select PHOTO 3 Hold down the AUTO TEXT PHOTO key until the AUTO indicator blinks The exposure level indicators show the current setting 4 Press the Light key or Dark key to lighten or darken the automatic exposure level as desired 5 Press the AUTO TEXT PHOTO key to comp...

Page 34: ...ress the AUTO TEXT PHOTO key to select TEXT 2 Hold down the AUTO TEXT PHOTO key until the PHOTO indicator blinks The exposure level indicators show the current setting 3 To enable toner save mode press the Light key To enable high image quality mode press the Dark key When enabling toner save mode make sure that 1 is lit When enabling high image quality mode make sure that 5 is lit 4 Press the AUT...

Page 35: ...ey on the operation panel is pressed a print job is received or an original is placed 3 Auto power shut off timer 1 5 min 2 30 min 3 60 min 4 120 min 5 240 min This function automatically switches the machine to a state that consumes even less power than preheat mode if the set duration of time elapses without the machine being used when the power is on All lights except the POWER SAVE indicator a...

Page 36: ...7 Audible signals volume 1 Short beep 2 Long beep 3 OFF This sets the volume of beep signals p 35 28 Base setting beep signal 0 OFF 1 ON Use this to sound a beep when a base setting is selected p 35 29 Number of copies limit 1 99 copies 2 999 copies Use this setting to select 99 or 999 for the maximum number of copies 30 Use close paper size 0 OFF 1 ON When this function is enabled printing in pri...

Page 37: ...different types of beep signals a key entry beep that sounds when a valid key is pressed an invalid key beep that sounds when an invalid key is pressed and a base setting beep that sounds when a setting is the same as the base setting base settings are explained below The base setting beep is initially disabled If you wish to enable the base setting beep see Base setting beep signal on page 34 If ...

Page 38: ... mode 0 OFF 1 ON Use to enable or disable Auditing mode Auditing mode is initially disabled 11 Account number entry None Use to set up account numbers Up to 20 accounts can be established 12 Account number change None Use to change an account number 13 Account number deletion 0 Delete single account 1 Delete all accounts Use to delete an account number A single account number can be deleted or all...

Page 39: ...links in the 1st digit of the display 4 Enter the desired setting code for the program as explained in the detailed procedures on the following pages For the setting codes see AUDITING MODE SETTINGS p 36 5 Press the Light key to complete the settings The alarm indicators go off and the display returns to the number of copies display If you enter the wrong number press the CLEAR key and then enter ...

Page 40: ...Copy ratio display key and then press the START key Number of copies per account program No 14 Use this procedure to display the copy count of each account If no account numbers have been established the error code 14E will appear in the display 1 Select the account number with the Copy ratio display key 2 Hold down the 0 key The copy count of the selected account will appear in the display while ...

Page 41: ...ter your 3 digit account number with the numeric keys When you enter your account number 0 appears in the display to indicate that copying is possible 2 Follow the appropriate steps to make the copy 3 When finished press the AUDIT CLEAR key To reset another account number enter the program number 15 for account number deletion and then repeat the procedure for Resetting a single account Note If yo...

Page 42: ...Paper misfeed 42 Original size not selected automatically 42 Copies are smudged or dirty 43 White or black lines appear on copies 43 Paper size for a paper tray cannot be set 43 A copy job stops before it is finished 43 The POWER SAVE indicator is lit 43 Any one of the alarm indicators is lit or blinking 43 Lighting fixture flickers 43 PRINTING PROBLEMS The machine does not print ON LINE indicator...

Page 43: ...UTO TEXT PHOTO key or press the Light key and Dark key to manually select an appropriate exposure If the copy is too light or too dark even though AUTO was selected with the AUTO TEXT PHOTO key adjust the automatic exposure level 21 31 Blank copies The original is not placed face up in the SPF or face down on the document glass Place the original face up in the SPF or face down on the document gla...

Page 44: ...her than the indicator line on the tray remove some of the paper and reload so that the stack does not exceed the line 14 Some sheets of paper stick together Fan the paper well before loading it 14 The guides on the bypass tray do not match the width of the paper Adjust the guides to match the width of the paper 15 The bypass tray extension is not pulled out When loading a large size of paper pull...

Page 45: ...ically paused every 250 copies Remove the copies in the paper output tray and press the START key to resume copying 22 The tray is out of paper Load paper 14 The POWER SAVE indicator is lit Any other indicators are lit If other indicators are lit the machine is in Preheat mode Press any key on the operation panel to resume normal operation 12 The POWER SAVE indicator and ON LINE indicator are only...

Page 46: ...button click Control Panel click Printers and Other Hardware and then click Printers and Faxes On Windows 95 98 Me NT 4 0 2000 click the Start button select Settings and then click Printers 2 The SHARP AR 5316 printer driver icon is not shown 3 If the icon is shown but you still cannot print the printer driver may not have been installed correctly In this case delete AR 5316 Software and then rein...

Page 47: ... and store it in a dark place in a bag to prevent moisture absorption You did not set sufficient margins in the paper settings of your application The top and bottom of the paper may be dirty if the margins are set outside of the specified print quality area Set the margins in the software application within the specified print quality area The printed image is skewed or it runs off the paper The ...

Page 48: ...indicator 18 19 PAPER SIZE indicator Blinking A blinking PAPER SIZE indicator means that the size of paper loaded in the tray is different from the paper size setting for the tray Change the paper size setting To clear the display do one of the following Use the TRAY SELECT key to change the tray selection Open and close the tray Press the CLEAR ALL key 16 CH appears in display Steadily lit The fr...

Page 49: ...ment feeder tray Close the feeding roller cover Section B Open the SPF and rotate the two release rollers in the direction of the arrow to feed the original out Close the SPF and then remove the original If a small original 5 1 2 x 8 1 2 etc is misfed open the right side cover and remove the original Close the right side cover The paper may tear when you remove a misfeed In this event be sure to r...

Page 50: ...eeding roller cover or the right side cover 3 Return the originals indicated by the minus number in the display to the document feeder tray and press the START key Copying will resume from the originals that still remained when the misfeed occurred MISFEED IN THE BYPASS TRAY 1 Gently pull the misfed paper out 2 Open and close the side cover The misfeed indicator will go out When closing the side c...

Page 51: ... out If paper is misfed here go to B Misfeed in the fusing area If paper is misfed here go to A Misfeed in the paper feed area If the misfed paper is visible here go to C Misfeed in the transport area The fusing unit is hot Do not touch the fusing unit when removing misfed paper Doing so may cause a burn or injury Do not touch the drum cartridge green portion when removing the misfed paper Doing s...

Page 52: ...ll go out The fusing unit is hot Do not touch the fusing unit when removing misfed paper Doing so may cause a burn or injury Do not touch the drum cartridge green portion when removing the misfed paper Doing so may damage the drum and cause smudges on copies Be careful about unfixed toner on the misfed paper not to soil your hands or clothes Roller rotating knob Fusing unit release lever Warning C...

Page 53: ...by pulling it into the paper output area Be careful not to tear the misfed paper during removal 3 Close the side cover The misfeed indicator will go out The fusing unit is hot Do not touch the fusing unit when removing misfed paper Doing so may cause a burn or injury When closing the side cover press on the handle If the paper was torn make sure that no torn pieces remain in the machine If the mis...

Page 54: ...e side cover The misfeed indicator will go out 3 Close the paper tray Push the paper tray in completely Make sure that there is no misfed paper in the tray before pulling it out p 49 Note When closing the side cover press on the handle If the misfeed indicator does not stop blinking check for torn pieces of paper in the machine Note AR 5316 5320 EX book 52 ページ 2005年4月8日 金曜日 午前9時35分 ...

Page 55: ...from the bag Grasp the cartridge on both sides and shake it horizontally four or five times 4 Remove the protective cover from the TD cartridge by unlatching three cover hooks from the holes on the cartridge and then pulling the cover in the direction indicated by the arrow in the illustration 5 Insert the TD cartridge along the guides until it locks in place If there is any dirt or dust on the TD...

Page 56: ...TD cartridge until the green strap handle can be grasped While supporting the TD cartridge at the green label with your left hand grasp the green strap handle with your right hand and pull the TD cartridge all the way out 4 Grasp the drum cartridge handle and gently pull the cartridge out Dispose of the old drum cartridge in accordance with local regulations Before closing the front cover make sur...

Page 57: ...lace If there is any dirt or dust on the TD cartridge remove it before installing the cartridge 8 Close the front cover and side cover The drum cartridge replacement required indicator will go out Do not touch the drum cartridge green portion Doing so may damage the drum and cause smudges on copies Before closing the front cover make sure that the TD cartridge and drum cartridge is correctly insta...

Page 58: ...unt can be counted up to 999 999 Total output count Hold down the 0 key The total output count appears sequentially in two parts while you hold down the 0 key Example Total number of pages output is 12 345 Total copy count Hold down the key The count display and counting method are the same as for the total output count Each 11 x 17 size page is counted as two pages During a copy run pressing the ...

Page 59: ... to return to the normal display The alarm indicators go off The display returns to the number of copies display DRUM CARTRIDGE LIFE To find out how many more copies can be made before the 30 000 mark is reached follow the procedure described below 1 Hold down the Light key until the alarm indicators blink The display will show 2 Hold down the CLEAR key for more than 5 seconds The number will appe...

Page 60: ...leaning agents CLEANING THE ORIGINAL SCANNING GLASS ONLY WHEN A SPF IS INSTALLED If white or black lines appear in copies made with using the SPF use the provided glass cleaner to clean the original scanning glass If white or black lines appear in copies or printed pages when the SPF is not used see CLEANING THE TRANSFER CHARGER on page 59 1 Open the SPF and take out the glass cleaner 2 Clean the ...

Page 61: ...3 Lift and pull out the paper tray 4 Take the charger cleaner out by holding the tab 5 Set the charger cleaner onto the transfer charger and gently slide the cleaner in the direction indicated by the arrow two or three times If the white sheet metal is smudged with toner wipe it with a soft clean cloth 6 Return the charger cleaner to its original position Close the paper tray Close the side cover ...

Page 62: ...ecification figures indicated are nominal values of production units There may be some deviations from these values in individual units Note Single pass feeder AR SP6N AR SP6N Single pass feeder Acceptable original Weight 15 lbs to 24 lbs 56 g m2 to 90 g m2 Size 5 1 2 x 8 1 2 to 11 x 17 5 1 2 x 8 1 2 size originals cannot be used in the duplex copy mode Capacity Up to 40 sheets Thickness 5 32 4 mm...

Page 63: ...at a stable temperature not exposed to direct sunlight Store paper in the wrapper and lying flat Paper stored out of the wrapper or in packages standing on end may curl or get damp resulting in paper misfeeds For best copying results be sure to use only SHARP Genuine Supplies which are designed engineered and tested to maximize the life and performance of SHARP copiers Look for the Genuine Supplie...

Page 64: ... time Approx 7 2 sec Warm up time Approx 45 sec Copy ratio Variable 25 to 400 in 1 increments total 376 steps Fixed preset 50 64 77 95 100 121 129 141 200 Exposure system Document glass Moving optical source slit exposure stationary platen with automatic exposure SPF Moving original Paper feed One automatic feeding paper tray 250 sheets bypass tray 100 sheets Fusing system Heat rollers Developing ...

Page 65: ... operator position Copying 50 dB A Standby 18 dB A Noise emission measurement in accordance with ISO 7779 Emission concentration measured according to RAL UZ62 Edition Jan 2002 Ozone 0 02 mg m3 or less Dust 0 075 mg m3 or less Styrene 0 07 mg m3 or less Print speed 12 ppm Resolution 600 dpi Memory 16 MB Emulation SHARP GDI Interface IEEE1284 parallel connector USB connector USB1 1 Interface cables...

Page 66: ...ermination This license is effective until terminated You may terminate this License at any time by destroying the Software and related documentation and all copies thereof This License will terminate immediately without notice from SHARP and or SHARP s Licensors if you fail to comply with any provision of this License Upon termination you must destroy the Software and related documentation and al...

Page 67: ...OR ADVICE GIVEN BY SHARP OR A SHARP AUTHORIZED REPRESENTATIVE SHALL CREATE A WARRANTY OR IN ANY WAY INCREASE THE SCOPE OF THIS WARRANTY SHOULD THE SOFTWARE PROVE DEFECTIVE YOU AND NOT SHARP OR A SHARP AUTHORIZED REPRESENTATIVE ASSUME THE ENTIRE COST OF ALL NECESSARY SERVICING REPAIR OR CORRECTION SOME JURISDICTIONS DO NOT ALLOW THE EXCLUSION OF IMPLIED WARRANTIES SO THE ABOVE EXCLUSION MAY NOT APP...

Page 68: ... 274 277 France Sharp Electronics France S A Telephone number for information 01 49 90 34 00 Austria Sharp Electronics GMBH Telephone number for information 01 727 19 0 Italy Sharp Electronics Italy S P A Telephone number for information 02895951 Spain Sharp Electronics Espana S A Telephone number for information 93 581 97 00 Netherlands Sharp Electronics Benelux B V Telephone number for informati...

Page 69: ... water and drink several glasses of water If irritation or discomfort does occur consult medical personnel 5 FIRE FIGHTING MEASURES Extinguishing Media Water CO2 foam and dry chemicals Special Fire Fighting Procedures None Fire and Explosion Hazards Toner material like most finely divided organic powders may form an explosive mixture 6 ACCIDENTAL RELEASE MEASURES Personal Precautions None Environm...

Page 70: ...ely divided organic powders Conditions to Avoid Electric discharge throwing into fire Materials to Avoid Oxidizing Materials Hazardous Decomposition Products CO CO2 and NOX Further Information None 11 TOXICOLOGICAL INFORMATION Acute Toxicity Ingestion oral LD50 2000mg kg Rats Inhalation No Data Eye irritation Not an irritant Rabbits Skin irritation Not an irritant Rabbits Skin sensitizer No sensit...

Page 71: ...Superfund Amendments and Reauthorization Act Title III 302 Extreme Hazardous Substance None 311 312 Hazard Classification None EU Information 1999 45 EC and 67 548 EEC Symbol Indication Not required R Phrase Not required 76 769 EEC All chemical substances in this product comply with all applicable rules or order under 76 769 EEC 16 OTHER INFORMATION NFPA Rating USA Health 1 Flammability 1 Reactivi...

Page 72: ...dom Sharp Electronics U K Ltd Telephone number for information 08705 274 277 France Sharp Electronics France S A Telephone number for information 01 49 90 34 00 Austria Sharp Electronics GMBH Telephone number for information 01 727 19 0 Italy Sharp Electronics Italy S P A Telephone number for information 02895951 Spain Sharp Electronics Espana S A Telephone number for information 93 581 97 00 Neth...

Page 73: ... water and drink several glasses of water If irritation or discomfort does occur consult medical personnel 5 FIRE FIGHTING MEASURES Extinguishing Media Water CO2 foam and dry chemicals Special Fire Fighting Procedures None Fire and Explosion Hazards Toner material like most finely divided organic powders may form an explosive mixture 6 ACCIDENTAL RELEASE MEASURES Personal Precautions None Environm...

Page 74: ...organic powders Conditions to Avoid Electric discharge throwing into fire Materials to Avoid Oxidizing Materials Hazardous Decomposition Products CO CO2 and NOX Further Information None 11 TOXICOLOGICAL INFORMATION Acute Toxicity Ingestion oral LD50 2000mg kg Rats Inhalation No data Eye irritation Not an irritant Rabbits Skin irritation Not an irritant Rabbits Skin sensitizer No sensitization Muta...

Page 75: ...er under TSCA SARA Superfund Amendments and Reauthorization Act Title III 302 Extreme Hazardous Substance None 311 312 Hazard Classification None EU Information 1999 45 EC and 67 548 EEC Symbol Indication Not required R Phrase Not required 76 769 EEC All chemical substances in this product comply with all applicable rules or order under 76 769 EEC 16 OTHER INFORMATION NFPA Rating USA Health 1 Flam...

Page 76: ...EAR ALL key 11 12 CLEAR key 11 18 19 Conventions used in this manual 6 Copy functions 18 Copy ratio display key 10 23 38 56 D Dark indicator 10 21 Dark key 10 21 31 32 Display 10 39 46 Document cover 8 18 20 56 Document feeder tray 9 19 Document glass 8 18 56 Drum cartridge 9 54 Drum cartridge handle 9 Drum cartridge life 57 Drum cartridge replacement required indicator 10 DUAL PAGE COPY indicator...

Page 77: ...ument cover 20 Replacing the drum cartridge 54 Replacing the TD cartridge 53 Right side cover 9 47 Roller rotating knob 9 49 50 Routine maintenance 55 56 S Selecting the tray 21 Setting the number of copies 22 Side cover 8 Side cover handle 8 Single pass feeder SPF 60 Software license 64 Specifications 62 SPF indicator 11 19 20 START indicator 11 12 START key 11 12 18 19 35 37 Storage of supplies ...

Page 78: ...ng mode Copies how to make 39 Setting procedures 37 Settings 36 Automatic exposure level setting 31 High image quality mode 32 Toner save mode 32 User programs 33 Setting procedures 35 Settings 33 Problem occurs Misfeeds Bypass tray 48 Machine fusing area 49 Machine paper feed area 49 Machine transfer area 51 Paper tray 52 SPF 47 Troubleshooting 40 Indicators lit and blinking Drum cartridge replac...

Page 79: ...ed to make any representations or warranties on behalf of Sharp Specifically SHARP DOES NOT EXTEND TO YOU THE END USER ANY EX PRESS WARRANTY OR ANY IMPLIED WARRANTY OF MERCHANTABILITY FITNESS FOR USE OR FITNESS FOR ANY PARTICULAR PURPOSE IN CON NECTION WITH THE HARDWARE SOFTWARE OR FIRMWARE EMBODIED IN OR USED IN CONJUNCTION WITH THIS PRODUCT Sharp is not respon sible for any damages or loss eithe...

Page 80: ...00 post consumer recycled paper PRINTED IN CHINA 2005E KS1 TINSE1480QSZZ AR 5316 SHARP CORPORATION SHARP ELECTRONICS CORPORATION Sharp Plaza Mahwah New Jersey 07430 1163 www sharp usa com SHARP ELECTRONICS OF CANADA LTD 335 Britannia Road East Mississauga Ontario L4Z 1W9 Cover4 fm 1 ページ 2005年5月20日 金曜日 午前11時11分 ...

Reviews: