background image

34

35

Chapter 5: Email & Messages

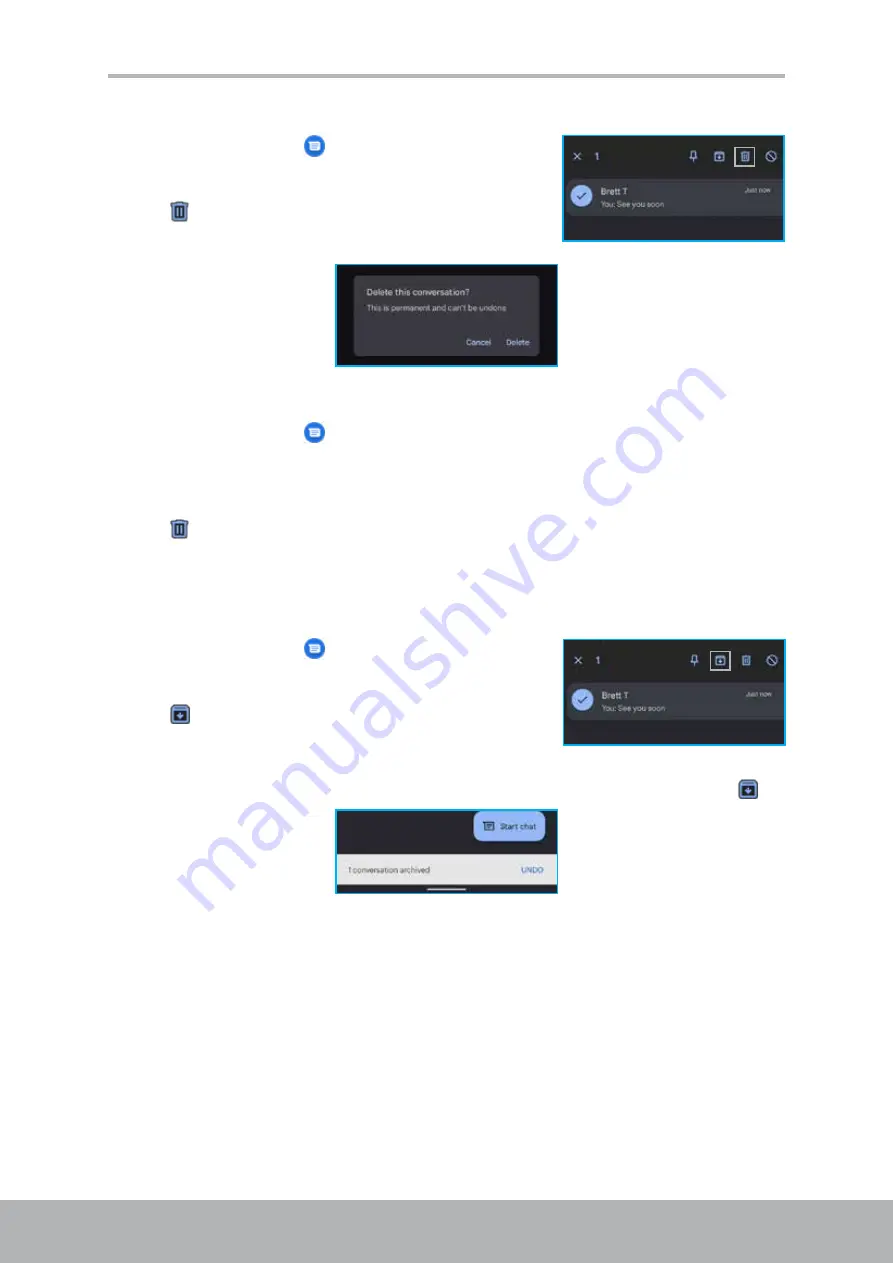
Delete a message thread

1.  Tap 

Home screen

 > 

.

2.  Long-tap on the message thread you want to delete.
3.  Tap   to delete the thread.
4. 

When prompted to confirm deletion, tap 

Delete

.

Delete all message threads

1.  Tap 

Home screen

 > 

.

2.  Long-tap on the message thread you want to delete.
3.  Select the message threads you want to delete.
4.  Tap   to delete the threads.
5. 

When prompted to confirm deletion, tap 

Delete

.

Archive message thread

1.  Tap 

Home screen

 > 

.

2.  Long-tap on the message thread you want to archive.
3.  Tap   to archive the thread.

NOTE: 

If you archived the message thread mistakenly and wish to recall it, tap 

UNDO

 on the bottom of the screen within a few seconds after tapping  .

Summary of Contents for AQUOS wish

Page 1: ...User Manual Model SH WS10 ...

Page 2: ...ff 11 Restart the Device 11 Switch the Device to Airplane Mode 11 Switch the Device to Sleep Mode 11 1 6 Locking and Unlocking the Screen 12 1 7 Using the Headset 13 1 8 Adjusting the Volume 13 Chapter 2 The Basics 14 2 1 Home Screen 14 Status Bar 15 Notifications Panel 16 Open Apps 17 View Running Apps and Manage Resources 17 Home Screen Management 18 Folders 19 Launch the Google Assistant Screen...

Page 3: ...ing a call 30 Accept or reject an incoming call 30 4 3 Ending a call 30 4 4 In Call Options 31 4 5 Call Log 32 Chapter 5 Email Messages 33 5 1 Text Message 33 Create and Send Text Messages 33 Receive and Manage Messages 33 5 2 Multimedia Message 36 Create and Send MMS Messages 36 5 3 Customizing Message Settings 37 Managing MMS Messages 37 5 4 Email Accounts 38 Set Up Email Account 38 Add More Ema...

Page 4: ...53 Access the Camera App 53 Take Photos 53 Record Videos 55 Capture Modes 56 Review Photos 56 Review Videos 57 Configure the Camera Settings 58 8 2 Viewing Photos Videos 59 8 3 Google Lens App 61 Use Google Lens 61 Chapter 9 Apps 63 9 1 Apps Screen 63 9 2 Google Apps 64 Web Browsers 64 Gmail 64 Maps 64 YouTube 64 Drive 64 YT Music 64 Google Play Movies TV 65 Duo 65 Calendar 65 Assistant 65 Google ...

Page 5: ...10 1 Device Settings 69 10 2 Change Basic Settings 75 Date and Time 75 Time Zone 76 To manually set the time zone 76 Time Format 76 Display Settings 77 Adjust screen brightness 77 10 3 Use Wireless Networks 78 10 4 Protect Your Phone 79 10 5 Manage Mobile Data Limit 80 10 6 Reset the Device 80 Chapter 11 Specifications 81 Important Information 82 Compliance Information 84 ...

Page 6: ...6 Chapter 1 Getting Started Chapter 1 Getting Started 1 1 Part Names Front View Earpiece Front camera Screen Sensor window Back View Mobile light Rear camera NFC ...

Page 7: ...Started Side Views nanoSIM microSD tray Volume Up Down key Google Assistant key Power key Left Right Fingerprint sensor Top and Bottom Views 3 5mm earphone jack Microphone Microphone USB Type C connector Speaker Top Bottom ...

Page 8: ...er 1 Getting Started 1 2 Accessories Your package comes with the following items If any of them is missing please contact your retailer Smartphone Quick Switch Adapter Quick Start Guide Warranty Card combined ...

Page 9: ...t Install the SIM card Align the nanoSIM card properly with the notch in the tray and then insert the tray back in the slot If inserted correctly the tray should go in smoothly SIM Install the memory microSD card Place the memory microSD card onto the tray microSD SIM Replace the nanoSIM microSD tray Push the nanoSIM microSD tray into the card slot ...

Page 10: ...ces Overheat protection mechanism is activated the device will temporarily stop charging When the system temperature reaches the maximum operating temperature the device will automatically activate the overheat protection mechanism and temporarily stops battery charging When the system temperature drops the system will automatically restart the battery charging NOTE Battery life varies depending o...

Page 11: ... Press and hold the Power key until the Power menu is displayed 2 In the Power menu tap Restart Switch the Device to Airplane Mode Airplane mode temporarily disables wireless functions from cellular radio Wi Fi and Bluetooth 1 Slide down from the top of the screen to open the quick settings panel 2 Drag the panel down to extend the quick settings panel then slide to left until you see the Airplane...

Page 12: ...77 Lock the screen To manually lock the screen and turn off the display press the Power key Unlock the screen 1 While the screen is off press the Power key 2 Swipe up from the bottom of the screen to unlock the screen NOTE The lock screen also provides a quick access to the Camera app and Google Assistant To open the Camera app tap on the lock screen and swipe diagonally left To open the Google As...

Page 13: ...ou Do not set the headset volume to its maximum as it may damage your hearing 1 8 Adjusting the Volume To adjust the volume use either of the two methods Press the Volume Up Down key repeatedly to adjust the volume Press the Volume Up Down key once Then drag the volume slider to adjust the volume NOTE In volume quick menu you can also configure settings for incoming calls and notifications Vibe Mu...

Page 14: ...em status and clock Tap an icon to access the app Perform Google search TIP On the Home screen swipe up to access more apps Refer to Open Apps on page 17 On the Home screen swipe up from the bottom of the screen to view the recent apps Refer to View Running Apps and Manage Resources on page 17 Long tap on a blank space on the Home screen to configure Home screen settings add widgets and select a w...

Page 15: ...ly discharged Network signal strength Fewer bars indicate lower signal strength New text message notification New email notification VoLTE is connected An alarm is set VoWiFi is connected Silent mode is activated Wi Fi is connected Vibrate mode is activated Wi Fi is not connected File is downloading Hotspot connection is active Weather forecast Bluetooth connection is active Latest news Airplane m...

Page 16: ...ications tap Manage To remove all the notifications tap Clear all To view and manage notifications that show up with no audible or visual alert tap Silent In silent notifications panel view recently sent notifications configure lock screen notifications and more To enable or disable device features from quick settings panel tap on the desired setting shortcut If the shortcut is not visible extend ...

Page 17: ...t to open NOTE On Apps screen you can also search for apps View Running Apps and Manage Resources To open the recent apps overview and close unnecessary apps swipe up from the bottom of the screen on the Home screen Do any of the following Tap on the app to quickly access it To close the app tap the app and swipe up To take a screenshot of the current notification app tap Screenshot To use the spl...

Page 18: ...e Home screen enable or disable screen auto rotation and more Widgets Add small views of apps on the Home screen for a quick access Add a widget 1 Long tap on the widget you want to add to the Home screen a Select the Home screen where you want to add the widget b Select the location on the Home screen where you want to add the widget 2 Release the widget Modify a widget Long tap on the widget and...

Page 19: ... the folder and enter the folder name Modify a folder 1 Tap on the folder you wish to modify 2 Do any of the following To relocate the folder long tap on the folder and drag it to your preferred Home page To remove an app from the folder long tap on the app and then drag it out from the folder To uninstall the app long tap on the app and drag it to Remove To rename the folder tap on the current fo...

Page 20: ...tomatically or you can update them manually by swiping down from your device screen NOTE Access more Google apps on the Home screen or access Google Assistant by pressing the Google Assistant key on the side of your device Changing the Device Settings A complete list of device settings such as network connections accounts apps privacy and more are available in Settings menu The Settings menu can b...

Page 21: ...have not sign in with your Google account tap Sign in and follow the on screen instructions to complete the setup If you have already configured Google account in your phone go to step 2 to add a new contact Otherwise tap to directly create a new contact without synchronizing with your Google account 2 Tap to start adding a new contact 3 Tap to add the contact s photo then enter the first name las...

Page 22: ...le or a SIM card and export contacts to VCF file 1 Tap Home screen Google folder 2 Tap Settings Manage contacts 3 Select one of the following options Import contacts from VCF file or SIM card and tap OK Export contacts to a VCF file modify the file name if necessary and tap SAVE ...

Page 23: ...to Chapter 4 Using the Phone on page 28 Text Contacts 1 Tap Home screen Google folder 2 Tap a contact in the list 3 Tap Text 4 Compose and send your message Refer to Chapter 5 Email Messages on page 33 Video Chat with Contacts 1 Tap Home screen Google folder 2 Tap a contact in the list 3 Tap Video to start video chat NOTE Video chat uses Google Duo app Email Contacts 1 Tap Home screen Google folde...

Page 24: ... want to delete Tap on any other contact you also want to delete if necessary 3 Tap to delete the contact s 4 When prompted to confirm deletion tap Move to Trash Send Contact Information You can send contact information to other devices through a sharing application such as Nearby Share Messages Gmail Bluetooth or saving to Google Drive 1 Tap Home screen Google folder 2 Long tap on the contact you...

Page 25: ...ite Contacts Add the most frequently called contacts to Favorites to access contacts quickly and easily The favorites list will appear on the top of the Contacts list NOTE You can also access the Favorites list by tapping Home screen and select the Favorites tab Add to Favorites You can add contacts to favorites list 1 Tap Home screen Google folder 2 Tap on the contact you want to add to the favor...

Page 26: ...ching for Contacts Edit Contacts 1 Tap Home screen Google folder 2 Do any of the following to search for contacts easily a Swipe up and down on the screen to scroll the contacts list b On the Search contacts box type the first few letters of the contact to search or enter an alphabetical index to view contact names that start with the letter For example to view names that start with a tap a and th...

Page 27: ...such as your classmates colleagues and more 1 Tap Home screen Google folder 2 Tap Create label 3 Enter the label name and tap OK 4 Tap and select the contact s to be added into the group NOTE You can also add the contact into the specific group by selecting the contact and then tapping Add to label Select the desired group ...

Page 28: ...4 Using the Phone To open the Phone app tap on the Home screen Tap to configure the call history call settings and read help or send feedback Tap to show the onscreen keypad List of calls Search contacts and places Tap to show recent calls ...

Page 29: ... tap on the contact to edit number before calling or copy number You can add the number to the contacts list by tapping on Create new contact add the number to an contact by tapping Add to a contact or instead of calling send a message by tapping Send a message 4 To call a number tap 5 To end a call tap Make a call from Contacts 1 Tap Home screen and select the Contacts tab NOTE You can also acces...

Page 30: ...rs You may also see the caller s phone number if available NOTE If you receive a call while using the phone the incoming call is displayed as follows Accept or reject an incoming call Swipe up to answer on the lock screen or tap ANSWER on the Home screen Swipe down to reject on the lock screen or tap DECLINE on the Home screen To reject the call with a message tap then select a pre written message...

Page 31: ... 4 In Call Options To mute or unmute the microphone tap To display the on screen keypad tap To use the speakerphone tap To set up a conference call tap and enter the second phone number To put the call on hold tap To end a call tap ...

Page 32: ...number as spam or view call details tap on the contact name and then tap on the respective option To view only missed calls tap Missed tab To view all call history tap All tab To view the contact s number copy the number edit the number before call block report the number or delete the entry from the call log long tap on the entry and select the respective option from the pop up menu To clear the ...

Page 33: ... scroll the contacts list and select contact s 4 Compose your message 5 Tap to send your message NOTE If you close Messaging app before sending your message the unsent message will be automatically saved as a draft You can also send text message through Contacts and Phone apps Refer to 3 3 Communicating with Contacts on page 23 and 4 5 Call Log on page 32 respectively Receive and Manage Messages W...

Page 34: ... 2 Long tap on the message thread you want to delete 3 Select the message threads you want to delete 4 Tap to delete the threads 5 When prompted to confirm deletion tap Delete Archive message thread 1 Tap Home screen 2 Long tap on the message thread you want to archive 3 Tap to archive the thread NOTE If you archived the message thread mistakenly and wish to recall it tap UNDO on the bottom of the...

Page 35: ...u want to pin 3 Tap to pin the thread NOTE A icon will appear next to the pinned thread Block the message sender 1 Tap Home screen 2 Long tap on the message thread you want to block 3 Tap to block the sender and report the spammer s number optional 4 When prompted to confirm blocking the sender tap OK ...

Page 36: ...om Contacts swipe up or down on the screen to scroll the contacts list and select contact s 4 To attach an item to your message tap any of the following Add a smiley or emoticon to your message Tap and hold to record and attach an audio file Attach a GIF Attach a sticker Attach your current location coordinates Share a contact Attach a file Capture an image or select an image from the Gallery and ...

Page 37: ...ges Spam blocked View the messages Settings Customize message options such as chat features notifications bubbles hear outgoing message sounds your current country automatic previews spam protection advanced settings and read terms policy terms of service Help feedback Seek for help and support Managing MMS Messages 1 Tap Home screen 2 Tap on the MMS message thread 3 Tap then tap any of the follow...

Page 38: ... manually enter the email settings tap Other and skip to step 6 4 Enter your email address or phone number and password 5 Tap Next The device will automatically retrieve the email settings 6 Select an email connection protocol which best suits your needs Personal POP3 Select to download all emails from the mail server and save locally on the device Your email cannot be accessed via any webmail or ...

Page 39: ...tomatically retrieve your emails Add More Email Accounts 1 Tap Home screen Google folder 2 Tap on the profile icon for example 3 Tap Add another account NOTE Your can also add a new account by tapping Settings Add account 4 Select the account type and enter the email address or phone number and password 5 Follow the on screen instructions to complete the setup Once the account setup is complete th...

Page 40: ... Email Accounts 1 Tap Home screen Google folder 2 Tap on the profile icon for example 3 Tap Manage accounts on this device 4 Tap the account you want to delete 5 Tap REMOVE ACCOUNT 6 When prompted to confirm deletion tap REMOVE ACCOUNT ...

Page 41: ... To field enter the recipient s email address TIP Tap next to the To field to enter additional recipient s email addresses to Cc and or Bcc lines 4 Tap Subject then type a subject 5 Compose your email 6 Tap to add an attachment to your email from local disk Attach file or from Google drive Insert from Drive optional 7 Tap ...

Page 42: ...tically received to the inbox folder when the device is connected to the network Manually receive emails 1 Tap Home screen Google folder 2 Swipe down on the screen to reload the inbox content Email contains attachments Unread emails appear in bold text Meet app ...

Page 43: ...attachment Then tap on any of the following pop up menu options Save to save the attachment Save all to download all attachments Save to Drive to save the attachment to Google Drive Save to Photos to save the attachment to Google Photos Share to send the attachment with Gmail Messages Maps Duo video chat Nearby Share Photos Lens Bluetooth or Files by Google send with Files app Share all to send al...

Page 44: ...he email or tap Reply on the bottom of the email To reply all tap Reply all on top of the email or tap Reply all on the bottom of the email To forward tap Forward on top of the email or tap Forward on the bottom of the email 3 Compose your email 4 Tap Mark email as unread 1 Tap Home screen Google folder 2 On the inbox for example PRIMARY screen tap an email to open it 3 Tap ...

Page 45: ... message s within a few seconds by tapping Undo on the bottom of the email screen Archive emails 1 Tap Home screen Google folder 2 On the inbox for example PRIMARY screen tap and swipe the email you want to archive to the left or to the right or long tap on the email s you want to archive and then tap NOTE You can archive an individual email also after opening it and tapping If archiving the messa...

Page 46: ...e email from the inbox for example PRIMARY folder The email will still appear in All mail folder Report spam to report the email as a spam mail NOTE To switch to light theme print the email add email to tasks or view help and feedback open the email first and then tap Start or Join a Meeting You can create and join video meetings for groups of up to 250 people 1 Tap Home screen Google folder 2 Tap...

Page 47: ...p Home screen or slide down the status bar extend the quick settings panel and tap 2 Tap Network internet Make sure the Wi Fi function is enabled 3 Tap Wi Fi to view all available wireless access points 4 Tap on the Wi Fi network you want to join NOTE You can also tap Add network to manually add a connection Refer to Add Wi Fi network on page 48 5 When connecting to a secured network you will be p...

Page 48: ...er of the following Tap Add network and enter the SSID select the security protocol configure any advance options if necessary and tap SAVE Tap to join Wi Fi by scanning a QR code Advanced Wi Fi settings 1 Tap Home screen or slide down the status bar extend the quick settings panel and tap 2 Tap Network internet 3 Tap Wi Fi 4 Scroll to the bottom of the list and tap Wi Fi preferences Then enable o...

Page 49: ...ernet Mobile network 3 The following mobile network settings are available Use SIM Activate or deactivate the SIM card Mobile data Enable or disable accessing data while using mobile network Roaming Connect to data services when roaming App data usage View the app data usage Data warning limit Configure the data warning and data limit related settings 4G Calling Enable or disable 4G services Prefe...

Page 50: ...re features and settings Tap to return to the homepage Viewing the page To scroll the website swipe up or down on the screen To zoom in on the page move your two fingers apart from each other at the location of the screen where you want to zoom in In zoom mode swipe your finger up or down and left or right To zoom out on the page move your two fingers closer together at the location of the screen ...

Page 51: ...b History View browsing history Downloads Access the page downloaded for offline reading Bookmarks Access the bookmarks page Recent tabs View recent page tabs Share Share the website link via one of the sharing apps Find in page Perform a search on the website Translate Display automatic translation bar on the bottom of the page Add to Home screen Add a shortcut of the website to the Home screen D...

Page 52: ... Home screen or slide down the status bar extend the quick settings panel and tap 2 Tap Connected devices 3 Tap Pair new device All detected Bluetooth devices are listed under Available devices 4 Tap on the device you want to connect to 5 Verify the pairing code on both Sharp device and the target device If the codes match tap PAIR Then follow the on screen instructions to complete setting up the ...

Page 53: ... open the Camera Go app do any of the following Tap on the lock screen and swipe diagonally left Tap Home screen Lock screen Take Photos Swipe and tap to select a capture mode Tap to configure the camera settings Tap to enable disable the HDR function Tap to select the flash mode Tap to switch between front and rear camera Tap to take a photo Tap to enable disable the Night mode Tap to use the zoo...

Page 54: ... Configure the Camera Settings on page 58 3 Tap on the screen to aim the focus point Move your fingers apart on the screen to zoom out or move your fingers together to zoom in on the subject if necessary You can also adjust the zoom level by tapping and drag the slider Move the brightness slider up or down to adjust the brightness if necessary Focus frame Slide to adjust the brightness level 4 Tap...

Page 55: ...en front and rear camera tap If you want to configure the camera settings for recording videos tap For more information refer to Configure the Camera Settings on page 58 2 Tap to start recording 3 While recording a video do any of the following Tap on the screen to aim the focus point if necessary Move your fingers apart on the screen to zoom out or move your fingers together to zoom in on the sub...

Page 56: ...een You will be directed to the Photos directly To return to the Camera mode tap To mark the photo as your favorite tap To access all photos and videos tap To view the photo details add a description add location backup add image to the selected album delete from the device use as wallpaper or contact s profile photo view in a slideshow print or get help and send feedback tap To send the photo to ...

Page 57: ...otos and videos tap To view the video details add a description add location backup enable loop playback view in another app image to the selected album delete from the device view in a slideshow or get help and send feedback tap To send the video to a group or contact create a link send via Gmail Bluetooth or other apps tap To edit the video tap Then make the necessary adjustment To delete the cu...

Page 58: ...Night mode HDR enhance in Photo mode only Enable disable the HDR function Flash Select the flash mode Face retouch in Photo mode only Enable disable the Face retouch function Timer in Photo mode only Set the timer before capturing a photo Photo aspect ratio in Photo mode only Specify the photo aspect ratio Gride type Enable disable a 3 x 3 grid to be appeared on the screen Save selfie as previewed...

Page 59: ...t date 4 Tap any of the following to send the image and or video to a group or contact create a link send via Gmail Bluetooth or via other apps to create an album shared album movie animation or collage of the selected image s and or video s You can also add the selected image s and video s to an existing album to delete the selected image and or video files to zoom in or zoom out on the first sel...

Page 60: ...recordings by Entering the search word to the search bar Places things your recent activities categories and creations collages animations and more View image and video library 1 Tap Home screen Photos 2 Tap Library tab 3 View your images and recording in different folders such as Favorites Utilities Archive Trash and Albums ...

Page 61: ...eature screen opens Swipe and tap to select a function Tap to close Google Lens Tap to return to the Google Lens main screen Tap to use flashlight Tap to capture or search 2 Select a function from the available options Translate Translate text the captured text Text Take a photo of words to copy Search Search similar items Homework Search for help to the captured homework Shopping Check for produc...

Page 62: ...ults will appear on the screen NOTE The available search option varies depending on the selected function An example of Search function shown as below Option to choose 4 Select the desired option to continue or tap the photo on the Virtual matches to view more information ...

Page 63: ... that you can access the latest available Google apps from the Google Play Store Some of the app updates require the Wi Fi connection 9 1 Apps Screen To access all apps on your device on the Home screen swipe up from the bottom of the screen Then tap on the app s shortcut to open it Search for apps on your device or in Google Play Frequently accessed apps All apps ...

Page 64: ...sit information and explore your local neighborhoods by learning where to eat drink and go from anywhere in the world YouTube Tap Apps screen Google folder YouTube Use YouTube to watch music videos shows news subscribe to channels you like and more Drive Tap Apps screen Google folder Drive Use Drive to back up and access all your files from any device Invite your friends to view edit or leave comm...

Page 65: ...our events Assistant Tap Apps screen Google folder Assistant Use Assistant for information and for help with everyday tasks For more details refer to Launch the Google Assistant Screen on page 20 Google One Tap Apps screen Google folder Google One Use Google One to back up data manage account storage and learn about member benefits Google Pay Tap Apps screen Google folder Google Pay Use Google Pay...

Page 66: ... translate text identify plants and animals explore places around you and more For more details refer to 8 3 Google Lens App on page 61 Files Tap Apps screen Google folder swipe the screen to the left Files Use Files to free up space by cleaning recommendations find files faster share files offline and back up files to the cloud storage Phone Tap Apps screen Phone Use Phone to connect with family ...

Page 67: ...3 5 2 Multimedia Message on page 36 and 5 3 Customizing Message Settings on page 37 Photos Tap Apps screen Photos Use Photos to manage and share your photos and videos For more details refer to 8 2 Viewing Photos Videos on page 59 Play Store Tap Apps screen Play Store Use Play Store to browse and install games apps movies and books to your device ...

Page 68: ...he bedtime 9 5 Calculator Tap Apps screen Calculator Use Calculator to perform mathematical calculations 9 6 Settings Tap Apps screen Settings Use Settings to configure various device settings For more details refer to Chapter 10 Managing Your Device on page 69 9 7 KARADA MATE Tap Apps screen KARADA MATE Use KARADA MATE to record the number of steps your weight and more You can also display the hi...

Page 69: ... settings that you want to configure Tap on each category to configure the related settings Setting Description Network internet Wi Fi Manage Wi Fi connections scan and connect to available Wi Fi networks Mobile network Select networks enable accessing data using mobile network enable roaming view app data usage enable 4G calling and configure advanced settings Airplane mode Enable or disable the ...

Page 70: ...ted settings Cast Cast your device screen to an available receiver Printing Configure print services Files received via Bluetooth View files received via Bluetooth Chromebook Link your device to Chromebook Nearby Share Share files with nearby services Android Auto Use apps on your car screen Apps notifications Recently opened apps View and manage recently opened apps See all apps View and manage a...

Page 71: ... temperature Battery percentage Enable showing the battery percentage in status bar View last full charge and screen usage since full charge Display Brightness level Adjust the screen brightness level Adaptive brightness Enable the adaptive brightness function to allow automatic brightness adjustment based on the environment and activities Dark theme Enable the dark theme function to help keep the...

Page 72: ... AQUOS Tricks Configure the settings for convenient functions supplied with the device including using rich color technology mobile feature fingerprint sensor and Pay Trigger setup using auto scroll to check notifications clip now gaming settings and other convenient operation settings Home applications Select your preferred launcher screen from AQUOS Home default and AQUOS Kantan Home Storage Vie...

Page 73: ...nows when it is safe to stay unlocked Device admin apps Enable Find My Device to lock or erase a lost device Set up SIM card lock Enable to lock the SIM card and require PIN to make calls Advanced Configure advanced settings such as encryption and credentials trust agents and more Accounts Add account Add device owner account s and enable automatically sync app data Accessibility Configure accessi...

Page 74: ...ion function Configure the power menu related settings such show cards passes and device controls Date time Configure date and time settings Backup Manage the account storage enable back up by Google One configure Google account data and enable back up using the mobile data System continued Advanced Select device reset options and perform factory reset Update the system manually About phone View d...

Page 75: ...e network NOTE To manually set the date and time tap the enable disable slider To manually set the date and time 1 Tap Home screen Apps screen or Quick settings panel 2 Tap System Date time 3 Disable Use network provided time 4 Do the following Tap Date and select the date from the calendar Then tap OK to save the setting Tap Time and rotate the hour minute slider to set the correct time Then tap ...

Page 76: ...o manually set the time zone tap the enable disable slider To manually set the time zone 1 Tap Home screen Apps screen or Quick settings panel 2 Tap System Date time 3 Disable Use network provided time zone 4 Tap Time zone and select the time zone in your location Time Format 1 Tap Home screen Apps screen or Quick settings panel 2 Tap System Date time 3 Tap Use locale default to use the default ti...

Page 77: ...htness 1 Tap Home screen Apps screen or Quick settings panel 2 Tap Display 3 Tap Brightness level 4 Drag the Brightness level slider to adjust the screen brightness Your settings is automatically saved NOTE You can also access the Brightness level slider by extending the quick settings panel Control screen rotation 1 Tap Home screen Apps screen or Quick settings panel 2 Tap Display Advanced 3 Tap ...

Page 78: ...twork internet Mobile Network Use SIM To enable or disable Airplane mode tap Network internet Airplane mode To enable or disable Bluetooth tap Connected devices Pair new device or Connection preferences Bluetooth On Off To share Internet connection from your device to other nearby devices do any of the following Enable Wi Fi hotspot Tap Network internet Hotspot tethering Wi Fi hotspot On Enable US...

Page 79: ...t pattern lock no PIN or password Then follow the on screen instructions to complete the procedure if necessary To use fingerprint authentication tap Fingerprint and follow the on screen instructions to complete the procedure To use the smart lock feature tap Smart Lock and you can either choose on body detection trusted places or trusted devices to keep the device unlocked Enable SIM Card Lock If...

Page 80: ... Tap System Advanced Reset options 3 Tap any of the following option Reset Wi Fi mobile Bluetooth This operation will reset all network settings Tap RESET SETTINGS to complete the procedure NOTE Check Delete downloaded SIMs to delete all your eSIMs Reset app preferences This operation will reset all preferences for disabled apps disabled app notifications default apps for actions background data r...

Page 81: ...8 38 41 5G n1 n3 n7 n28 n38 n41 n78 WiFi IEEE 802 11 a b g n ac 5 2 4GHz Bluetooth BT5 1 GPS Yes GLONASS Galileo BeiDou Michibiki QZSS Assisted GPS Security Fingerprint sensor Yes Face unlock No Sensors Ambient light sensor Accelerometer Fingerprint Sensor E compass Gyroscope Interfaces microSD Up to 1TB nanoSIM 1 slot USB Type C Buttons Power Volume Up Down Google Assistant 3 5 mm audio jack Yes ...

Page 82: ...t detect the touch well Please wipe off water with dry and clean cloth Disconnect the device from an electrical outlet and power off before cleaning the device NEVER attempt to connect or disconnect the power adapter with wet hands Clean the touch screen with a soft cloth If needed dampen the cloth slightly before cleaning Never use abrasives or cleaning solutions DO NOT disassemble the device Onl...

Page 83: ...an not be removed please do not disassemble There is the danger of explosion if disassemble by unauthorized personnel Recycle or dispose used batteries according to the local regulations Road and Environmental Safety Turn off the device in areas with a potentially explosive atmosphere or where flammable objects exist such as gas stations fuel depots and chemical plants among others Sparks from the...

Page 84: ... CERTIFIED logo and the Wi Fi logo are trademarks of Wi Fi Alliance All technologies and products used in this device are the intellectual property rights owned by individual owners Compliance Information Band WCDMA B1 B8 LTE FDD B1 B3 B7 B8 B28 LTE TDD B38 B41 5G n1 n3 n7 n28 n38 n41 n78 Connection Wi Fi IEEE 802 11 a b g n ac 2 4 GHz 5 GHz Bluetooth5 1 NFC Contents of Accessories Quick Start Gui...

Page 85: ... 請勿將任何異物插入裝置內 請勿讓裝置受到強力磁場或電場 請勿於易受高溫的環境下使用或存放本設備 如接近明火或發熱設備處 請勿在可能遭水等液體濺灑處使用或存放本裝置 雨水 水霧 果汁 咖啡 蒸汽 等液體 也可能導致故障 請參閱裝置上的額定值標籤 並務必使用符合額定值的電源變壓器 請僅使用製造 商所提供的週邊配件 長時間使用本裝置可能導致裝置的溫度升高 若認為裝置過熱 請避免持續碰觸裸 露的皮膚 以免造成不適感或灼傷 在清潔裝置前 請先從電源插座拔出插頭 並關閉裝置電源 雙手潮濕時 切勿嘗試連接或拔出電源變壓器 請使用柔軟布料清潔觸控螢幕 如有需要 可稍微沾濕布料再進行清潔 切勿使用 研磨材料或清潔溶液 請勿拆解裝置 僅限由合格的維修人員進行維修工作 請與當地主管機關或零售商聯繫 以妥善棄置電子產品 使用者必須使用USB 2 0 以上版本的USB 傳輸線進行連接 電源變壓器應該安裝在靠近設備...

Page 86: ...話 電話網路訊號可能會對導航系統造成干擾 為維護安 全 大多數國家的法律皆禁止在航空工具上使用電話 版權資訊 Copyright SHARP Corporation 2021 版權所有 Android 是 Google LLC 的商標 microSD 是SD卡協會的商標 USB Type C 是USB協會的商標 LTE是ETSI的商標 在本裝置中使用的所有產品及此處提及的商標 皆為個別擁有者所有之商標或註冊 商標 智慧財產權資訊 Bluetooth 及 Bluetooth 標誌皆為 Bluetooth SIG Inc 所 有之商標 Java JME及所有其他Java標記皆為Oracle Corporation在美國及其他國家的商標或 註冊標 Wi Fi 是Wi Fi任證的標籤 Wi Fi標籤是Wi Fi聯盟的商標 本装置使用之所有技術及產品皆為個別擁有者所有之智慧財產權 內裝物 快速使用指...

Page 87: ...響飛航安全及干擾合法通信 經發現有干擾現象時 應立即停用 並改善至無干擾時方得繼續使用 前述合法通信 指依電信管理法規定作業之無線電通信 低功率射頻器材須忍受合法通信或工業 科學及醫療用電波輻射性電機設備之干 擾 應避免影響附近雷達系統之操作 網路 WCDMA B1 B8 LTE FDD B1 B3 B7 B8 B28 LTE TDD B38 B41 5G n1 n3 n7 n28 n38 n41 n78 連接機能 Wi Fi IEEE 802 11 a b g n ac 2 4 GHz 5 GHz 藍牙 5 1 NFC 如何更改區域 設定 系統 日期和時間 關閉 使用網路提供的時 時區 區域 台灣 如何更改語言 設定 系統 語言與輸入設定 語言 將 繁體中文 台灣 移到頂部 製造號碼 IMEI 若要確認序號 IMEI 請進行以下操作 設定 關於手機 IMEI 驗證 若要確認驗證 請進行以...

Page 88: ...88 Chapter 11 Specifications 製 造 商 SHARP CORPORATION 進 口 商 台灣夏普股份有限公司 地 址 新北市土城區中山路16 號7 樓 客服專線 0809 090 510 ...

Reviews: