background image

ENGLISH

3

E

 20.   Usage of the monitor must not be accompanied by fatal risks or dangers that, could lead directly to death, personal injury, 

severe physical damage or other loss, including nuclear reaction control in nuclear facility, medical life support system, and 

missile launch control in a weapon system.

 21.   Do not stay in contact with the parts of the product that become hot for long periods of time. Doing so may result in 


low-temperature burns.

 22.   Do not modify this product.

WARNING:

This is a Class A product. In a domestic environment this product may cause radio interference in which case the user may 

be required to take adequate measures.

An apparatus with CLASS I construction shall be connected to a MAIN socket outlet with a protective earthing connection.

STABILITY HAZARD

If a monitor is not positioned in a sufficiently stable location, it can be potentially hazardous due to falling. Many injuries, 

particularly to children, can be avoided by taking simple precautions such as:

• Using fixing devices like wall mount brackets recommended by the manufacturer.

• Only using furniture that can safely support the monitor.

• Ensuring the monitor is not overhanging the edge of the supporting furniture.

•  Not placing the monitor on tall furniture (for example, cupboards or bookcases) without anchoring both the furniture and the 

monitor to a suitable support.

• Not standing the monitors on cloth or other materials placed between the monitor and supporting furniture.

• Educating children about the dangers of climbing on furniture to reach the monitor or its controls. 

• This equipment is not suitable for use in locations where children are likely to be present unsupervised.

Especially for child safety

- Don’t allow children to climb on or play with the monitor.

- Don’t place the monitor on furniture that can easily be used as steps, such as a chest of drawers.

-  Remember that children can become excited while watching a program, especially on a “larger than life” monitor. Care 

should be taken to place or install the monitor where it cannot be pushed, pulled over, or knocked down.

-  Care should be taken to route all cords and cables connected to the monitor so that they cannot be pulled or grabbed by 

curious children.

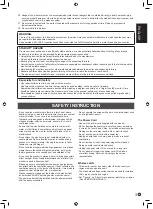
SAFETY INSTRUCTION

-  Do not use the monitor where there is a lot of dust, where 

humidity is high, or where the monitor may come into contact 

with oil or steam. Do not use in an environment where 

there are corrosive gases (sulfur dioxide, hydrogen sulfide, 

nitrogen dioxide, chlorine, ammonia, ozone, etc.). As this 

could lead to fire.

-

  Ensure that the monitor does not come into contact with 

water or other fluids. Ensure that no objects such as paper 

clips or pins enter the monitor as this could lead to fire or 

electric shock.

-


Do not place the monitor on top of unstable objects or in 

unsafe places. Do not allow the monitor to receive strong 

shocks or to strongly vibrate. Causing the monitor to fall or 

topple over may damage it.

-

  Do not use the monitor near heating equipment or in places 

where there is likelihood of high temperature, as this may 

lead to generation of excessive heat and outbreak of fire.

-


Do not use the monitor in places where it may be exposed to 

direct sunlight.

 Risk of cabinet deformation and failure if the 

monitor is used in direct sunlight.

-  Please be sure to constantly remove dust and garbage that 

has attached to the ventilation opening. If dust collects in the 

ventilation opening or the inside of the monitor, it may lead to 

excessive heat, outbreak of fire, or malfunction.


Please request a cleaning of the inside of the monitor from 

an authorized SHARP servicing dealer or service center.

-


The power outlet shall be installed near the equipment and 

shall be easily accessible.

-  Do not operate the screen with a hard or pointed object such 

as a fingernail or pencil.

The Power Cord

-  Use only the power cord supplied with the monitor.
-


Do not damage the power cord nor place heavy objects on 

it, stretch it or over bend it. Also, do not add extension cords. 

Damage to the cord may result in fire or electric shock.

-

  Do not use the power cord with a power tap. 

Adding an extension cord may lead to fire as a result of 

overheating.

-

  Do not remove or insert the power plug with wet hands. 

Doing so could result in electric shock.

-

  Unplug the power cord if it is not used for a long time.

-


Do not attempt to repair the power cord if it is broken 

or malfunctioning. Refer the servicing to the service 

representative.

Wireless LAN

- This monitor cannot be used in other than the country or 

region where you purchased it.

- The channels and frequencies that can be used for wireless 

LAN vary by country and region.

- Set “Country” on “Admin” menu appropriately for your region. 

(See OPERATION MANUAL.)

Summary of Contents for AQUOS PN-LE901

Page 1: ... FARBMONITOR ЖК МОНИТОР SETUP MANUAL MANUEL D INSTALLATION MANUAL DE INSTALACIÓN INSTALLATIONSANLEITUNG РУКОВОДСТВО ПО УСТАНОВКЕ ENGLISH E1 FRANÇAIS F1 ESPAÑOL S1 DEUTSCH D1 РУССКИЙ Р1 ENGLISH FRANÇAIS ESPAÑOL ENGLISH FRANÇAIS ESPAÑOL DEUTSCH РУССКИЙ ...

Page 2: ... coloured GREEN AND YELLOW must be connected to the terminal in the plug which is marked by the letter E or by the safety earth or coloured green or green and yellow The wire which is coloured BLUE must be connected to the terminal which is marked with the letter N or coloured black The wire which is coloured BROWN must be connected to the terminal which is marked with the letter L or coloured red...

Page 3: ...ct Thank you for your purchase of a SHARP LCD product To ensure safety and many years of trouble free operation of your product please read the Safety Precautions carefully before using this product DEAR SHARP CUSTOMER IMPORTANT INFORMATION Contents ENGLISH IMPORTANT INFORMATION 1 DEAR SHARP CUSTOMER 1 SAFETY PRECAUTIONS 2 SAFETY INSTRUCTION 3 MOUNTING PRECAUTIONS 4 Supplied Components 5 Specifica...

Page 4: ...ternal parts For the same reason do not spill water or liquid on the product 13 Servicing Do not attempt to service the product yourself Removing covers can expose you to high voltage and other dangerous conditions Request a qualified service person to perform servicing 14 Repair If any of the following conditions occurs unplug the power cord from the power outlet and request a qualified service p...

Page 5: ... monitor where there is a lot of dust where humidity is high or where the monitor may come into contact with oil or steam Do not use in an environment where there are corrosive gases sulfur dioxide hydrogen sulfide nitrogen dioxide chlorine ammonia ozone etc As this could lead to fire Ensure that the monitor does not come into contact with water or other fluids Ensure that no objects such as paper...

Page 6: ...een unit corner or speaker This may cause product damage failure or injury This monitor should be used at an ambient temperature between 41 F 5 C and 95 F 35 C Be careful of high temperatures in the surrounding area If it is difficult to provide sufficient space for any reason such as the installation of the monitor inside a housing or if the ambient temperature may be outside of the range of 41 F...

Page 7: ...ations Model PN CD701 Power requirement AC 100 V 240 V 4 2 A 50 60 Hz Operating temperature 41 F to 95 F 5 C to 35 C Operating humidity 20 to 80 no condensation Power consumption 370 W Dimensions excluding protrusions inch mm Approx 63 15 16 W x 3 9 16 D x 38 7 16 H 1623 5 x 90 0 x 976 5 Weight lbs kg Approx 143 3 65 Temperature condition may change when using the monitor together with the optiona...

Page 8: ...of Video Electronics Standards Association Adobe Acrobat and Acrobat Reader are either registered trademarks or trademarks of Adobe Systems Incorporated in the United States and or other countries VESA is either registered trademark or trademark of Video Electronics Standards Association in the United States and or other countries All other brand and product names are trademarks or registered trad...

Page 9: ...sor hub mounting brackets fit into the recess of this monitor It is possible to mount a camera in the following position 3 5 mm mini jack to USB A cable supplied USB A to B cable supplied S PDIF cable supplied 1 Attach the supplied camera with the supplied knurled screws M3 x2 The camera can be tilted downward TIPS The cable clamp supplied can be used to clamp the 3 5 mm mini jack to USB A cable s...

Page 10: ...onitor White lit Power on Amber lit Power off nOperations after first power on When the monitor is turned on for the first time after being shipped from the factory the setting screen will be displayed Configure the settings according to the screen About Operation Mode Mode1 This monitor goes into standby mode when there is no operation for 4 hours Power consumption in standby mode is also minimiz...

Page 11: ...ture To attach a VESA compliant mounting bracket use M6 screws that are 5 16 inch 8 mm to 3 8 inch 10 mm longer than the thickness of the mounting bracket Screws M6 Mounting bracket Monitor mounting 5 16 3 8 inch 8 10 mm Do not use an impact driver After mounting please carefully ensure the monitor is secure and not able to come loose from the wall or mount Do not use any screw holes other than th...

Page 12: ...MEMO ...

Page 13: ... importante dans les manuels accompagnant le produit INFORMATIONS IMPORTANTES CHER CLIENT Nous vous remercions d avoir acheté cet appareil SHARP à écran LCD Afin de garantir le bon fonctionnement de ce moniteur nous vous conseillons de lire attentivement cette brochure et de la conserver pour toute référence ultérieure INFORMATIONS IMPORTANTES 1 CHER CLIENT 1 PRÉCAUTIONS DE SÉCURITÉ 2 MESURES DE S...

Page 14: ...ou un liquide sur l appareil 13 Entretien N essayez pas de réparer vous même l appareil Le démontage des couvercles peut vous exposer à une haute tension ou à d autres dangers Confiez toute réparation à un personnel qualifié 14 Réparation Dans les cas suivants débranchez le cordon d alimentation au niveau de la prise d alimentation secteur et demandez à un personnel qualifié d effectuer les répara...

Page 15: ... incendie Assurez vous que le moniteur ne se trouve pas en contact avec de l eau ou d autres fluides Assurez vous qu aucun objet tel que des agrafes et des trombones ne pénètre dans le moniteur car cela pourrait provoquer un début d incendie ou un choc électrique N installez pas le moniteur au dessus des objets instables ou dans des endroits peu sûrs Faites attention que le moniteur ne reçoive pas...

Page 16: ...in de l unité ou le haut parleur Ceci pourrait causer une panne un dysfonctionnement ou une blessure Ce moniteur doit être utilisé sous une température ambiante entre 5 C et 35 C Faites attention aux températures élevées autour des moniteurs S il est difficile de laisser un espace suffisant pour une raison ou pour une autre installation du moniteur dans une enceinte par exemple ou si la températur...

Page 17: ...g Environ 65 La température de fonctionnement du moniteur peut être différente de celle des accessoires additionnels recommandés par SHARP Lorsque c est le cas veuillez vérifier la température de fonctionnement des accessoires additionnels SHARP se réserve le droit d apporter sans préavis des modifications à la présentation et aux caractéristiques des appareils aux fins d amélioration Les valeurs ...

Page 18: ...o Electronics Standards Association Adobe Acrobat et Acrobat Reader sont des marques déposées ou des marques commerciales de Adobe Systems Incorporated aux États Unis et ou dans d autres pays VESA est une marque déposée ou une marque commerciale de Video Electronics Standards Association aux États Unis et ou dans d autres pays Toutes les autres marques et les noms de produits sont des marques comm...

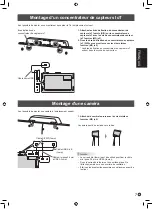
Page 19: ... sur ce moniteur avec les vis moletées fournies M3 x2 Les bras de fixation du concentrateur de capteurs IoT entrent dans l encoche de ce moniteur Il est possible de monter une caméra à l emplacement suivant Câble mini prise 3 5 mm à USB A fourni Câble USB A à B fourni Câble S PDIF fourni 1 Attachez la caméra fournie avec les vis moletées fournies M3 x2 La caméra peut être inclinée vers le bas Cons...

Page 20: ...é en blanc Power en position marche Allumé en ambre Power en position arrêt n Opérations après la première mise sous tension Lorsque le moniteur est allumé pour la première fois après sa livraison l écran des réglages s affiche Configurez les réglages en suivant les instructions à l écran À propos de Operation Mode Mode de fonctionnement Mode1 Ce moniteur se met en mode veille lorsqu aucune opérat...

Page 21: ...8 mm à 10 mm plus longues que l épaisseur du support de montage Vis M6 Support de montage Fixation du moniteur 8 10 mm N utilisez pas de tournevis à percussion Après le montage assurez vous que le moniteur est bien fixé au mur ou au support sans risque de relâche N utilisez pas de trous de vis autres que les trous de vis pour les supports de montage et situés à l arrière du moniteur pour l install...

Page 22: ...MEMO ...

Page 23: ...ompaña al producto INFORMACIÓN IMPORTANTE 1 ESTIMADO CLIENTE DE SHARP 1 PRECAUCIONES DE SEGURIDAD 2 INSTRUCCIONES DE SEGURIDAD 3 PRECAUCIONES DE MONTAJE 4 Componentes suministrados 5 Especificaciones 5 Preparación del control remoto 5 Conexiones 6 Montaje de una unidad de microcontrolador IoT 7 Montaje de una cámara 7 Encendido apagado 8 Precauciones de montaje para distribuidores y técnicos de se...

Page 24: ...jetos podría provocar descargas eléctricas y o cortocircuitar los componentes internos Por la misma razón no derrame agua o líquidos sobre el producto 13 Servicio No intente reparar usted mismo el producto La retirada de las tapas podría exponerle a alto voltaje y otras circunstancias peligrosas Solicite cualquier reparación a un técnico de servicio calificado 14 Reparación Si se produjera cualqui...

Page 25: ...e monitor no puede utilizarse en un país o una región que no sea donde fue adquirido Los canales y las frecuencias que se pueden usar para la LAN inalámbrica varían según el país y la región Defina Country País en el menú Admin Administrador como corresponda según su región Véase el MANUAL DE INSTRUCCIONES 20 El monitor no deberá utilizarse en lugares con riesgos o peligros fatales que pudieran pr...

Page 26: ...lla las esquinas de la unidad o el altavoz Esto podría provocar daños en el producto fallos o lesiones Este monitor deberá utilizarse a una temperatura ambiente de entre 5 C y 35 C Evite altas temperaturas en el área circundante Si fuera difícil proporcionar suficiente espacio por cualquier razón como puede ser la instalación del monitor dentro de una carcasa o si la temperatura ambiente pudiera e...

Page 27: ...local Acerca del cable alargador USB Tipo C Conecte el cable alargador USB Tipo C suministrado entre el cable USB Tipo C suministrado y el dispositivo externo Cuando conecte desconecte el dispositivo externo enchufe desenchufe el cable alargador USB Tipo C para evitar dañar el cable USB Tipo C Precaución El cable USB Tipo C también puede alimentar al ordenador conectado Contacte con el contratista...

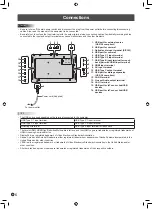
Page 28: ...pagar el interruptor primario y desconectar el enchufe de la toma de corriente antes de conectar desconectar los cables Asimismo lea el manual del equipo que desea conectar Tenga cuidado de no confundir el terminal de entrada con el terminal de salida al conectar los cables La inversión accidental de los cables conectados a los terminales de entrada y salida podría causar malfuncionamientos y otro...

Page 29: ...leteados suministrados M3 x2 Los brazos de fijación de la unidad de microcontrolador IoT encajan en la ranura de este monitor Montaje de una cámara Se puede montar una cámara en la siguiente posición Cable mini jack de 3 5 mm a USB A suministrado Cable USB A a B suministrado Cable S PDIF suministrado 1 Sujete la cámara suministrada con los tornillos moleteados suministrados M3 x2 La cámara puede i...

Page 30: ...tación encendida Encendido en ámbar Alimentación apagada n Operaciones después del primer encendido Cuando se enciende el monitor por primera vez tras haberse enviado de fábrica aparece la pantalla de configuración Configure los ajustes según la pantalla Acerca de Operation Mode Modo de operación Mode1 Modo1 Este monitor pasa al modo en espera cuando no se realiza ninguna operación en 4 horas El c...

Page 31: ...colocar una ménsula de montaje compatible con VESA use tornillos M6 que sean 8 mm a 10 mm más largos que la ménsula de montaje Tornillos M6 Ménsula de montaje Montaje del monitor 8 10 mm No utilice un destornillador de impacto Una vez efectuado el montaje asegúrese de que el monitor está instalado de forma segura y que no se puede aflojar de la pared o el soporte No utilice orificios de tornillos ...

Page 32: ...MEMO ...

Page 33: ...enten 5 Technische Daten 5 Vorbereiten der Fernbedienung 5 Anschlüsse 6 Befestigung des IoT Sensor Hub 7 Befestigung einer Kamera 7 Ein und ausschalten 8 Wichtige Hinweise zur Befestigung Für SHARP Händler und Servicetechniker 9 Verwenden Sie EMV gerechte abgeschirmte Kabel um die folgenden Anschlüsse zu verbinden HDMI Eingangsanschluss USB Eingangs Ausgangsanschlüsse und Audioausgangsanschluss VO...

Page 34: ...Gegenständen besteht Stromschlaggefahr bzw die Gefahr von Kurzschlüssen zwischen den Bauteilen Aus demselben Grunde dürfen auch keine Flüssigkeiten auf das Gerät verschüttet werden 13 Wartung Versuchen Sie auf keinen Fall selbst Wartungsarbeiten am Gerät durchzuführen Durch das Entfernen von Abdeckungen setzen Sie sich hohen Spannungen und anderen Gefahren aus Lassen Sie sämtliche Wartungsarbeiten...

Page 35: ...Dampf in Kontakt kommen könnte Verwenden Sie den Monitor nicht an Orten an denen ätzende Gase Schwefeldioxid Schwefelwasserstoff Stickstoffdioxid Chlor Ammoniak Ozon auftreten können Dies zu einem Brand führen könnte Achten Sie darauf dass der Monitor nicht mit Wasser oder anderen Flüssigkeiten in Berührung kommt Achten Sie auch darauf keine Gegenstände wie z B Büroklammern oder sonstige spitze Ge...

Page 36: ...tsprecher an Das Gerät könnte dadurch beschädigt werden oder Sie könnten sich dabei verletzen Dieser Monitor sollte bei einer Umgebungstemperatur zwischen 5 C und 35 C verwendet werden Vermeiden Sie hohe Temperaturen in der Umgebung des Geräts Wenn es aus irgendeinem Grund schwierig ist ausreichend Platz frei zu lassen etwa weil der Monitor in ein Gehäuse eingebaut wird oder wenn die Umgebungstemp...

Page 37: ...ungen ohne Vorsprünge mm Ca 1623 5 B x 90 0 T x 976 5 H Gewicht kg Ca 65 Die Temperaturbedingungen können sich ändern wenn das Monitor zusammen mit von SHARP empfohlenem Zubehör verwendet wird Überprüfen Sie in diesem Fall bitte die für das Zubehör empfohlenen Temperaturbedingungen Bedingt durch fortlaufende technische Verbesserungen behält sich SHARP das Recht vor das Design und die Spezifikation...

Page 38: ...be Acrobat und Acrobat Reader sind entweder geschützte Warenzeichen oder Warenzeichen von Adobe Systems Incorporated in den USA und oder in anderen Ländern VESA ist entweder ein geschütztes Warenzeichen oder ein Warenzeichen von Video Electronics Standards Association in den USA und oder in anderen Ländern Alle andere Markenprodukt und Produktnamen sind Warenzeichen oder geschützte Warenzeichen de...

Page 39: ...ssparung dieses Monitors Befestigung einer Kamera Eine Kamera kann an folgender Position befestigt werden Kabel mit 3 5 mm Minibuchse an USB A im Lieferumfang enthalten USB Kabel A zu B im Lieferumfang enthalten S PDIF Kabel im Lieferumfang enthalten 1 Befestigen Sie die mitgelieferte Kamera mit den mitgelieferten Rändelschrauben M3 x2 Die Kamera kann nach unten geneigt werden TIPPS Mit der Kabelk...

Page 40: ...or eingeschaltet Oranges Licht Monitor ausgeschaltet nBetrieb nach dem ersten Einschalten Wenn der Monitor zum ersten Mal nach dem Versand ab Werk eingeschaltet wird wird der Einstellungsbildschirm angezeigt Konfigurieren Sie die Einstellungen gemäß dem Bildschirm Über Operation Mode Betriebsmodus Mode1 Modus1 Dieser Monitor wechselt in den Standby Modus wenn für 4 Stunden kein Betrieb stattfindet...

Page 41: ...enden Sie die M6 Schrauben die 8 bis 10 mm länger als die Dicke des Montagewinkel sind zum Befestigen des VESAkompatiblen Montagewinkel Schrauben M6 Montagewinkel Monitor Befestigung 8 10 mm Verwenden Sie keinen Schlag oder Akkuschrauber Überprüfen Sie nach der Befestigung des Monitors sorgfältig dass der Monitor sicher befestigt ist und sich auf keinen Fall von der Wand oder der Befestigungsvorri...

Page 42: ...MEMO ...

Page 43: ...именяемыми техническими стандартами Импортер в России ООО Шарп Электроникс Раша Адрес Россия 105120 Москва 2 й Сыромятнический пер 1 Телефон 7 495 899 00 77 Класс защиты от поражения электрическим током I Дата производства указана в серийном номере SERIAL No 0 1 2 3 4 5 6 7 Месяц 1 Январь 9 Сентябрь 0 Октябрь X Ноябрь Y Декабрь Год 1 2021 9 2019 0 2020 ВАЖНАЯ ИНФОРМАЦИЯ 1 УВАЖАЕМЫЙ КЛИЕНТ КОМПАНИИ...

Page 44: ...ивести к пожару или поражению электрическим током 12 Попадание внутрь корпуса предметов и жидкостей Категорически запрещается вставлять какие либо предметы внутрь изделия через вентиляционные или другие отверстия Внутрь изделия подается высокое напряжение поэтому просовывание в его корпус через отверстие какого либо предмета может привести к поражению электрическим током и или короткому замыканию ...

Page 45: ...и со своим регионом См Руководство по эксплуатации Используйте только рекомендуемый тип батареек В соответствии с инструкциями в отсеке для батареек вставьте поставляемые батарейки правильно сориентировав их стороны с знаками и Не используйте одновременно старые и новые батарейки Не используйте батарейки различных типов Напряжение батареек одинаковой формы может отличаться Оперативно заменяйте раз...

Page 46: ... может привести к повреждению изделия его неисправности или к травмированию людей Данный монитор должен эксплуатироваться при температуре окружающей среды от 5 C до 35 C Избегайте окружающей среды с высокой температурой Если сложно обеспечить достаточное пространство по той или иной причине например из за того что монитор устанавливается внутри кожуха или из за того что температура окружающей сред...

Page 47: ... в домашний мусор Следуйте инструкциям по утилизации действующим там где вы проживаете Об удлинительном USB кабеле типа C Присоединяйте удлинительный USB кабель типа C входит в комплект между USB кабелем типа C входит в комплект и внешним устройством При подключении отключении внешнего устройства вставляйте вынимайте удлинительный USB кабель типа C чтобы не повредить USB кабель типа C Внимание По ...

Page 48: ...iation Adobe Acrobat и Acrobat Reader являются или зарегистрированными торговыми марками или торговыми марками Adobe Systems Incorporated в Соединенных Штатах и или в других странах VESA является или зарегистрированной торговой маркой или торговой маркой Video Electronics Standards Association в Соединенных Штатах и или в других странах Все другие бренды и названия продуктов являются торговыми мар...

Page 49: ...3 x2 Крепежные кронштейны концентратора датчика интернета вещей вставляются в углубление данного монитора Камеру можно прикрепить в показанном ниже месте Кабель мини джек 3 5 мм USB A входит в комплект USB кабель A B входит в комплект Кабель S PDIF входит в комплект 1 Присоедините поставляемую камеру поставляемыми винтами с накатанной головкой М3 x2 Камеру можно наклонять вниз ПОДСКАЗКИ Для фиксац...

Page 50: ... Состояние Статус монитора Белое свечение Питание вкл Янтарное свечение Питание выкл n Действия после первого включения питания При первом включении монитора после отгрузки с завода отображается экран настроек Выполните соответствующие настройки на экране О Operation Mode Рабочий Режим Mode1 Режим1 Данный монитор переходит в режим ожидания при отсутствии управления в течение 4 часов Потребление эн...

Page 51: ...тимые со стандартом VESA следует использовать винты М6 длина которых на 8 10 мм больше толщины крепежного кронштейна Крепление монитора 8 10 мм Винты М6 Крепежные кронштейн Запрещается использовать ударные инструменты После установки убедитесь в том что монитор надежно закреплен на стене и в креплении Запрещается использовать для установки какие либо другие отверстия для крепежных винтов за исключ...

Page 52: ...MEMO ...

Page 53: ...MEMO ...

Page 54: ...tot 5350 MHz 5470 MHz tot 5725 MHz 24150 MHz tot 24250 MHz Vermogen draadloze overdracht Minder dan 20 dBm 23 dBm 30 dBm 12 dBm EIRP Käesolevaga deklareerib Sharp et käesolev raadioseadme tüüp LCD MONITOR PN CD701 vastab direktiivi 2014 53 EL nõuetele ELi vastavusdeklaratsiooni täielik tekst on kättesaadav järgmisel internetiaadressil http www sharp eu documents of conformity Spetsifikatsioone Sag...

Page 55: ...se http www sharp eu documents of conformity Špecifikácie Frekvenčný rozsah 2400 MHz až 2483 5 MHz 5150 MHz až 5350 MHz 5470 MHz až 5725 MHz 24150 MHz až 24250 MHz Bezdrôtový vysielací výkon menej ako 20 dBm 23 dBm 30 dBm 12 dBm EIRP Sharp potrjuje da je tip radijske opreme LCD MONITOR PN CD701 skladen z Direktivo 2014 53 EU Celotno besedilo izjave EU o skladnosti je na voljo na naslednjem spletne...

Page 56: ...Printed in China Imprimé en Chine Impreso en China Gedruckt in China Отпечатано в Китае 3A2263000 000 G 1 ...

Reviews: