background image

42

30%

MENU    

[Setup ... Auto Sync.]

No

Yes

Useful adjustment settings

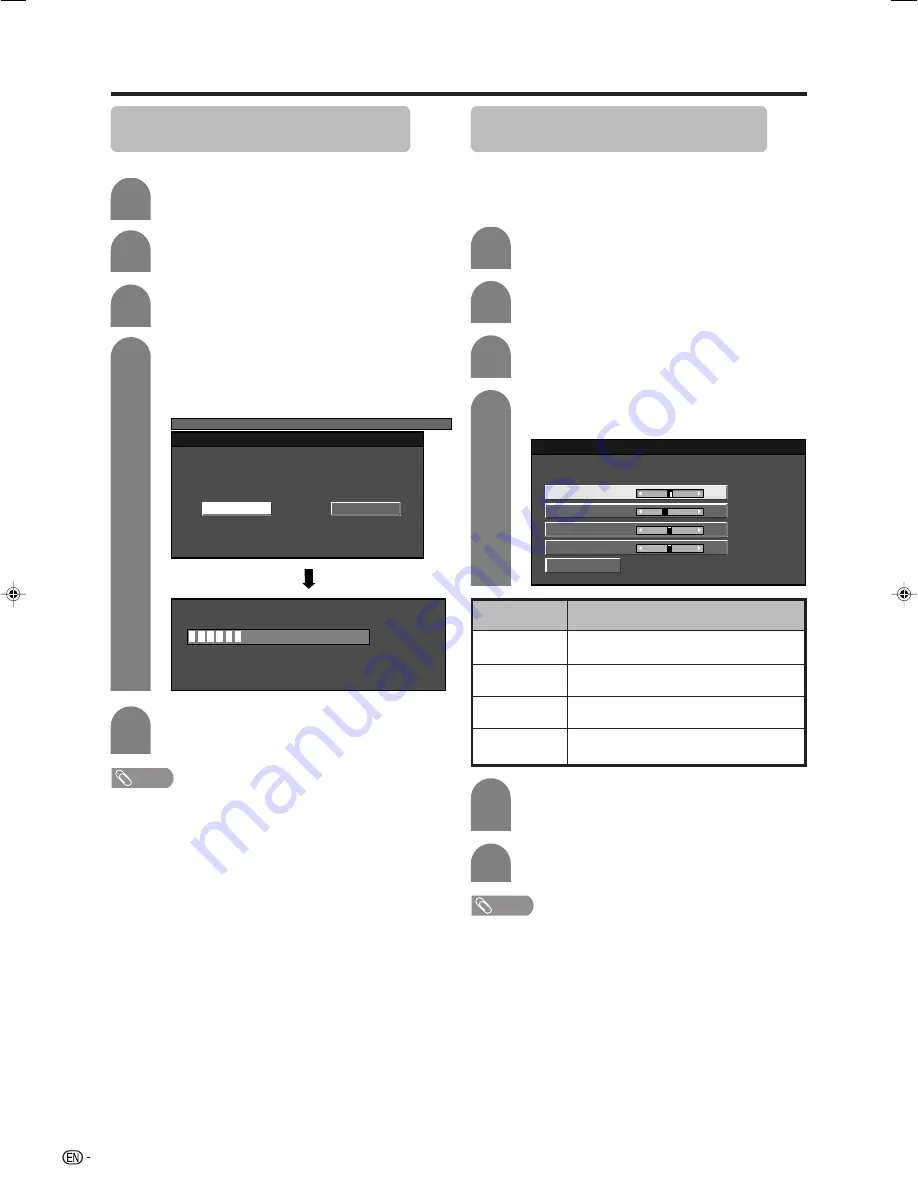
Auto Sync. adjustment (PC input
mode only)

For automatically adjusting the PC image.

Press 

MENU

 and the MENU screen displays.

Press 

c

/

d

 to select “Setup”.

Press 

a

/

b

 to select “Auto Sync.”, and then

press 

ENTER

.

Press 

c

/

d

 to select “Yes”, and then press

ENTER

.

• Auto Sync. starts and “Adjusting the image”

displays.

NOTE

• When Auto Sync. is successful, “Auto Sync completed

successfully.” displays. If not, Auto Sync. failed.

• Auto Sync. may fail even if “Auto Sync completed

successfully.” displays.

• Auto Sync. may fail if the computer image has low

resolution, has unclear (black) edges, or is moved while
executing Auto Sync.

• Be sure to connect the PC to the TV and switch it on before

starting Auto Sync.

• Auto Sync. can be executed only when inputting analogue

signals.

Press 

MENU

 to exit.

Fine Sync. adjustment (PC input
mode only)

Ordinarily you can easily adjust the picture as
necessary to change image position using Auto Sync.
In some cases, however, manual adjustment is needed
to optimize the image.

Press 

MENU

 and the MENU screen displays.

Press 

c

/

d

 to select “Setup”.

Press 

a

/

b

 to select “Fine Sync.”, and then

press 

ENTER

.

Press 

c

/

d

 to adjust the item to your

desired position.

NOTE

• For resetting all adjustment items to the factory preset

values, press 

a

/

b

 to select “Reset”, and then press

ENTER

.

• “Clock” and “Phase” in the “Fine Sync” menu can be

adjusted only when inputting analogue signals.

Description

Centres the image by moving it to the left
or right.

Centres the image by moving it to the up or
down.

Adjust when the image flickers with vertical
stripes.

Adjust when characters have low contrast
or when the image flickers.

Selected item

H-Pos.

V-Pos.

Clock

Phase

Press 

a

/

b

 to select the specific

adjustment item.

Press 

MENU

 to exit.

5

1

2

4

3

Reset

H-Pos.

[ 90]

+

V-Pos.

Clock

Phase

[ 39]

[ 90]

[ 20]

+

+

+

5

6

1

2

4

3

Summary of Contents for Aquos LC-46GD7X

Page 1: ...LCD COLOUR TELEVISION OPERATION MANUAL LC 46GD7X LC 52GD7X MODEL ...

Page 2: ... TV Rear 13 Remote control unit 14 Watching TV 15 Turning on the power 15 Turning off the power 15 Simple button operations for changing channels 15 Using Flashback A on the remote control unit 16 Using MPX on the remote control unit 16 Simple button operation for changing volume sound 17 Sleep timer 17 ANALOG DTV RADIO buttons 18 Basic adjustment settings 19 Menu operation buttons 19 On Screen Di...

Page 3: ...ion 43 Wide Screen Signalling WSS 44 Picture aspect ratio 44 Standby Mode 45 Reset 45 WIDE mode for TV AV input mode 46 WIDE mode for PC input mode 47 Audio Only 48 DNR Digital Noise Reduction 48 HDMI Setup 48 Language setting for on screen display 49 Identification 49 Colour system setting 49 Trademarks HDMI the HDMI logo and High Definition Multimedia Interface are trademarks or registered trade...

Page 4: ...proper ventilation is provided or the manufacturer s instructions are followed The LCD panel used in this product is made of glass Therefore it can break when the product is struck forcefully or with a sharp object If the LCD panel is broken be careful not to be injured by broken glass Heat sources Keep the product away from heat sources such as radiators heaters stoves and other heat generating p...

Page 5: ...ety restraints Page 8 Restraining brackets Screws for brackets Clamps Screws for clamps NOTE Always use the AC cord supplied with the TV The illustrations and on screen displays in this operation manual are for explanation purposes and may vary slightly from the actual operations The illustrations used throughout this manual are based on LC 46GD7X Operation manual Cable clamp Page 6 ...

Page 6: ...or an extended period of time remove the batteries from it Inserting the batteries Before using the TV for the first time insert two AAA size batteries supplied When the batteries become depleted and the remote control fails to operate replace the batteries with new AAA size batteries Using the remote control unit Use the remote control unit by pointing it towards the remote sensor window Objects ...

Page 7: ...quipment to the TV 1 2 Removing the terminal cover Press down the hooks to remove the cover toward you AC cord See pages 9 to 11 for connecting antennas and external equipment such as VCR and DVD player AC outlet Place the TV close to the AC outlet and keep the power plug within reach Cable clamp 3 Bundling the cables and closing the terminal cover Insert the cable clamps in the hole on the TV as ...

Page 8: ...nstructions that come with the bracket before beginning work Removing the stand For wall mounting with the optional bracket remove the stand Before attaching detaching the stand Before detaching or attaching the stand unplug the AC cord from the AC outlet Remove all terminal covers and connected cables Make sure two or more people perform the operation CAUTION Do not remove the stand from the TV u...

Page 9: ...supplied Wall CAUTION As this product is heavy use a table that is wide enough to support the product and capable of withstanding the product s weight The table should be set where it will not be overturned Be sure to use at least two people when moving the TV Restraining brackets supplied Table Screws supplied 1 Insert commercially available screws in the holes of the restraining brackets from th...

Page 10: ...axial cable Connecting to the AC outlet NOTE Always turn off the power of the TV when connecting the AC cord Disconnect the AC cord from the AC outlet if the TV will not be used for a long period of time Antenna cable commercially available Room antenna terminal 75 ohm type To antenna terminal Standard DIN45325 plug IEC169 2 75 ohm coaxial cable round cable AC outlet Antenna input terminal DTV Ant...

Page 11: ...r the video terminals only when Auto is selected in Input Select setting You can also connect the game console to INPUT 1 or 2 terminals to enjoy clearer picture Preparation CAUTION To protect all equipment always turn off the TV before connecting to a VCR DVD player HDTV tuner game console camcorder or other external equipment Please refer to the relevant operation manual VCR DVD player etc caref...

Page 12: ...sion adaptor input the Audio Signal from the AUDIO terminal of INPUT 5 When using component cable select COMPONENT for Input Select in the menu When using HDMI cable commercially available Digital TV STB L R AUDIO Y PB CB PR CR When using component cable commercially available Digital TV STB Connecting a PC You can use the INPUT 6 DVI terminal when connecting to a PC DVI I AUDIO L R When using DVI...

Page 13: ...C indicator Headphone jack Regarding the headphone jack Use headphones with a stereo mini plug Ø 3 5 mm Be sure to unplug headphones from the jack when they are not in use The speakers do not output volume when headphones are plugged in Audio adjustments page 30 do not affect the audio of connected headphones You can set the volume to different levels for each input source 30 Volume display when h...

Page 14: ...tenna input terminal DTV INPUT 3 terminals INPUT 1 terminals INPUT 4 HDMI terminal AC INPUT terminal RS 232C terminal SERVICE ONLY terminal MONITOR OUT terminals DIGITAL AUDIO OUTPUT terminal To optical digital input of external audio devices Antenna input terminal ANALOGUE INPUT 5 HDMI terminal INPUT 6 terminals INPUT 5 AUDIO terminals ...

Page 15: ...53 1 Subpage TELETEXT mode Display the Teletext subpage directly See page 53 v Top Bottom Full TELETEXT mode Set the area of magnification See page 52 15 TV VIDEO INPUT SOURCE Select an input source TV DTV INPUT1 INPUT2 INPUT3 INPUT4 INPUT5 INPUT6 See pages 10 43 and 50 16 ANALOG To display analogue screen See page 18 DTV Press to access DTV mode while watching other input sources and vice versa S...

Page 16: ...rol NOTE If you are not going to use this TV for a long period of time be sure to remove the AC cord from the AC outlet Minor power is consumed when the TV is turned off by POWER on the TV or when the TV is in standby mode Simple button operations for changing channels You can change channels in several ways Using CHr son the remote control unit Press CHr to increase the channel number Press CHs t...

Page 17: ...nit Monaural mode When receiving a monaural signal Each time you press MPX the mode switches between NICAM MONO and MONO In the TV mode of A2 TV broadcasts When receiving a stereo signal Each time you press MPX the mode switches between STEREO and MONO Stereo mode Bilingual mode Monaural mode PAL B G MONO 99 BBC2 When receiving a bilingual signal Each time you press MPX the mode switches among CH ...

Page 18: ...me displays when sleep timer has been set NOTE The sleep timer indicator on the TV lights up when the time has been set When the time has been set countdown automatically starts Five minutes before the preset of time expires the remaining time displays each minute Select Off by pressing SLEEP to cancel the sleep timer 2 Sleep Timer Remain 2 hr 00 min 1 2 0 hr 30 min 1 hr 00 min 1 hr 30 min 2 hr 30...

Page 19: ...tly tuned radio channel When you watch the TV for the first time When the TV powers on for the first time after purchase perform the auto installation Analogue TV You can run the auto installation to set channels automatically 1 2 After setting the channels you can select a channel using CH r s or 0 9 on the remote control unit See page 15 To watch the analogue TV select Auto Installation from Set...

Page 20: ...tes an item can be selected 4 Item displayed in grey This indicates that the item cannot be selected There are various reasons why items cannot be selected but the main reasons are as follows 1 Nothing is connected to the selected input terminal 2 The function is not compatible with the current input signal NOTE Menu options differ in the selected input modes but the operating procedures are the s...

Page 21: ...ker Setup Page 40 Input Skip Page 41 Input Signal Page 41 Auto Sync Page 42 Input Label Page 43 Fine Sync Page 42 Position Page 43 Standby mode Page 45 Language Page 49 Reset Page 45 Treble Page 30 Bass Page 30 Balance Page 30 Surround Page 30 Audio Only Page 48 DNR Page 48 Input Select Page 50 HDMI Setup Page 48 Audio Power Control Setup Option NOTE Some menu items may not be displayed depending ...

Page 22: ...TV before then because the TV is saving the data found MENU Setup Programme Setup Setup Option Child Lock Speaker Setup Input Skip Auto Installation Programme Setup Position Identification Reset Panorama 4 3 Mode Mode1 Standby Mode English Language West Europe Text Language On WSS 5 Press c d to select Yes and then press ENTER Auto search starts with the following order 1 Programme auto search 2 A...

Page 23: ...ess ENTER The selected channel information displays Press a b to select Fine and then press ENTER Press c d to adjust the frequency and then press ENTER Adjust while checking the background picture as a reference 1 2 Fine Colour sys Sound sys Label Skip Lock 179 25 Search Auto B G Off SAT 1 Off 179 25 MHz Instead of the method above you can also set by directly entering the frequency number of the...

Page 24: ...d system menu Fine Search Colour sys Sound sys Label Skip Lock 179 25 Auto B G Off SAT 1 Off B G D K I M 3 2 Fine Colour sys Sound sys Label Skip Lock 179 25 Search Auto B G Off SAT 1 Off A BACK CLEAR END K U B L V C M W D N X E O Y F P Z G Q H R _ I S J T 0 1 2 3 4 5 6 7 8 9 Labelling menu 4 Press a b to select Label and then press ENTER Alphabets and numbers are listed Press a b c d to select ea...

Page 25: ...sword lifts the child lock temporarily until the power is turned off Setting the child lock You can block the viewing of any channel Fine Search Colour sys Sound sys Label Skip Lock 179 25 Auto B G Off SAT 1 Off Off On Lock menu Press a b to set Lock to On and then press ENTER Channels with Skip set to On are passed over when using CHr s even if selected while watching the image from the TV Manual...

Page 26: ...s a b to select Erase Programme and then press ENTER 6 7 8 Press c d to select Yes and then press ENTER Press a b c d to select the channel you want to erase and then press ENTER A message screen pops up Press c d to select Yes and then press ENTER to erase the selected programme All the subsequent programmes move up Repeat the steps 6 and 7 until all desired channels are erased Press MENU and the...

Page 27: ... Backlight See page 27 Automatically adjusts Displays the OPC effect on the screen while adjusting the brightness of the screen Selected item Off On On Display Press OPC to switch the OPC function on and off Using OPC on the menu screen NOTE You can select a different AV MODE item for each input mode For example select STANDARD for TV input and DYNAMIC for VIDEO input AV MODE STANDARD AV MODE DYNA...

Page 28: ...R Adjustments items MENU Picture Picture Audio Contrast OPC Brightness Colour Tint Sharpness Advanced Reset 30 0 0 0 0 0 30 30 30 10 40 30 30 30 10 Backlight 14 16 16 Off On On Display STANDARD The screen dims For less contrast For less brightness For less colour intensity Skin tones become purplish For less sharpness Backlight Contrast Brightness Colour Tint Sharpness NOTE Select Advanced and the...

Page 29: ...ng enables you to set the picture adjustment in more detail There are seven options you can choose from 3D Y C Provides high quality images with minimal dot crawl and cross colour noise Press a b to select 3D Y C and then press ENTER Repeat steps 1 to 3 in Colour temperature 1 2 3 Press a b to select the desired level and then press ENTER NOTE 3D Y C is not selectable depending on the input signal...

Page 30: ...vel range of the OPC sensor s automatic adjustments can be set according to your preferences The adjustment range of the OPC sensor can be set to a maximum of 16 and a minimum of 16 Press a b to select Range of OPC and then press ENTER Press a b to select Max or Min and then adjust the item to the desired position Repeat steps 1 to 3 in Monochrome 1 2 3 Description 15 through 16 16 through 15 Sele...

Page 31: ... MENU Audio Surround Audio Power Control Treble Bass Balance Surround Reset Off 0 0 15 L 15 0 15 15 R STANDARD Audio adjustment You can adjust the sound quality to your preference with the following settings Press c d to select Audio Press a b to select a specific adjustment item Press c d to adjust the item to your desired position 2 3 4 For weaker treble For weaker bass Decrease audio from the r...

Page 32: ... not operate Press c d to select Power Control Power control menu displays Press MENU and the MENU screen displays No Operation Off When set to Enable the power will automatically shut down if there is no operation for 3 hours Press a b to select No Operation Off and then press ENTER Press c d to select Enable and then press ENTER Five minutes before the power shuts down remaining time displays ev...

Page 33: ... I Plate Setup Page 38 Information Page 38 Quick Search Page 36 Audio Setup NOTE The illustrations and on screen displays in this manual are for explanation purposes and may vary slightly from the actual operations Selecting DTV mode Press DTV MENU to directly display DTV menu screen Setup Option Programme DTV Menu Programme S W Update SERVICE ONLY Page 38 DTV MENU Press to open or close DTV menu ...

Page 34: ... channel number 2 Date and current local time 3 Teletext 4 Audio system Dolby D or MPEG 5 Parental rate 6 Station name 7 Service name 8 Current programme name 9 Time for the current programme 0 Next programme name 12 0021 11 52 TTX Mpeg Jun 25 G INFO ABC Melbourne ABC2 NOW Montreux Jazz Festival 2003 11 04 12 03 NEXT The New Inventors Favourite Programme List When you are watching terrestrial TV c...

Page 35: ... to the channel You can easily select your favourite channel from the Favourite Programme List Selected item Lock Fav NOTE Press ENTER again to cancel FAV or Lock settings Parental Rate This function allows TV channels to be restricted It prevents children from watching violent or sexual scenes that may be considered inappropriate Repeat steps 1 to 3 in Favourite Lock 1 2 Press a b to select Paren...

Page 36: ... SNR The rate of signal and noise to radiated frequency Installation The first time the receiver is powered on Database is empty or No Channel Available will display on the screen Under the main menu select Installation and enter into the sub menu Auto Search You can automatically search for and download TV channels Press a b to select Setup and then press ENTER Press DTV MENU to display the DTV m...

Page 37: ...password 1234 See page 39 for setting a password Press DTV MENU to display the DTV menu screen Description Displays every DTV broadcast converted to1080i Displays the DTV broadcast in the format it is received Selected item Fix Auto Audio Setup Time Setup I Plate Setup Video Setup Fix Auto Output Format Press a b to select Quick Search and then press ENTER Press a b to select your city or region l...

Page 38: ... no Dolby Digital audio signal Selected item PCM Dolby Digital Press a b to select Multilingual and then press ENTER 2 Multilingual Digital Output Language Dolby D Language 1 Mpeg Audio Language Press a b to select your desired audio language and then press ENTER 3 Time Setup This function allows you to select your local time zone Repeat steps 1 to 3 in Digital Output 1 2 Press a b to select Time ...

Page 39: ...ss ENTER Press a b to select your desired item Press c d to select your desired value and then press ENTER 4 Press DTV MENU to display the DTV menu screen 1 2 3 Press a b to select Setup and then press ENTER Press a b to select System Setup and then press ENTER 5 6 2 Press a b to select Option and then press ENTER 3 Audio Setup Time Setup I Plate Setup Video Setup Display Time 5 sec 24 HR Time For...

Page 40: ...ress a b to select Child Lock and then press ENTER Press a b to select Reset and then press ENTER Press c d to select Yes and then press ENTER Press MENU and the MENU screen displays Press c d to select Setup NOTE As a precautionary measure make a note of your password and keep it in a familiar place If you lose or forget your password initialise the TV to return all settings except for the TV cha...

Page 41: ...until the speaker cable s lead wire reaches the metal part of the speaker terminal External Audio Bypass External Audio Bypass automatically optimises the audio quality to suit internal supplied speakers Press MENU and the MENU screen displays Press c d to select Setup Press a b to select Speaker Setup and then press ENTER Press c d to select Yes or No and then press ENTER Press a b to select Exte...

Page 42: ...C input mode only Some input signals may have to be registered manually to display properly The pairs of input signals resolutions in the list below are not distinguishable when received In such case you have to set the correct signal manually After setting once it will display when the same signal resolution is input again Press MENU and the MENU screen displays 1 Press a b to select Input Signal...

Page 43: ...to exit Fine Sync adjustment PC input mode only Ordinarily you can easily adjust the picture as necessary to change image position using Auto Sync In some cases however manual adjustment is needed to optimize the image Press MENU and the MENU screen displays Press c d to select Setup Press a b to select Fine Sync and then press ENTER Press c d to adjust the item to your desired position NOTE For r...

Page 44: ...ding to input source Input Label You can assign each input source a label you like Press MENU and the MENU screen displays 5 Press c d to select Setup Press a b to select Input Label and then press ENTER 6 Repeat until the name is fully spelt out The name can be 6 characters or less When you want to set an input source name of less than 6 characters select END then press ENTER to exit from the lab...

Page 45: ...screen format When the broadcast signal contains no WSS information the function will not work even if enabled Picture aspect ratio The WSS signal has 4 3 auto switching that allows you to select between Panorama and Normal Press MENU and the MENU screen displays 1 2 Press a b to select 4 3 Mode and then press ENTER 3 Press c d to select Panorama or Normal and then press ENTER 4 WSS signal 4 3 scr...
Page 46: ...ou can reset the settings to the factory preset values 4 5 Press c d to select Yes and then press ENTER Now TV will restart automatically OK displays on the screen 4 Press a b to select Mode1 or Mode2 and then press ENTER Press c d to select Yes and then press ENTER Now initialising displays on the screen and blinks After the reset has completed the power shuts off and then comes back on The scree...

Page 47: ...9 WIDE mode for TV AV input mode Manual Selection Press WIDE The WIDE MODE menu displays The menu lists the wide mode options selectable for the type of video signal currently received Auto Selection If you set WSS and 4 3 Mode in the Setup menu on page 44 the optimum WIDE mode is automatically chosen for every broadcast containing the WSS information WSS menu To enable Auto Selection set WSS in t...

Page 48: ...ll Cinema Input Signal Dot by Dot Full 1024g768 Keeps the original aspect ratio in a full screen display For viewing wide screen programs The top and bottom of the image is slightly cropped Detects the resolution of the signal and displays an image with the same number of pixels on the screen An image fully fills the screen 1360g768 a Screen size images Detects the resolution of the signal and dis...

Page 49: ... and the MENU screen displays 1 2 3 HDMI Setup HDMI High Definition Multimedia Interface terminal selection MENU Option HDMI Setup Option Audio Only DNR HDMI Setup Off 5 Press a b to select the desired item and then press ENTER Selectable items RGB YCbCr 4 4 4 YCbCr 4 2 2 Enable Disable Digital Analogue HDMI Setup items Signal Type Auto View Audio Select Description Select the video signal type fr...

Page 50: ...actory preset value is Auto If Auto is selected colour system for each channel is automatically set If an image does not display clearly select another colour system e g PAL NTSC 4 43 Language setting for on screen display You can also select a language from setup menu Select from among 3 languages English Chinese and Arabic 3 Press MENU and the MENU screen displays 1 2 4 Press c d to select Setup...

Page 51: ...it or TV VIDEO on the TV to select the input source An image from the selected source automatically displays You can also select the input source by pressing a b Selecting input signal type For setting the signal type of external equipment 1 2 Using external equipment Displaying an external equipment image Explanation here is for the setting when connecting DVD to INPUT1 terminal NOTE Each time TV...

Page 52: ...when it is sent by a network Not used to convert between languages Teletext language setting If Teletext information does not display correctly perform the setting procedure below Select from among 4 kinds of language tables West Europe East Europe Greek Turkish Cyrillic Each table is compatible with the Teletext languages listed below MENU Setup Text Language West Europe East Europe Greek Turkish...

Page 53: ...letext available is displayed The same message displays during other modes if no Teletext signal is available 1 2 3 Red Green Yellow Blue TELETEXT When viewing the Teletext information Press CHr to increase the page number Press CHs to decrease the page number Button functions Colour Red Green Yellow Blue You can select a group or block of pages displayed in the coloured brackets at the bottom of ...

Page 54: ...ubpage by using CHr CHs Red or Green 0 9 directly selects the desired subpage Press 1 to exit the subpage screen 4 NOTE Skip step 1 if receiving DTV broadcasts Select a TV channel providing Teletext information The time information is automatically captured 1 2 3 4 Press DISPLAY The channel display will appear on the display Press DISPLAY again within the three second interval the channel display ...

Page 55: ...ote control sensor Is the image position correct See page 43 Are screen mode adjustments such as picture size made correctly See pages 44 46 and 47 Adjust the picture tone See pages 27 to 29 and 48 Is the room too bright The picture may look dark in a room that is too bright Check the colour system setting See pages 23 and 49 Check the input signal setting See pages 41 and 50 Check the HDMI Setup ...

Page 56: ...gs of the TV are as follows Baud rate Parity bit Data length Stop bit Flow control 9 600 bps 8 bits None 1 bit None Appendix Command format Communication procedure Send the control commands from the PC via the RS 232C connector The TV operates according to the received command and sends a response message to the PC Do not send multiple commands at the same time Wait until the PC receives the OK re...

Page 57: ...F SURROUND TOGGLE SURROUND ON SURROUND OFF TOGGLE OFF SLEEP TIMER 30 MIN SLEEP TIMER 1 HOUR SLEEP TIMER 1 HOUR 30 MIN SLEEP TIMER 2 HOUR SLEEP TIMER 2 HOUR 30 MIN TEXT OFF TEXT ON TOGGLE DIRECT PAGE JUMP 100 899 WIDE MODE POSITION VOLUME SURROUND MUTE AUDIO CHANGE SLEEP TIMER TEXT O P P P P L H I I I I I I I I I I I U U U C C C C F F F F F F E E C L O O O O C S D D D D D D D D D D D T T T S S S H ...

Page 58: ...720P 60Hz 1080I 50Hz 1080I 60Hz 1080P 50Hz 1080P 60Hz INPUT 6 Ø 3 5mm jack Audio input DVI I DVI I input MONITOR OUT VIDEO out AUDIO out RS 232C 9 pin D sub male connector INPUT 3 VIDEO in AUDIO in S VIDEO in Headphones Ø 3 5mm jack Audio output Side Front DIGITAL AUDIO OUTPUT Optical Digital audio output Power Requirement AC 110 240 V 50 Hz Power Consumption Weight 274 W 0 9 W Standby 299 W 0 9 W...

Page 59: ...er cables 2 while pushing in on the tabs on the speaker terminals 1 2 Remove the two speaker terminal covers 1 Remove the two screws on both the left and right of the speaker unit Place cushioning on both sides of the stand to avoid scratching or damaging to the speakers 3 4 Lean the speakers slightly toward you 1 and lay them straight down onto the cushioning 2 NOTE To attach the speakers perform...

Page 60: ...onal drawings 200 200 800 800 1128 1264 1022 1155 576 651 681 761 853 949 73 78 99 110 517 573 360 360 131 129 125 126 100 100 200 200 LC 46GD7X LC 52GD7X NOTE Figures within parentheses are for LC 52GD7X Unit mm ...

Page 61: ... password clear the password using the following procedure Press MENU to display the MENU screen and then press c d to select Setup 1 2 3 Press and hold both CHr and VOLk on the TV simultaneously until the message appears on the screen The password resets to the factory preset 1234 Press a b to select Auto Installation Programme Setup Child Lock and the password input screen displays ...

Page 62: ...IMILE 09 573 0113 FOR LOCATION ENQUIRIES WITHIN AUSTRALIA REGARDING YOUR LOCAL SHARP APPROVED SERVICE CENTRE VISIT OUR WEBSITE AT www sharp net au OR CALL SHARP CUSTOMER CARE 1300 135 022 SHARP CORPORATION OF AUSTRALIA PTY LTD SPform019 JUNE 2004 LOCAL CALL COST APPLY WITHIN AUSTRALIA SHARP APPROVED SERVICE CENTRE www sharp net nz CONTACT YOUR SELLING DEALER RETAILER OR CALL ...

Page 63: ...from misuse abuse neglect accidental damage improper voltage liquid spillage vermin infestation software or any alterations made to the product which are not authorised by Sharp Please retain your sales documentation as this should be produced to validate a warranty claim This warranty is in addition to and in no way limits varies or excludes any express and implied rights and remedies under any r...

Reviews: