background image

15

NOTE 

• For resetting all adjustment items to the factory preset 

values, press 

a

/

b

 to select “Reset”, press 

ENTER

, press 

c

/

d

 to select “Yes”, and then press 

ENTER

.

• Images may not be displayed properly depending on the 

settings and/or input signals.

Input signal

• Some input signals may have to be registered 

manually to display properly.

• The pairs of input signals (resolutions) in the list 

below are not distinguishable when received. 
In such case, you have to set the correct signal 
manually. After setting once, it will display when the 
same signal (resolution) is input again.

 1280 

g

 768 

1360 

g

 768

H

 DivX (R) Reg. Code

Please see page 20.

H

 Version up

This function is only for service personnel to use for 
software updates.

Picture and still image

You can freeze a motion picture on the Display.

1

Press 

FREEZE

.

• A still image displays. 

2

Press 

RETURN

 again to exit still image.

NOTE 

• The still image automatically goes out after 30 minutes.
• FREEZE doesn’t function for PC input (all resolution).

Wide Mode

Auto Selection

If you set “WSS” and “4:3 mode” in the Setup menu, 
the optimum WIDE mode is automatically chosen for 
every broadcast containing the WSS information.

“WSS” menu

To enable Auto Selection, set “WSS” in the Setup 
menu to “On”. (See page 13.)
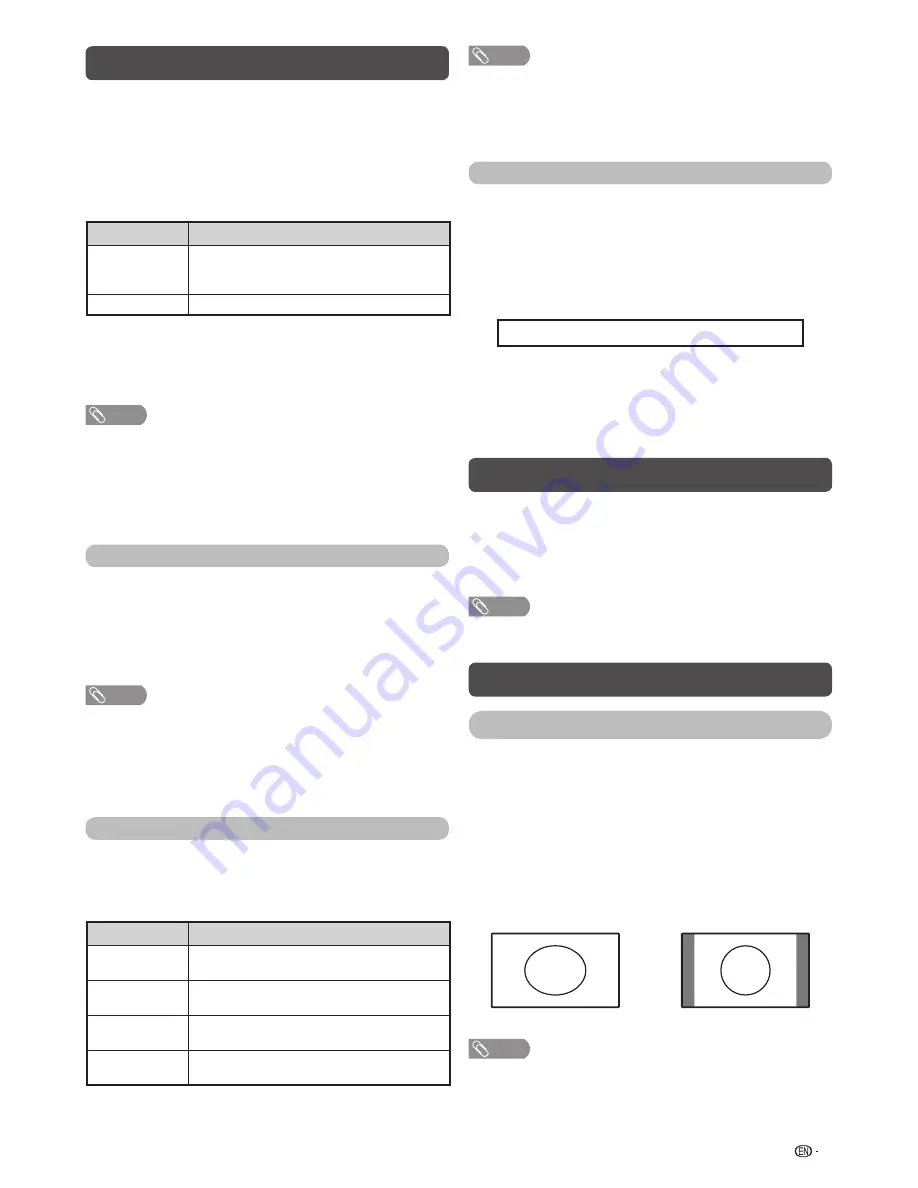
“4:3 mode” menu

To set the type of the wide screen, select “Panorama” 
or “Normal” in the 4:3 mode menu. (See page 13.)

4:3 mode set to “Panorama”

4:3 mode set to “Normal”

NOTE 

• If the broadcast signal contains no WSS information, Auto 

Selection will not function even when the WSS option is 
enabled.

Option menu (Continued)

H

 Game play time

This function displays the elapsed game time so you 
do not lose track of the time.
To display the elapsed time, select “GAME” under 
“AV mode” for the input mode of the terminal 
connected to the game console before starting the 
game.

Selected item

Description

On

The elapsed time is displayed every 30 
minutes when you switch to GAME mode 
in external input mode.

Off

Hides the time.

H

 Colour system

You can change the colour system to one that is 
compatible with the image on the screen. (Auto, 
PAL, SECAM, NTSC 3.58, NTSC 4.43, PAL-60)

NOTE 

• If “Auto” is selected, colour system for each channel is 

automatically set. If an image does not display clearly, 
select another colour system (e.g. PAL, NTSC 4.43).

• “Colour system” is selectable only when inputting a 

composite signal.

H

 Fine sync. (PC input mode only)

Adjusting the PC image automatically

Auto sync.

This function enables the screen to be automatically 
adjusted to its best possible condition when the 
analogue terminals of the TV and PC are connected 
with a commercially available RGB cable, etc.

NOTE 

• Auto sync. is likely to succeed when an input PC image 

has wide vertical stripes (e.g. pattern with high contrast 
stripes, or cross-hatched). 

  It may fail when an input PC image is solid (low contrast).
• Be sure to connect the PC to the TV and switch it on 

before starting Auto sync.

Adjusting the PC image manually

Ordinarily you can easily adjust the picture as 
necessary to change image position using Auto 
sync. In some cases, however, manual adjustment is 
needed to optimise the image.

Selected item

Description

H-Position

Centres the image by moving it to the left 
or right.

V-Position

Centres the image by moving it up or 
down.

Clock

Adjusts when the image fl ickers with 
vertical stripes.

Phase

Adjusts when characters have low 
contrast or when the image fl ickers.

Summary of Contents for Aquos LC-40LE530M

Page 1: ...LC 40LE530M LC 46LE530M LC 60LE630M LCD COLOUR TELEVISION OPERATION MANUAL ENGLISH ภาษาไทย ...

Page 2: ......

Page 3: ... Setting the TV 5 Connecting external devices 6 Remote control unit 7 Part names 8 Turning the TV on off 8 Initial auto installation 9 Auto installation 9 Programme setup 9 Selecting a preset AV mode 10 Page Menu operation 11 Picture menu 11 Audio menu 12 ECO menu 12 Setup menu 13 Option menu 14 Picture and still image 15 Wide Mode 15 Teletext function 16 PC compatibility chart 16 USB media player...

Page 4: ...p or near the TV set To prevent fire or shock hazard do not place the AC power cord under the TV set or other heavy items Do not place heavy objects on this product or stand on it Doing so could cause injury if the product overturns Take special care near children and pets The LCD panel is a very high technology product with 2 073 600 pixels giving you fine picture details Due to the very large nu...

Page 5: ...ing damaged CAUTION Attach the stand in the correct direction Be sure to follow the instructions Incorrect installation of the stand may result in the TV falling over 1 Confirm that there are screws with the stand unit For 40 inch models three long screws three middle screws and one short screw For 46 inch models four long screws four middle screws and one short screw 2 Attach the supporting post ...

Page 6: ...will prevent it from being damaged CAUTION Attach the stand in the correct direction Be sure to follow the instructions Incorrect installation of the stand may result in the TV falling over 1 Confirm that there are screws with the stand unit For 60 inch models Eight long screws and four short screws 2 Attach the supporting post for the stand unit onto the base using the long screws with a screwdri...

Page 7: ...feeder not supplied 75 ohm impedance converter not supplied Standard DIN45325 plug IEC 169 2 75 ohm coaxial cable round cable not supplied To antenna terminal If your outdoor antenna uses a 75 ohm coaxial cable with a standard DIN45325 plug IEC 169 2 plug it into the antenna jack at the rear of the set If your outdoor antenna uses a 300 ohm twin lead flat feeder connect a 300 ohm to 75 ohm impedan...

Page 8: ...ole Camcorder VCR Game console Camcorder Connecting a DVD player Digital TV STB Set Top Box You can use the HDMI 1 HDMI 2 HDMI 3 INPUT 6 terminals when connecting to a DVD player Digital TV STB Set Top Box and other audiovisual equipment When using HDMI certified cable commercially available When using component cable commercially available AUDIO L R Y PB CB PR CR DVD player Digital TV STB Set Top...

Page 9: ...ally Press 3 again to release the hold mode See page 16 1 Subpage Display the Teletext subpage directly when in Teletext mode See page 16 v Top Bottom Full TELETEXT mode Set the area of magnification See page 16 1 POWER STANDBY ON To switch the power on and off See page 8 2 0 9 Set the channel TELETEXT mode Set the page See page 16 3 A Flashback Press A to return to the previous selected channel o...

Page 10: ...MI1 and PC terminals can both use the same audio input terminal However the proper item must be selected in the PC audio select menu See page 14 The illustrations in this operation manual are for explanation purposes and may vary slightly from the actual operations The illustrations used throughout this manual are based on LC 46LE530M Turning the TV on off Turning on off the power Standby mode To ...

Page 11: ...ad of pressing c d to adjust the frequency you can set by directly entering the frequency number of the channel with 0 9 Initial auto installation When the TV powers on for the first time after purchase the initial auto installation wizard appears Follow the menus and make the necessary settings one after another 1 Press POWER on the TV The initial auto installation wizard appears 2 Press a b c d ...

Page 12: ... then press ENTER 4 Press a b c d to select the channel you want to move and then press ENTER 5 Move it to the desired position by pressing a b c d and then press ENTER 6 Repeat the steps 4 and 5 until all desired channels are sorted Erase programme The individual programme can be erased 1 Repeat steps 1 to 4 in Auto search 2 Press a b to select Erase programme and then press ENTER 3 Press c d to ...

Page 13: ...ENTER press c d to select Yes and then press ENTER Menu operation 1 Press MENU and the MENU screen displays 2 Press c d to select the desired menu Picture Audio ECO Setup Option 3 Press a b to select the desired menu item Press ENTER to proceed if necessary 4 Press a b or c d to select the desired item or adjust the item to the desired level Press ENTER if necessary Picture menu 16 0 8 30 0 30 0 3...

Page 14: ...e displays every minute NOTE Disable is the factory preset value H Ecology When set to Yes the TV activates the following power saving mode OPC set to On Page 11 No signal off set to Enable Page 12 Power management set to Mode1 Page 12 No operation off set to 3hr Page 12 Quick start set to Off Page 14 NOTE Ecology mode cannot be deactivated by selecting No Each setting must be changed individually...

Page 15: ... you prefer 1 Press INPUT to select the desired input source 2 Press MENU and the MENU screen displays 3 Press c d to select Setup 4 Press a b to select Input label and then press ENTER 5 Press a b c d to select each character of the new name for the input source and then press ENTER 6 Repeat until the name is fully spelt out The name can be 6 characters or less When you want to set an input sourc...

Page 16: ... set this to PC when connecting devices including a PC with an HDMI certified cable to the HDMI 1 terminal If HDMI1 is set there will be no sound output H Output volume select Allows you to select what controls the audio output Selected item Description Fixed Sound via speakers is adjusted with VOL k l on the remote control unit or the TV Sound via the AUDIO OUT terminal is not adjustable and cons...

Page 17: ...s the elapsed game time so you do not lose track of the time To display the elapsed time select GAME under AV mode for the input mode of the terminal connected to the game console before starting the game Selected item Description On The elapsed time is displayed every 30 minutes when you switch to GAME mode in external input mode Off Hides the time H Colour system You can change the colour system...

Page 18: ... television sets News weather reports sports information stock exchange prices and programme previews are among the many services available Turning on and off Teletext 1 Select a TV channel or external input source providing the Teletext programme 2 Press m to display the Teletext 3 Each time you press m the screen switches as shown below TELETEXT TELETEXT NOTE If you select a programme with no Te...

Page 19: ... disconnect a USB device from the TV repeatedly CAUTION Do not use a USB extension cable when connecting a USB device to the USB terminal of the TV Using a USB extension cable may prevent the TV from performing correctly H USB media Press INPUT to select the USB mode or the TV automatically switches to the USB mode when a USB device is connected to the TV USB media In this mode you can enjoy viewi...

Page 20: ...own RETURN Return to the USB select mode Viewing video Buttons for full screen display operation Buttons Description ENTER Play Pause the video a Cursor Go to the previous file b Cursor Go to the next file d Cursor The FWD speed changes every time you press d After playing to the end the player goes to the next file and starts to play c Cursor The REW speed changes every time you press c After goi...

Page 21: ...Press c d to select Photo mode and then press ENTER 2 Press a b c d to select the desired folder and then press ENTER 3 Press a b c d to select the desired photo and then press ENTER Buttons for thumbnail operations Buttons Description ENTER When selecting a folder icon Enter this directory When selecting a photo thumbnail Display the photo in full screen a b c d Cursor Select a desired item R but...

Page 22: ...de USB device USB Memory USB card reader Mass Storage class File system FAT FAT32 NTFS Photo file format JPEG jpg DCF2 0 compliant Music file format MP3 mp3 Bitrate 32 k 40 k 48 k 56 k 64 k 80 k 96 k 112 k 128 k 160 k 192 k 224 k 256 k 320 kbps Sampling frequency 32 k 44 1 k 48 kHz Video file format File extension Container Video avi AVI DivX 3 11 4 4 12 5 x 6 XviD H 264 MPEG2 mkv MKV H 264 MPEG2 ...

Page 23: ... See page 13 Power is suddenly turned off The unit s internal temperature has increased Remove any objects blocking the vent or clean Check the ECO setting See page 12 Is the sleep timer set See page 7 No picture Is the connection to external equipment correct See page 6 Has the input signal setup been performed correctly after connection See page 15 Is the picture adjustment correct See page 11 I...

Page 24: ... 110 240 V 50 60 Hz Power consumption 97 W 0 5 W Standby 116 W 0 5 W Standby 190 W 0 5 W Standby Dimensions without stand mm 959 W g 605 H g 89 D 1093 W g 682 H g 89 D 1383 W g 838 H g 72 D with stand mm 959 W g 642 H g 257 D 1093 W g 719 H g 293 D 1383 W g 871 H g 333 D Weight without stand with stand 14 kg 16 5 kg 19 kg 22 5 kg 29 5 kg 32 5 kg Operating Temperature 0 C 40 C The HDMI1 and PC term...

Page 25: ...dels 46 inch models NOTE To attach the stand perform the above steps in reverse order As the TV is very heavy be careful when moving it Removing the stand 60LE630M For wall mounting with the optional bracket AN 52AG4 remove the stand Before setting TV on the wall Remove the connected cables DVD VCR etc from the terminals Detach the four caps at the 4 locations on the rear of the TV 1 Unfasten the ...

Page 26: ...al skills and should only be performed by qualified service personnel Customers should not attempt to do the work themselves SHARP bears no responsibility for improper mounting or mounting that results in accident or injury You can ask qualified service personnel about using an optional bracket and attachment to mount the TV to a wall When you mount the TV on a wall you should attach the supportin...

Page 27: ...25 Memo ...

Page 28: ...26 Memo ...

Page 29: ......

Page 30: ...Printed in Malaysia TINS F212WJZZ 11P07 MA NG ...

Reviews: