background image

49

Rear view

Useful adjustment settings

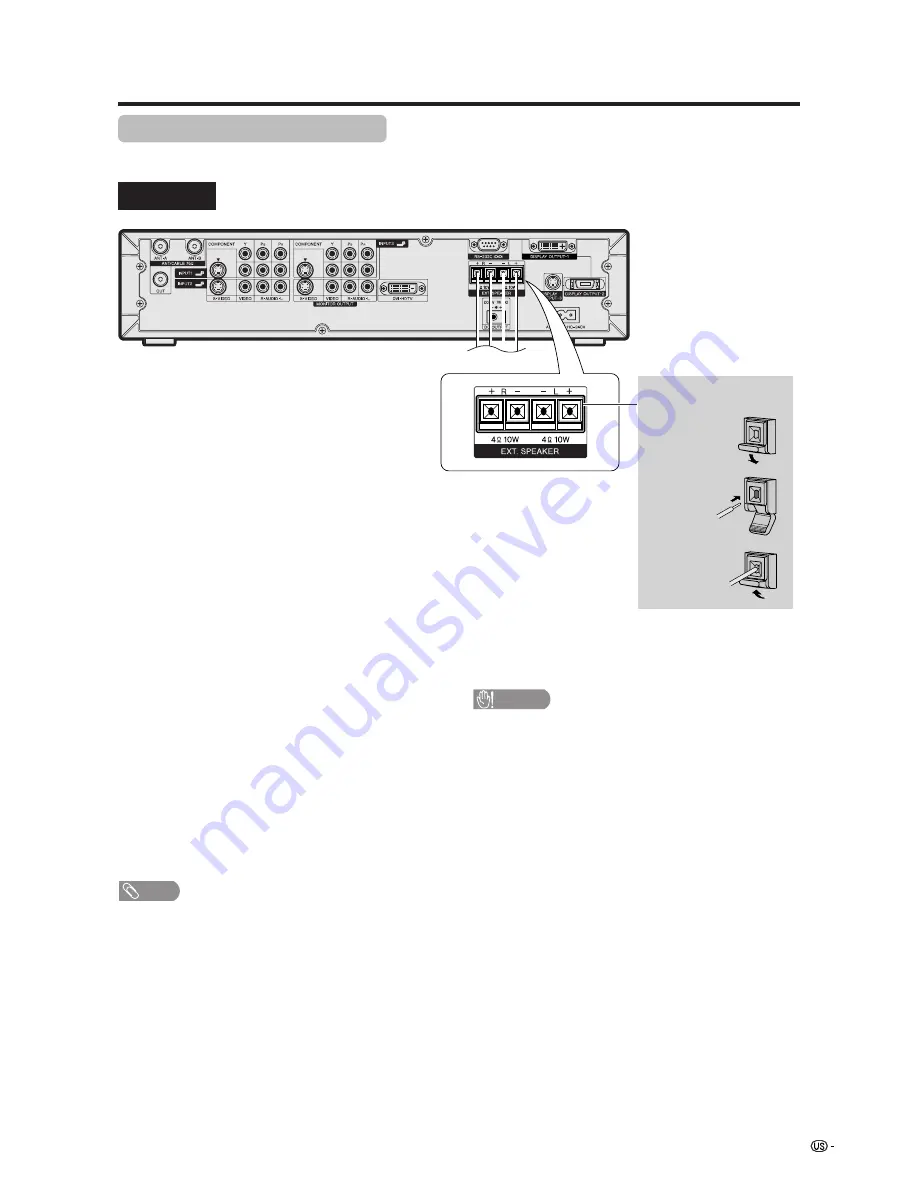
Connecting external speakers

When using external speakers

• Change the speaker setting to external speakers. (See

page 50.)

Make sure to connect the speaker terminal and
cable polarity (

L

+

) properly

• The speaker terminals have plus (

L

) and minus (

+

)

polarity.

• Plus is red and minus is black.
• The cables are also divided into plus and minus.
• When connecting the left/right speakers, be sure to

connect the plus/minus terminals with the correct cables.

NOTE

• Unplug the AC cord from the AC outlet before installing

the speakers.

CAUTION

• Make sure external speakers have 4 ohm and 10 watt

specifications.

• Connect the plus/minus terminals with the correct cables.

Incorrect connection may cause a short.

How to connect the

speaker cable

Push down
the tab.

Insert the
end of the
cable.

1

1

1

1

1

2

2

2

2

2

3

3

3

3

3

Lift the tab
back up.

Summary of Contents for Aquos LC 37HV6U

Page 1: ... Sharp Plaza Mahwah New Jersey 07430 2135 SHARP CORPORATION LC 37HV6U ESPAÑOL FRANÇAIS Printed on 100 post consumer recycled paper Imprimé sur 100 de papier recyclé Impreso en 100 de papel reciclado de postconsumo Papel 100 Reciclado Cuidado do Meio Ambiente Printed in Japan Imprimé au Japon Impreso en Japón Impresso no Japão TINS A904WJZZ 03P10 JKG PORTUGUÊS OPERATION MANUAL MANUAL DE OPERACIÓN M...

Page 2: ...uct s enclosure that may be of sufficient magnitude to constitute a risk of electric shock to persons The exclamation point within a triangle is intended to alert the user to the presence of important operating and maintenance servicing instructions in the literature accompanying the product IMPORTANT To aid reporting in case of loss or theft please record the TV s model and serial numbers in the ...

Page 3: ... the limits for a Class B digital device pursuant to Part 15 of the FCC Rules These limits are designed to provide reasonable protection against harmful interference in a residential installation This equipment generates uses and can radiate radio frequency energy and if not installed and used in accordance with the instructions may cause harmful interference to radio communications However there ...

Page 4: ...d Entry Never push objects of any kind into this product through openings as they may touch dangerous voltage points or short out parts that could result in a fire or electric shock Never spill liquid of any kind on the product Servicing Do not attempt to service this product yourself as opening or removing covers may expose you to dangerous voltage or other hazards Refer all servicing to qualifie...

Page 5: ...ince they can block ventilation openings This product is not designed for built in installation do not place the product in an enclosed place such as a bookcase or rack unless proper ventilation is provided or the manufacturer s instructions are followed The Liquid Crystal panel used in this product is made of glass Therefore it can break when the product is dropped or applied with impact Be caref...

Page 6: ... ELECTRIC SERVICE EQUIPMENT NEC NATIONAL ELECTRICAL CODE Lightning For added protection for this television equipment during a lightning storm or when it is left unattended and unused for long periods of time unplug it from the wall outlet and disconnect the antenna This will prevent damage to the equipment due to lightning and power line surges Power Lines An outside antenna system should not be ...

Page 7: ...D player 42 Displaying a DVD image 42 Watching a VCR image 43 Connecting a VCR 43 Displaying a VCR image 43 Watching broadcasts via a Digital TV tuner 44 Connecting a Digital TV tuner 44 Displaying broadcasts via a Digital TV tuner 44 Enjoying a game console or viewing camcorder images 45 Connecting a game console or camcorder 45 Displaying an image of the game console or camcorder 45 Viewing an i...

Page 8: ...TV SAT DVD FAVORITE CH RECEIVER DTV DVD TOP SOURCE DTV SAT DTV SAT VCR REC A B C D RETURN MENU POWER SET ENTER MENU GUIDE INPUT POWER VOLⴑ VOLⴐ INFO VIEW SLEEP LEARN EDIT ENT DISPLAY INPUT TV VCR CBL SAT DTV DVD LD 1 2 3 4 5 6 7 8 9 100 0 FLASHBACK Virtual RF cable g1 TINS A904WJZZ QCNW A342WJZZ Pages 18 and 19 GDAI A059WJSA PSPAHA101WJZZ GLEGGA013WJZZ XBPSN40P14JS0 NOTE Always use the AC cord sup...

Page 9: ...g and result in malfunction Where to place the System System means the Display and AVC System First select the location where to place the System Selecting the location of the System Select a place with no direct sunlight and good ventilation The Display and the AVC System are connected by the system cable See page 9 for details Keep enough space System cable AVC System Display There is an exhaust...

Page 10: ...N TO PREVENT RISK OF ELECTRIC SHOCK DO NOT TOUCH UN INSULATED PARTS OF ANY CABLES WITH THE AC CORD CONNECTED Press down the two upper hooks to remove the cover toward you Press the two hooks toward the center of the Display and remove the cover toward you AC cord with ferrite core GRAY Connect the plug firmly until the hooks on both sides click WHITE Connect the plug into the terminal and secure i...

Page 11: ...e cables with the clamp Closing the terminal cover Cable clamp Large Insert the cable clamp in the hole on the Display leg as shown Cable clamp Small Peel off the seal on the back and attach as shown Display rear view Cables come out from the small opening ...

Page 12: ...n Stick each spacer to the stand as shown Peel each spacer away from the paper and attach to the four bulging areas on the stand 2 Attach each cushion to the stand as shown 3 Fit the stand to the AVC System Peel each cushion away from the paper and attach to the four areas at the bottom Insert the stand into the AVC System making sure that the thick and thin bulges of the stand align with the big ...

Page 13: ... will prevent it from being damaged CAUTION The speaker terminals on the Display are only for the attached speaker Do not connect any third party plug or speaker to the terminal Insert the speaker plug completely into the terminal NOTE To attach the speaker perform the above steps in reverse order Check the left L and right R when connecting the speaker plugs 2 3 4 Unfasten the four screws used to...

Page 14: ...cy due to storage conditions If you will not be using the remote control unit for an extended period of time remove batteries from it Inserting the batteries If the remote control fails to operate Liquid Crystal Television functions replace the batteries in the remote control unit Using the remote control unit Use the remote control unit by pointing it towards the remote control sensor on the Disp...

Page 15: ...rt names OPC indicator POWER indicator MAIN POWER button OPC sensor Display POWER button INPUT button VOLUME buttons VOLl k CHANNEL buttons CHs r Remote control sensor OPC Optical Picture Control See page 32 ...

Page 16: ...cator If the AVC System is switched on but it does not appear to be operating correctly it may need resetting In this case press CLEAR shown in the diagram lightly with the end of a ballpoint pen or other pointed object This will reset the System as shown below AV MODE resets to STANDARD TV channel returns to initial channel setting Air 2ch Cable 1 or 2ch Twin picture resets to normal Audio settin...

Page 17: ...o watch broadcasts via the two tuners 13 INPUT Select a Liquid Crystal Television input source TV INPUT 1 INPUT 2 INPUT 3 INPUT 4 PC See pages 42 46 and 52 14 When pressed all buttons on the remote control unit will light The lighting will turn off if no operations are performed within about 5 seconds This button is used for performing operations in dark places 15 MTS Select the MTS SAP See page 2...

Page 18: ...o remember what kind of connection is made with your System The connection type will determine whether to select Air or Cable for both ANT A and B when configuring Air Cable settings Cable converter VCR connection S VIDEO Coaxial Antenna Cable commercially available VCR Video Cable commercially available Audio Cable commercially available S video Cable commercially available Coaxial Antenna Cable ...

Page 19: ...d not be concerned about the position of the VCR s TV VCR switch and you can enjoy stereo tape playback from a stereo VCR If your VCR has an S Video terminal S video connection is recommended B Connecting with Converter Descrambler Box without VCR Coaxial Antenna Cable commercially available Cable lead in OUT IN Coaxial Antenna Cable commercially available Coaxial Antenna Cable commercially availa...

Page 20: ... commercially available Audio Cable commercially available S video Cable commercially available Cable lead in Coaxial Antenna Cable commercially available Rear Terminals RF Cable Supplied 2 way signal splitter not supplied 300 ohm twin lead flat 300 ohm twin lead 75 ohm coaxial cable round 75 ohm coaxial cable Cable TV lead In or IN OUT 300 ohm twin lead VHF ANTENNA UHF ANTENNA Combiner commercial...

Page 21: ... been completed Display rear view AC cord AC cord AVC System rear view NOTE Always turn off the main power of the Display and AVC System when connecting the AC cords Disconnect the AC cords from the AC outlet Display and AVC System when the System is not going to be used for a long period of time ...

Page 22: ...AVC System Press MAIN POWER on the AVC System The STANDBY ON indicator on the AVC System lights up red 1 2 Press MAIN POWER on the Display The System turns the power on The POWER indicator on the Display lights up green and the STANDBY ON indicator on the AVC System lights up green If the STANDBY ON indicator on the AVC System and the POWER indicator on the Display still light up red press TV POWE...

Page 23: ...e System look for all channels viewable in the set area 3 1 2 English Español Français ANT A Air ANT B Cable Air Cable CH Search ANT A 2 Air CH Search ANT B 2 Cable RECEIVER POWER TV SAT DVD RETURN MENU SET ENTER MENU FAVORITE CH DTV DVD TOP SOURCE DTV SAT DTV SAT VCR REC A B C D POWER MENU GUIDE INPUT VOLⴑ VOLⴐ INFO ANT A Air ANT B Cable Air Cable Example 2 ANT A Language setting Select from amon...

Page 24: ...125 To select a channel enter a 2 or 3 digit number NOTE When selecting a 1 digit channel number do not fail to press the 0 button To select a 3 digit channel number e g Channel 115 Complete the following steps within 3 seconds 0 5 Display CH s r a To select a 1 or 2 digit channel number e g Channel 5 Complete the following steps within 3 seconds 1 1 2 Press the 0 button Complete the step 2 within...

Page 25: ...n the remote control unit can also cancel the mute Mute will be canceled after 30 minutes have passed However the System will not suddenly output a loud sound as the volume level is set to 0 automatically Within 30 minutes press MUTE again to cancel the mute Before 30 minutes the volume level returns to the previous setting After 30 minutes increase the volume level by pressing VOL k 20 20 ⴐ ⴑ VOL...

Page 26: ...SAP mode Setting MTS SAP stereo mode The System has a feature that allows reception of sound other than the main audio for the program This feature is called Multi channel Television Sound MTS The System with MTS can receive mono sound stereo sound and Secondary Audio Programs SAP The SAP feature allows a TV station to broadcast other information which could be audio in another language or somethi...

Page 27: ...icture Flip Page 53 Language Page 31 Treble Page 38 Bass Page 38 Balance Page 38 Dolby Virtual Page 38 Audio Only Page 57 Input Select Page 52 DNR Page 56 Audio Out Page 57 Quick Shoot Page 58 Audio Power Control Setup Option PC input mode menu items List of PC menu items to help you with operations OPC Page 32 Backlight Page 33 Contrast Page 33 Brightness Page 33 Red Page 33 Green Page 33 Blue Pa...

Page 28: ...NT B Cable Air Cable Searching TV channels Press c d to select Air or Cable for ANT A then press a b to move down Press c d to select Air or Cable for ANT B Press SET ENTER to enter the setting This operation makes the System search for both ANT A and B Channel search Channel auto search makes the System look for all channels viewable in the set area TV SAT DVD RETURN MENU SET ENTER MENU FAVORITE ...

Page 29: ...Search for ANT B Press a b to select the desired item and then press SET ENTER Channel Search automatically starts 4 5 NOTE Make sure what kind of connection is made with your System TV MENU Setup EZ Setup Search for ANT A ANT A 2 Air Press a b to select CH Setup and then press SET ENTER If you already set the Secret No input the 4 digit secret number here See page 60 for setting a secret number P...

Page 30: ...T B On Off 1 2 3 Press a b to select Skip and press c d to select On or Off On Skips channels Channel selection disabled using CHa a a a a b b b b b and TWIN CHa a a a a b b b b b Off Does not skip channels Channel selection enabled using CHa a a a a b b b b b and TWIN CHa a a a a b b b b b 4 Press a b to select CH Setup and then press SET ENTER If you already set the Secret No input the 4 digit s...

Page 31: ... Favorites ANT A or Favorites ANT B and then press SET ENTER NOTE Make sure what kind of connection is made with your System TV MENU Setup CH Setup Setup Option Parental CTRL EZ Setup CH Setup Position Speaker Standard Internal English Picture Flip Language Air Cable CH Search CH Memory Favorites ANT A Favorites ANT B A B B B B B B B B B B B B B B B B B C D On screen display when Favorites ANT A i...

Page 32: ... MENU Setup Language Setup Option Parental CTRL EZ Setup CH Setup Position Speaker English Standard Internal Picture Flip Language 4 English Español Français Press a b to select the desired language listed on the screen and then press SET ENTER 3 Press MENU and the PC MENU screen displays 1 2 Press c d to select Setup Press a b to select Language and then press SET ENTER PC MENU Setup Language Set...

Page 33: ...ucts the OPC sensor which could affect its ability to sense surrounding light RECEIVER POWER TV SAT DVD RETURN MENU SET ENTER MENU FAVORITE CH DTV DVD TOP SOURCE DTV SAT DTV SAT VCR REC A B C D POWER MENU GUIDE INPUT VOLⴑ VOLⴐ INFO TV MENU Picture OPC Picture Audio USER TV Contrast OPC Brightness Color Tint Sharpness Advanced Reset 30 0 0 0 0 0 30 30 30 10 40 30 30 30 10 Backlight 8 8 8 Off On PC ...

Page 34: ... contrast For weaker black For more color intensity Skin tones become greenish For more sharpness cbutton For less brightness For less contrast For stronger black For weaker red For weaker green For weaker blue Selected item Backlight Contrast Brightness Red Green Blue dbutton For more brightness For more contrast For weaker black For stronger red For stronger green For stronger blue Picture adjus...

Page 35: ... 30 30 Changing reds closer to magenta or yellow NOTE For resetting all adjustment items to the factory preset values press a b to select Reset and then press SET ENTER AV input mode PC input mode Press MENU and the PC MENU screen displays Press c d to select Picture Press a b to select C M S and then press SET ENTER Press a b to select a specific adjustment item Press c d to adjust the item to yo...

Page 36: ... depth by selecting a level for automatically adjusting the dark portion of an image 4 5 Press a b to select the desired level and then press SET ENTER Press a b to select Black and then press SET ENTER Press a b to select the desired level and then press SET ENTER C M S Color Temp Black 3D Y C Monochrome Film Mode I P Setting Off High Low Press MENU and the TV MENU screen displays 1 2 Press c d t...

Page 37: ... in monochrome Description Normal color For viewing in monochrome Selected item Off On Press a b to select Monochrome and then press SET ENTER 4 Press c d to select On and then press SET ENTER 5 Press MENU and the TV MENU screen displays 1 2 Press c d to select Picture 3 Press a b to select Advanced and then press SET ENTER TV MENU Picture Advanced Picture Audio USER TV Contrast OPC Brightness Col...

Page 38: ...n give you a more beautiful picture Press a b to select I P Setting and then press SET ENTER Some items may be grayed out They are not selectable Press c d to select Interlace or Progressive and then press SET ENTER 4 5 Press MENU and the TV MENU screen displays 1 2 Press c d to select Picture 3 Press a b to select Advanced and then press SET ENTER C M S Color Temp Black 3D Y C Monochrome Film Mod...

Page 39: ...ess c d to select Audio Press a b to select Dolby Virtual and then press SET ENTER Press c d to select On and then press SET ENTER 2 3 4 Press MENU and the TV MENU PC MENU screen displays 1 Dolby Virtual You can enjoy the SURROUND 2ch stereo with Dolby Pro Logic II technology VIRTUAL DOLBY SURROUND is a technology certified by Dolby Laboratories that creates a virtualized surround sound experience...

Page 40: ...s SET ENTER Press c d to select Enable and then press SET ENTER Five minutes before the power shuts down remaining time displays every minute NOTE Disable is factory preset value Press c d to select Power Control Press MENU and the TV MENU screen displays 2 1 TV MENU Power Control No Signal Off Power Control Setup No Signal Off No Operation Off Disable Disable Disable Enable 3 4 2 1 TV MENU Power ...

Page 41: ... inputs again the System stays off The System turns on again by pressing POWER button on the Display or TV POWER on the remote control unit See page 21 If no signal inputs for 8 seconds the power shuts down When you start using the PC and the signal inputs again the System turns on Selected item Off Mode1 Mode2 Press c d to select Power Control Press MENU and the PC MENU screen displays 3 4 2 1 PC...

Page 42: ...order To view external source images select the input source from INPUT on the remote control unit or on the Display CAUTION To protect all equipment always turn off the AVC System before connecting to a DVD player VCR Digital TV tuner PC game console camcorder or other external equipment NOTE Please refer to the relevant operation manual DVD player PC etc carefully before making connections S VID...

Page 43: ...ially available Component video cable commercially available TV MENU Option Input Select Auto COMPONENT AV Y C For INPUT1 signal Display INPUT button To watch a DVD image select INPUT1 from INPUT SOURCE menu using INPUT on the remote control unit or on the Display See page 52 INPUT SOURCE TV INPUT1 INPUT2 INPUT3 INPUT4 PC 2 1 Select the desired signal type on Input Select in the Option menu See pa...

Page 44: ... using INPUT on the remote control unit or on the Display See page 52 When connecting to the INPUT 2 terminals select INPUT2 S VIDEO cable commercially available INPUT TV ANT A B TWIN MODE AV POWER MTS CC PICTURE SELECT SUB TWIN CH FREEZE MODE VIEW SLEEP LEARN EDIT DISPLAY INPUT TV VCR CBL SAT DTV DVD LD Virtual INPUT SOURCE TV INPUT1 INPUT2 INPUT3 INPUT4 PC Display INPUT button You only need to s...

Page 45: ...INPUT SOURCE TV INPUT1 INPUT2 INPUT3 INPUT4 PC TV MENU Option Input Select Auto COMPONENT AV Y C DVI For INPUT3 signal Select the desired signal type on Input Select in the Option menu See page 52 The setting is stored and can be selected on the INPUT SOURCE menu NOTE Each time INPUT is pressed the input source toggles If the Digital TV tuner image does not come in clearly you may need to change t...

Page 46: ...nals Displaying an image of the game console or camcorder To connect a game console or view a camcorder select INPUT4 from the INPUT SOURCE menu using INPUT on the remote control unit or on the Display See page 52 When connecting to the INPUT 4 terminals select INPUT4 INPUT TV ANT A B TWIN MODE AV POWER MTS CC PICTURE SELECT SUB TWIN CH FREEZE MODE VIEW SLEEP LEARN EDIT DISPLAY INPUT TV VCR CBL SA...

Page 47: ...tem Signal names for 15 pin mini D sub connecter NOTE Macintosh adaptor may be required for use for some Macintosh computers Displaying an image from a PC To view an image from a PC select PC from the INPUT SOURCE menu using INPUT on the remote control unit or on the Display See page 52 When connecting to a PC the correct input signal type is automatically detected If the PC image does not come in...

Page 48: ... a b to select Position and then press SET ENTER Press a b to select H Pos or V Pos TV MENU Setup Position Setup Option Parental CTRL EZ Setup CH Setup Speaker Position Standard Internal English Picture Flip Language Reset H Pos 0 10 10 V Pos 0 20 20 Press c d to adjust the item to your desired position Description Centers the image by moving it to the left or right Centers the image by moving it ...

Page 49: ...Adjusting Position displays to the desired position This setting cannot be stored Once the System shuts down or enters standby mode the setting is erased To move the picture around the screen again you must perform the above procedure again The image position setting using the steps on page 47 can be stored Select either according to your objectives TV INPUT1 INPUT2 INPUT3 and INPUT4 can each adju...

Page 50: ...les are also divided into plus and minus When connecting the left right speakers be sure to connect the plus minus terminals with the correct cables NOTE Unplug the AC cord from the AC outlet before installing the speakers CAUTION Make sure external speakers have 4 ohm and 10 watt specifications Connect the plus minus terminals with the correct cables Incorrect connection may cause a short How to ...

Page 51: ...ress a b to select Speaker and then press SET ENTER 1 2 3 TV MENU Setup Speaker Setup Option Parental CTRL EZ Setup CH Setup Position Speaker Standard Internal English Picture Flip Language External Internal Useful adjustment settings AV input mode PC input mode Press c d to select External or Internal and then press SET ENTER 4 Press MENU and the PC MENU screen displays Press c d to select Setup ...

Page 52: ... picture as necessary to change image position using Auto Sync In some cases however manual adjustment is needed to optimize the image Press MENU and the PC MENU screen displays Press c d to select Setup Press a b to select Fine Sync and then press SET ENTER Press c d to adjust the item to your desired position NOTE For resetting all adjustment items to the factory preset values press a b to selec...

Page 53: ...connectivity priority Input selection Can use for selecting the input source NOTE Some items may be grayed out They are not selectable INPUT 1 1 COMPONENT VIDEO 2 S VIDEO 3 VIDEO INPUT 3 1 COMPONENT VIDEO 2 S VIDEO 3 VIDEO 4 DVI Press INPUT on the remote control unit or on the Display and select INPUT3 as explained in Input selection Select Auto or DVI from the Input Select menu for INPUT 3 signal...

Page 54: ...e Flip Setup Option Fine Sync Input Signal Auto Sync English Standard Language Picture Flip Speaker Internal Press MENU and the PC MENU screen displays 1 2 Press c d to select Setup Press a b to select Picture Flip and then press SET ENTER 3 PC input mode 4 Press a b to select the desired mode and then press SET ENTER NOTE If you choose Mirror or Rotate the sound orientation also changes Standard ...

Page 55: ...VIE AV MODE STANDARD AV MODE DYNAMIC AV MODE GAME AV MODE USER AV MODE DYNAMIC Fixed AV MODE STANDARD AV MODE USER PC View mode for 4 3 Programs Press VIEW MODE The View mode menu displays The menu lists the view mode options selectable for the type of video signal currently received MODE VIEW TWIN PICTURE SELECT SUB TWIN CH FREEZE INPUT SET ENTER FAVORITE CH SOURCE DTV SAT DTV SAT VCR REC A B C D...

Page 56: ...e original aspect ratio in a full screen display An image fully fills the screen Detects the resolution of the signal and displays an image with the same number of pixels on the screen Keeps the original aspect ratio in a full screen display The top and bottom of the image is slightly cropped 1024g768 An image fully fills the screen Keeps the original aspect ratio in a full screen display The top ...

Page 57: ...se you have to set the correct signal manually After setting once it will display when the same signal resolution is input again NOTE You can only select the Input Signal on the Setup menu when receiving one of the 6 input signals listed above DNR Digital Noise Reduction Produces a clearer video image 1 2 3 TV MENU Option DNR Option DNR Input Select Audio Out Audio Only Quick Shoot Fixed Low Auto ...

Page 58: ...Audio Only Quick Shoot Fixed Low Auto Off Variable Fixed On screen display for AV input mode On screen display for PC input mode PC MENU Option Audio Out Option Audio Out Audio Only Quick Shoot Fixed Off On screen display for AV input mode RECEIVER POWER TV SAT DVD RETURN MENU SET ENTER MENU FAVORITE CH DTV DVD TOP SOURCE DTV SAT DTV SAT VCR REC A B C D POWER MENU GUIDE INPUT VOLⴑ VOLⴐ INFO 4 On O...

Page 59: ... Virtual Sleep timer Allows you to set a time when the TV automatically switches to standby Sleep Timer 0 30 60 90 120 Sleep Timer Sleep Timer Sleep Timer Sleep Timer 1 2 Press SLEEP Remaining time displays when sleep timer has been set Each time you press SLEEP the remaining time switches as shown below When set the time automatically starts counting down If you want to adjust the sleep timer you...

Page 60: ...n the picture other information e g TV guide weather that is independent of the TV in progress RECEIVER POWER CC TV ANT A B INPUT TWIN MODE AV POWER MTS PICTURE SELECT SUB TWIN CH ⴐ ⴑ FREEZE MODE VOL CH MUTE MENU TV SAT DVD FAVORITE CH DTV DVD TOP SOURCE DTV SAT DTV SAT VCR REC A B C D RETURN MENU POWER SET ENTER MENU GUIDE INPUT VOLⴑ VOLⴐ INFO VIEW SLEEP LEARN EDIT ENT FLASHBACK DISPLAY INPUT TV ...

Page 61: ...ET ENTER 4 TV MENU Setup Parental CTRL Secret No Select New Secret No and then press SET ENTER Input the new 4 digit secret number by using 0 9 5 New Secret No New Secret No Input Secret No Reconfirm Input the same 4 digit number on the Reconfirm screen as in step 5 to confirm 6 New Secret No New Secret No Input Secret No Reconfirm Setting parental control status Used to enable or disable the pare...

Page 62: ...g menu displays 1 2 Input the 4 digit secret number by using 0 9 3 5 4 Press a b to select Secret No and then press SET ENTER Press c d to select Yes and then press SET ENTER Your secret number is cleared Press a b to select Secret No Clear and then press SET ENTER NOTE See page 60 for re registering with a new secret number after being cleared As a precautionary measure make a note of your secret...

Page 63: ...ot edited for television The V CHIP can also be set to block MPAA rated movies Voluntary movie rating system MPAA Rating Age G PG PG 13 R NC 17 X General audiences All ages admitted Parental guidance suggested Some material may not be suitable for children Parents strongly cautioned Some material may be inappropriate for children under 13 Restricted Under 17 requires accompanying parent or adult g...

Page 64: ...V Guidelines Repeat steps 1 to 5 in Voluntary movie rating system MPAA 1 2 Press a b to select TV Guidelines and then press SET ENTER Press a b to adjust the item to your desired position indicates the item is blocked The setting automatically enters Block for any ratings below your selection 3 MPAA TV Guidelines Can English Ratings Can French Ratings L S V D TV G TV PG TV 14 TV MA NONE TV Y7 TV Y...

Page 65: ...r a general audience but may not be suitable for younger children under the age of 8 because it could contain controversial themes or issues Over 14 Years Could contain themes where violence is one of the dominant elements of the storyline but it must be integral to the development of plot or character Language usage could be profane and nudity present within the context of the theme Adults Intend...

Page 66: ...iguration settings will not work See page 60 3 MPAA TV Guidelines Can English Ratings Can French Ratings 8ans 13ans 16ans 18ans NONE G E Press MENU and the TV MENU screen displays 1 2 Press c d to select Setup Input the 4 digit secret number by using 0 9 3 TV MENU Setup Parental CTRL Setup Option Secret No Press a b to select Parental CTRL and then press SET ENTER Secret number setting menu displa...

Page 67: ...D 100 Virtual Reactivating the temporarily released the V CHIP BLOCK You can reactivate the temporarily released V CHIP BLOCK as shown below Method 1 Select Status setting from the Parental CTRL menu to reactivate BLOCK See page 60 Method 2 Select V Chip setting MPAA TV Guidelines Can English Ratings or Can French Ratings from the Parental CTRL to reactivate BLOCK See pages 63 and 65 Method 3 Swit...

Page 68: ...ressing ANT A B while viewing Twin Picture with video selected will not change the image displayed Pressing ANT A B while viewing Twin Picture with two TV images displayed will not have any effect Pressing ANT A B while viewing Twin Picture with two video images displayed will switch the selected screen to a TV image 5 Picture and still image You can display two same sized pictures one moving and ...

Page 69: ...E To stop the EDIT mode in the middle press EDIT LEARN once more If Mode switch is switched while in EDIT mode EDIT mode will be canceled If there is no operation for over 1 minute running exit this mode When you enter a code that is not listed LED flashes quickly If the table on page 69 does not include your desired manufacturer or the remote control does not work you can make the memory learn it...

Page 70: ...SONY DVD TOSHIBA DVD JVC DVD PIONEER LD KENWOOD LD PANASONIC1 LD PANASONIC2 LD PIONEER1 CATV CATV SAT DTV PIONEER2 CATV JERROLD1 CATV JERROLD2 CATV JERROLD3 CATV JERROLD4 CATV JERROLD5 CATV JERROLD6 CATV JERROLD7 CATV JERROLD8 CATV JERROLD9 CATV JERROLD10 CATV S A 1 CATV S A 2 CATV S A 3 CATV S A 4 CATV ZENITH1 CATV ZENITH2 CATV ZENITH3 CATV PIONEER SAT RCA1 SAT RCA2 SAT SONY SAT 24 25 26 27 28 29...

Page 71: ...splay the receiver can operate using buttons 1 to 3 When another non SHARP receiver is connected to the display the signals for 1 to 3 must first be learned before operating See page 68 1 RECEIVER POWER STANDBY ON Turns receiver power on and off 2 RECEIVER INPUT Selects the input source connected to the receiver 3 RECEIVER VOL k k k k k l l l l l Adjusts receiver volume level Press RECEIVER VOL k ...

Page 72: ...el selection buttons 5 FLASHBACK Press to switch between the current channel and the channel you were watching immediately before Some manufacturers do not preset 100 ENT and FLASHBACK Use these buttons to learn if necessary NOTE CABLE SAT and DTV cannot be selected at the same time The color highlighted buttons on the remote control can learn the control signal from another device s remote contro...

Page 73: ...nnel selection buttons Use this button to learn if necessary 5 SAT MENU When this button is pressed the satellite broadcasting menu screen will display 6 SAT GUIDE When this button is pressed the satellite broadcasting guide screen will display 7 SAT INFO When this button is pressed information on satellite broadcasting will display Use this button to learn if necessary NOTE CABLE SAT and DTV cann...

Page 74: ...llow Used to make selections from the digital TV tuner menu 7 FLASHBACK Press to switch between the current channel and the channel you were watching immediately before 8 DTV DVD TOP MENU When this button is pressed the DTV menu screen will display 9 DTV SAT GUIDE When this button is pressed the DTV guide screen will display 10 DTV SAT INFO When this button is pressed information on DTV will displ...

Page 75: ...buttons at the same time to start recording NOTE Depending on the VCR manufacturer for some models VCR REC is activated by first pressing INFO followed by d while you keep pressing INFO For other models VCR REC is activated by following the opposite sequence first pressing d followed by INFO while you keep pressing d Please try both methods and use the appropriate one 7 J Rapidly advances the tape...

Page 76: ... player on and off 4 F Set pauses and still pictures 5 G Continue pressing to go backward 6 H Playback stops when pressing once With some DVD LD players pressing the button twice may open the disc tray 7 DVD MENU DVD only When this button is pressed the DVD menu will display 8 DVD TOP MENU DVD only When this button is pressed the DVD top menu will display 9 SET ENTER a b c d DVD only SET ENTER Pre...

Page 77: ...correctly See pages 54 and 55 Adjust the picture tone See pages 33 to 37 Is the room too bright The picture may look dark in a room that is too bright Check the input signal setting See page 52 Is the sleep timer set See page 58 Check the power control settings See pages 39 and 40 The unit s internal temperature has increased Remove any objects blocking vent or clean Is connection to other compone...

Page 78: ...Standard PC 31 5 kHz 37 9 kHz 31 5 kHz 37 9 kHz 31 5 kHz 37 9 kHz 37 5 kHz 43 3 kHz 31 5 kHz 35 1 kHz 37 9 kHz 48 1 kHz 46 9 kHz 53 7 kHz 48 4 kHz 56 5 kHz 60 0 kHz 68 7 kHz 45 0 kHz 48 1 kHz 64 0 kHz 34 9 kHz 49 7 kHz 60 2 kHz 640 x 400 720 x 400 VGA 640 x 480 WVGA 848 x 480 SVGA 800 x 600 1024 x 768 XGA 1280 x 720 WXGA 1280 x 768 SXGA 1280 x 1024 VGA 640 x 480 MAC13 XGA 1024 x 768 MAC19 SVGA 832...

Page 79: ...e Parity bit Data length Stop bit Flow control 9 600 bps 8 bits None 1 bit None Appendix Command format Communication procedure Send the control commands from the PC via the RS 232C connector The display operates according to the received command and sends a response message to the PC Do not send multiple commands at the same time Wait until the PC receives the OK response before sending the next ...

Page 80: ...Dot by Dot PC Zoom PC On Off One screen Twin screens The channel number of TV The channel number of TV Ⳮ1 The channel number of TV ⳮ1 Toggle Toggle OFF CC1 CC2 T1 T2 1 125 AUTO P O W R I T G D I T V D I A V D I P C D I N P 1 I N P 3 INPUT SELECTION A TOGGLE INPUT SELECTION B AV MODE SELECTION VOLUME POSITION VIEWMODE Dolby Virtual TWIN PICTURE CHANNEL ANT A B CC DIRECT CH UP CH DOWN CHANNEL H POSI...

Page 81: ... indicated are nominal values of production units There may be some deviations from these values in individual units Specifications LCD panel 37o Advanced Super View BLACK TFT LCD Number of dots 3 147 264 dots 1366 m 768 m 3dots Brightness 430 cd m2 Backlight 60 000 hours at Backlight Standard position Viewing angles H 170 V 170 Audio amplifier 10W m 2 Speakers Ø 8cm 2pcs Ø 2 5cm 2pcs AVC System M...

Page 82: ...mensional drawings Unit inch mm Display 37 32 82 335 64 90 3721 64 948 2129 64 545 12 305 18 7 32 462 8 3211 32 821 6 19 1 2 495 5 30 55 64 784 2 7 16 62 5 7 64 130 5 127 3 16 5 77 8 200 7 7 8 200 3 11 32 85 ...

Page 83: ...82 Dimensional drawings 1423 64 365 1659 64 430 927 32 250 713 64 183 75 64 180 3 47 64 95 3 16 5 Unit inch mm AVC System ...

Page 84: ...u can run the EZ Setup again by using the following steps 1 Turn on the power of the Display and the AVC System 2 Press MENU Make sure the menu screen displays 3 Press c d to select Setup 4 Press a b to select EZ Setup 5 Press SET ENTER NOTE If the secret number setting screen displays you need to enter your secret number If you forget your secret number refer to HOW TO SET THE FACTORY PRESETS abo...

Page 85: ... and for the period of time described herein shall constitute complete fulfillment of all liabilities and responsibilities of Sharp to the purchaser with respect to the Product and shall constitute full satisfaction of all claims whether based on contract negligence strict liability or otherwise In no event shall Sharp be liable or in any way responsible for any damages or defects in the Product w...

Page 86: ...arranty period warranty service may be obtained upon delivery of the Sharp product together with proof of purchase and a copy of this LIMITED WARRANTY statement to an Authorized Sharp Service Centre or an Authorized Sharp Servicing Dealer In home warranty service may be provided at Sharp s discretion on any Sharp television with the screen size of 27 or larger and on any Sharp Over the Range Micro...

Reviews: