background image

5

BEFORE USING THE MACHINE

OPERATION PANEL

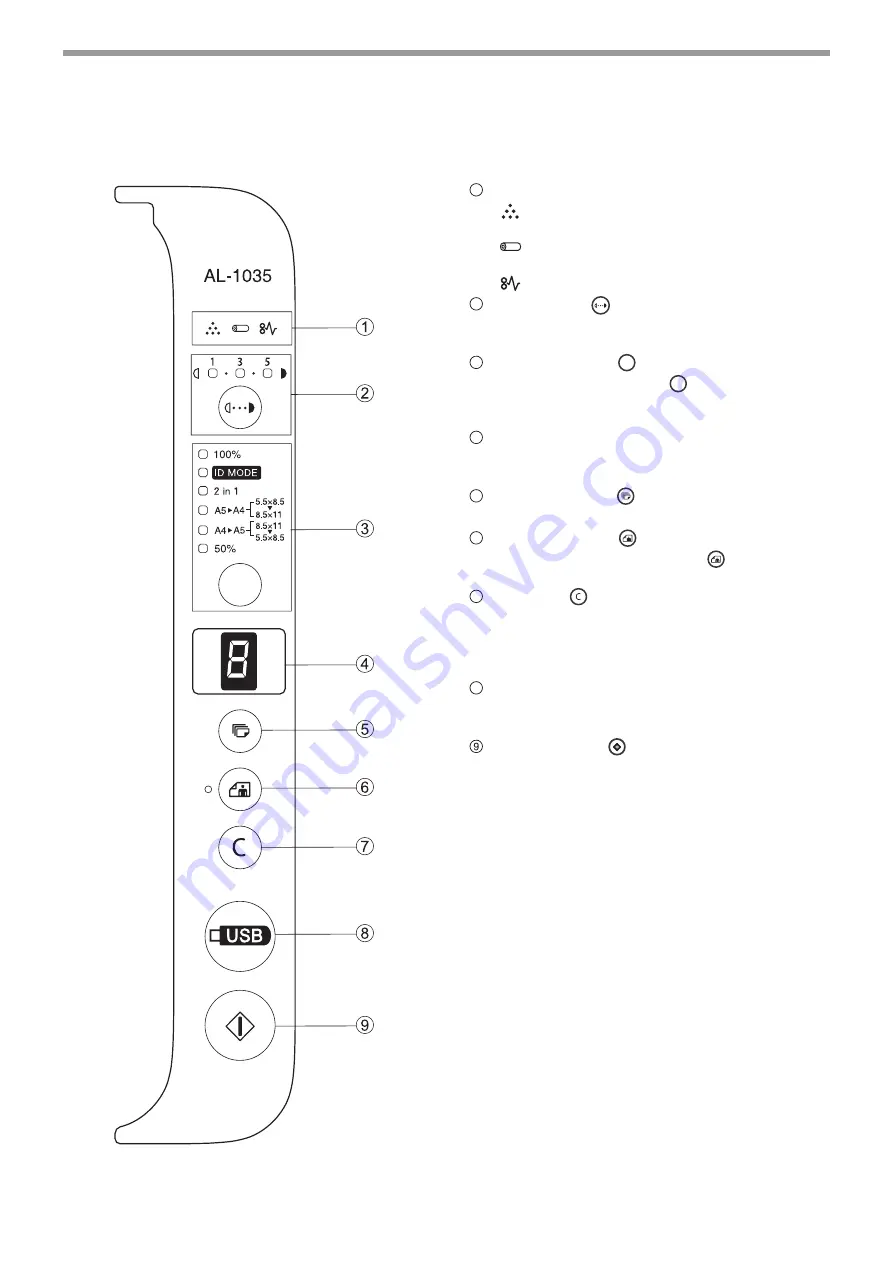
Alarm indicator

[

] "Toner cartridge replacement required" 

indicator

(Page 45)

[

] "Drum cartridge replacement required" 

indicator

(Page 46)

[

] "Misfeed" indicator

(Page 42)


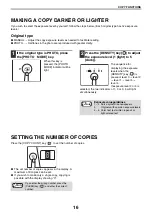
Density key (

)/Indicator

It is used to adjust the MANUAL or PHOTO 
exposure level.

(Page 16)

Mode select key (

)

Press the mode select key 

(

)

, you can select the 

ratio (100%, A5 

X

 A4, A4 

X

 A5 and 50 %), ID MODE 

and 2-in-1 mode.

 (Page 17, Page 18, Page 19)


LED indicator

It is used to indicate the number of copies, "out of 
paper", "misfeed" and error code. 

(Page 42) 

Copy Count key (

)

It is used to set the number of copies.

(Page 15)

Photo mode key (

)/Indicator

Press the [PHOTO MODE] key


(

to copy the 

image originals (e.g., photo)

(Page 16)

Clear key (

)

It is used to clear the displayed number of copies 
or to terminate a copying task. The total number 
will be displayed if you press and hold this 
key.

(Page 6)

SCAN to USB key

Press this key to scan the originals to the USB 
device (USB memory). 

(Page 29)

Copy Start key (

)

Press this key to copy start. 

(Page 15)

1

2

3

4

5

6

7

8

Summary of Contents for AL-1035-WH A

Page 1: ...Scanner Copier Printer Model AL 1035 WH AL 1035 WH A DIGITAL MULTIFUNCTIONAL SYSTEM OPERATION GUIDE ...

Page 2: ...Up Printing 23 FITTING THE PRINTED IMAGE TO THE PAPER Fit To Paper Size 24 ROTATE THE PRINTED IMAGE 180 DEGREES Rotate 180 degrees 24 ENLARGING REDUCING THE PRINTED IMAGE Zoom 25 ADJUSTING THE IMAGE EXPOSURE image adjustment 25 ADDING A WATERMARK TO PRINTED PAGES Watermark 26 SAVING FREQUENTLY USED PRINT SETTINGS 27 SAVING SETTINGS AT THE TIME OF PRINTING Custom Settings 27 4 SCANNER FUNCTIONS SCA...

Page 3: ... strict quality control and inspection procedures In the unlikely event that a defect or other problem is discovered please contact your dealer or nearest authorised service representative Aside from instances provided for by law SHARP is not responsible for failures occurring during the use of the product or its options or failures due to incorrect operation of the product and its options or othe...

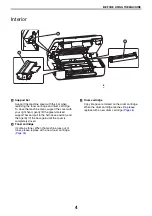
Page 4: ...tion panel It contains the operation keys and indicators and is used to select functions and enter the number of copies Page 5 Power line connector USB 2 0 connector A type It is used to connect the USB device USB memory to the machine to use the SCAN to USB function Page 29 USB 2 0 connector B type It is used to connect the machine to your computer to use the print and scan functions Page 14 Powe...

Page 5: ... the green marked support bar and pull to the half close position and then gently lift the bar again until the cover is completely closed Toner cartridge It contains toner When the machine runs out of toner please replace with a new toner cartridge Page 45 Drum cartridge Copy images are formed on the drum cartridge When the drum cartridge reaches life please replace with a new drum cartridge Page ...

Page 6: ...e 17 Page 18 Page 19 LED indicator It is used to indicate the number of copies out of paper misfeed and error code Page 42 Copy Count key It is used to set the number of copies Page 15 Photo mode key Indicator Press the PHOTO MODE key to copy the image originals e g photo Page 16 Clear key It is used to clear the displayed number of copies or to terminate a copying task The total number will be di...

Page 7: ...the machine will automatically enter auto power shut off mode The 100 ratio indicator will flash and all the other indicators will be off To restore normal operation press any key on the operation panel The normal mode will be resumed when the machine receives any printing task ON OFF Upon the startup of the machine or when the CLEAR key is pressed twice the machine will be restored to its initial...

Page 8: ...paper one sheet at a time into the feed tray 4 Appliable for the inch system Special paper Please observe the following standards when using special paper When using paper not recommended by SHARP please operate in single sheet mode do not try to perform continuous copying or printing There are many types of special paper some of which cannot be used in this machine Before using special paper plea...

Page 9: ... been printed by another printer or multifunctional device Perforated paper Postcards without folds Various types of plain paper and special media are sold Some types cannot be used with the machine Contact your dealer or nearest authorised service representative for advice on using these types of paper The image quality and toner fusibility of paper may change due to ambient conditions operating ...

Page 10: ... remove the paper remaining on the feed tray and combine them into one stack before loading The size and type of the added paper shall be consistent with the previous one Do not use paper smaller than the size of the original Otherwise folding or an incomplete image may be resulted in Do not use paper that has been printed by another printer or multifunction device Otherwise a folded or corrupted ...

Page 11: ...OPY PRINT or SCAN mode some operations cannot be run simultaneously Mode COPY PRINT Scan to computer SCAN to USB COPY COPY key input Yes Yes Yes No In the copying process No No No PRINT In the printing process No No No SCAN In the process of Scan Preview scanning No Yes ...

Page 12: ...s 1 Only when the computer is preinstalled with the Microsoft USB 2 0 driver or installed with the USB 2 0 driver provided by Microsoft in Windows Update for the Windows 2000 XP Vista 7 system can the USB 2 0 interface of the machine transmit data with the standard speed of USB 2 0 high speed 2 Using the installer for the installation of software requires administrator authority 3 Includes the 64 ...

Page 13: ...esired language and then click the next button 6 Read the welcome message and then click the next button 7 Select the installation position and then click the next button 7 8 When the finish screen appears click the finish button 9 Ensure that the machine is on and connect the machine and your computer with the USB cable page14 Windows will detect the machine and display the Plug and Play screen 1...

Page 14: ...If you are using Windows Vista 7 If a security warning window appears be sure to click Install this driver software anyway If you are using Windows 2000 XP If a warning message for Windows logo test or digital signature appears be sure to click Continue Anyway or Yes button Caution ...

Page 15: ...terface of the machine 2 Insert the other end of the cable into the USB interface of your computer 3 4 5 6 7 8 9 10 11 USB is available with a PC that is configured with a USB driver and preinstalled with Windows 2000 Windows XP Windows Vista or Windows 7 Caution System requirement of USB 2 0 for high speed mode If the computer is preinstalled with a Microsoft USB 2 0 driver or installed with a US...

Page 16: ...e copy can be made even if 0 appears for the number of copies 4 Press the COPY START key to copy start The copy is delivered to the paper output tray An original up to A4 can be placed on the document glass Document glass scale Mark 8 x5 A5 A4 1 2 1 2 11x81 2 A6 ID Note If you set the wrong number of copies press the CLEAR key and then enter the correct number Remove the paper on the output tray w...

Page 17: ... The sequence for displaying the exposure levels when the DENSITY key is pressed level 3 level 2 level 1 level 5 level 4 If exposure level 2 or 4 is selected the two indicators of 1 3 or 3 5 will light simultaneously SETTING THE NUMBER OF COPIES Press the COPY COUNT key to set the number of copies The set number of copies appears in the display A maximum of 9 copies can be set If you wish to make ...

Page 18: ...ing ratio Selecting a fixed ratio Press the MODE SELECT key and select a fixed ratio AB system A5 A4 141 A4 A5 70 and 50 Inch system 5 5X8 5 8 5X11 129 8 5X11 5 5X8 5 64 and 50 3 Set the number of copies and other settings and then press the COPY START key The copy will be delivered to the paper output tray Original position Selectable ratios Document glass AB system A5 A4 141 A4 A5 70 and 50 Inch...

Page 19: ...5X11 5 5X8 5 64 50 3 Set the number of copies and other settings and then press the COPY START key 4 When the 2 in 1 indicator lights replace the original with the next original and then press the COPY START key The 2 in 1 indicator blinks and the original is scanned into memory 5 When the originals have been scanned the copies will be delivered to the output tray When using the document glass red...

Page 20: ...conds the copying will be cancelled 5 Press the COPY START key again When the scan is finished Copy will begin To copy an ID card operate according to the following steps ID Card Copy cannot be used together with 2 in 1 or manual ratio selection Usable paper A4 or letter The image may be cut off even if paper of standard size is used In ID Copy mode the scan area and number of copies 1 copy cannot...

Page 21: ...HARP AL XXXX is selected as the printer If you need to change any printing settings click the Preferences button to open the printer driver setup screen The printer driver setup screen will appear Windows 2000 does not have the Preferences button in this dialog box Select settings as needed on each of the tabs in the setup screen and click the OK button PRINTER DRIVER SETUP SCREEN Page 22 SETTING ...

Page 22: ...nd select Control Panel and then select Printers In Windows 7 click the Start button and then select Equipment and Printers 2 Click the SHARP AL XXXX printer driver icon 3 Select Properties in the File menu In Windows Vista select Properties from the Organize menu In Windows 7 right click the printer driver icon and select printer properties 4 Click the Printing Preferences button in the General t...

Page 23: ...a list of choices Copies button It allows you to select numbers of printing sets Max 9 sets Check button It allows you to select one item from a list of options OK button Click to save your settings and exit the dialog box Cancel button Click this button to exit the dialog box without making any changes to the settings Apply button Click to save your settings without closing the dialog box Help bu...

Page 24: ...s on a single sheet of paper This is convenient when you want to print multiple images such as photos on a single sheet of paper and when you want to save paper The following print results will be obtained depending on the order selected 1 Click the Main tab in the printer driver setup screen 2 Select the number of pages per sheet If you wish to print borderlines check the Border box 3 Select the ...

Page 25: ...rinted image in Paper Size 3 Check the Fit To Paper button 4 Select the actual size of paper A5 to be used for printing The size of the printed image will be automatically adjusted to match the size of the paper loaded in the machine ROTATE THE PRINTED IMAGE 180 DEGREES Rotate 180 degrees The function can be used to rotate the image 180 degrees so that it can be printed correctly on paper that can...

Page 26: ...can also set the center point of the paper by checking Center box ADJUSTING THE IMAGE EXPOSURE image adjustment The exposure can be adjusted in the print settings when printing a photo or other image These settings can be used for simple corrections when you do not have image editing software installed in your computer 1 Click the Advanced tab in the printer driver setup screen 2 Press the button ...

Page 27: ...ed data Text 1 Click the Watermarks tab in the printer driver setup screen 2 2 Check the Text button Select a saved watermark text from the list You can click the Edit button to edit the font and select other detailed settings You can also determine the watermark printing range by checking the First Page Only box Image stamp 1 Click the Watermarks tab in the printer driver setup screen 1 2 Check t...

Page 28: ... driver properties window For the steps for accessing the printer driver please refer to BASIC PRINTING Page 20 1 Configure the print settings on each tab and click the Save button on any tab 2 After checking the saved settings enter a name for the settings maximum of 21 characters 3 Click the OK button Using the saved settings Select the custom settings that you wish to use on any tab Deleting sa...

Page 29: ...s not possible when the machine is under maintenance or when a misfeed occurs or the machine runs out of toner or when the drum cartridge needs to be replaced Note Scanning from the TWAIN 1 compliant applications PC scanning Place the original in the scanning position For details please refer to NORMAL COPYING Page15 Start a TWAIN compliant application and select the machine s scanner driver Inser...

Page 30: ...3 5 will light simultaneously 4 Press the SCAN to USB key to start scanning When scanning an ID card ID card mode the LED indicator and ID Copy indicator will flash after one side of the ID card has been scanned Turn over the ID card on the document glass within 30 seconds and press the SCAN to USB key again to finish scanning To stop scanning press the CLEAR key To return to the default state pre...

Page 31: ...ver Help SCANNER DRIVER SETTINGS Page31 7 When you are ready to begin scanning click the Scan button The method for accessing the menu to select the scanner depends upon the application For more information refer to the manual or the help file of your application Depending on your system AL XXXX or AL XXXX 1 0 may appear on the Select Source screen Note Note If the angle of the image is not correc...

Page 32: ... 8 Bit Gray Image enhancement tool Descreen button Click this button to clear the common cloud patterns in the prints You can select None Newspaper Magazine or Catalog Sharpen button Click this button to enhance the scanned image You can select None Light More Heavy or Extra Heavy Color Adjustment button Click this button to adjust the image of the default image color Auto Level button Click this ...

Page 33: ...Preview Auto Area button Click when the preview screen is displayed to automatically set the scanning area as the entire preview image Click the Preview Auto Area button and then the scanning area will be automatically set as the entire preview image Preview image Preview screen Page Size button Click this button to select the area that you want to scan You can select Card 4 2 5 inch Photo 5 3 5 i...

Page 34: ...some places 34 Paper misfeed 34 Copies are smudged or dirty 35 A copy job stops before it is finished 35 Any one of the alarm indicators is lit or blinking 35 Lighting fixture flickers 35 SOFTWARE INSTALLATION PROBLEMS The driver cannot be installed Windows 2000 XP Vista 7 36 The Plug and Play window does not appear 36 The driver cannot be installed correctly with the Plug and Play window 37 Unins...

Page 35: ...lesappearinthepaperor theimagedisappearsinsome places The paper is outside of the specified size and weight range Use copy paper within the specified range 7 Paper is curled or damp Do not use the curled or crimped paper Replace it with dry copy paper If the machine is not used for a long time remove the paper from the feed tray put it into a bag and store in a dark place to prevent moisture absor...

Page 36: ...Acopyjobstopsbeforeitis finished The feed tray is out of paper Load paper 9 Anyoneofthealarmindicators islitorblinking Please refer to INDICATOR DISPLAY OF THE MACHINE STATUS AND SOLUTION to check the meaning of the alarm indicator and error message and take appropriate actions 42 Lightingfixtureflickers The same power socket is used by the lighting fixture and the machine Connect the machine to a...

Page 37: ...LATION Page12 In Windows Vista the Windows Update Driver Settings window will appear In Windows 7 the Device Installation Settings window will appear The Plug and Play window does not appear If the Plug and Play window does not appear when you connect the machine to your computer with USB cable and turn on the machine power please check whether the USB port is available according to following step...

Page 38: ...ardware tab and then click the Device Manager button In Windows 2000 double click the System icon click the Hardware tab and then click the Device Manager button In Windows Vista click Device Manager if a message window appears asking for your confirmation click Continue In Windows 7 click the Device Manager button directly 3 Click the icon beside Other devices If SHARP AL XXXX appears select and ...

Page 39: ...RP AL XXXX printer driver icon is shown but you still cannot print it is possible that the printer driver has not been installed correctly In this case delete the software and then reinstall it Printingisslow Simultaneous use of two or more applications Exit all the undesired applications before printing Theprintedimageislightand uneven The paper is loaded in such a way that the printing takes pla...

Page 40: ...setup screen and select the Density Adjustment from 1 light to 5 dark Anyoneofthealarmindicators islitorblinking Please refer to INDICATOR DISPLAY OF THE MACHINE STATUS AND SOLUTION to check the meaning of the alarm indicator and error message and take appropriate actions 42 Poorscanningquality The document glass or the inside of the document cover is dirty Clean them regularly 47 The original is ...

Page 41: ...n your TWAIN compliant application You have not specified all the scanning preferences appropriately Scanning a file with large area at high resolution results in a large quantity of data and a prolonged scanning time The scanning preferences should be set appropriately for the type of original to be scanned i e Newspaper Magazine Catalogue There is not enough machine memory The scan resolution wi...

Page 42: ... arrow until a click is heard Gently lift support bar at the green marked and pull to a half closed position and then gently lift the bar again until the cover is completely closed The misfeed indicator will go out The paper may tear when you remove a misfeed paper In this event be sure to remove all the torn pieces of paper from the machine Take care not to touch the drum cartridge the green part...

Page 43: ...neris abouttorunout Preparethenew tonercartridge Byreplacingthetonercartridge thecounterwillbecleared automatically 45 9 Drumcartridgereplacement requiredindicator Light Thelifeofthedrumcartridgeisabouttoend Preparingtoreplacethedrumcartridge 46 10 Drumcartridgereplacement required indicator Blinking Thelifeofthedrumcartridgeends The machinestopsworking Replacethedrum cartridge andthecountofthedru...

Page 44: ...r Then turn on and check it 3 E7 20 LSU trouble Turn off the power Then turn on and check it 4 F5 02 Scanner trouble Turn off the power Then turn on and check it 5 L1 00 Scanner trouble Turn off the power Then turn on and check it 6 L3 00 Scanner trouble Turn off the power Then turn on and check it 7 L4 58 Motor trouble Clear it by service 8 L6 10 LSU trouble Turn off the power Then turn on and ch...

Page 45: ... 25 second The display interval of the sub codes is the same as that of the main codes See the following display example for the error code of LED indicator Example L1 00 Main Code Sub Code Main Code If do not press the copy start button after a brief interval the two Main Code repeatedly display Press the copy start button to show the sub code Release the copy start button main code display The t...

Page 46: ...ridge remove it before installing the cartridge 5 Gently lift the support bar at the green marks and pull to a half closed position and then gently lift the bar again until the cover is completely closed Connect the power The toner cartridge replacement required indicator will go out The following phenomena indicate that the cartridge has run out of toner please replace it with a new cartridge Whe...

Page 47: ... the direction of the arrow until a click is heard Gently lift support bar at the green marked and pull to a half closed postion and then gently lift the bar again until the cover is completely closed 5 Turn on the power press the DENSITY key and PHOTO MODE key at the same time until all indicators except for PHOTO MODE indicator light on 6 Press the DENSITY key again until the indicatiors return ...

Page 48: ... be copied Wipe the document glass and the underside of document cover with a soft clean cloth If necessary dampen the cloth with water Do not use thinner benzene or similar volatile cleaning agents CARTRIDGE CLEANING MODE If printed images are smudged or dirty under the humid environment please execute cartridge cleaning mode 1 Press the mode select key for approx 5 seconds 2 The blinks in the di...

Page 49: ...end the toner may not distribute well even after shaking the cartridge vigorously and will remain inside the cartridge without flowing out Supply of spare parts and consumables The supply of spare parts for repair of the machine is guaranteed for at least 7 years following the termination of production Spare parts are those parts of the machine which may break down within the scope of the ordinary...

Page 50: ...OPERATION GUIDE AL1035 EX ZZ ...

Reviews: